author avatar
    Senior Program Developer
 

Summary
Learn how to use Word's automatic recovery feature to restore accidentally deleted files. Discover three reliable data recovery software options and safeguard your Word documents through regular saving and backups.


Accidentally deleting word files is a problem that many people often encounter when operating computers. Whether due to misoperation, computer crash or virus attack, important word documents may be accidentally deleted if you are not careful. However, fortunately, there are now some methods that can help us recover deleted word files.
First, we can try to retrieve the deleted word file in the Recycle Bin . In Windows systems, the Recycle Bin is a place where deleted files are temporarily stored . We can recover deleted word documents by opening the Recycle Bin and searching for the file name or selecting “Restore”.
recycle bin
Secondly, if the deleted files cannot be found in the Recycle Bin, we can use some professional data recovery software to help us retrieve the lost word documents. These software can usually scan our hard drive and recover deleted files.
In conclusion, we don’t need to worry too much when facing accidentally deleted word files because there are many ways we can try to recover them. The important thing is to take timely action and choose the right recovery method to make sure we can get back the lost files as soon as possible.

How to Open Auto Recovery Folder and Recover Deleted Word Documents

The following describes how to open Auto Recovery Folder and recover deleted Word documents. In Word, we can open Auto Recovery Folder and recover deleted documents by following these steps:
Step 1: First, open the Word application. You can find its icon in the start menu or on the desktop.
Step 2: In Word, click on the “File” tab, which is usually located in the upper left corner of the screen. Click on it and a drop-down menu will pop up.
Step 3: In the drop down menu, select “Options”. This will open the Word settings screen.
Step 4: In the settings screen, select the “Save” option. You will see a page with various saving options.
Step 5: In the save options page, find the “Save Document” section and you will see a text box labeled ” AutoRecover File Location “.
word auto save folder settings
Step 6: Click the “Browse” button next to “AutoRecover File Location”. This will open a file browser window. In the file browser window, you can see the location of the AutoRecover folder. Copy the path to the folder.
Step 7: Close the File Browser window and Word’s Settings screen. Open the file browser window again and paste the path you just copied into the address bar. Press the Enter key to open the AutoRecover folder.
Step 8: In the Auto Recovery folder, you can see some files starting with “~”. These files are automatically saved copies of Word documents. Find the deleted Word document you want to recover and copy it to the location where you wish to save the document.
By following the above steps, you can open the Auto Recovery folder and recover deleted Word documents. Remember to copy the desired document to another location as soon as you find it to prevent data loss.

Precautions when using the auto-recovery function

When using the AutoRecover feature, we need to pay attention to some things to ensure that the files are safe and the recovery goes smoothly. Below are some details and steps to take care of:
1. Save files in time
During the process of editing Word documents, we should save the file frequently to prevent data loss. Even with automatic recovery, it’s still a good habit to save files regularly . You can save the file using the shortcut Ctrl + S or by clicking the Save button on the toolbar.
2. Set the auto-save interval
The default save interval for Word’s AutoRecover feature is 10 minutes. However, if we want to save the file more frequently, we can set it according to our needs. Click the “File” option on the Word menu, and then select “Options”. In the pop-up dialog box, select the “Save” tab. In the text box under “Save AutoRecover Information Every”, enter the desired time interval, such as 5 minutes. Click OK to save the settings.
Emphasize things to keep in mind when using the auto-recovery feature, such as saving files in a timely manner and setting autosave intervals.
3. Recover deleted Word documents
If we accidentally delete a Word document, you can recover it by following these steps. First, click on the “File” option on the Word menu and then select “Open”. Next, click the “Recover Unsaved Documents” button on the bottom left. In the pop-up dialog box, we can see a list of all unsaved documents. Find the document we need to recover and click the “Recover” button. Finally, we can make necessary edits and saves in the recovered document.

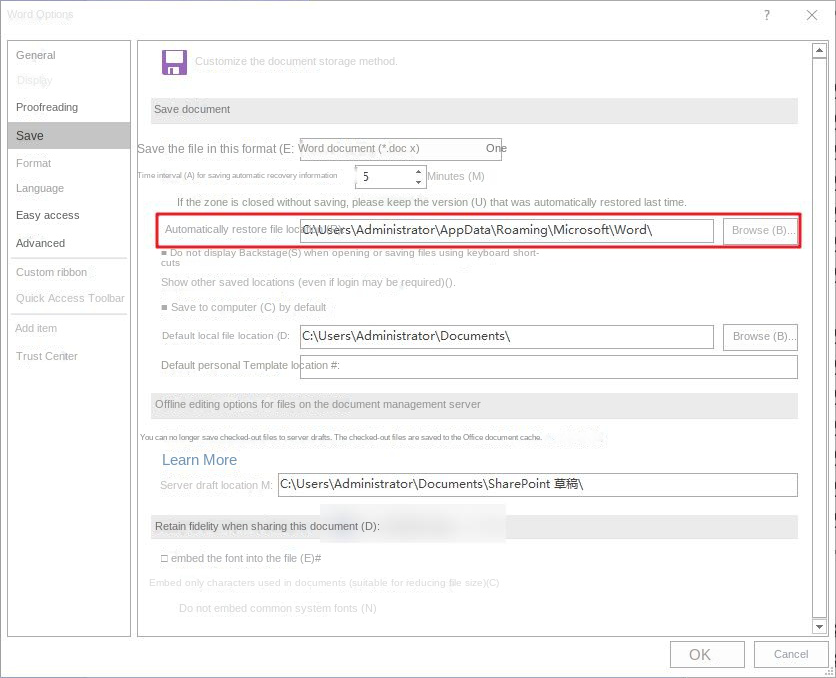
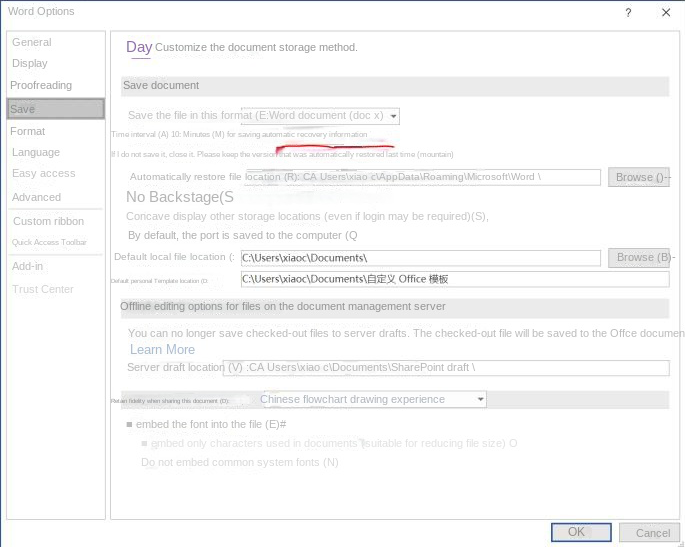
In short, when using the automatic recovery function, we should develop the habit of saving files regularly and set the automatic saving interval as needed to ensure the safety of the files and the smooth progress of recovery. If you cannot find the lost Word document through the above methods, you can try the following data recovery tools to scan and recover it.

Data Recovery Software: Recover Mistakenly Deleted Word Files

You need to pay attention to things when using the automatic recovery function, such as saving files in time, setting the auto-save interval, and so on. In addition, when we unintentionally delete a Word document or the file is corrupted due to other reasons, we need to look for reliable data recovery software to help us recover the lost files. Below I will recommend and introduce three reliable data recovery software to you, including their features and steps to use them.

1. Renee Undeleter

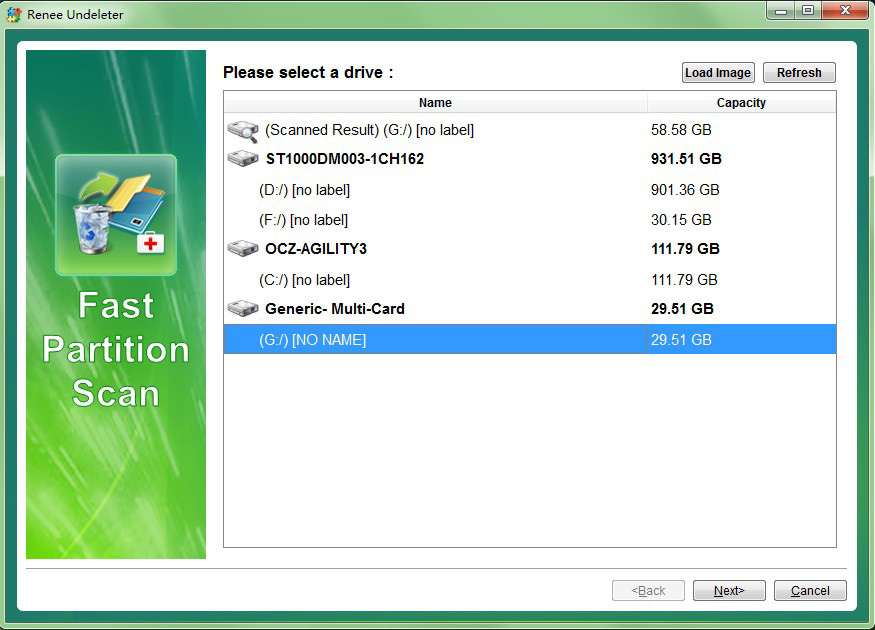
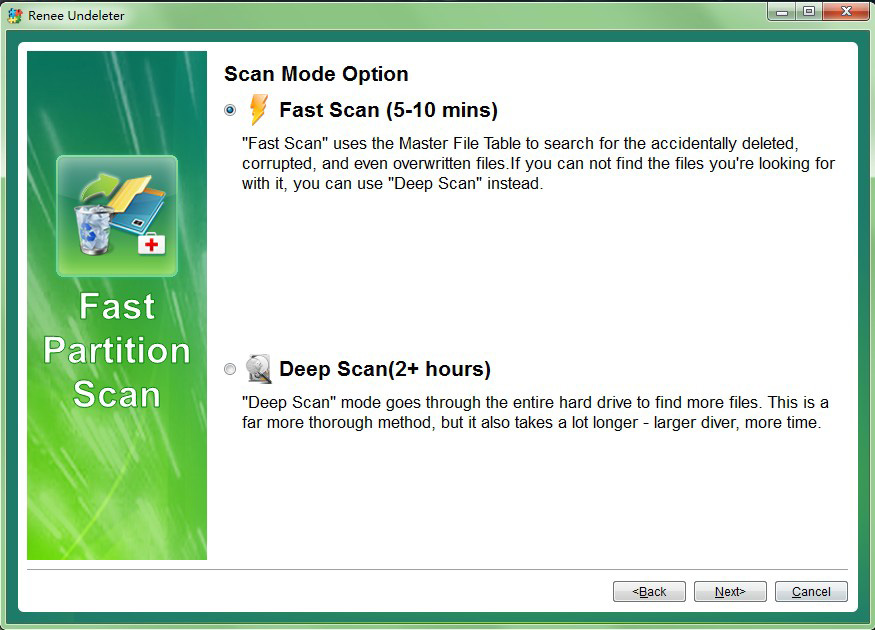
Renee Undeleter is a professional data recovery software that supports Windows and MacOS systems. When you encounter problems while using your computer, such as accidentally deleting important files, emptying the Recycle Bin, or formatting the disk/storage, as long as the data has not been damaged or overwritten, you have the opportunity to Tool to recover lost data back. In addition, the software also covers four major functional modules, including file recovery, format recovery, partition recovery and image creation . The functions are very diverse and easy to operate.

Hot Topic - ADsRenee Undeleter - Professional Data Recovery Software

Easy to use Only simple steps to recover data from storage devices.

Multiple scan modes Fulfill different data lost and recovery needs.

File types Recover pictures, videos, audios, documents, mails, etc.

Supported storage devices Recover data from recycle bin, SD card, external disk, etc.

Supported System Windows 10, 8.1, 8, 7, Vista, XP, 2000 and Mac OS X10.6, 10.7, 10.8.

Easy to use Simple steps to recover data

Recover different file formats Support to recover multiple file types

Support different devices Recover data from multiple storage devices

Free TrialFree TrialFree Trial 1000 users have downloaded and recovered data back!
The steps for use are as follows:
Step 1: Download, install and run Renee Undeleter on your Windows computer and select (Fast Partition Scan) option in the main interface. Note that please do not install the software on the disk from which you need to recover data to avoid data overwriting. In addition, please do not save new data to the same disk partition after file loss to avoid corruption or complete loss of lost files.
Selecting File Recovery Options
Step 2: Next, select the partition where the lost data is located and click (Next).
File Recovery Select Target Device
Step 3: Select the (Fast Scan) option and click the (Next) button to scan. The (Fast Scan) mode just scans the first 30GB of the remaining space on the selected disk. if you don’t find the files you want after scanning, you can use the (Deep Scan) mode to try to do a full scan of the hard disk partitions again, which will take more time, but will scan more data.
File Recovery Quick Scan Option
Step 4: Wait for the scanning to complete, you can double-click the files to preview them, then check the files you need to recover and click the (Recover) button to recover the files to other disks.
File Recovery Selecting Files to be Recovered
Pros:
  • Files can be recovered.
  • Provides fast scan and deep scan modes.
  • Can preview files and select for recovery.

Drawbacks:Recovered files can only be saved to other disks.

2. Recuva

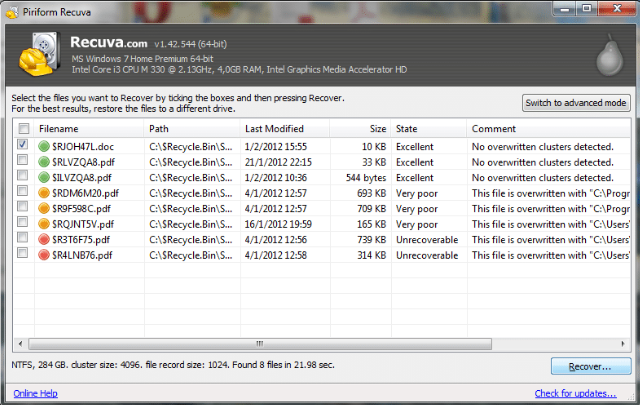
Recuva is a free data recovery software. It can recover files deleted from Windows computers, Recycle Bin, digital cameras, flash memory cards and other storage media. The usage steps are as follows:

Step 1: Download and install Recuva.
Step 2: Open the software and select the type of files you need to recover.
Step 3: Select the drive or device where the file is located.
Step 4: Click on the “Scan” button and the software will start scanning the selected drive or device.
Step 5: Select the files to be recovered in the scanning result and click on “Recover” button.
NO_TRANS:Piriform Recuva
Pros:
  • Free data recovery software.
  • Recovers deleted files from multiple media storage.

Drawbacks:

  • It may take longer depending on the disk size.
  • The interface is not newbie friendly as compared to other similar products.

3. Stellar Data Recovery

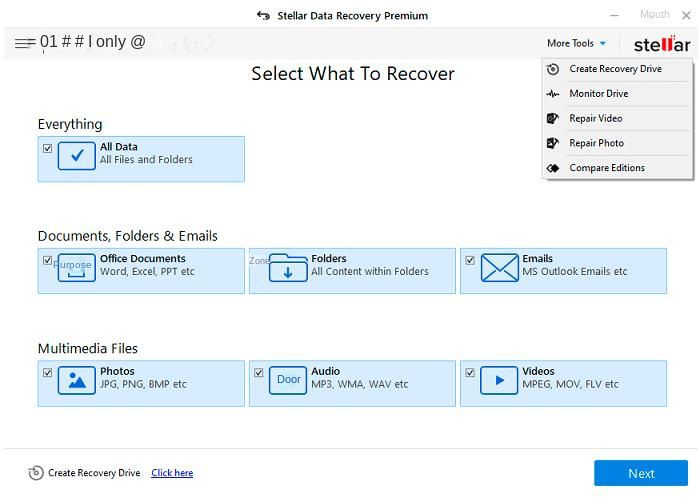
Stellar Data Recovery is a professional data recovery software. It can recover deleted files from various storage media such as hard drive, flash drive, SD card, etc. The usage steps are as follows:

Step 1: Download and install Stellar Data Recovery.
Step 2: Open the software and select the type of files you need to recover.
Step 3: Select the drive or device where the file is located.
Step 4: Click on the “Scan” button and the software will start scanning the selected drive or device.
Step 5: Select the files to be recovered in the scanning result and click on “Recover” button.
Stellar Data Recovery Premium Software Interface
Pros:
  • Professional data recovery software.
  • Support various storage media.
  • Simple and easy-to-use operation steps.

Drawbacks:

  • It may not be possible to recover some files.
  • Requires downloading and installing software.

These are the three reliable data recovery software and their usage steps that I recommend for you. When using these software, make sure you follow the instructions to get the best recovery results.

Preventing File Deletion or Loss: The Importance of Regularly Saving or Backing Up in Word

For users of Word, accidentally deleting or losing documents can be a very frustrating and time-consuming problem. To avoid this happening, the most important thing is to save files or backups regularly . This simple step can help you avoid a lot of unnecessary hassle and confusion.
There are several ways to save files on a regular basis when using Word .
1. One method is to use the shortcut key Ctrl + S , which can quickly save your current work.
2. You can use Word’s auto-save function , which can automatically save your document within a certain time interval. This means that even if you encounter a computer crash or other unexpected situation, your files will be backed up.
In addition, backup is also very important . You can save documents on external devices such as USB flash drives or external hard drives. This way, even if your computer fails, you can still easily recover your files. In addition, cloud storage is also a good choice. By uploading documents to cloud storage services such as Google Drive or Dropbox, you can access your files from anywhere, and they also have backup and restore capabilities.
Hot Topic - ADsRenee Becca – Professional, Reliable Tools for Data Backup and Recovery

Quick Back up files at up to 3,000MB/min.

Overall Support system backup, disk/partition backup, file backup and disk clone.

Intelligent Automatically analyze the data differences between the source files and the backup files and save disk space by backing up incremental/differential data.

Convenient Support VSS, allowing to freely view web pages during the backup of the operating system.

Highly compatible Support various files and storage devices.

Quick Back up at up to 3,000MB/min

Overall System/partition/disk backup

Incremental/differential technology Save disk space

Free TrialFree TrialNow 2000 people have downloaded!

Finally, don’t forget to regularly check that your backup and preservation strategies are working . When it comes to keeping your files safe, only your most recent backups are useful. Make sure your backup device is working properly and has the latest copies of your files.
In conclusion, regular file saving and backup is essential to avoid accidental deletion or loss of documents. Whether you use shortcut keys to save or the autosave feature, or save files on an external device or cloud storage service, these simple measures can help you protect your work from potential loss. Remember, prevention is better than cure, so don’t overlook these simple but important steps.

Conclusion

In the case of accidentally deleting Word, we successfully found a way to recover it. With simple steps and tips, now everyone has a chance to recover important Word documents from accidental deletion.
First, stay calm after deleting . Never rush or panic as this may lead to irrecoverable consequences.
Next, we recommend you to use a professional data recovery software that can deeply scan and search deleted files and restore them to their original state.
In addition, it is important to understand some common recovery techniques . For example, you can try to retrieve deleted Word documents from the Recycle Bin or backup files. Another way is to use the System Restore feature to restore your computer to the state it was in before the files were deleted.
In short, no matter how much pressure we are under, we must believe that there will always be a solution to the problem. Although it is frustrating to accidentally delete Word, with the correct operation and professional software, we can still get back our precious files.