author avatar
    Senior Program Developer
 

Summary
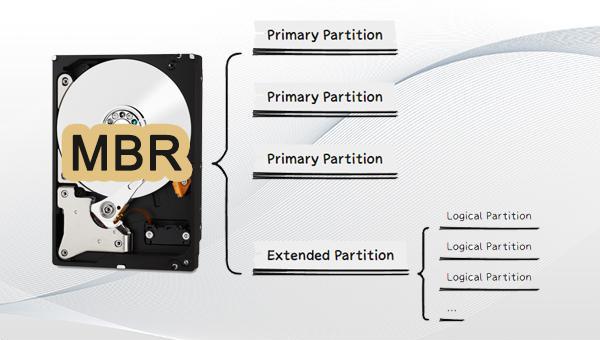
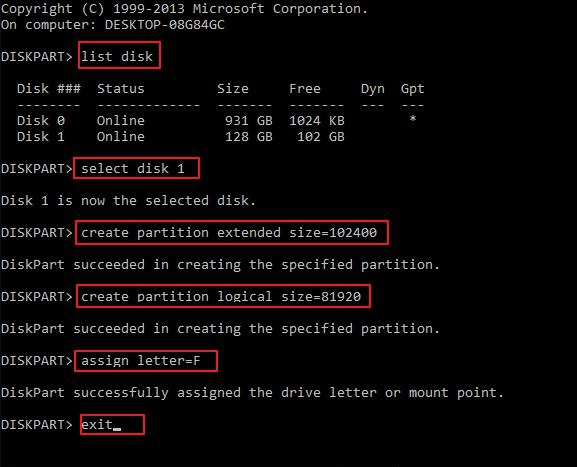
Hard drives can be divided into storage units called partitions. Today, I will explain to you the definition and difference between logical vs primary partition, as well as the method of mutual conversion between the two. If you are also interested in this, please continue to read the following content.


logical vs primary partition

I. About primary partition and logical partition

1. What is the primary partition?

A primary partition, also known as a primary disk partition, is a crucial type of partition used for installing and loading the operating system. This ensures that the computer can seamlessly enter the system upon startup. In MBR partition format, users can create up to 4 primary partitions, or they can opt for 3 primary partitions and 1 extended partition. On the other hand, GPT-based hard disks allow for the creation of up to 128 primary partitions. It is worth noting that other types of partitions cannot be classified as primary partitions.

2. What is a logical partition

A logical partition is a volume that is formed within an extended partition on a disk using the basic master boot record (MBR). As long as there is ample disk space, there is no restriction on the number of logical partitions that can be created. In other words, the only limiting factor is the availability of disk space. It is important to note that logical partitions can only be created within extended partitions. If the disk does not have an extended partition or if the specified size of the logical partition exceeds the extended partition’s capacity, the creation process will fail.

3. The difference between primary partition and logical partition

Primary partitions and logical partitions have differences in their structures.
① The primary partition has multiple uses such as loading the operating system and storing data. It can also be set as an active partition. On the other hand, the logical partition cannot load the operating system or be set as an active partition, but it is capable of storing data.
② The number of possible combinations varies depending on the type of disk. While only 4 primary partitions can be created on an MBR disk, a GPT disk allows for up to 128 partitions. Additionally, the extended partition of an MBR disk has the ability to create an unlimited number of logical partitions.
③ Primary partitions can be created on both MBR and GPT disks. Logical partitions can only be created in extended partitions of MBR disks, but cannot be created on GPT disks or MBR disks without extended partitions.
The above is a brief overview of primary and logical partitions. But when should you create a logical partition? Typically, a logical partition is needed when there are already 4 partitions on an MBR disk. This is because MBR disks can only support up to 4 primary partitions, or 3 primary partitions and 1 extended partition. If you require more partitions, you can opt to create 3 primary partitions and 1 extended partition, and then create multiple logical partitions within the extended partition.

II. How to convert primary partition and logical partition

1. How to check the partition type

To find out the type of partitions on your computer, just follow these steps:
Step 1: Right-click (Start), select (Disk Management).
open windows disk management
Step 2: After launching Disk Management, you will be able to access the partition details. These details will include either “Primary Partition” or “Logical Drive”, with the latter being logical partitions. In case you wish to convert between primary and logical partitions, make sure to take note of their drive letter, size, and disk number for future actions.
disk management

2. How to convert primary partition to logical partition

We can convert a primary partition to a logical partition through the DiskPart command. Specific steps are as follows:
Step 1: Right-click (Start), select (Disk Management). In Disk Management, right-click the target primary partition and select (Delete Volume) to change it to “Unallocated”. Then remember the number of the disk with “unallocated” space, such as disk 1.
Delete the volume
Step 2: Press (Windows logo + R) to open the Run window, enter (diskpart) in the text box and click the (OK) button.
type diskpart to run
Step 3: Please enter the following commands to convert the primary partition to a logical partition, and press the (Enter) key after you type in each line of command.
list disk (it will list all disks in the computer)
select disk 1 (this means that disk 1 is selected, “1″ is the number of the disk with “unallocated” space. The number can be replaced according to your disk)
Create a partition with an extended size of n MB. (This action will convert the unallocated space into an extended partition. Please ensure that the value of “n” is equal to or less than the unallocated space.)
Create a logical partition with a size of m. (This action will create a partition within the extended partition. Please ensure that “m” is equal to or less than the size of the extended partition.)
assign letter=F (assign drive letter “F” to a logical partition. This letter can easily be substituted with any other letter depending on your needs.)
exit (exit)
diskpart set logical partition

3. How to convert a logical partition into a primary partition

Please check the drive letter and size of the logical partition through Disk Management, and then perform the following steps:
Step 1: Press (Windows logo + R) to open the Run window, enter (diskpart) in the text box and click the (OK) button.
type diskpart to run
Step 2: Please enter the following commands to convert the logical partition into a primary partition, and press the (Enter) key after you input each line of command.
list disk
select disk n (select disk n, where “n” refers to the number of the disk where the logical partition is located.)
list partition (list all partitions)
select partition m (select partition m, where “m” is the drive letter of the logical partition.)
delete partition (this command will delete everything on the selected partition)
create partition primary
assign letter=H (assign drive letter H. This letter can be substituted with any other letter depending on your needs.)
exit (exit)
We have discussed the process of converting primary and logical partitions into one another. If you have mistakenly deleted a partition or important file while using your computer, don’t worry. Simply refer to the following steps to scan and recover your data.

III. If the hard disk/partition data is deleted by mistake, how to restore it?

After accidentally deleting data, it is crucial to immediately cease using the affected hard disk or partition to prevent overwriting any potential recoverable data. Instead, utilize specialized data recovery software to promptly scan and retrieve the lost information. One such software is Renee Undeleter, which offers a free trial version to scan the hard disk or partition and locate any missing files. The software also includes a preview feature to assess the integrity of the recovered data and a complimentary recovery allowance of 50MB.

1. What is Renee Undeleter?

Renee Undeleter is a software specially used to restore various data files. When you accidentally delete important files by mistake, empty the recycle bin, or format the disk/memory card/U disk/mobile hard disk, etc., you can Retrieve lost data with the help of this tool. The software covers four functional modules, including file recovery, formatting recovery, partition recovery and image creation, which can help you solve many data loss problems in an all-round way.
Hot Topic - ADsRenee Undeleter – Simple & Powerful Software for Data Recovery

Easy to use Recover data by 3 steps;

Multiple scan modes Fast partition scan, whole partition scan and whole disk scan;

Supported file types Image, video, audio, text, email and so on;

Image creation Create a partition image to read and back up data;

Supported devices SD card, SDHC, SDXC, USB flash drive, hard disk and computer.

Easy to use Recover data by 3 steps;

Multiple scan modes Fast partition/whole partition/whole disk scan;

Supported devices SD card/USB/hard disk.

Free TrialFree TrialFree Trial 800 people have downloaded!

2. How to use Renee Undeleter to recover hard disk/partition data?

Step 1: Download, install and run Renee Undeleter on the computer. Select the (Whole Disk Scan) option on the main interface.

This function will scan the entire disk, which takes a long time. If you want to complete the scanning process as soon as possible, you can use the (Fast Partition Scan) or (Whole Partition Scan) function.

Note: Do not install Renee Undeleter in the disk where data is lost to avoid data overwriting.
select whole disk scan in renee undeleter
Data recovery function introduction:
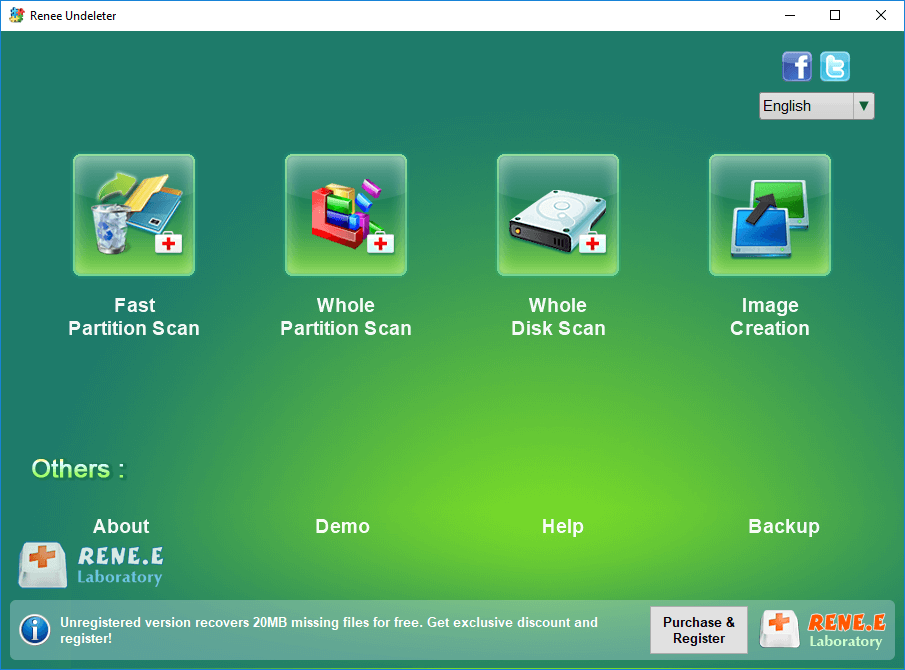
Fast Partition Scan – Quickly retrieve files lost due to accidental deletion or emptying the recycle bin.
Whole Partition Scan – Quickly recover files lost due to inaccessible or formatted partitions.
Whole Disk Scan – Analyze and get partition information and perform a full scan of the entire partition.
Image Creation – You can create a mirror image for a partition to back up the current partition state.
Step 2: Select the disk where the data is lost, and click (Next).
select a disk to recover in renee undeleter
Step 3: Please wait patiently for the scan. This process will find all the partitions in the hard disk. Then the “Select the partition you need to scan” window will pop up, and you can select the lost partition to scan. If not selected, all partitions will be scanned, which will take longer, but more data will be scanned.
Step 4: During the scanning process, you can double-click the files to preview them.

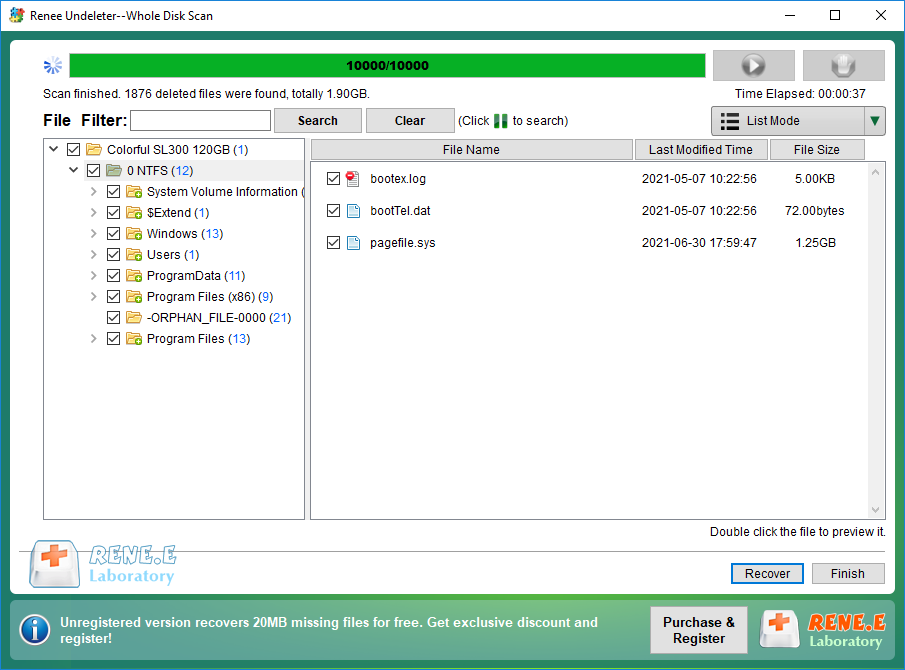
If all the required files have been found, you can check the target files and click the (Recover) button to restore the files to other disks on the computer.

select taget files to recover with renee undeleter