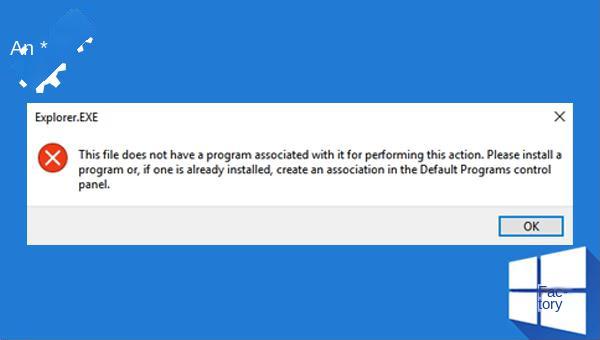
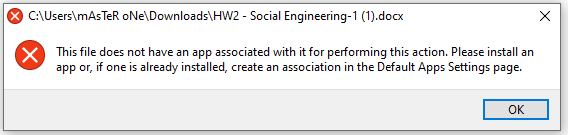
author avatar
    Senior Product Manager
 

Summary

Learn how to easily solve the common Windows error "this file does not have an app associated with it for performing this action" and restore lost file data with the simple fixes and methods outlined in this comprehensive article.


this file does not have an app associated with it
I. Causes for the error This file does not have an app associated with it
Typically, this error occurs when you try to run a game on a Windows computer, or when you try to open certain files or third-party software. There are many reasons for this error, including the external USB drive set to autoplay; system file corruption; limited account permissions; registry data corruption and so on.
This file has no programs associated with it
After understanding the possible reasons for the failure, we can better fix the error. The following is a detailed repair method, and we will continue to learn.
II. How to solve the error, This file does not have an app associated with it?

1. Create a new Windows user account

Creating a new Windows user account means adding another user to the computer, which can effectively solve the problem of “this file does not have an application associated with it to perform this action” caused by limited account permissions. The specific operation steps are as follows:
Step 1: Run the computer, find (Start)-(Settings)-(Account) option in turn and enter.
Go to Account Options
Step 2: After selecting the (Other users) option on the left, click the (Add others to this computer) button on the right.
Click to add others to this computer
Step 3: Next, click on the (Users) option on the left, right-click on the blank space on the right and select the (New User) option.
add new user
Step 4: In the new user creation page, enter the username and password and click the (Create) button to create a new Windows user account. Afterwards restart the computer, and log into the computer with the newly created account and see if the problem is resolved.
Enter username and password to create a new user

2. Add the user account to the Administrators group

In addition to method one, adding the user account to the administrator group is also a solution that is used and recognized by most people. The specific operation steps are as follows:
Step 1: Run the computer, press the (Windows+R) key at the same time to open the run window, then enter the (lusrmgr.msc) command and press (OK).
Open the run window and enter the command
Step 2: Click (Group) on the left side, double-click the (Administrators) administrator option on the right side, and then click the (Add) button.
Click the add button
Step 3: In the “Enter the object name to select” module, enter the account name you want to add, and click (Check Name) after the input is complete. After the search is complete, click (OK) to add the user account to the administrator group. Restart your computer when the operation is complete and see if the problem is resolved.
Enter and check the object name

3. Disable autoplay

As mentioned above, file association errors can be related to autoplay settings. To resolve this issue, you can try disabling this feature by following these steps:
Step 1: Run the computer, find (Settings) – (Device) option in turn and enter.
Click on the device option and enter
Step 2: Next, select the (AutoPlay) option on the left, and then set the “Use AutoPlay on all media and devices” option to Off on the right. Under the Removable Drive option, select (Take no action). Restart the computer when the operation is complete, and see if the problem is resolved.
Adjust autoplay options

4. Change the registry

Before making changes to the registry information, in order to protect the important files of the system, it is recommended that you create a restore point and disk image first, and then perform the following operations:
Step 1: Run the computer, press the (Windows+R) key at the same time to open the run window, then enter the (Regedit) command and press (OK) to open the Registry Editor.
Open the Registry Editor
Step 2: Navigate to (HKEY_CLASSES_ROOT\Lnkfile) inside the search box and check if there is a value called (IsShortcut) in the right panel. If the value exists, skip to the next step. If you can’t find it, right click on the blank space to recreate it, select (New) – (String Value) and name it (IsShortcut).
Find the IsShortcu value
Step 3: Find the path (HKEY_CLASSES_ROOT\CLSID\{20D04FE0-3AEA-1069-A2D8-08002B30309D}\shell\Manage\command), then double-click the (default) option and make sure its value data is set to (%SystemRoot%\ system32\CompMgmtLauncher .exe). Click (OK) after confirmation is complete.
check default value
The above are just a few ways to solve the “This file does not have a program associated with it to perform this action” error. If you accidentally delete important files in the process of fixing errors, you can also use the content of the third part below to retrieve the lost data, let’s continue to learn.
III. When important files are accidentally lost, use Renee Undeleter

1. What is Renee Undeleter?

Renee Undeleter is a software specially designed to restore various data files. When you encounter problems such as: accidentally deleting important files by mistake, emptying the recycle bin, or formatting the disk/memory during the use of the system, etc. When there is a problem, you can use this tool to retrieve the lost data. In addition, the software covers four functional modules, including file recovery, format recovery, partition recovery and image creation. The functions are very diverse and easy to operate.
Hot Topic - ADsRenee Undeleter – Simple & Powerful Software for Data Recovery

Easy to use Recover data by 3 steps;

Multiple scan modes Fast partition scan, whole partition scan and whole disk scan;

Supported file types Image, video, audio, text, email and so on;

Image creation Create a partition image to read and back up data;

Supported devices SD card, SDHC, SDXC, USB flash drive, hard disk and computer.

Easy to use Recover data by 3 steps;

Multiple scan modes Fast partition/whole partition/whole disk scan;

Supported devices SD card/USB/hard disk.

Free TrialFree TrialFree Trial 800 people have downloaded!
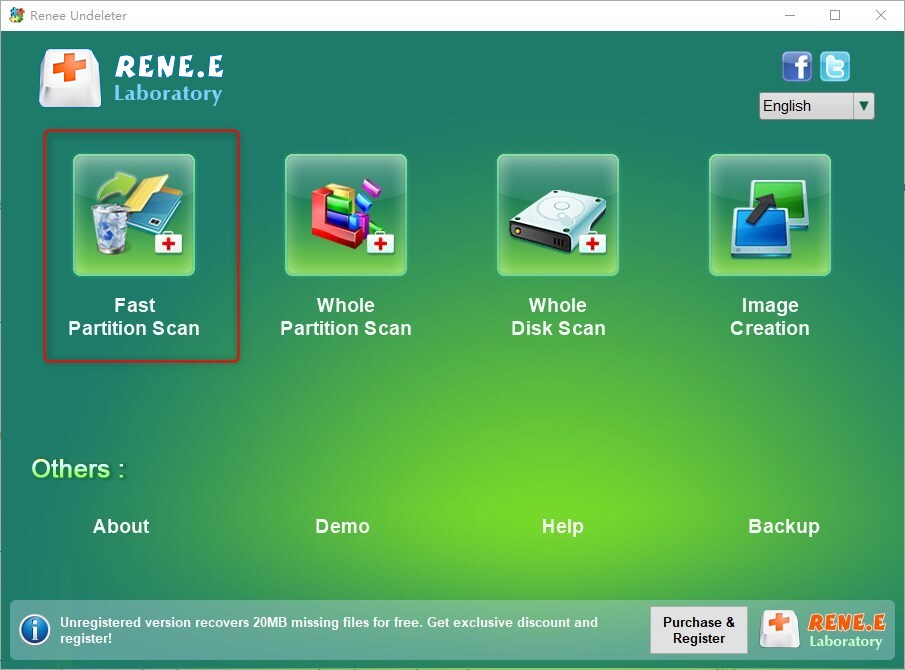
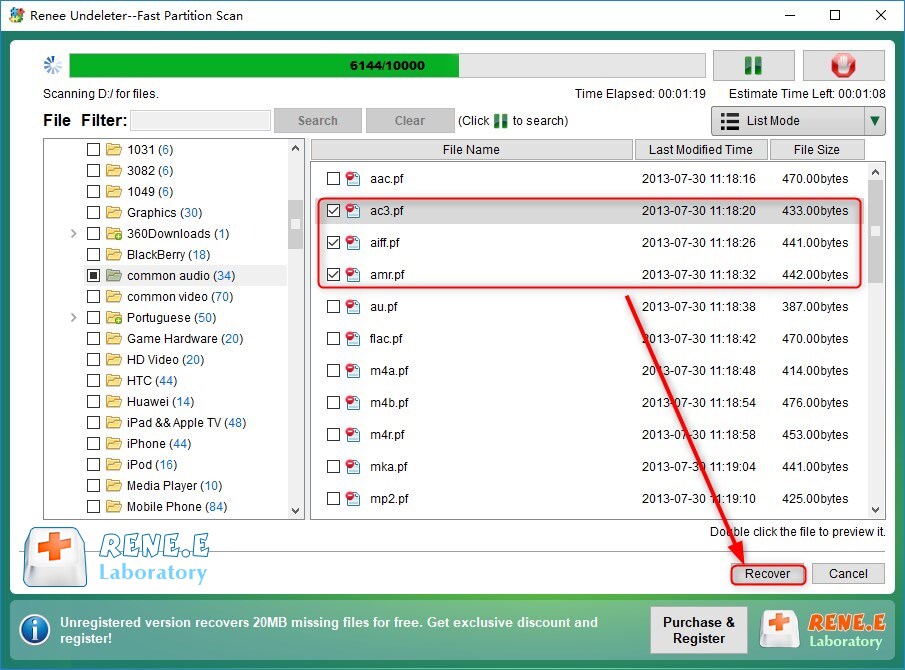
2. How to restore accidentally lost files with Renee Undeleter?

Restoring files with Renee Undeleter is very simple, the specific steps are as follows:
Step 1: Download, install and run Renee Undeleter, select the (File Recovery) option in the main interface.
Select file recovery options
Step 2: Next, select the partition where the lost data is located and click on (Next). Then enter the scanning process, please wait patiently.
Select target device for file recovery
Step 3: Select the (Quick Scan) option and click the (Next) button to scan. It should be noted that “File Recovery – Quick Scan” only scans the first 30GB of the remaining space of the selected disk. If the desired file is not found after scanning, you can use “File Recovery – Deep Scan” to try to scan the hard disk partition again, but it will take more time, please wait patiently.
Quick Scan Options
Step 4: Wait for the scan to complete, you can double-click the file to preview, then check the file to be recovered, click the (Recover) button to restore the file to another disk.
Select files to restore