author avatar
    Specialist of Customer Service Dept.
 

Summary
Learn how to salvage data from a damaged or broken hard drive with these essential tips and techniques. From connecting the drive to using specialized recovery software, this article will guide you through the process of reviving your important files.


In today’s digital age, our lives revolve around technology and the data we store on our devices. Whether it’s important work documents, precious family photos, or personal information, losing data can be a nightmare. One of the most common causes of data loss is a broken hard drive. It can leave us feeling helpless and frustrated, wondering if our valuable data is gone forever. However, there is hope. In this article, we will explore the steps needed to safely connect a dead hard drive to a secondary computer for diagnosis. We will also discuss the importance of choosing a reliable USB HDD hub and evaluating the extent of physical damage before proceeding. These crucial steps will help increase the chances of successfully recovering data from a broken hard drive.

Warning: If Your Hard Drive is Unresponsive or Making Strange Noises, Send it to a Repair Shop Immediately

Tips:If your hard disk drive is showing signs of failure, such as strange noises or unresponsiveness, it is crucial to take immediate action to avoid further damage. Continuing to operate a failing hard drive can result in permanent data loss or complete system failure.

Safely Connecting a Dead Hard Drive to a Secondary Computer for Diagnosis

When faced with a broken hard drive, it can feel like all hope is lost for recovering important data. However, there are steps you can take to try and salvage your files. One method is to safely connect the dead hard drive to a secondary computer for diagnosis. This involves using a USB HDD hub and evaluating any physical damage to the hard drive before proceeding.

Evaluating Physical Damage

Before attempting to connect the dead hard drive to a secondary computer, it is important to assess any physical damage. This can help you determine the best course of action and avoid further damage to the drive.
Look for any visible damage such as dents, cracks, or broken components.
If possible, try to identify the cause of the damage, such as a fall or water exposure. This information can be helpful in diagnosing the issue and determining if the drive is salvageable.
Dented hard drive
It is also important to check for any electrical damage, such as burnt or damaged connectors.
This can be a sign of a power surge or fluctuation, which can cause severe damage to the hard drive. In this case, it may be best to seek professional help or proceed with extreme caution.
If there is no physical damage, the issue could be due to software or drive failure. In this case, it may be possible to recover the data using specialized software, which will be covered in a later chapter.

Choosing a Better USB HDD Hub

The first step in safely connecting a dead hard drive to a secondary computer is to choose a reliable USB HDD hub. This device acts as a bridge between your hard drive and the computer, allowing you to transfer data and perform diagnostics. It is important to choose a hub that is compatible with your hard drive and has good reviews from other users. This will ensure a smooth connection and minimize any potential risks or complications.
USB hard disk or SSD adapter
Tips:It is important to handle the hard drive with care and avoid any further damage. Do not attempt to disassemble the drive unless you are a professional and have the necessary tools and experience.

Method 1: Use Renee Undeleter Software to Attempt File Recovery on the Broken Hard Drive

If your hard drive is broken or damaged, it can be a devastating experience. All of your important files and data could potentially be lost forever. However, If your hard drive is not physical damaged, there is still hope for recovering your data with the help of third-party data recovery software. One such program is Renee Undeleter, which is designed specifically for recovering lost or deleted files from damaged or corrupted hard drives.
Step 1: Connect your hard drive to another computer. This is to ensure that the hard drive is in a stable and accessible state for the data recovery process.
external hard drive dock to connect to another computer
Step 2: Download and install Renee Undeleter on the computer you have connected your hard drive to.
Hot Topic - ADsRenee Undeleter – Simple & Powerful Software for Data Recovery

Easy to use Recover data by 3 steps;

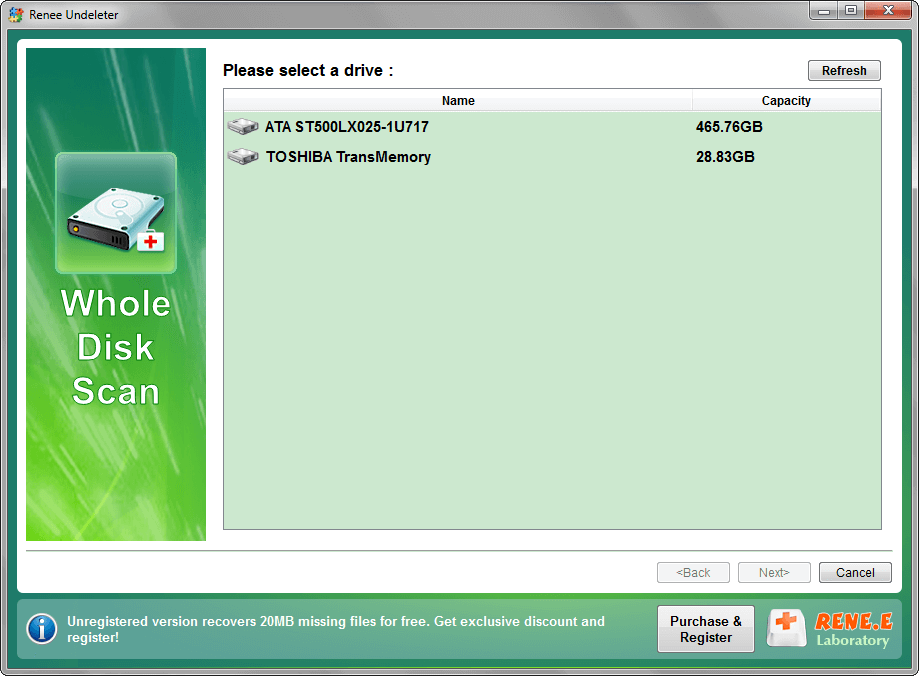
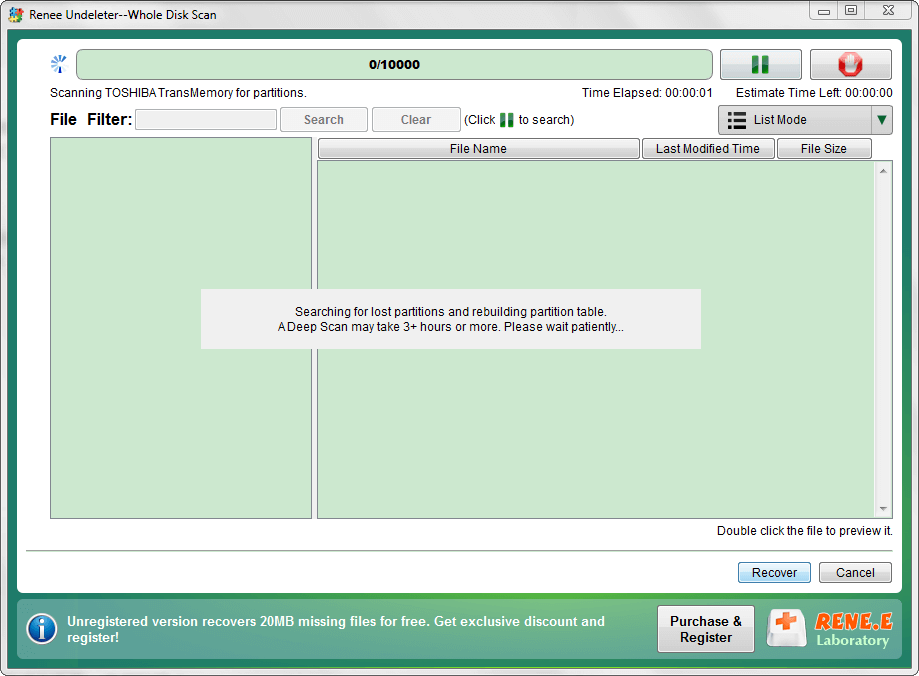
Multiple scan modes Fast partition scan, whole partition scan and whole disk scan;

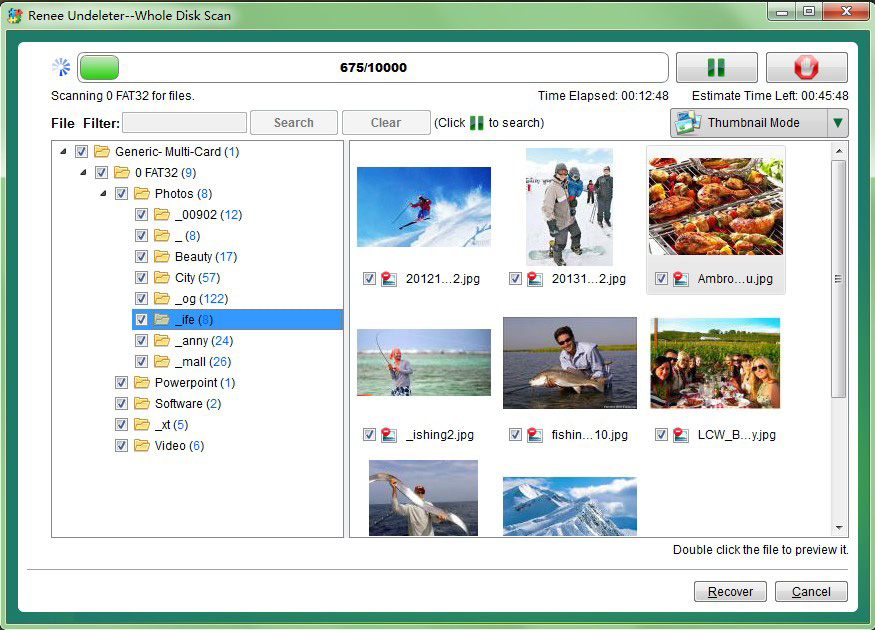
Supported file types Image, video, audio, text, email and so on;

Image creation Create a partition image to read and back up data;

Supported devices SD card, SDHC, SDXC, USB flash drive, hard disk and computer.

Easy to use Recover data by 3 steps;

Multiple scan modes Fast partition/whole partition/whole disk scan;

Supported devices SD card/USB/hard disk.

Free TrialFree TrialFree Trial 800 people have downloaded!
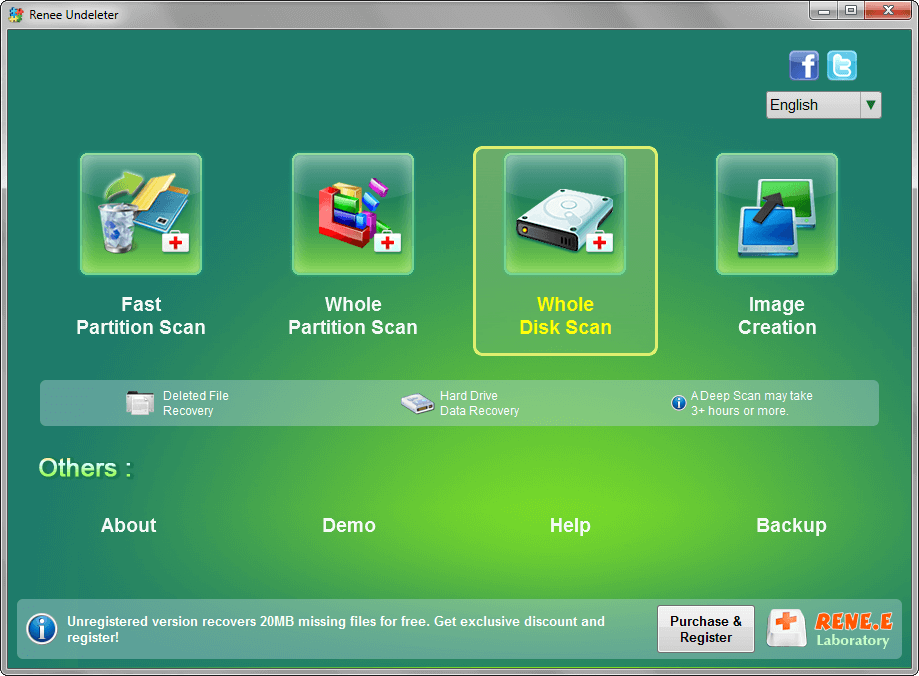
Step 3: Launch the software and select “Whole Disk Scan” from the main interface.
Detect and Repair Bad Sectors and Cylinder 0 Error of Hard Drive in Windows  10/8/7
Note: If you suspect your hard drive is damaged, it is recommended to use the “Create Image” feature to back up your data before proceeding.
Step 4: Select the hard drive from the list of available drives and click on the “Next” button.
select hard drive to scan
Step 5: The software will start scanning your hard drive for the lost or deleted files. You can use the “Pause” and “Stop” buttons to manage the scan process.
Renee Undeleter will initiate the reconstruction of the partition table for the damaged hard disk, utilizing the available information on the drive. This process may require a few minutes. Upon successful reconstruction, Renee Undeleter will proceed to search for deleted files across various partitions.
scan disk with whole disk scan of Renee Undeleter
Step 6: Once the scan is complete, you can preview the recovered files under different categories, such as documents, photos, and videos. You can also use the search function to locate specific files.
preview before recovery
Step 7: Select the files you want to recover and click on the “Recover” button.
Using Renee Undeleter software to attempt file recovery on a broken hard drive can be a lifesaving solution for those who have lost important data. It is a relatively simple and straightforward process, but it is important to follow the steps carefully and use a compatible USB HDD hub to ensure the best chances of successful data recovery. However, it is important to keep in mind that not all data can be recovered and it ultimately depends on the condition of the hard drive.

Method 2: Explore Alternative Recovery Software such as Testdisk and Recuva

Considering the critical need to recover data from damaged hard drives and the valuable advice provided by industry professionals, it becomes evident that a comprehensive approach is necessary. After the critical initial step of cloning the drive to preserve the original data, as suggested by experts, one can leverage powerful recovery tools like TestDisk and Recuva to attempt data recovery from the cloned drive.
Step 1: Securely clone the damaged drive using a tool like Clonezilla or the

dd

command on Linux, ensuring you do not further compromise the integrity of the data. Attach both the damaged drive and the new drive to another system as secondary drives and proceed with cloning.
clonezilla
Step 2: Download TestDisk from its official website. Extract the files to a folder on your computer and run TestDisk with administrative privileges. Choose the “Create” option to generate a log file, which could be invaluable for later analysis.
TestDisk select disk
Step 3: Select the cloned drive and the partition table type, allowing TestDisk to scan for lost partitions or files. Should issues with the partition structure be detected, TestDisk offers functionalities to repair or recover the lost partitions, potentially reviving the file system.
select files to recover for testdisk
Step 4: If you are looking to recover specific files, especially from drives with logical errors or corruption, Recuva can be your tool of choice. Install Recuva and use its user-friendly wizard to specify the file types and the location for scanning—the cloned drive.
Recuva
Step 5: Review the scan results presented by Recuva, select the files you aim to recover, and designate a safe location for data restoration, once again, not the same drive from which you are recovering to avoid potential overwrites.
These methods, combined with an understanding of the importance of taking immediate action and creating drive clones to prevent additional data writing, embody an effective data rescue strategy. However, caution and awareness of the limitations of software-based recovery must be maintained. Should these methods prove ineffective, particularly when dealing with a physically damaged or non-responsive drive, the expertise of a professional data recovery service becomes crucial. These specialized services can manage complex situations involving mechanical failures or severe physical damage in controlled environments to maximize the chances of successful data recovery.

Method 3: Consider Professional Data Recovery Services for Severely Damaged Drives

When a hard drive is too damaged for standard recovery methods, professional data recovery services become a crucial lifeline. These specialists possess the necessary skills, tools, and cleanroom environments to tackle severe physical damage and complex data loss scenarios. Here’s an optimized approach to engage their expertise:
Step 1: Stop using the damaged drive immediately to prevent overwriting or additional damage, which could occur through continued operation.
Step 2: Safely disconnect the drive from your system to avoid further electrical risk to the stored data.
Step 3: Securely send the original damaged hard drive (or the cloned copy) to the chosen service, using appropriate packaging to prevent further damage during transit.
Step 4: Wait for the service’s evaluation and proceed with the data recovery if they determine it’s feasible. Be prepared for their honest assessment of the situation’s gravity and potential recovery outcomes.
Summarizing, professional data recovery services provide a vital option when all else fails. The key advantage is accessing advanced recovery techniques beyond the reach of consumer software tools. Potential drawbacks include cost, which can be significant, and no guarantee of full data recovery, depending on the damage’s extent. When you choose this route, it’s crucial to manage expectations and have a clear understanding of the involved risks and possibilities. Always consider creating a backup of the affected drive if possible before recovery attempts to preserve the original data state.
recover data from broken hard drive
Tips:When using professional data recovery services, be sure to choose a reputable and experienced provider.

Finally, Repair Logical Issues Using Disk Management Tools and CHKDSK

If you have recovered all the data you want, and you would like to try to fix the partitions in broken hard disk, using disk management tools and CHKDSK commands can be an effective solution. In this chapter, we will explore how to repair logical issues using these tools.
Step 1: Use Disk Management Tools
Disk management tools are built-in utilities in most operating systems that allow you to manage your drives and partitions. To check for errors and repair them, follow these steps:
1. Open the disk management tool by searching for “disk management” in the start menu.
2. Right-click on the disk or partition you want to repair and select “Properties“.
3. Go to the “Tools” tab and click on the “Check” button under “Error checking“.
4. The tool will scan for errors and give you the option to repair them. Follow the prompts to complete the repair process.
Step 2: Use CHKDSK Command
If using disk management tools does not fix the issue, you can try using the CHKDSK command. This command is a built-in utility in Windows that checks for and repairs logical issues on drives. Follow these steps to use it:
1. Open the command prompt by searching for “cmd” in the start menu.
2. Type the following command and press Enter:

CHKDSK /f "drive letter"

(replace “drive letter” with the letter of the drive you want to repair)
3. The command will scan for and repair any logical issues on the drive.
In this chapter, we learned how to repair logical issues using disk management tools and CHKDSK commands. These methods can effectively fix common issues like file system errors, bad sectors, and corrupt files. However, severe damage may require professional data recovery services for the best results.

Conclusion

In conclusion, recovering data from a broken hard drive can seem like a daunting task, but with the right tools and knowledge, it is possible to retrieve important files and documents. By safely connecting the dead hard drive to a secondary computer and using specialized recovery software like Renee Undeleter, readers can increase their chances of successful data retrieval. It is important to evaluate the extent of physical damage before attempting any recovery methods and to explore alternative software options like Testdisk and Recuva. For severely damaged drives, it may be best to seek professional data recovery services. Additionally, learning how to repair logical issues using disk management tools and CHKDSK commands can also be helpful in the recovery process. By following these tips and steps, readers can increase their chances of successfully recovering data from a broken hard drive. Remember to always back up important files to avoid the stress and hassle of data loss in the future.