

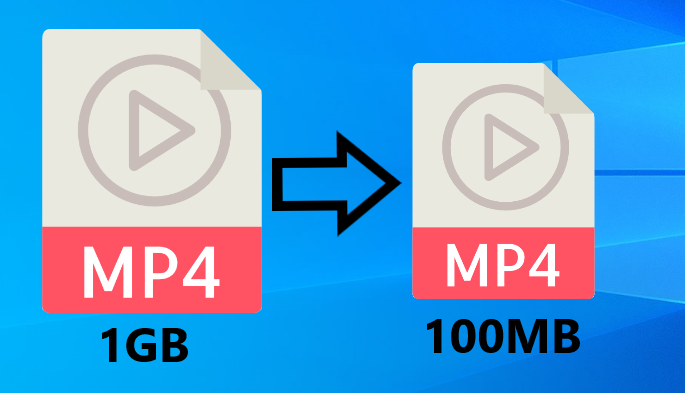
[2024] Top Recommended Video Compression Software

Summary
Discover the top video compression software available today, tailored for specific file types or versatile enough for any video format. Enhance your decision-making process with our expert review.

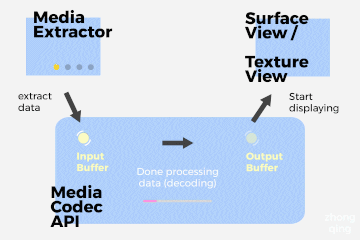
- Video encoding is the process of converting video into a compressed format by breaking it down into frames and encoding each frame.
- Video decoding is the process of recovering video frames from a compressed format by decoding it back to an uncompressed format.
- Video presentation is the process of displaying a video on the screen by rendering the encoded frames.

Separate videos with different parametersUsers can separate videos into equal clips by time, size and self-set parameter.
Cut Videos & AudiosUsers are free to cut videos and audios clips by setting start and end time.
Multiple Edit ToolsMerge, crop, rotate, cut and transform video easily. Change and add background music, subtitles and watermark to video.
Format ConversionSupport to convert videos and audios into different formats.
Separate videosSeparate videos into equal clips by time, size and self-set parameter.
Cut Videos & AudiosCut videos and audios clips by setting start and end time.
Format ConversionConvert videos and audios into different formats.
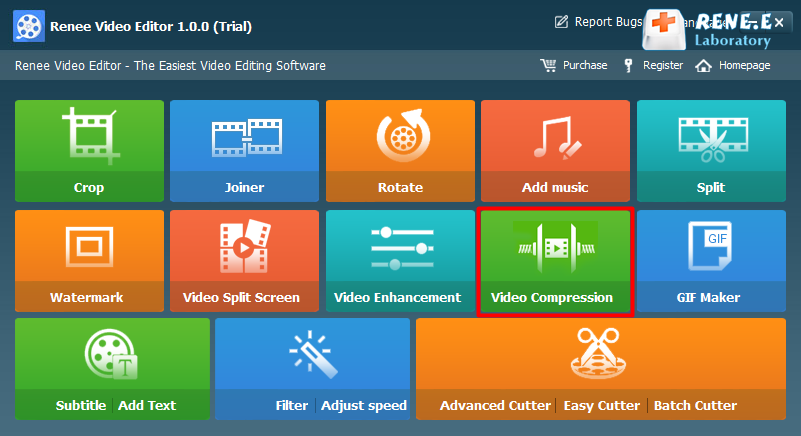
merge: Merge multiple video/audio files into one complete file
Rotation: Rotate the video 90°/180°/270° clockwise, counterclockwise, or turn the video upside down or mirror.
Soundtrack: Adjust volume, select audio tracks, score videos or delete original audio.
segmentation: Divide the movie into multiple small clips according to duration, number of segments or file size.
Watermark: Add text, pictures, videos or GIF pictures to the video in the form of watermark.
Split movie frames: One video or multiple video clips can be spliced into one video screen.
Video enhancements: Improve video quality.
Video Compression: Compress movie size.
GIFs Make: Make videos or pictures into GIF files.
Subtitles/Text: Add subtitles/text to videos.
Filter/Speed: Adjust brightness, contrast, saturation and add a variety of special effects; video speed adjustment supports 1/10-4 times speed adjustment.
Advanced editing: Edit video, crop video, add watermark, subtitles, filter effects and soundtrack.
Easy clip: Quickly cut video clips.
Batch clipping: Batch clip video/audio.
+) icon to import the video to be compressed into the software (or directly drag and drop it into the software).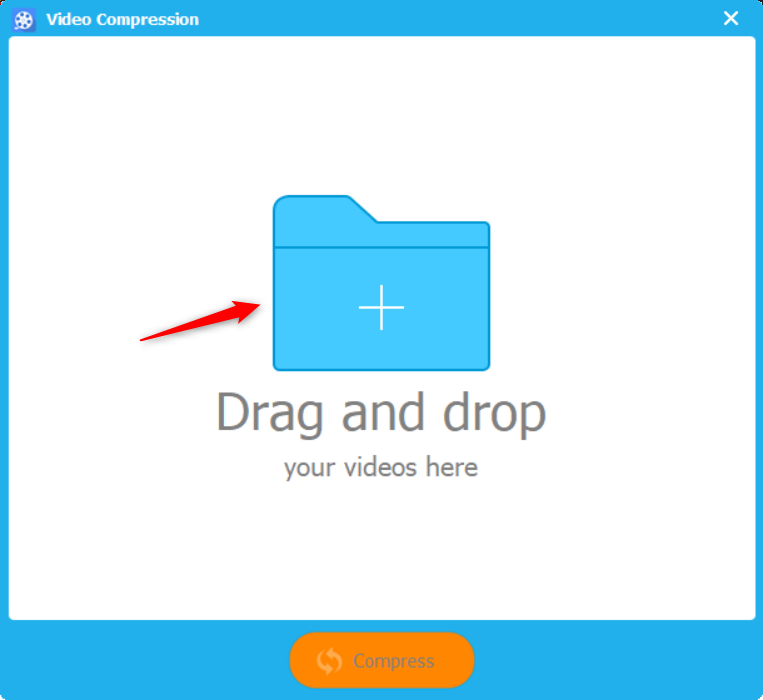
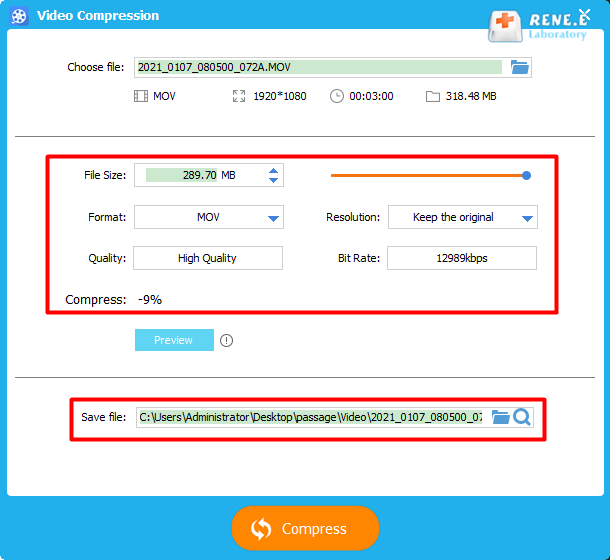
- Import and export any video file format
- 7 days free trial
- Compatible with Windows and Mac
- Rich resource library
- Works in sync with Adobe products for fast data processing even with high-quality video files
1 pass VBR or faster yet lower quality CBR. To further reduce file size, lower the bitrate by adjusting the target bitrate slider in the export settings and monitor the estimated file size. For significant size reduction, decrease video resolution or change frame size in Sequence Settings by modifying Width and Height under Video and Video Preview. Cropping can remove unwanted frames but has minimal impact on file size.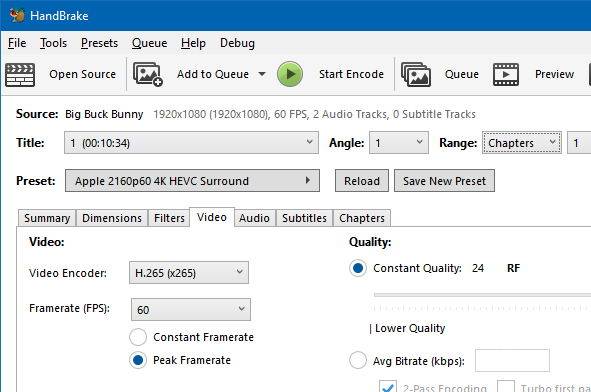
- Convert video to almost any format
- free and open source
- Multi-platform video compression tool
- Built-in device presets
- Support input and output sources
- Live still and video preview
1. Download and install HandBrake from
http://handbrake.com/.2. Open the HandBrake app after installation.
3. Click File under Source Selection on the left.
4. Select the file to compress and click Open.
5. Click Browse to select a location to save the compressed video.
6. Enter a name for the video, give it something that will allow you to easily distinguish the compressed video from the original, i.e. “Vidello – Compressed- H264.mp4“, and click Save.
7. Under Output settings, choose MP4 for Container.
8. Click the Video tab and select H.264 (x264) for Video Codec.
9. Select a preset from the Presets drawer. We recommend you choose Fast1030p 30 for high quality.
10. Select the frame rate, which depends on your source video, which is NTSC (29.97fps), then make it 30fps by selecting 30. Also check Constant Frame Rate to ensure better compatibility.
11. Enter an average bitrate (kbps) between 5,000-10,000 for the video (the higher the bitrate, the better the video quality, but the longer the upload and download time).
12. Click on the picture where we can change the video frame size or resolution.
13. Change Anamorphic to None and Modulus to 16. And check Keep Aspect Ratio, use the down arrow on Width to change from 1920 (Full HD) down to 1280.
14. Select the Audio tab and choose a sample rate of 48. Select Stereo for the audio mix. Choose 320 for your audio bitrate.
15. Click the Start Encode button and wait for the video compression to complete. Handbrake will notify you when it is complete.
Relate Links :
Best Video Editing Software: Master the Art of Editing All Types of Videos

07-05-2024
Amanda J. Brook : Master video editing software with this guide: it provides essential techniques and software selection advice for beginners.
Merge Videos Fast with Online Video Mergers
02-08-2023
Amanda J. Brook : Want to merge videos quickly? In this article, you will master how to merge multiple video formats easily...
How to Make Videos with Free Video Editing Software
06-08-2019
Amanda J. Brook : Currently, short videos can be viewed everywhere online. Compared with texts and images, short videos conclude much information...
How to Combine Videos on YouTube
21-06-2019
Amanda J. Brook : YouTube is an American video-sharing website viewed by 1 billion people. Although you cannot directly save the videos...

