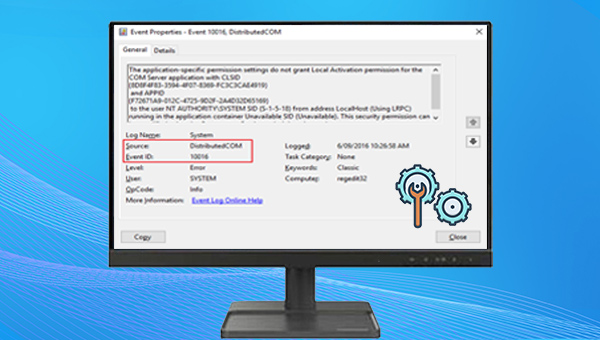
I. How to fix the DistributedCOM error 10016 encountered in Windows 10?
DistributedCOM (DCOM) is an integral part of Windows computer network communication. Traditional COM can only access information on the same computer, while DCOM can access data on remote servers. DistributedCOM error 10016 means that an application is trying to access a DCOM server, but does not have the required permissions to do so. We can try the following methods to fix it.
1. Edit the Windows Registry
Before editing the registry, it is recommended to back up the registry, so as not to lose key registry information due to misoperation, so as to affect the normal operation of the system. The steps to backup and edit the registry to fix DistributedCOM error 10016 are as follows:
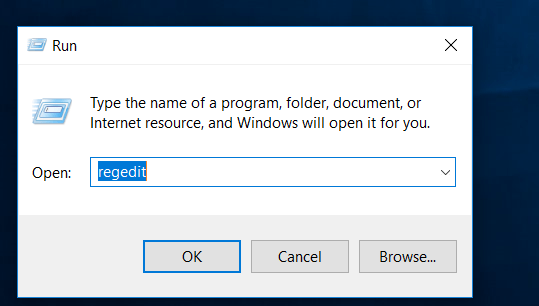
Step 1: Right-click (Start), select (Run), enter (regedit) in the text box and click (OK), then click (Yes) on the “User Account Control” interface to enter the registry.
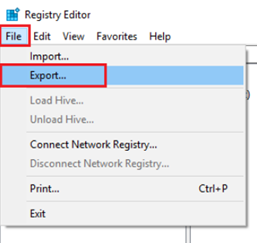
Step 2: After opening the registry, click (File) > (Export), set the export range to (All), and then choose a suitable location to save the Windows registry. If you need to restore the registry later, open the storage location of the registry and double-click the exported registry file to restore it. After exporting, you can continue with the following repair operations.
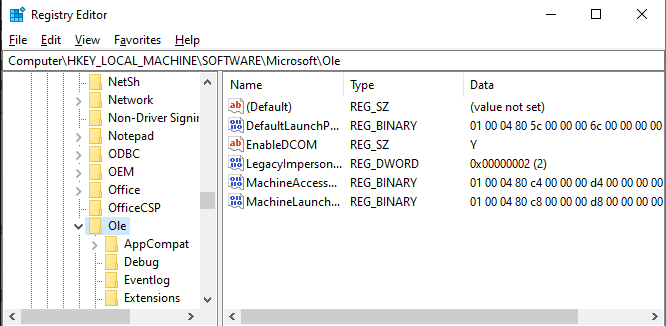
Step 3: Expand (HKEY_LOCAL_MACHINE\SOFTWARE\Microsoft\Ole) in turn, or copy and paste it into the address bar of the registry editor. Then delete the following four registry keys:
Machine Access Restriction
After that close the Windows Registry Editor and restart the system. After removing the above four registry keys from the registry, default permissions will be written to the system. Therefore, those applications that require access to the DCOM server will be granted access.
If that doesn’t work, you can check out Method 2, which is a bit more involved.
2. Enable DCOM permissions for specific errors
If you have multiple applications with DCOM errors, the following procedure will take some time because you will have to repeat most of it for each error. It should be noted that Microsoft does not recommend modifying the permissions on DCOM components to solve this problem, because these errors will not have a negative impact on functionality, and modifying permissions may have unexpected side effects. Details can be found on the Microsoft official website. View in . Specific steps are as follows:
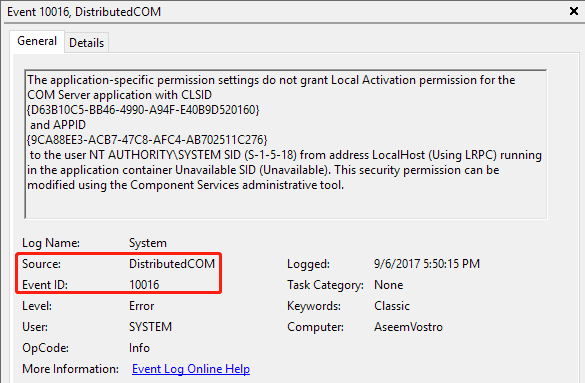
Step 1: Enter (event viewer) in the search bar in the lower left corner, and then open it. DCOM error messages in Event Viewer contain information about the specific application or process where the problem occurred.
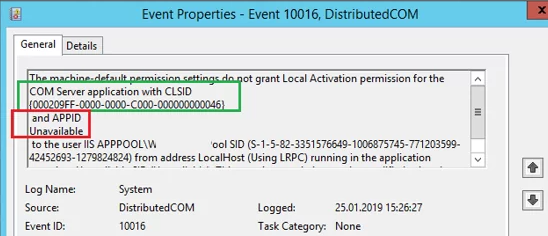
Step 2: Open (Windows Logs) > (System) and find your latest DCOM error 10016. Double-click the error message to expand it. The General tab explains the cause of the DCOM 10016 error and lists the CLSID (Class ID) and APPID (Application ID). Press (Ctrl+C) to copy the CLSID, something like {000209FF-0000-0000-C000-000000000046}. When copying the CLSID, you need to copy the braces together.
Step 3: Right-click (Start), select (Run), enter (regedit) in the text box and press (OK), then click (Yes) on the “User Account Control” interface to enter the registry.
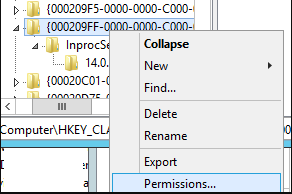
Step 4: Then, paste the following path in the registry address bar: HKEY_CLASSES_ROOT\CLSID\{000209FF-0000-0000-C000-000000000046} and press (Enter). Please replace {000209FF-0000-0000-C000-000000000046} with the CLSID shown on your computer. View and remember the (default) value data, which is the process or service that has an error, as shown in the figure below (PerAppRuntimeBroker). Then check that the AppID data matches the APPID shown in Event Viewer. After checking, in the list of registry keys on the left, right-click the CLSID associated with the error and select (Permissions) > (Advanced).
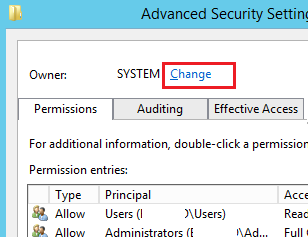
Step 5: Click (Change) in the advanced security settings interface, and click (Advanced) in the new pop-up window.
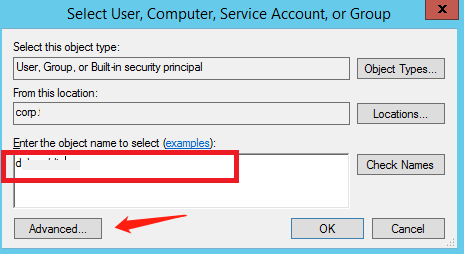
Step 6: Then click (Find Now), select (Administrators) (administrator group) and click (OK).
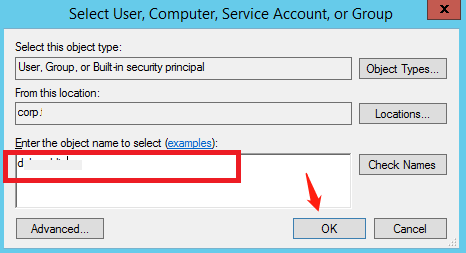
Step 7: Then you will return to the “Select User or Group” interface, “Enter the object name of select” will be displayed as the (Administrators) (administrator group) you just selected, and then click (OK)
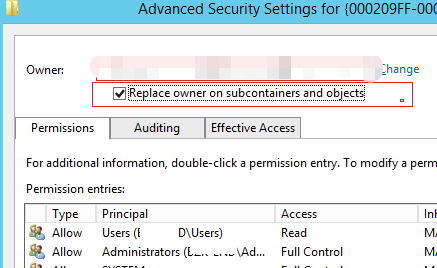
Step 8: Then in the advanced security settings interface, check (Replace owner on subcontainers and objects), and then click (Apply) > (OK) to save the changes.
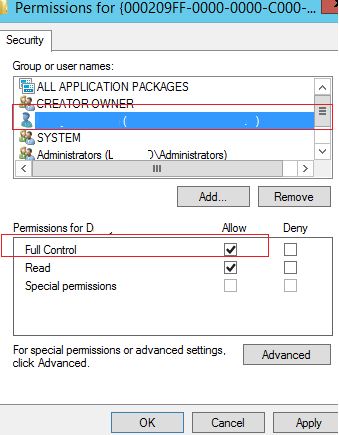
Step 9: Then select (Administrators) in the “Group or user name”, and set its full control permission to (Allow), that is, check the (Allow) option. Then click (Apply) > (OK).
Step 10: After setting, go back to the registry interface and paste the following path in the address bar: HKEY_LOCAL_MACHINE\Software\Classes\AppID\{000209FF-0000-0000-C000-000000000046}, please put {000209FF-0000-0000-C000-000000000046} with your APPID (you need to copy the braces together when copying). Then repeat step 4-step 9 to set permissions.
Step 11: After setting the permissions, please close the registry and restart the computer. Then right-click (Start), select (Run). Enter (comexp.msc) in the text box and click (OK) to open the Component Services interface.
Step 12: Expand (Component Services) > (Computer) > (My Computer) in turn, and then click (DCOM Configuration). Find the wrong process or service found in step 4, here it is (PerAppRuntimeBroker), right-click it, and select (Properties).
Step 13: In the (General) tab check if the Application ID matches the APPID in Event Viewer.
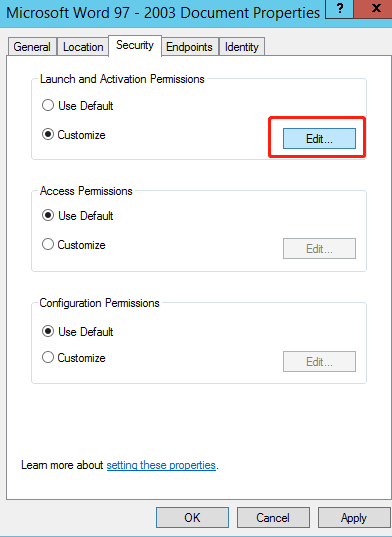
Step 14: After confirming that the application ID is consistent with the APPID in the event viewer, select the (Security) tab, and click (Customize) > (Edit) under “Launch and Activation Permissions”. If the (Edit) button cannot be clicked and it is grayed out, you need to verify the APPID registry entry permission. You can go back to step 10 and do it again to ensure that the APPID registry entry permission has been set.
Step 15: Under “Group or User Name”, select (Add), enter the group or user name recorded in the event log, and then click (OK), then set the (Local Startup) and (Local Activation) options to ( Allow), then save the settings and restart the computer.
If you find that files are lost after the repair is completed or during daily use of the computer, you can check the following methods for data scanning and recovery.