

How to Initialize SSD: Optimal Format and Partitioning Guidelines

Summary
Learn how to format an SSD correctly to avoid compatibility issues. Discover the appropriate file system format and partition for optimal use on both Windows and Mac systems.
Table of contents
1. Notes and suggestions before formatting
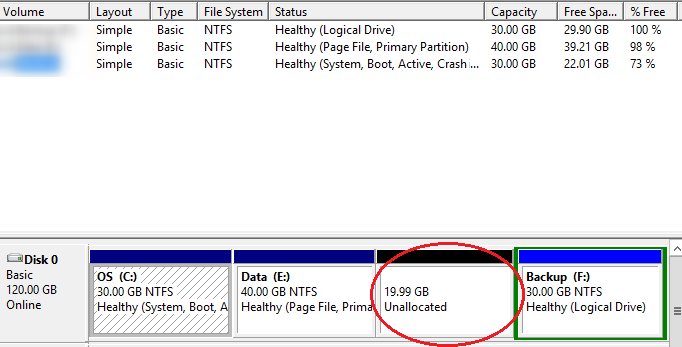
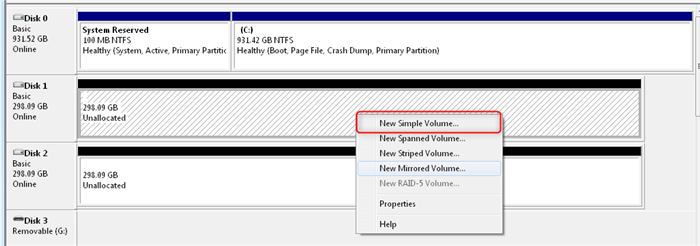
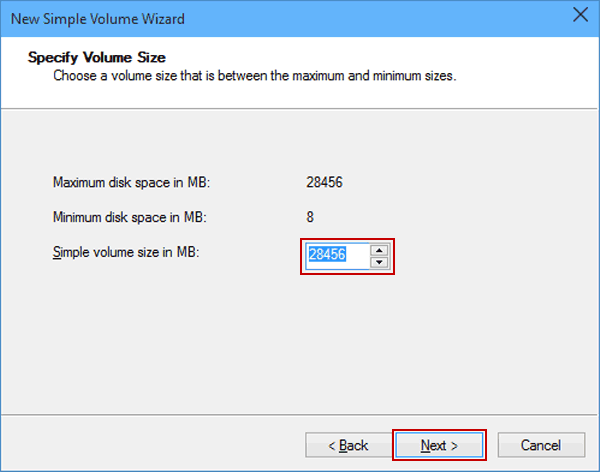
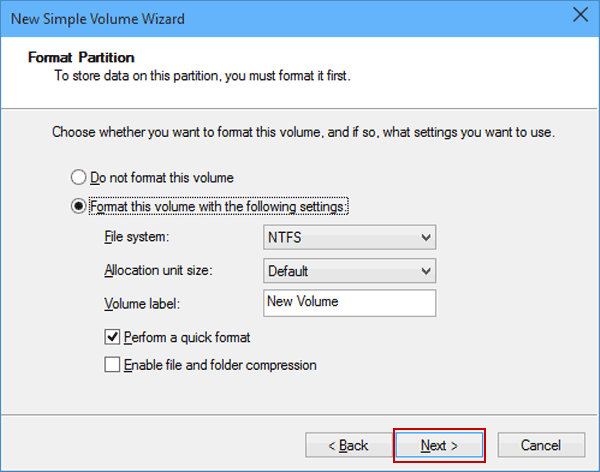
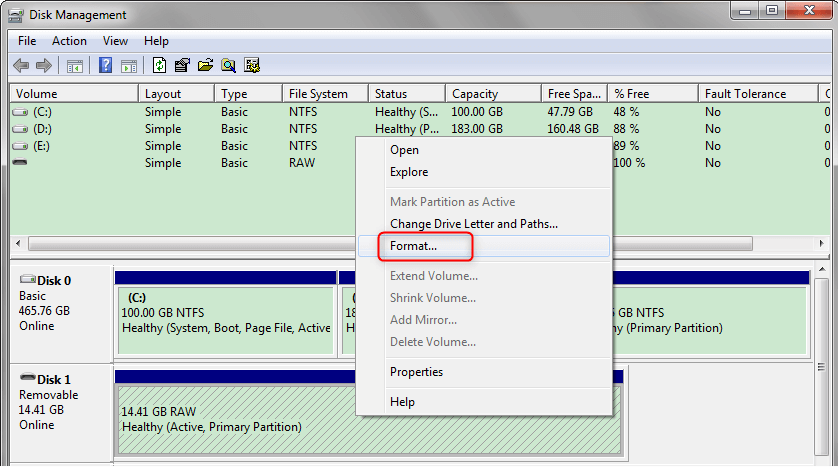
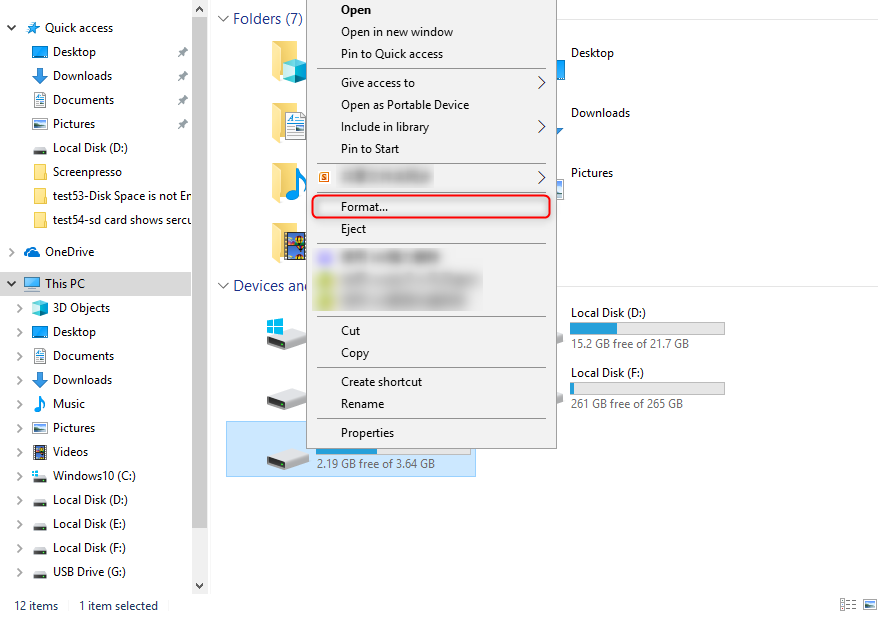
2. How to format and partition after adding/replacing SSD
- Partition and format the new hard drive
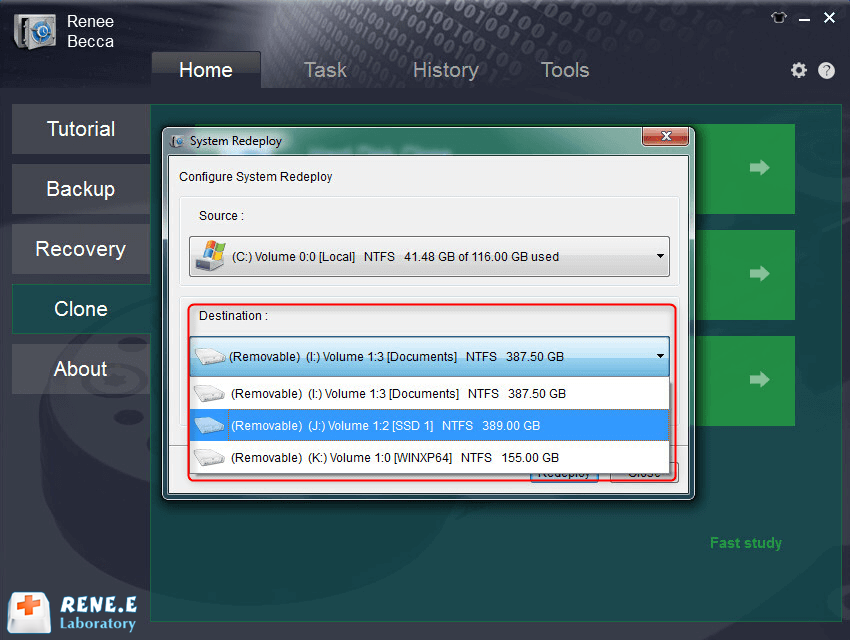
- Migrate the system on the mechanical hard disk to the SSD solid state drive
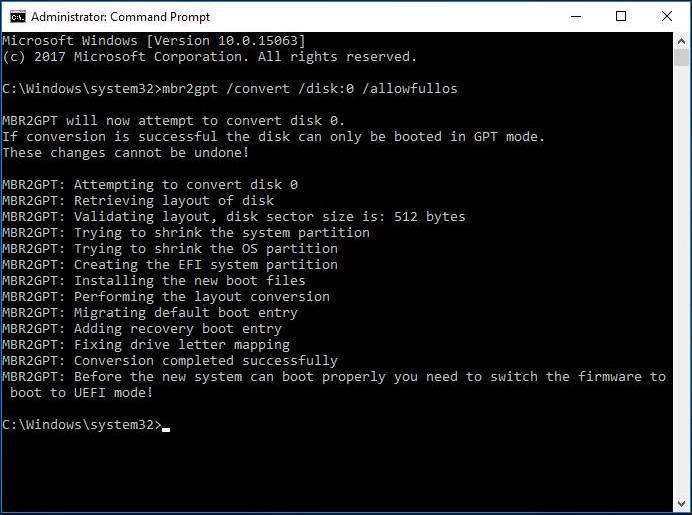
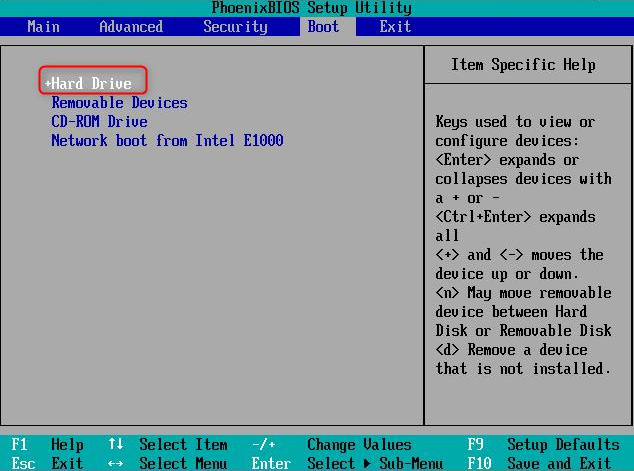
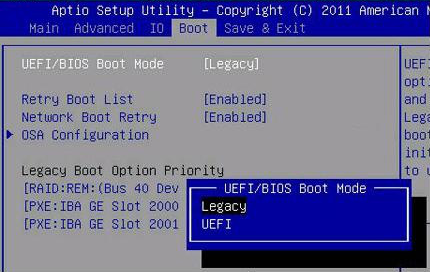
3. How to modify the BIOS/UEFI settings after replacing the SSD

Easy to use Recover data by 3 steps;
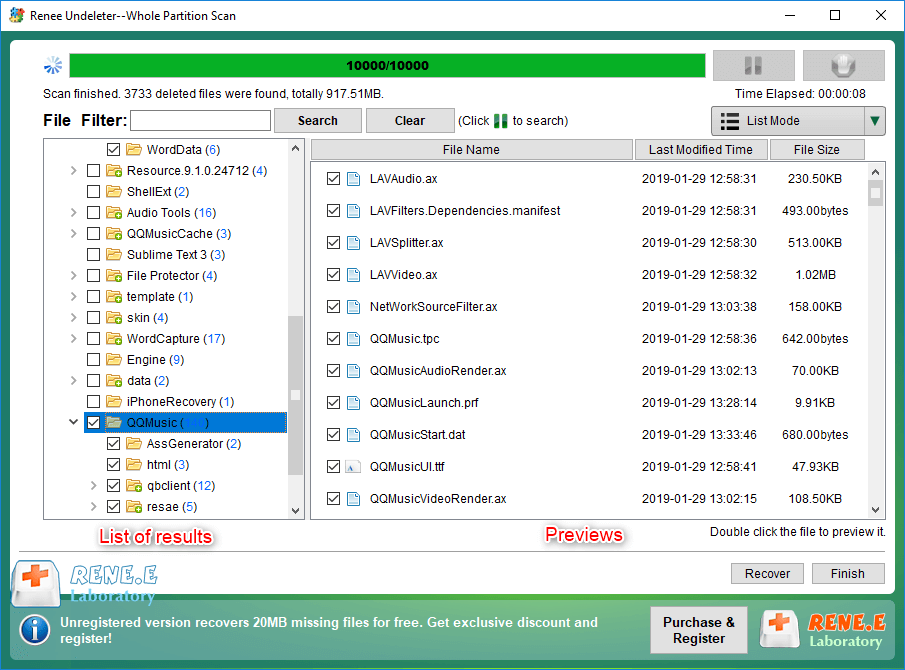
Multiple scan modes Fast partition scan, whole partition scan and whole disk scan;
Supported file types Image, video, audio, text, email and so on;
Image creation Create a partition image to read and back up data;
Supported devices SD card, SDHC, SDXC, USB flash drive, hard disk and computer.
Easy to use Recover data by 3 steps;
Multiple scan modes Fast partition/whole partition/whole disk scan;
Supported devices SD card/USB/hard disk.
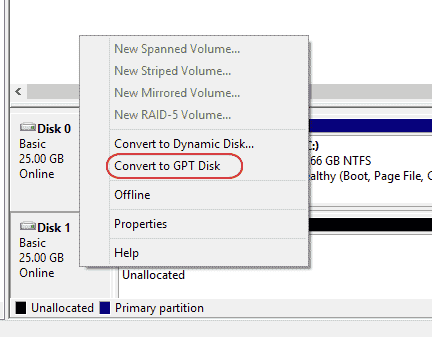
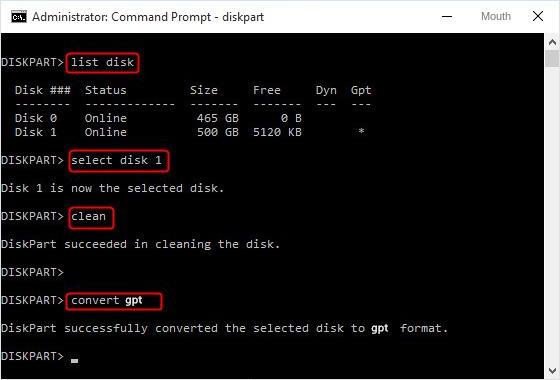
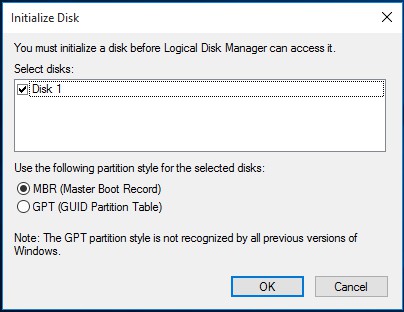
Free TrialFree TrialFree Trial 800 people have downloaded!1. If your computer motherboard is an old-fashioned BIOS motherboard, it is recommended to use the MBR partition scheme, because both new and old systems are compatible with MBR.
2. If your computer supports the new UEFI motherboard, it is recommended to use the GPT partition scheme. (Note: All 32-bit Windows versions are not compatible with GPT partitions)
3. The MBR mode does not support large hard drives with a capacity exceeding 2TB. If your hard drive capacity is greater than 2TB, it is recommended to use the GPT partitioning scheme directly.

● NTFS It is a modern file system in the Windows system and is currently the most widely used. Most of the built-in hard disks in Windows computers now use the NTFS file system. NTFS can support hard drives below 16 EB, and the operating systems are in Windows 8 and Windows 10 versions.
● FAT32 It is an older file system, not as efficient as NTFS, but it has good compatibility with different system platforms. It is a universal format and any USB storage device will have this file system preinstalled.
● exFAT It is an alternative to the FAT32 file format. It can support a maximum file size of 1EB, which is very suitable for storing large-capacity files, and can also be used universally on Mac and Windows operating systems.
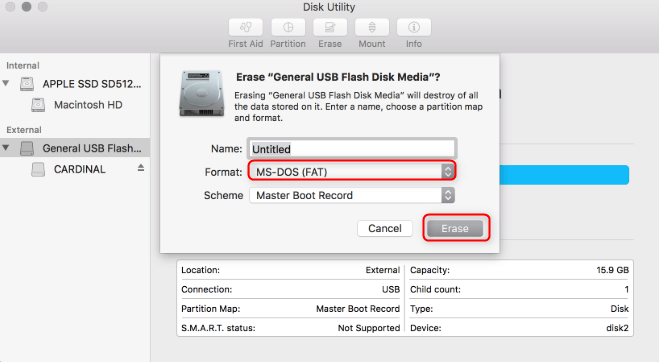
Apple File System (APFS) : APFS is Apple’s newest file system, first introduced for iOS devices in early 2017. The biggest improvement over Apple’s previous file system is speed. It only works with system volumes, hybrid drives, SSDs, and flash devices used with macOS.
Mac OS Extended (HFS+) : was the primary file system used for Mac system storage from 1998 until the release of APFS in 2017. HFS+ is an improved version of HFS that supports larger files and uses Unicode to name files or folders. The file system still works with HDDs and SSDs.
exFAT : exFAT is the best cross-platform option, it works on both Windows and Mac operating systems. Both macOS and Windows can read and write exFAT volumes, making them ideal for flash drives and external hard drives.
MS-DOS (FAT) : Apple also includes support for FAT32, which is labeled MS-DOS(FAT) in Disk Utility. Do not use the FAT32 file system unless you are using an old computer. Because it only works with drives used in Windows XP or earlier.
Automatic 4K alignment Improves SSD performance during system migration.
Support GPT and MBR Automatically adapt to the suitable partition format.
Support NTFS and FAT32 Redeploy various files in different file systems.
Back up quickly Back up files at up to 3,000MB/min.
Overall backup schedule Support system redeployment/system backup/partition backup/disk backup/disk clone.
Automatic 4K alignment Improve SSD performance
Support GPT and MBR Intelligently adapt to a partition format
Support NTFS and FAT32 Redeploy files in different file systems
Free TrialFree TrialNow 2000 people have downloaded!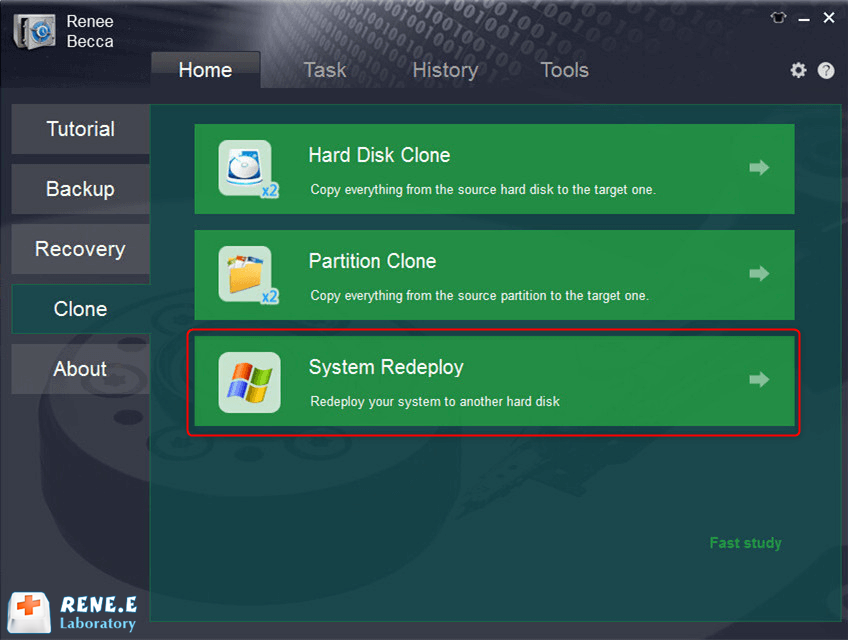


Easy to use Recover data by 3 steps;
Multiple scan modes Fast partition scan, whole partition scan and whole disk scan;
Supported file types Image, video, audio, text, email and so on;
Image creation Create a partition image to read and back up data;
Supported devices SD card, SDHC, SDXC, USB flash drive, hard disk and computer.
Easy to use Recover data by 3 steps;
Multiple scan modes Fast partition/whole partition/whole disk scan;
Supported devices SD card/USB/hard disk.
Free TrialFree TrialFree Trial 800 people have downloaded!
Relate Links :
How To Recover Deleted Files from Hard Drive: Expert Tips
11-06-2024
Amanda J. Brook : Learn how to how to recover deleted files from hard drive with these effective methods. Don't panic if...
Recover Deleted/Formatted Files from Mac's External Hard Drive

11-06-2024
John Weaver : Learn how to perform the external hard drive data recovery on mac effortlessly. Follow our simple, effective method...
Recover Deleted Mac Files: Easy MacOS Hard Drive Recovery Guide
11-06-2024
Amanda J. Brook : How to recover files from mac hard drive? Master effective Mac hard drive recovery techniques to restore data...
Recover Files Fast with the Best Memory Card Recovery Software
07-06-2024
Amanda J. Brook : Learn how to recover files from a memory card quickly and easily with memory card recovery software. Don't...

