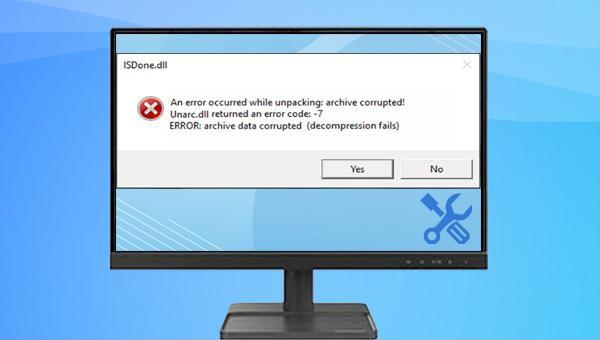
II. How to Fix ISDone.dll Error on Windows 10?
1. Increase virtual memory
Windows virtual memory is to use part of the capacity of the hard disk as memory, so as to make up for the lack of physical memory RAM. If the ISDone.dll error is caused by insufficient memory, you can try this method. Specific steps are as follows:
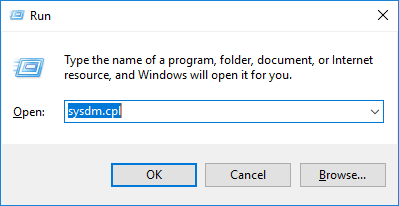
Step 1: Press Windows + R to open the Run box, type sysdm.cpl and press Enter to open the System Properties window.
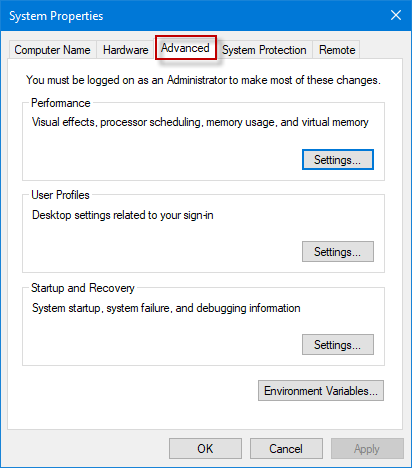
Step 2: In the pop-up window, switch to the Advanced tab, and click the Settings button in the Performance bar.
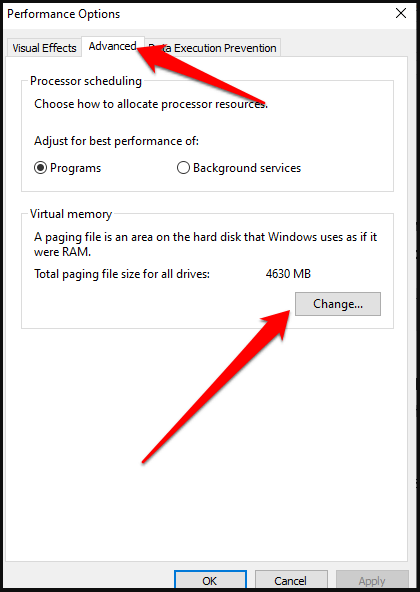
Step 3: In the Performance Options window, switch to the Advanced tab and click the Change button in the Virtual Memory column.
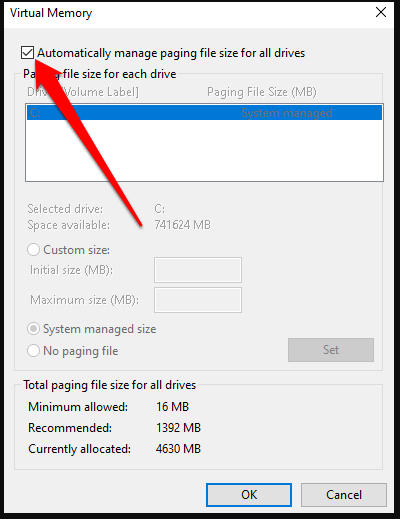
Step 4: First uncheck the box Automatically manage paging file size for all drives. Then select Custom Size, you can enter the increased value (in MB) in the Initial Size and Maximum size fields. You can set the initial size to 400MB, and the maximum value to 3000-4000MB (about 2.5GB or 2560MB for general games is enough, if some games need more virtual memory, you can adjust the value according to the actual situation), then click OK. After setting, please restart the computer, try to install the game again, and observe whether the problem is resolved.
2. Increase the hard disk space or change the installation folder
In addition to increasing the RAM size, you should also make sure you have enough hard drive space for large game installations. You can choose to expand the size of the partition where the game is installed, or copy and paste the game installation file to another disk partition with larger capacity for installation. The method of expanding the size of the partition requires unallocated space behind the disk partition. If the disk partition where the game is installed is the only partition in the hard disk, you cannot expand its size through the following methods. You can only solve it by changing the location of the installation folder Insufficient hard disk space problem. The steps to expand the partition size are as follows:
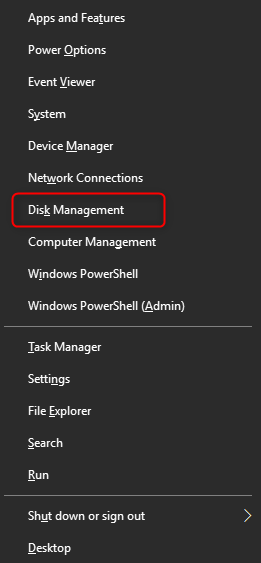
Step 1: Right-click Start and select Disk Management.
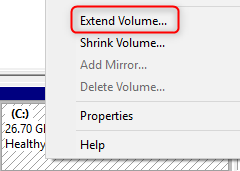
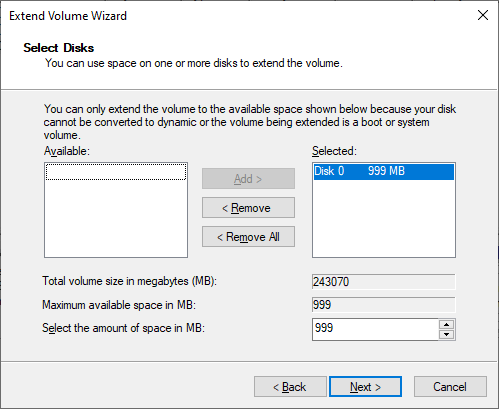
Step 2: After entering Disk Management, right-click the disk partition where the game is installed. Select Extend Volume and click Next on the Welcome to Extend Volume Wizard page.
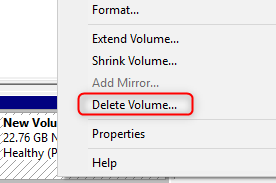
If there is no unallocated space behind the partition that needs to expand the size of the partition, but a partition, you need to delete that partition first to make it an unallocated space. Please right-click the target partition, select Delete Volume and follow the instructions.
Step 3: Set the amount of space for expansion, which can be set to the maximum amount of available space. Then click Next > Finish.
Corrupted RAM memory can also cause ISDone.dll errors. If the game still cannot be installed after increasing the memory and the hard disk partition space where the game is installed, you need to check whether the RAM memory is normal. Windows’ built-in memory diagnostic tool can help you check your RAM. The specific operation steps are as follows:
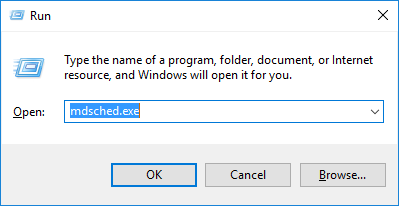
Step 1: Press the Windows + R imultaneously to open the Run window. Then type mdsched.exe and click OK to open the Windows Memory Diagnostic Tool.
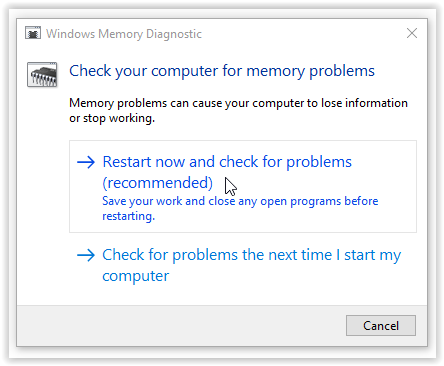
Step 2: Next, select the Restart now and check for problems (recommended) option in the Windows memory diagnostic interface. Wait patiently for the diagnostic process to complete, and then restart the computer to see if the problem is resolved.
Hard disk failure may also cause ISDone.dll error, and CHKDSK can help us check and repair hard disk bad sectors or damaged file system. Proceed as follows:
Step 1: Search cmd in the search box in the lower left corner. Right-click the search result, and select Run as administrator to open the command prompt tool.
Step 2: In the opened command prompt window, enter the command chkdsk X: /r /f (X refers to the hard disk drive letter, which can be changed to the drive letter of the hard disk partition where the game is installed; /r and /f are chkdsk parameters , /r to find bad sectors and restore readable information; /f will try to fix errors found on the disk), and press Enter to fix errors. After the fault repair is complete, restart the computer to check whether the problem is resolved.
5. Re-register the ISDone.dll file
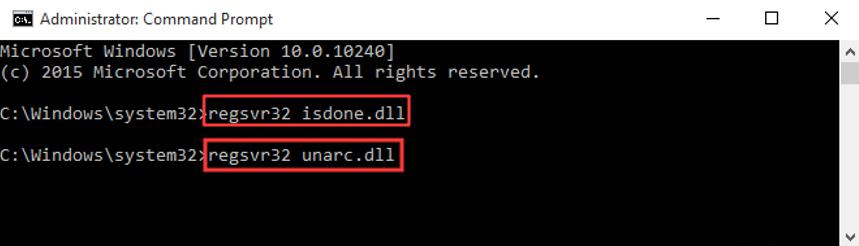
You may encounter ISDone.dll errors if the ISDone.dll and Unarc.dll files are damaged or missing. Re-registering the file on the system may resolve the issue.
Step 1: Search cmd in the search box in the lower left corner. Right-click the search result, and select Run as administrator to open the command prompt tool.
Step 2: Type regsvr32 isdone.dll command in the command prompt and press Enter. After registering the isdone.dll file, type regsvr32 unarc.dll and press Enter to re-register the unarc.dll file.
Step 3: Restart your computer and try installing a game or application to see if the problem is resolved.
6. Use SFC and DISM commands to scan and repair system files
System File Checker (SFC) can find and repair corrupt or missing system files in the system files directory. DISM is usually used to check and repair system image files, and to detect and clean registry items. Proceed as follows:
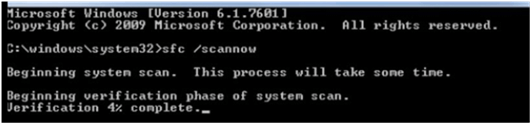
Step 1: Search cmd in the search box in the lower left corner. Right-click the search result, and select Run as administrator to open the command prompt tool.
Step 2: In the opened command prompt window, type the command sfc /scannow and press Enter. Next, System File Checker will scan and fix problematic system files.
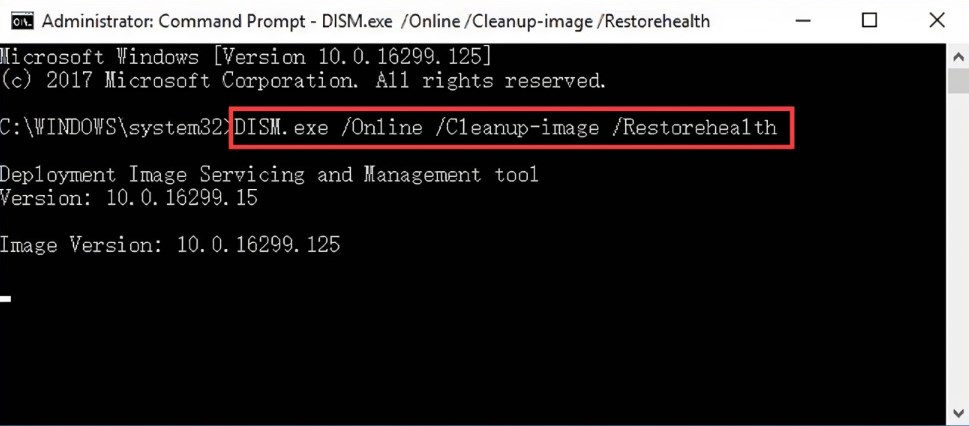
Step 3: If a problem is detected, but it prompts that it cannot be repaired, please enter the command DISM.exe /Online /Cleanup-image /Restorehealth and press Enter to execute the repair command. After the command is executed, restart the computer and reinstall the game to see if the problem is resolved.
7. Temporarily turn off Windows Defender Firewall or uninstall third-party antivirus software
If you have installed a third-party antivirus software, it is recommended that you close or uninstall it and then try Windows Update. Uninstallation steps: Right-click Start, select Applications and Features, select the antivirus software to be uninstalled, and click the button Uninstall. If you do not have third-party antivirus software installed, you can also try turning off the firewall, which sometimes blocks the installation of certain programs. The specific steps to turn off the firewall are as follows:
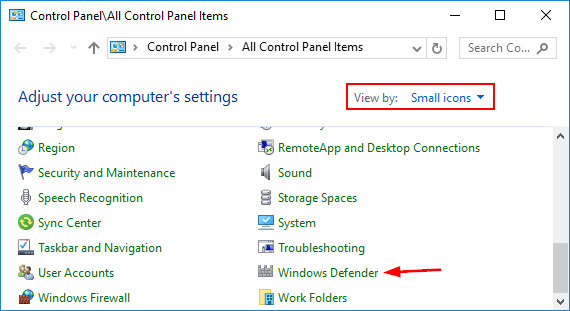
Step 1: Search for Control Panel in the taskbar search box in the lower left corner of the Windows desktop, open it, set the viewing method to Small icons, and then click Windows Defender.
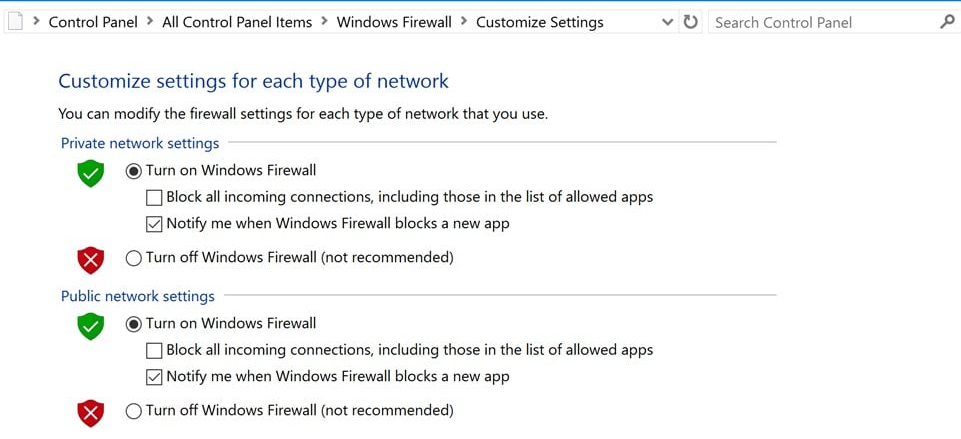
Step 2: Select Turn on/off Windows Firewall on the left side of the new interface, then select the option Turn on Windows Firewall and click OK. Then install the game again to see if the problem is resolved. If that doesn’t work, you can also re-enable Windows Defender Firewall and try other methods.
8. Enter safe mode or perform a clean boot before installing the game
Safe mode is a special startup mode in Windows system, which can start our computer without loading third-party device drivers. And clean boot refers to start the system by using the least set of drivers and startup programs, that is, only start the original components and services of the system without starting third-party software and plug-ins. In safe mode or clean boot environment, this can reduce the probability of third-party applications or startup items conflicting with the game installation. For the method of entering safe mode, you can check the content of this article (Comprehensive understanding of what is Windows 10 safe mode and how to enter it).
Here’s how to perform a clean boot:
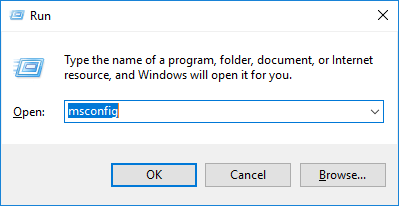
Step 1: Run the computer, press Windows + R at the same time to open the run window. Next type msconfig.exe and press the OK button to open the system configuration window.
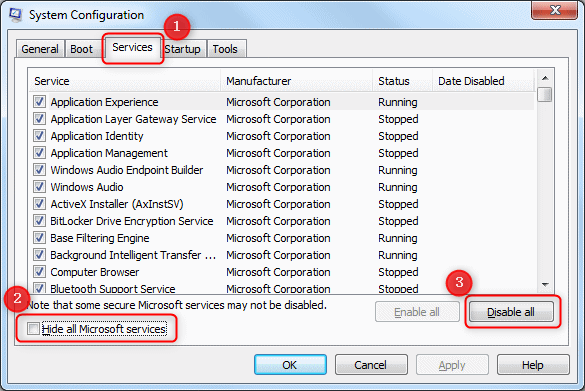
Step 2: After opening the system configuration, switch to the option bar Services, check Hide all Microsoft services and press the Disable all button.
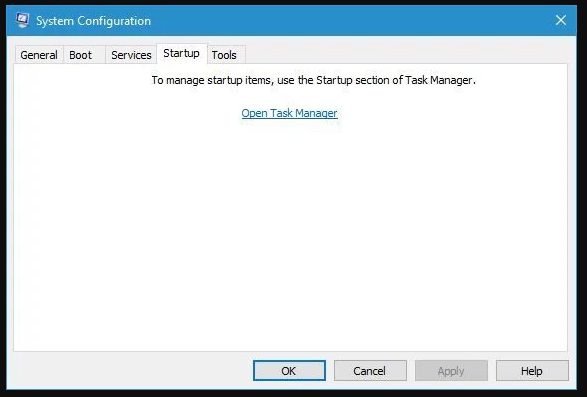
Step 3: Switch to the (Startup) option bar and click (Open Task Manager).
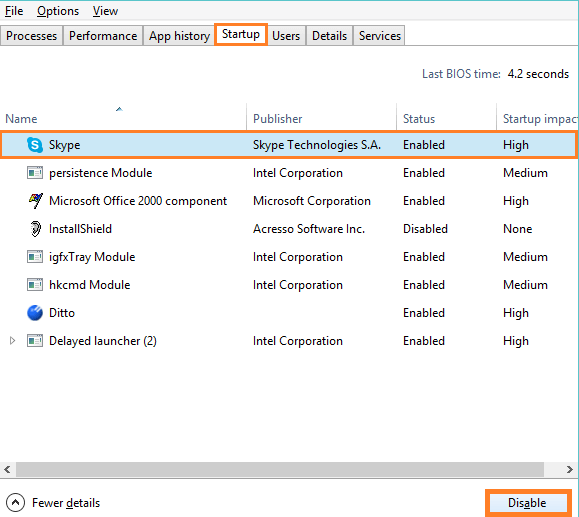
Step 4: Disable all programs displayed on the page. You can right-click the application and select Disable, or select the current program and click the button Disable in the lower right corner. After the operation is completed, close the task manager window, and click OK on the system configuration page. You will then see a pop-up window, click the Restart button, restart and then try installing the game or application to see if the problem is resolved.
That’s all for fixing the ISDone.dll error. If you find that files are missing after the repair is complete or during daily use of the computer, you can check the following methods to scan and restore them.


 II. How to Fix ISDone.dll Error on Windows 10?