8 December 2021Jennifer Thatcher Technology Manager of Test Dept.
Last update by Emma Johnson at 8 December 2021
Summary Bad sectors can cause data loss and file corruption. Worse still, the hard drive will stop working if there are too many bad sectors. In this essay, we will talk about how to fix bad sectors on hard drive.
Bad sectors are the permanently damaged units on the hard drive. Once the sectors are damaged, the data on these sectors will be lost. Generally, Windows 10/8/7 can locate at and mark these bad sectors, and then it can skip the bad part when the data is written into the hard drive. There are 2 types of bad sectors, hard bad sectors and soft bad sectors.
Physical bad sectors are related with the physical corruption of the hard drive. For example, the quality is bad; it gets a slight collision; the hard drive contains too much dust; it is burn-in; the hard drive works under the scene with high temperature. Logical bad sectors are about the program issues. For example, the hard drive is not used properly; the file system goes wrong; the drive is over written; the disk fragmentation is executed frequently; it is attacked by virus.
2. Symptoms of Bad Sectors
It is hard for us to identify the bad sectors from the hard drive directly. Usually, we can check the bad sectors when we encounter these situations:
● The files and folders are accidentally lost from the hard drive.
● The files and folders are not accessible, or they are corrupted.
● The hard drive gets struck when you use it.
● The hard drive needs more time for startup.
● The hard drive needs more time for loading and shutdown.
● The SMART tool is automatically enabled.
● You always receive the information about the hard drive errors.
● The computer is accidentally shut down.
If you meet with the above situations, you should learn about how to fix bad sectors on hard drive as follows.
Part 2: How to Fix Bad Sectors on Hard Drive?
Both of the hard bad sectors and the soft bad sectors are marked as unavailable by the operating system. The data on the hard disk may not be read. Under this situation, we suggest that you use the professional data recovery software to retrieve the data before fixing the bad sectors.
1. How to Use Renee Undeleter to Recover Data?
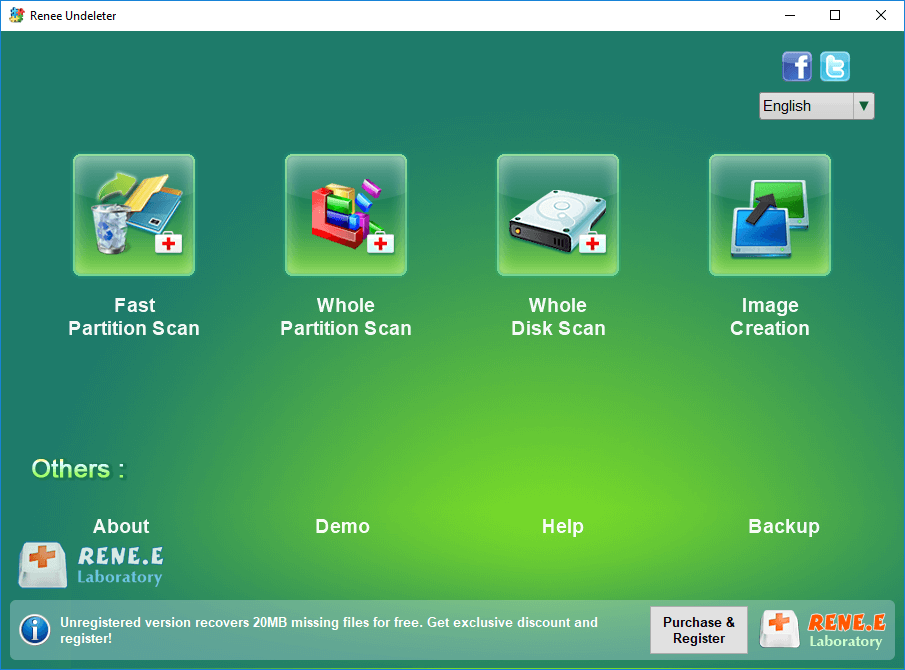
Renee Undeleter is the data recovery software. When the users accidentally delete the important files, empty Recycle Bin, or format the disk/drive, the software can retrieve the deleted data. It contains 4 options, namely fast partition scan, whole partition scan, whole disk scan and image creation. These functions can help the users easily recover the lost data.
Renee Undeleter - Powerful Data Recovery Software
Easy to use Only simple steps to recover data from storage devices.
Multiple scan modes Fast partition scan, whole partition scan and whole disk scan for different recovery needs.
File types Support to recover pictures, videos, audios, documents, mails, etc.
3000 users have downloaded Renee Undeleter and found data back!
Step 1: Download and install Renee Undeleter. Open the software and select [Whole Disk Scan].
Note: Please do not install the software into the USB that is to be recovered in case that the data is overwritten.
Functions of different recovery modes:
• Fast partition scan – Recover the files after emptying Recycle Bin or deleted by mistake without data backup.
• Whole partition scan – Scan the whole partition and list all files, especially for the formatted partition or inaccessible issue.
• Whole disk scan – Scan entire disk to find out all partitions’ information and simulate the partition table.
• Image creation – Create a partition image which can be used in case that reading partition is slow or need a backup.
Step 2: Select the USB flash drive and click on [Next] to go on.
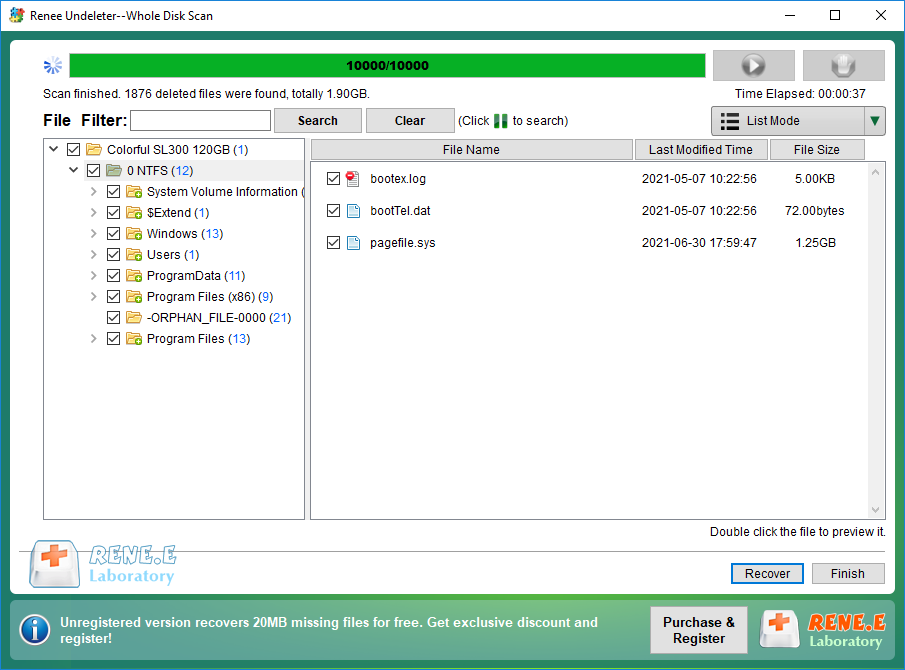
Step 3: Wait for scanning the USB.
After that, preview the files and check the targets. Click on [Recover] to recover the targets.
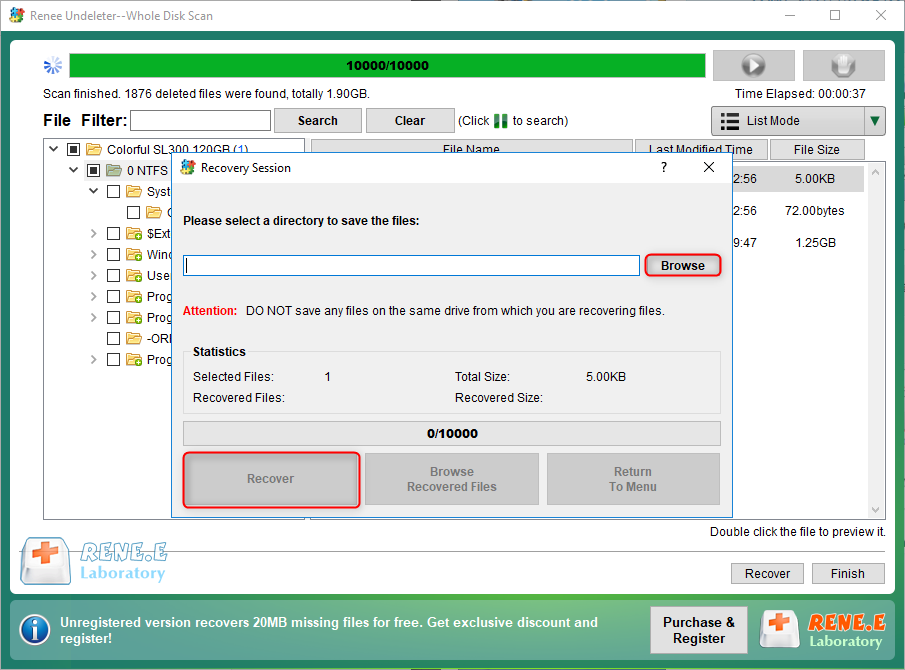
Step 4: Select a folder to save the files and finally click on [Recover] to output them.
Note: Please do not recover the files into the original USB in case that the data is overwritten.
2. Use Built-in Tool to Check & Fix Hard Drive
Next, we will show you how to use the built-in tool to fix bad sectors on hard drive. This tutorial is applicable to Windows 10/8/7.
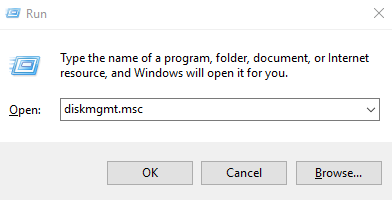
Step 1: Press the keys [Win + R]. Then, type [diskmgmt.msc] and press the Enter key to run.
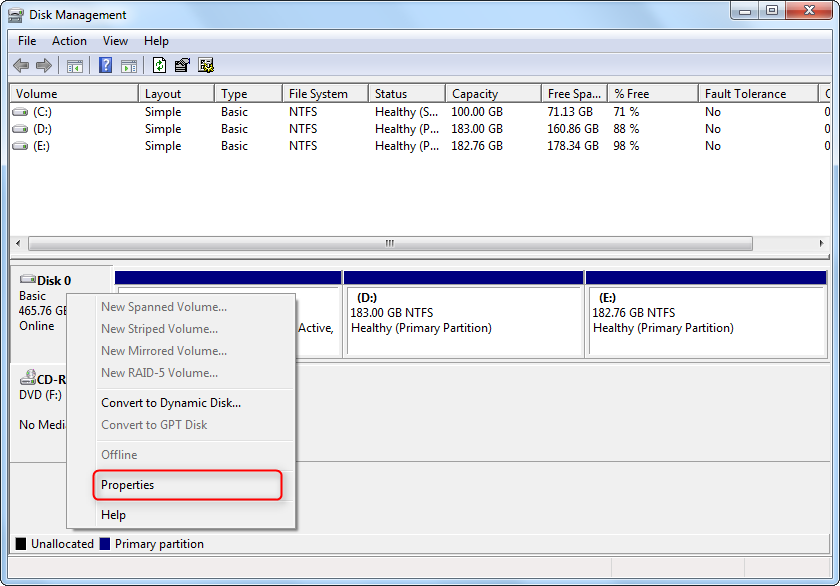
Step 2: Right click at the target hard drive and select [Properties].
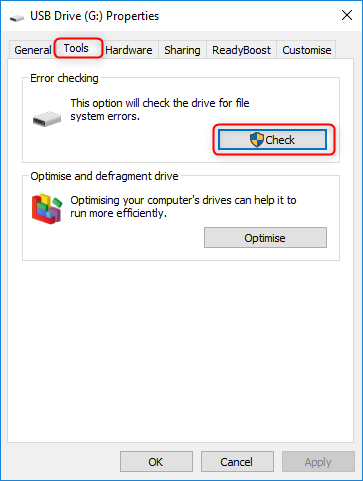
Step 3: Select the tab [Tools] and then click on [Check].
Step 4: For Windows 7 and Windows 8 users, check the options [Automatically fix file system errors] and [Scan for and attempt recovery of bad sectors]. Then, wait for the fix process.
Note: The bad sectors are marked as unavailable in the file system, and the data will not be written into these sectors. Some hard drive scanners, such as HDD-Scan, can scan out the bad sectors.
3. Execute Low-level Formatting for Hard Drive
Low-level formatting is a way to erase the whole hard drive and factory reset the drive to the original status. The available sectors will be divided into new partitions. When the hard drive is reallocated through low-level formatting, the operating system and the hard drive scanners (i.e. HDD-Scan) cannot get access with the sectors which are unable to store data stably any more.
TipsLow-level formatting has negative impact on the hard drive, shortening its life expectancy. Therefore, don’t execute low-level formatting for the hard drive frequently.
Next, we will show you how to execute low-level formatting with HDD LLF Low Level Format Tool. Before these steps, download and install this tool (link: http://www.drfreeware.org/ HDDLLF.4.40.exe).
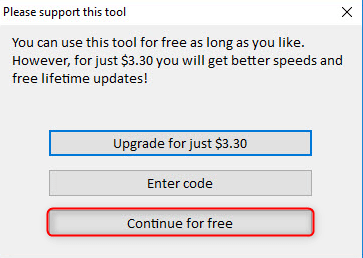
1. Download and install “HDD Level Format Tool 4.40”. Click [Continue for free] if it is only for your personal use.
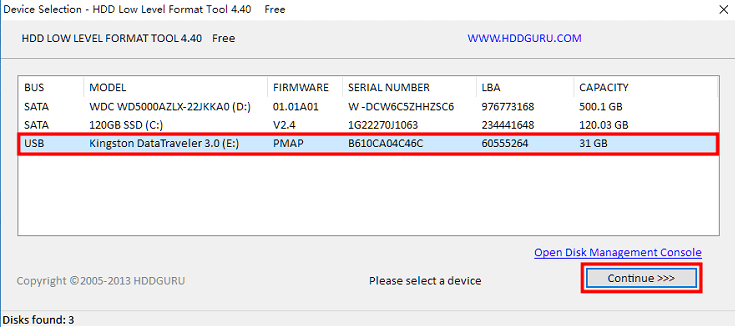
2. Select the target hard disk drive and click [Continue].
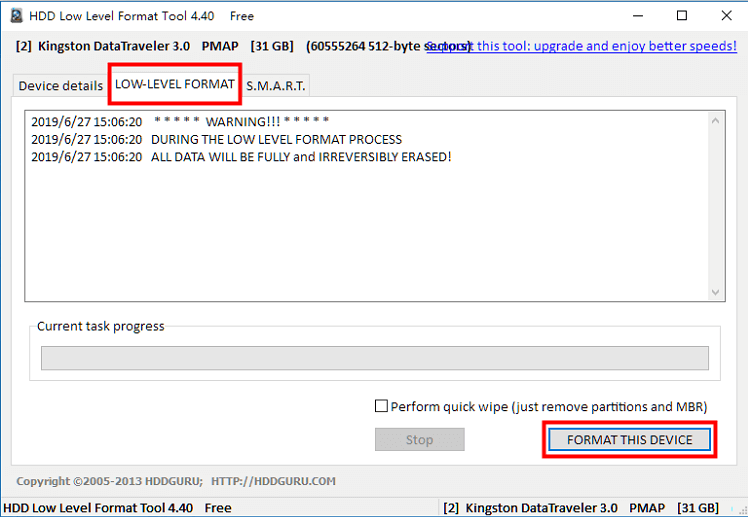
3. Then, select the tab [LOW-LEVEL FORMAT] and then click [FORMAT THIS DEVICE].
4. Soon, you will receive a warning that all data on the selected device will be lost. Click [Yes] to go on formatting.
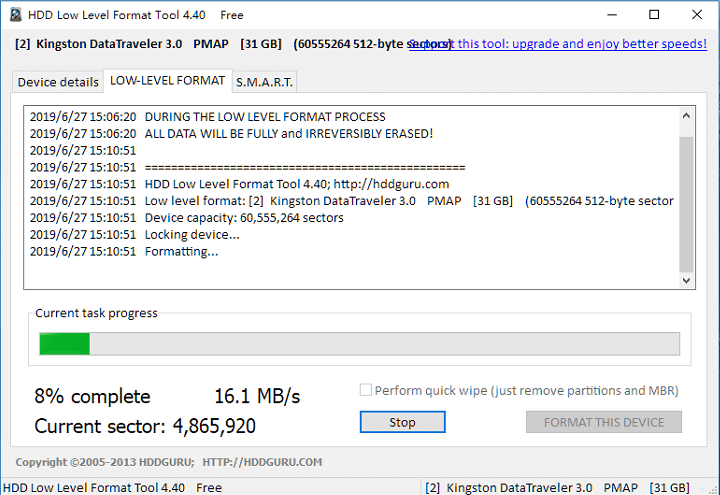
5. In the free version, the processing speed is capped at 180 GB per hour which is 50 MB/s.
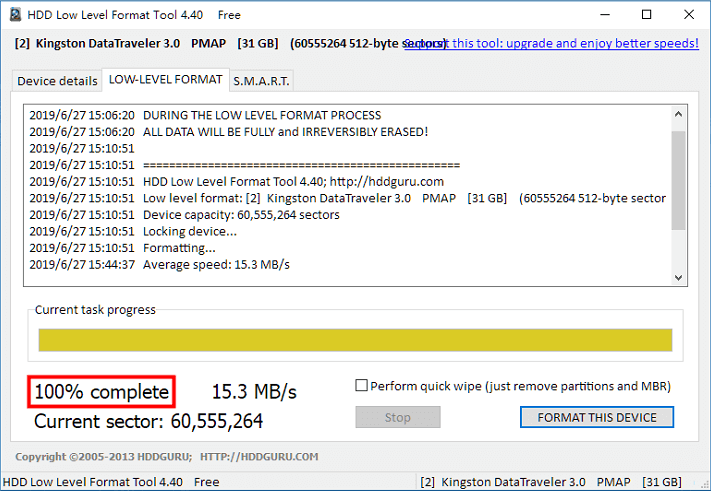
6. As you see 100%, low-level hard disk drive formatting will be successful.
4. Use Command Prompt
We will show you how to use Command Prompt to fix bad sectors on hard drive.
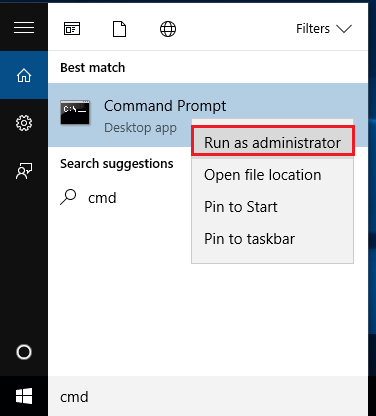
Step 1: Search [cmd] in the system. Select [Run as administrator] to open Command Prompt.
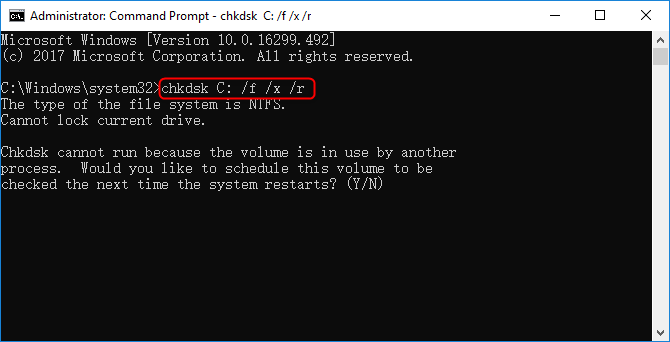
Step 2: Type the command [chkdsk F: /f /r /x]. “F” is the letter of the hard drive; “/f” is the parameter of fixing erros; “/x” means uninstalling the driver by force before scanning the hard drive and “/r” means searching the bard sectors and recover the readable information. Finally, press the Enter key to fix the errors on the hard drive.
TipsWe suggest that you should not use the fixed hard drive to store the important information in case that the data is lost again.