

Best Audio and Video Recording Software for YouTube

Summary
Discover the best YouTube video recording software in this comprehensive review. Learn about their user-friendly features and reap the benefits of high-quality video and audio recording.

YouTube is the world’s largest video sharing platform and has become the first choice for many people from the media. On this platform, users can upload, share and watch various video resources, including games, music, movies and so on. If you want to record videos/music on YouTube for your private enjoyment (non-commercial use), then you need a good video/music recording software. The following will introduce a variety of useful youtube video recording software, let’s learn together.
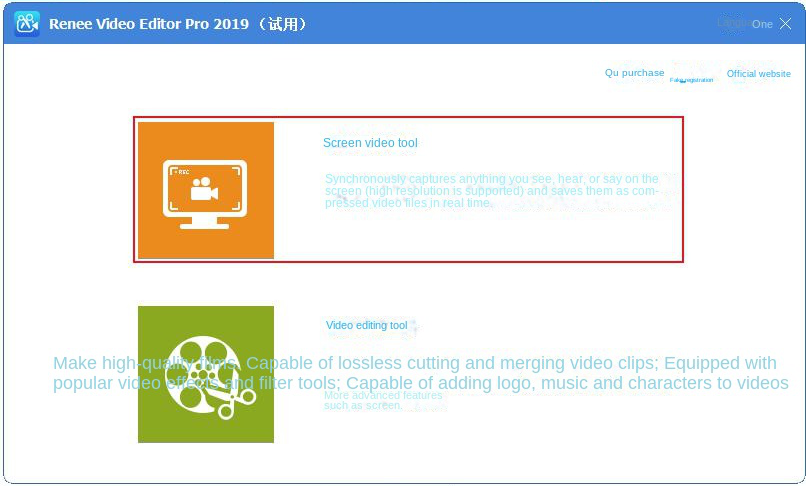
Renee Video Editor Pro It is a video recording and editing tool that integrates computer screen recording, video post-production and format conversion functions. Among them, the computer screen recording function can set the recording area and screen size, and can also set the watermark, cursor style, sound source and saved format, automatic recording plan, etc., whether it is online movies, conference video recordings, or game screens, software Operation steps, etc., it can help you record and save to the computer with one click.
In addition, this software can further improve and optimize the video content during video post-production, such as editing or merging video clips, cropping video screens, rotating or flipping videos, adding various types of opening/ending animations, and transition effects. Switch between different filter styles, dub videos, add music or remove original sound effects, import or create exclusive subtitles, and more. But the software currently only supports Windows system.

Convert formats Supports batch conversion of all formats, such as MP4, MP3, WAV, WMV, RMVB, etc.
Customize the settings Frequency, High Bit Rate, Block Video/Audio Channel, etc.
Easy to use Just 3 simple steps to complete the conversion quickly.
Multifunction Edit the video et record the screen.
Free to try Free (non commercial use only).
Convert formats Supports batch conversion of all formats, such as MP4, MP3, WAV, WMV, RMVB, etc.
Customize the settings Frequency, High Bit Rate, Block Video/Audio Channel, etc.
Easy to use Just 3 simple steps to complete the conversion quickly.
How to record video/music from YouTube with Renee Video Editor Pro ?
Step 1: After downloading and installing, run Renee Video Editor Pro, and click the (Screen Recording Tool) option on the main page.
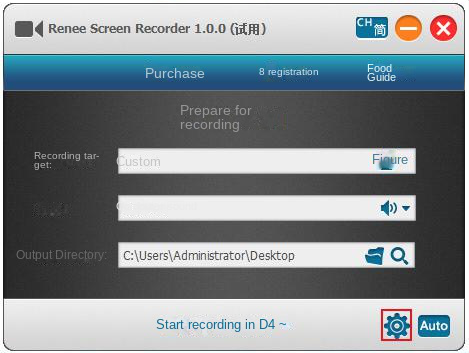
Step 2: Next, in the “Prepare to Record” interface, you can personalize the content to be recorded (recording target), (recording) and (output directory).

Description of interface settings for preparing to record:
Recording target: Supports full-screen recording, custom recording area and size, and recording images captured by the camera.
recording: It refers to the sound that needs to be included in the content recording process. It supports recording computer sound, microphone sound, and non-recording sound, etc.
Output directory: Choose where to store recordings
Step 3: In addition, click the (small gear) icon in the lower right corner, and you can also personalize the recording format, video quality, resolution, video frame rate, output directory, watermark and other parameters of the content to be recorded.
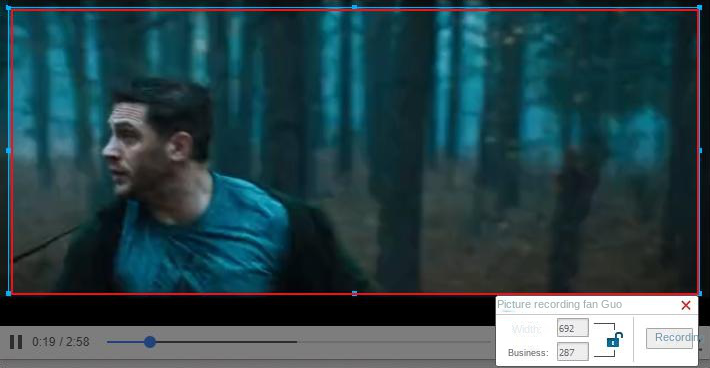
Step 4: After all the recording parameters are set, return to the “Ready to Record” interface, open the YouTube video you want to record, if the recording target is selected (Custom), then click the (Start Recording) button, you can set the desired Select the recording area to record, and then click the (Record) button in the lower right corner to start recording YouTube videos; if the recording target is selected (full screen), then click (Start Recording) to record a full-screen image, which is very convenient.
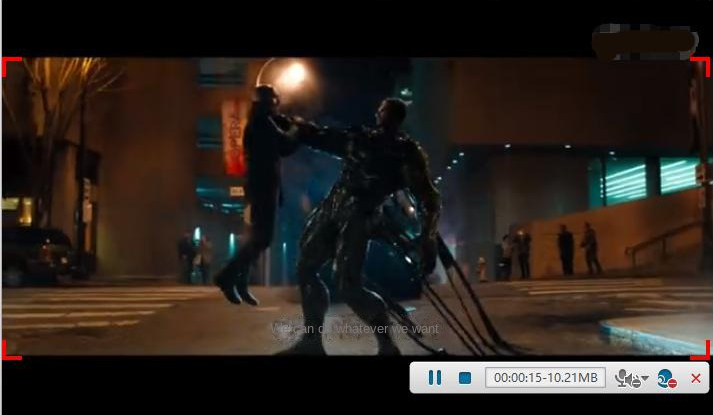
Step 5: During the recording process, you can pause or continue at any time. After recording, click the small square button in the recording option box in the lower right corner, and the recorded YouTube video will be saved to the preset path according to the parameters you initially set.
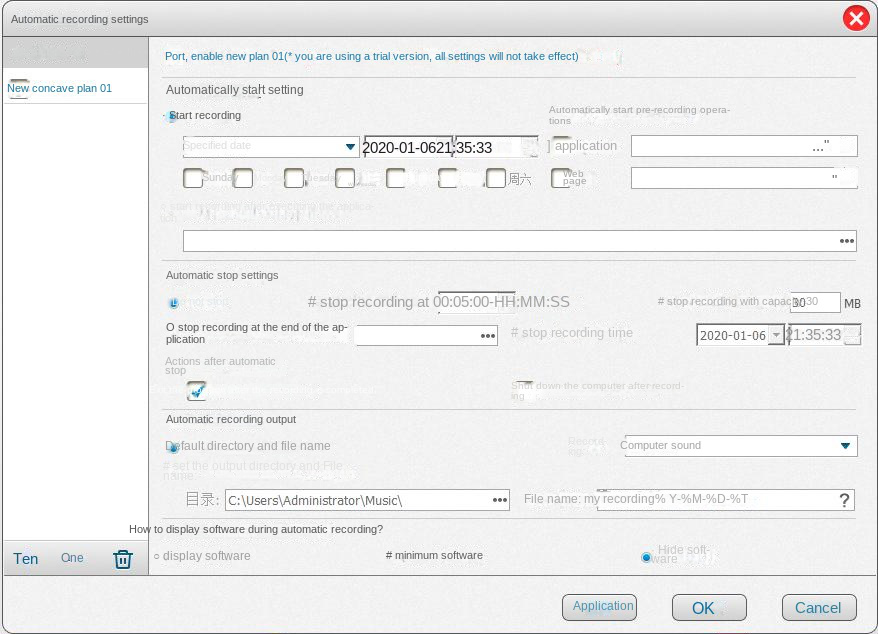
In addition, Renee Video Editor Pro also has the function of automatic recording, click the (Auto) button in the lower right corner of the (ready to record) interface, and then enter the setting page of the automatic recording function. Then, you can set the start and end time, output directory and file name of the content recording process. When the time to start recording arrives, the software will automatically start recording, which is convenient and worry-free.
Tip: How can I improve the content of my recorded video?
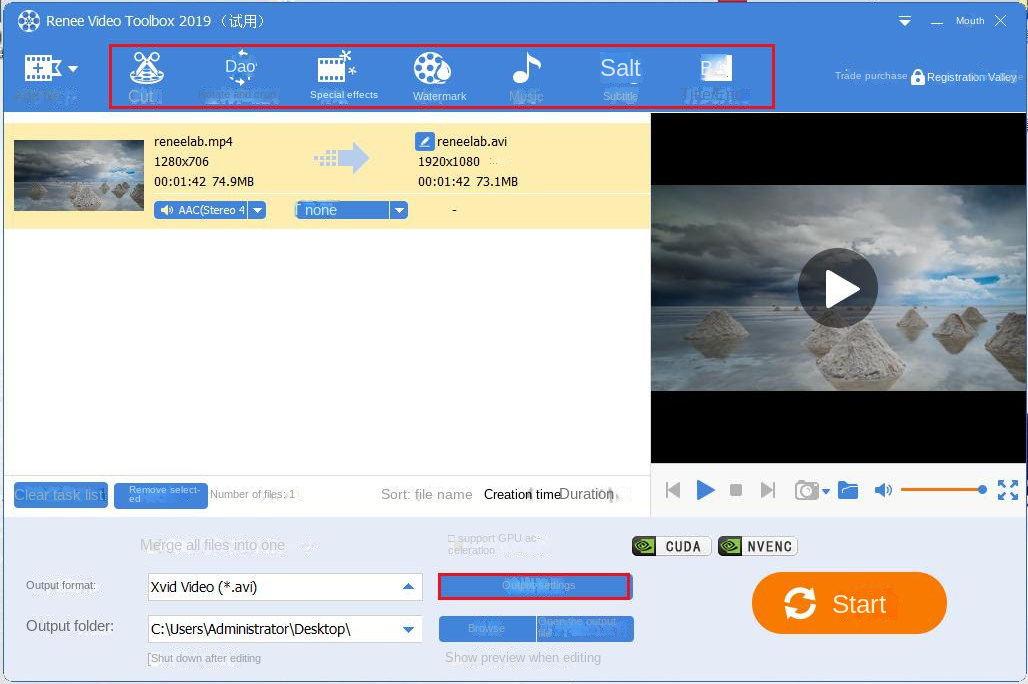
After the YouTube video content is recorded, you can return to the homepage of Renee Video Editor Pro, and use the (Video Editing Tool) function to perform a series of editing operations on the recorded video content, such as (cutting), (rotating and cropping), (Special Effects), (Watermark), (Music), (Subtitles), (Opening and Ending), etc., very convenient.
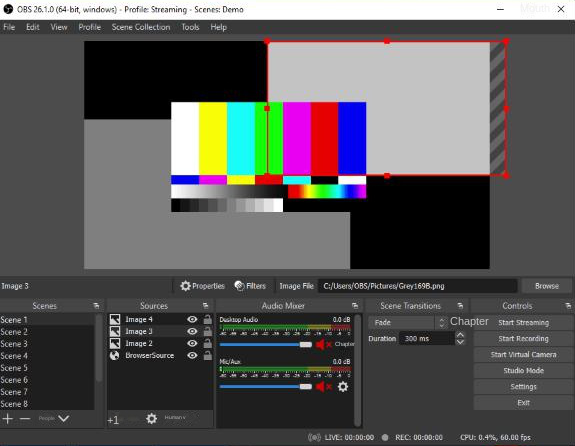
OBS Studio is a powerful free and open source video recording software that can record screen, camera and sound. Not only that, OBS Studio also supports multiple export formats and multi-platform use, so it is very popular in YouTube self-media creation. However, the operation of OBS Studio is relatively complicated and requires a certain learning cost.
OBS Studio Quick Start: Just follow these 4 steps to start streaming or recording!
(1) Run the automatic configuration wizard
If you are new to OBS, follow the steps in the automatic configuration wizard. This wizard will automatically test your system and try to find settings that your computer can handle. This includes streaming or recording, resolution, bitrate, encoder, streaming provider, etc. You can manually edit the settings at any time later.
Note: This wizard will be displayed the first time you run OBS. If you need to run it again, click Tools -> Auto Configuration Wizard.
(2) Set up your audio device
By default, OBS Studio is set to capture your desktop audio and microphone. You can verify this by looking at the volume meter in the mixer section of the main OBS Studio window. If they don’t move, or you suspect the wrong device is capturing, click Settings -> Audio and select the device manually.
NOTE: If you are using macOS, an additional application is required to capture desktop audio. This is due to a limitation of macOS that does not provide a direct capture method for desktop audio devices.
(3) Add your video source
Next, you’ll see that the preview is a black screen. By default, OBS does not capture any video. To start capturing, you need to add a source.
At the bottom of the window is a box called “Sources.” Click + (or right-click in the Source box) and select the desired source. For example:
- Select Display Capture to record everything visible on the monitor.
- If you are capturing a game, select Game Capture (Windows only).
- Choose Window Capture for non-gaming applications.
- Or select Video Capture Device for a webcam or capture card.
(4) Test your live and recording settings
Double check that all your settings in Settings -> Output are what you want. Then, just tap Start Recording or Start Streaming.
Camtasia is a professional-level video recording software that supports multiple functions such as screen recording, video editing, and special effects addition. Compared with other software, Camtasia has richer video post-processing functions. But the disadvantages are also obvious. The price is relatively expensive, which may be a heavy burden for some self-media creators who are just starting out.

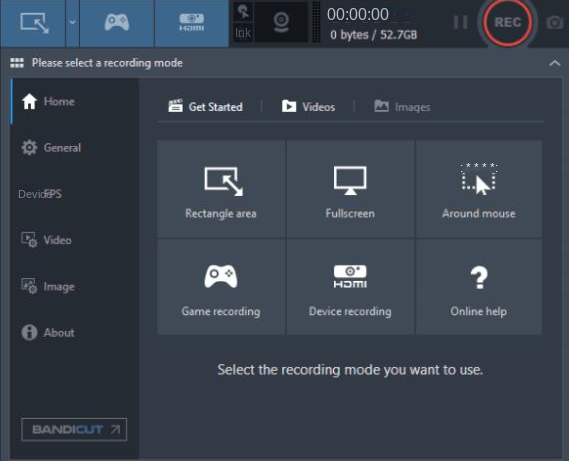
Online recording software mainly refers to video recording tools that can be used directly online without installation, such as Screencast-O-Matic, Apowersoft, Loom, etc. This kind of software is easy to operate, does not need to be installed, and often supports multi-platform use, but the recording quality is not as good as that of local software.
Generally speaking, there are many YouTube video recording software on the market, including local software, online software, etc., and each software has its applicable scenarios and advantages and disadvantages. When choosing, you need to make a choice according to your own needs and actual conditions in order to achieve the best results.
Relate Links :
Download Videos from 6play Telefilm - Simplified Guide

07-02-2024
Amanda J. Brook : Learn how to download videos from 6play for free in this article. 6play is a popular video site...
Download Canal Plus Videos: A Complete Guide

20-10-2023
John Weaver : Learn how to download videos from Canal+ for free and watch them offline. Discover the method in this...
Create Stunning Time-Lapse Videos Effortlessly

21-07-2023
Ashley S. Miller : Learn the art of time-lapse video creation with our step-by-step guide. Discover how to capture more content in...
Record Videos on PC Screen: The Ultimate Guide
23-04-2024
John Weaver : How to record video on pc? Master the art of screen recording for gameplay, software tutorials, and video...

