author avatar
    Specialist of Customer Service Dept.
 

Summary
Learn reasons for error code 0xE0000100 during Windows installation, updates, or driver installation. Discover common repair methods and data recovery options if data is lost.


error code 0xe0000100

I. What are the common causes of error code 0xE0000100?

When installing Windows and Windows updates or some drivers, an error message appears. The error code is 0xE0000100. The common reasons for this may be as follows:
● The installation file is damaged.
● If the USB port is faulty, you can try to solve it by connecting the installation medium to another USB port.
● The hard disk is faulty.
● The computer specifications do not meet the minimum requirements for installing Windows.
● A firewall blocks updates.
error code 0xE0000100
Before starting to troubleshoot the 0xE0000100 error code, review the minimum requirements for Windows 10 installation to rule out whether the computer does not meet the specifications.
● Processor: 1GHz or faster processor
● RAM: 1GB RAM for 32-bit operating system, 2GB RAM for 64-bit operating system
● Storage space: at least 16GB for 32-bit operating system, at least 20GB for 64-bit operating system
● Display: 800 x 600
● Graphics card: DirectX 9 or higher with WDDM 1.0 driver
If your computer specifications meet the requirements for installing Windows 10, you can continue to view the following repair methods.

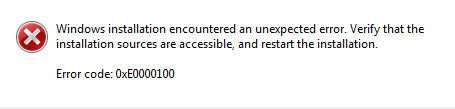
II. How to fix error code 0xE0000100?

1. Run the diskpart command to clean up the disk

When you fail to install Windows, you can consider running the diskpart command to clean up the disk, that is, to clear all the data in the disk where Windows will be installed, and then try to reinstall. Sometimes the problem of error code 0xE0000100 can be solved smoothly, but due to All data will be erased, so it is recommended to make a file backup in advance.
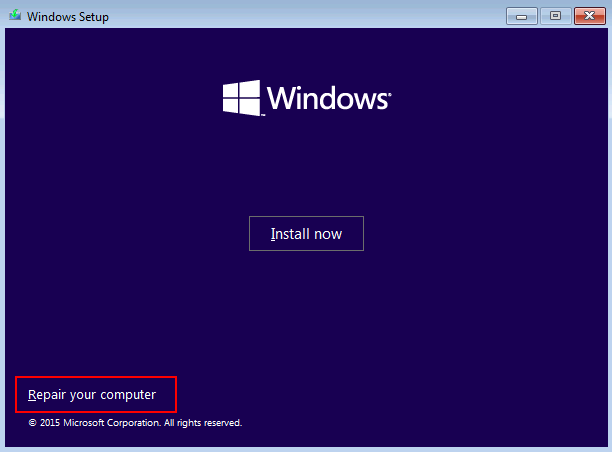
Step 1: Enter the BIOS and set the boot preferences to make the computer boot from the Windows installation media. After entering the Windows installer, click Repair Your Computer. Click here to see how to create installation media.
Repair your computer
Step 2: Click Troubleshooting > Advanced Options > Command Prompt.
command prompt
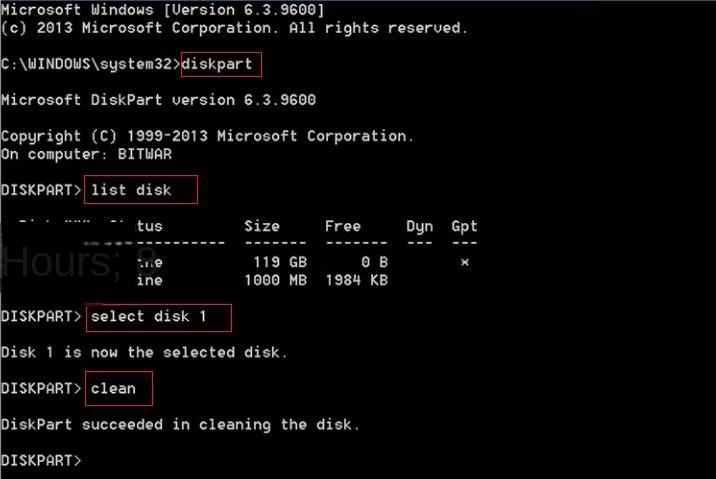
Step 3: Next, enter the following commands in sequence in the command prompt window, and press the (Enter) key after each command is entered. After waiting for the command to finish running, try installing Windows again.
● diskpart
● list disk (will list the disks in the computer)
● select disk 1 (1 is the number of the target disk, which can be judged according to the capacity)
● clean (will delete partitions and volumes on the disk, clearing all information)
● exit
diskpart clean command

2. Run the Chkdsk command to check and repair hard disk errors

When an error occurs on the hard disk, Windows updates or drivers cannot be installed normally. You can try to use the Chkdsk command to check and repair hard disk errors. Follow these steps:
Step 1: Search cmd in the search box in the lower left corner of the desktop, and select Run as administrator to open the command prompt tool.
run as administrator
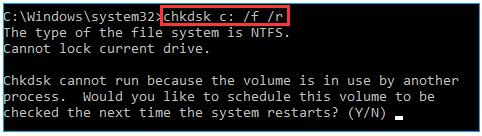
Step 2: In the command prompt window that opens, enter the command chkdsk C: /f /r and press the key Enter. If Chkdsk prompts that it cannot run because the disk partition is in use, please enter Y if you want to run the check plan next time the system restarts.
Note: C: refers to the drive letter where Windows or drivers are to be installed, and you can change the drive letter according to the actual installation location; /f is to repair errors found on the disk, and the disk must be locked; /r is to find bad sectors and recover them. read information.
chkdsk command

3. Run the Windows Update Troubleshooter

We can also try to run the Windows update troubleshooter to solve this problem, the following are the detailed steps:
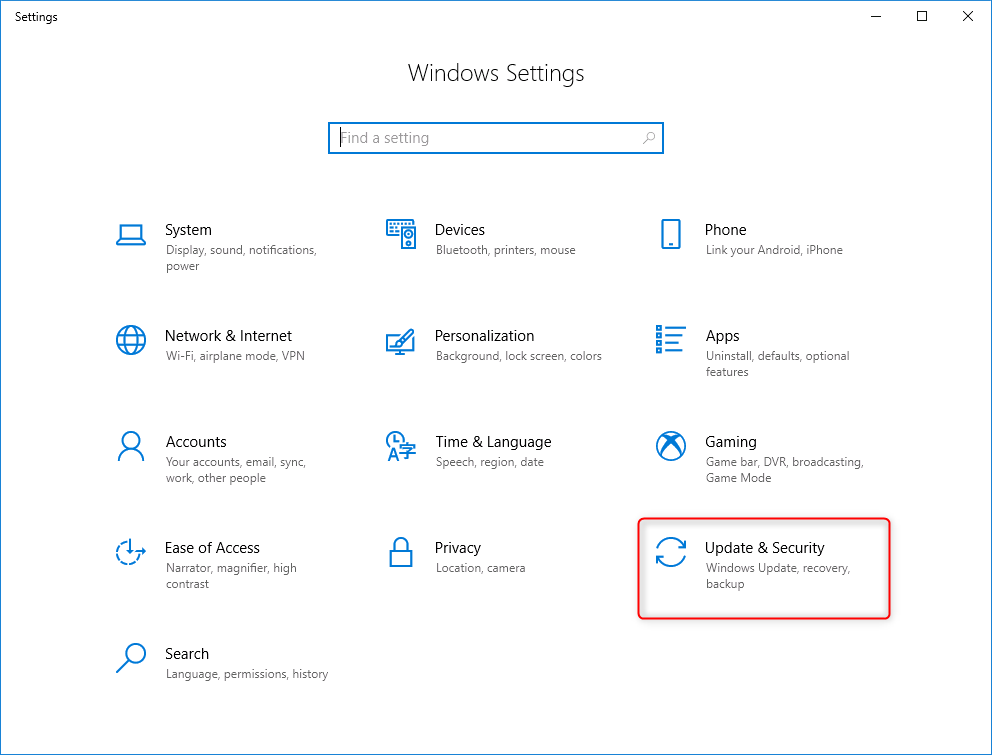
Step 1: Run the computer, press the key Windows and I on the keyboard at the same time to open the setting interface. Then click into the option Update & Security.
windows updates and security
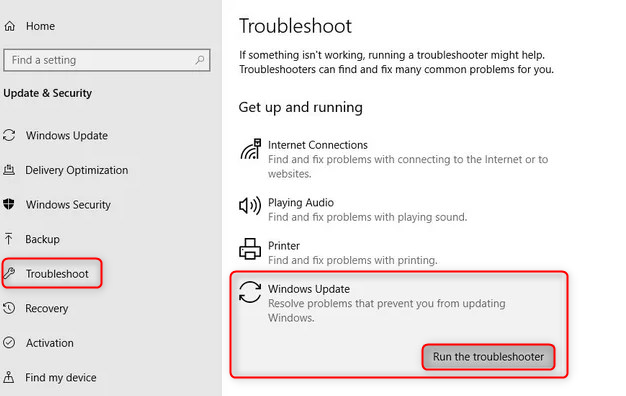
Step 2: Find Troubleshoot in the function bar on the left, then select the option Windows Update on the right, and click the button Run the troubleshooter. Wait a few moments after troubleshooting is complete to see if the problem is resolved. Some system versions may not be able to run the Windows Update Troubleshooter directly on the right. In this case, you can click Other Troubleshooters and then run the Windows Update Troubleshooter.
run windows update troubleshooter

4. Turn off the firewall

The firewall sometimes blocks updates, you can try to close it before installing Windows updates or drivers, etc. The specific operation steps are as follows:
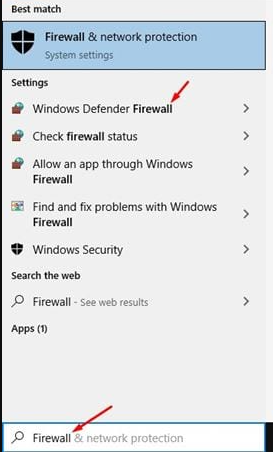
Step 1: Turn on the computer, search for firewall in the search box in the lower left corner, and click to open Firewall and network protection.
firewall and network protection
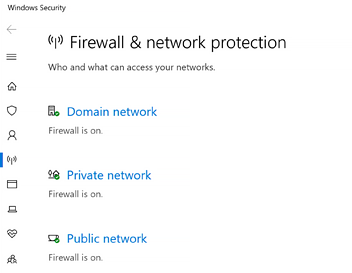
Step 2: Click Domain Network, Private Network and Public Network in sequence, and turn off the switch in the newly jumped interface.
Step 3: After closing the firewall, you can perform Windows update or driver installation again, and then return to this interface to open the firewall after the operation is completed.
firewall and network protection

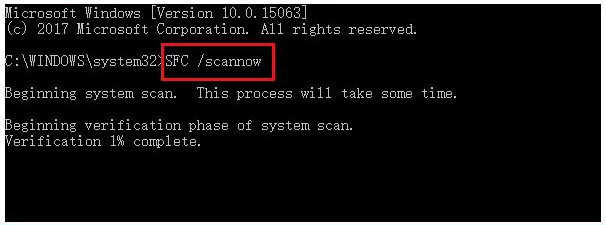
5. Run System File Checker (SFC)

System File Checker, commonly referred to as SFC, is a built-in utility developed by Microsoft that scans, detects, and repairs faulty or corrupted files that block Windows installation. The specific operation steps are as follows:
Step 1: Run the Windows device, search cmd in the search box in the lower left corner, and select Run as administrator to open the command prompt tool.
run as administrator
Step 2: In the opened command prompt window, enter the command SFC /scannow and press Enter. After the command is executed, perform the previous installation operation again to check whether the problem has been fixed.
Enter the SFC scan command
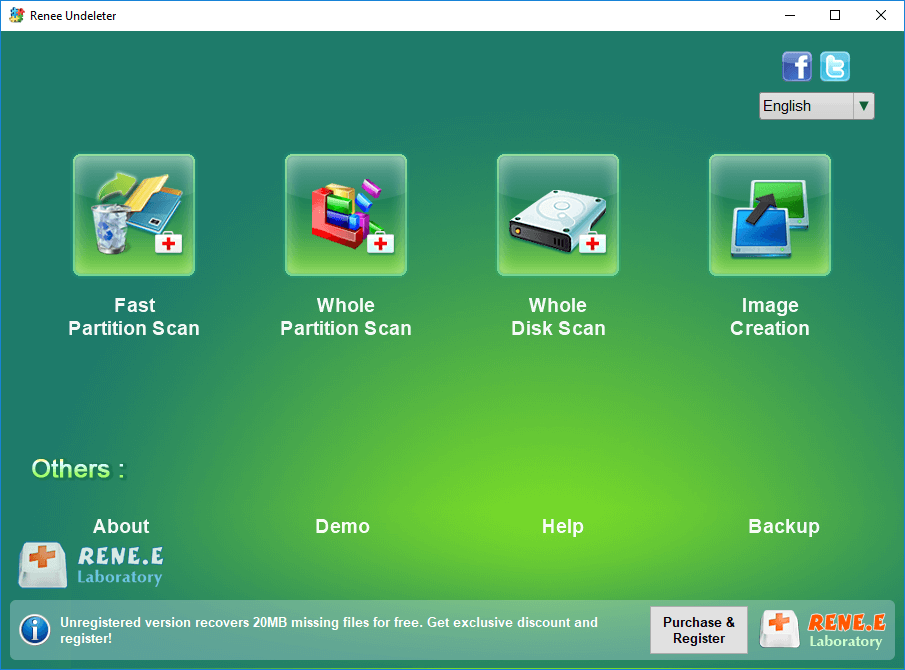
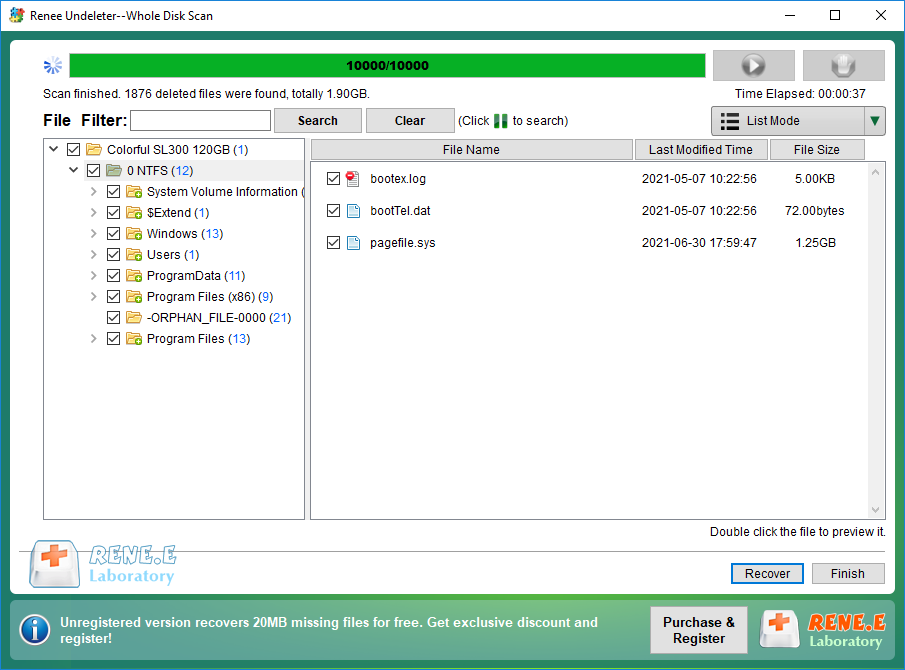
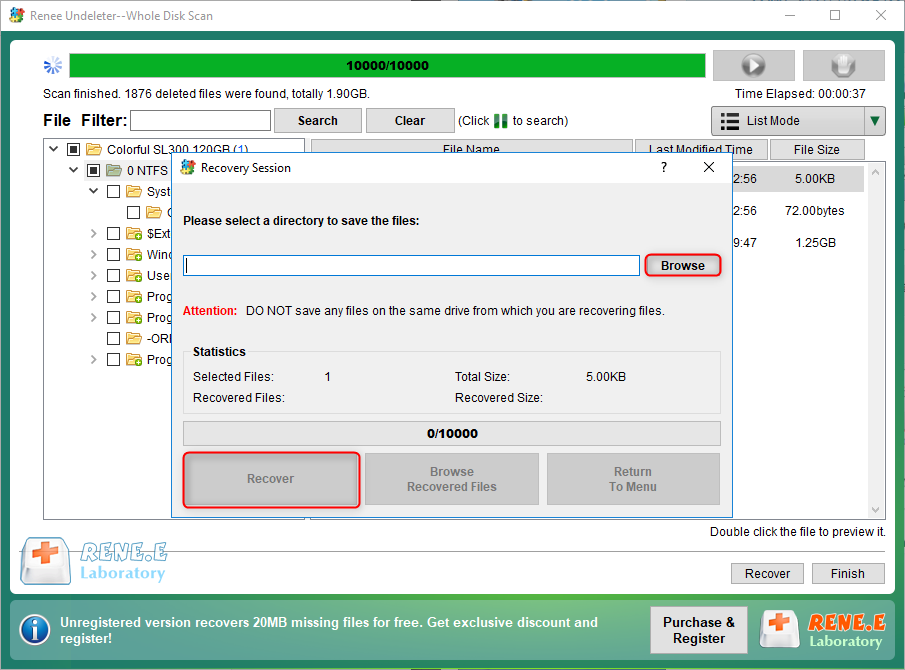
The above are the five commonly used solutions to fix the error code 0xE0000100. If you find that the data is lost after the error is fixed, you can also use professional data recovery software to retrieve the lost data. We recommend you to use Renee Undeleter to operate. Here’s how to do it in detail.

III. Recover lost files with Renee Undeleter

1. What is Renee Undeleter?

Renee Undeleter is a software specially designed to restore various data files. When you accidentally delete important files, empty the recycle bin, or format the disk/storage, you can use this tool to find the lost data back. This software covers four functional modules, including file recovery, format recovery, partition recovery and image creation, so it can help you solve many data loss problems that may occur during system use in an all-round way, which is very convenient.
Renee Undeleter - User friendly & Helpful Formatted Data Recovery Software

Easy to use 3 steps to recover formatted data back.

Multi Recovery Modes File recovery, Whole partition recovery and Whole disk recover are available.

Support Different File Types Photos, videos, audios, files, emails, etc.

Image Creation Creat image for disk or parititon.

Compatible with Different Devices SD card, SDHC, SDXC, USB disk, computer, etc.

Easy to go 3 steps for whole recovery.

Multi Recovery Modes Files/partition/disk recovery modes.

Support Different Devices SD card/USB disk/hard disk, etc.

Free TrialFree TrialFree Trial 800 users have downloaded and found data back!

2. How to recover lost files with Renee Undeleter?

Step 1: Download, install and run Renee Undeleter, select the option Whole Disk Scan in the main interface. This option will scan the entire hard disk, so do not install the software to any partition of the hard disk that needs to be scanned. In the hard disk that does not need to be scanned, otherwise it will not be able to use Whole Disk Scan to scan. If the lost data is not much and the lost time is not long, you can also use Fast Partition Scan and Whole Partition Scan modes to save scanning time.
select whole disk scan in renee undeleter
Data recovery function introduction:

Fast Partition Scan: Quickly retrieve files lost due to accidental deletion or emptying the recycle bin.

Whole Partition Scan: Quickly recover files lost due to inaccessible or formatted partitions.

Whole Disk Scan: It can analyze and obtain partition information, and fully scan the entire partition.

Image Creation: You can create a mirror image for a partition to back up the current partition state.

Step 2: Next, select the disk device to be scanned and then click Next. Select default setting on the advanced setting interface.
select a disk to recover in renee undeleter
Step 3: After that, the software will analyze the disk device. After scanning, you can double-click the file in the preview window on the right to preview it, then select the file you want to restore, and click the Recover button in the lower right corner to restore the selected file.
select taget files to recover with renee undeleter
Step 4: Next, select the target folder, click Browse to select another disk to save the recovered files, and then click the Recover button to start the file recovery command, you just need to wait patiently.
recover files from whole disk scan with renee undeleter