author avatar
    Specialist of Customer Service Dept.
 

Summary
Learn how to reset your Windows 10 Hello PIN with this comprehensive guide. From different methods to troubleshooting tips, we've got you covered. Keep your account secure with these best practices for PIN management.


Windows 10 is one of the most widely used operating systems in the world, providing numerous features and updates to its users. One of these features is the ability to create a Windows Hello PIN, which is a convenient and secure way to log in to your device. But what exactly is a Windows Hello PIN and how is it different from a traditional password? In this chapter, we will delve into the key differences between a PIN and a password, and why you might consider using a PIN as your primary method of authentication on Windows 10. Let’s explore the world of Windows Hello PIN and its advantages.

What is a Windows Hello PIN? : Key differences between PIN and password

The Windows Hello PIN is a security feature unique to Windows 10 that allows users to log in to their devices using a PIN instead of a traditional password. It is a convenient and secure method of authentication that offers several key differences compared to using a password.
What is a Windows Hello PIN?
The Windows Hello PIN is a personal identification number that is used to verify a user’s identity and grant access to their Windows 10 device. It is a 4-6 digit code that is set up by the user and is unique to their device. This PIN can be used to sign in to a device instead of using a password, making the login process quicker and more convenient.
Key Differences between PIN and Password
While both the PIN and password serve the same purpose of verifying a user’s identity, there are several key differences between the two. The first and most obvious difference is the use of numbers instead of characters. This makes the PIN easier to remember and enter, making it a more convenient option for users.
The second difference is the length of the PIN. As mentioned before, the PIN is a 4-6 digit code, while passwords usually consist of 8 or more characters. This makes the PIN more secure as it is less susceptible to brute force attacks.
Additionally, the PIN is tied to a specific device, while a password can be used to log in to multiple devices. This means that if someone gains access to your password, they will not be able to use it to log in to your device without the specific PIN.
Setting up and Resetting the Windows Hello PIN
Setting up a Windows Hello PIN is a quick and simple process. Users can go to the Windows 10 Settings and navigate to the Accounts section. From there, they can select the Sign-in options and choose to set up a PIN. They will be prompted to enter their current password and then enter and confirm their desired PIN.
In case users forget their PIN or want to change it for security purposes, they can easily reset it by going to the Windows 10 Settings, selecting Accounts, and then Sign-in options. From there, they can click on I forgot my PIN and follow the instructions to reset their PIN.
In conclusion, the Windows Hello PIN is a convenient and secure method of authentication that offers key differences compared to using a password. It is a great option for users who want to streamline their login process and ensure the security of their Windows 10 device.

Methods for Resetting Windows 10 Hello PIN

Method 1: Using the Settings app : Step-by-step instructions for resetting PIN through Settings

In Understanding the Windows Hello PIN, we discussed the importance of the Windows Hello PIN for security and ease of access to your Windows 10 device. However, there may be times when you need to reset your PIN due to forgetting it or security concerns. Fortunately, Windows 10 provides multiple methods for resetting your PIN, and in this chapter, we will explore Method 1: Using the Settings app.
Step 1: To begin, open the Settings app by clicking on the Start Menu and selecting the gear icon.
Step 2: In the Settings app, click on the Accounts option.
Step 3: Next, click on the Sign-in options tab in the left menu.
Step 4: Under the Sign-in options section, locate the Windows Hello PIN option and click on the I forgot my PIN link.
Step 5: You will then be prompted to verify your identity through your Microsoft account, fingerprint, or face recognition, depending on your settings. Follow the prompts to complete the verification process.
Step 6: Once your identity is verified, you will be given the option to set a new PIN. Enter your desired PIN and confirm it.
Step 7: You will then receive a confirmation that your PIN has been reset.
It is important to note that if you have set up a PIN for your Microsoft account, it will be reset as well. You will need to use your new PIN to log into your Microsoft account on other devices.
If you do not have any other method of sign-in verification set up, such as a fingerprint or face recognition, it is recommended to create a password reset disk in case you forget your PIN again in the future.
In conclusion, resetting your Windows 10 Hello PIN through the Settings app is a simple and straightforward process. However, it is important to remember your new PIN and make sure to have other sign-in options set up for added security and ease of access. Thank you for reading and stay tuned for our next chapter on Method 2: Using Command Prompt to reset your PIN.

Method 2: Resetting PIN from the lock screen : Step-by-step guide to resetting PIN from the lock screen

If you are unable to access your Windows 10 device because you have forgotten your PIN for Windows Hello, don’t worry, there is a simple solution. You can easily reset the PIN from the lock screen of your device. This method is quick and convenient, and only requires a few easy steps.
To begin, locate the “Sign-in options” on your lock screen. This can usually be found beneath the password entry field. Click on this option to open the sign-in settings.
Next, select “I forgot my PIN” from the available options. This will prompt you to enter your password in order to confirm your identity.
After entering your password, you will be prompted to create a new PIN. When creating a new PIN, it is important to remember that it must be different from your previous PIN and cannot be a sequence of numbers (i.e. 1234). This is to ensure the security of your device.
Once you have entered and confirmed your new PIN, click on “OK” to save the changes. You will then be returned to the lock screen.
Now, you can use your new PIN to log in to your Windows 10 device. Your previous PIN will no longer be recognized and you will have to use the new one to access your device.
If you encounter any issues while resetting your PIN, you can try restarting your device and following the steps again. You can also try using a different method, such as resetting your PIN through the Settings app, which was discussed in the previous chapter.
It is important to keep your PIN safe and to not share it with anyone. If you feel that your PIN has been compromised, you can always reset it using one of the methods discussed in this article. This will ensure the security of your device and your personal information.
By following these simple steps, you can easily reset your Windows 10 Hello PIN from the lock screen. This method is efficient and can save you time and hassle if you are unable to remember your PIN. It is always a good idea to regularly change your PIN for added security. With this method, you can easily do so whenever needed.

Method 3: Using Azure Active Directory (Azure AD) for domain accounts

Enabling PIN Recovery Feature for Domain Accounts
To enhance the security and convenience of resetting your Windows 10 Hello PIN for domain accounts, you can utilize the Azure Active Directory (Azure AD) service. This method allows you to reset your PIN without the need for re-enrollment and provides a seamless experience. Here, we will guide you through the process of enabling the PIN recovery feature using Azure AD.
Step 1: Registering the Required Applications
Before you can take advantage of non-destructive PIN reset with Azure AD, you need to register two applications in your Azure Active Directory tenant: Microsoft Pin Reset Service Production and Microsoft Pin Reset Client Production. These applications enable the secure reset process and ensure your PIN is protected. Follow the steps below to register these applications:
1. Go to the Microsoft PIN Reset Service Production website and sign in using a Global Administrator account that you use to manage your Azure Active Directory tenant.
2. Review the permissions requested by the Microsoft Pin Reset Service Production application and select “
Accept” to give consent for the application to access your organization.
3. Next, go to the Microsoft PIN Reset Client Production website and sign in using a Global Administrator account that you use to manage your Azure Active Directory tenant.
4. Review the permissions requested by the Microsoft Pin Reset Client Production application and select “
Next“.
Step 2: Configuring Windows Devices
To securely use the Microsoft PIN reset service and enable PIN recovery for your Windows 10 devices, you need to configure the necessary policies on your devices. This can be done through Group Policy, Microsoft Intune, or a compatible MDM solution. You may also need to establish network connectivity to your domain controllers, Active Directory Federation Services (ADFS), and issuing certificate authority for on-premises deployments. By ensuring the correct configuration, you can seamlessly reset your PIN without any disruptions.
Step 3: Resetting Windows 10 Hello PIN
Once you have enabled the PIN recovery feature and configured your devices, you can easily reset your Windows 10 Hello PIN using Azure AD. Here’s how:
1. On your Windows 10 device, go to the “Settings” app.
2. Navigate to the “Accounts” section and select “Sign-in options“.
3. Under the “Windows Hello PIN” section, click on the “I forgot my PIN” link.
4. You will be presented with authentication options based on the different methods enabled in your tenant, such as Password, PIN, or Security key. Select an authentication option and follow the instructions provided.
5. Once authenticated, your encrypted PIN reset protector will be sent to the Microsoft PIN reset service for decryption.
6. The decrypted PIN reset protector will be returned to your device, allowing you to change your current PIN used for authorizing Windows Hello for Business keys.
7. After successfully changing your PIN, the decrypted PIN reset protector will be cleared from memory for enhanced security.
With this method, you can conveniently reset your Windows 10 Hello PIN for domain accounts without losing any of your Windows Hello for Business containers and keys. The integration with Azure AD ensures a seamless and secure experience, making it easier for you to regain access to your device.

Method 4: 《When No account available》 Using Renee PassNow to reset login password

In the previous chapter, we discussed how to reset Windows 10 Hello PIN using Azure Active Directory (Azure AD) for domain accounts. However, if you do not have an account available and need to reset your login password, then this method is for you.
Renee PassNow is a professional Windows password reset tool that can help you reset your login password in just a few simple steps. Here’s how:
Tips:If your account is Microsoft Account, Renee PassNow will convert this account to Local account. After resetting login password, you need to connect your account to your Microsoft Account again.
To reset your Windows password using Renee PassNow, follow these steps:
Step 1: Download and Install Renee PassNow
Start by downloading Renee PassNow from the official website and install it on a different computer that you can access. You can choose the appropriate version based on your computer’s operating system.
Renee PassNow – Professional Windows System Rescue Tool

Remove Windows Login Password 3 steps for whole password remove process.

Recover the files Recover the deleted files without Windows system.

Transfer the data Transfer the important files of the computer with system.

Fix Windows startup error Fix various Windows startup failures or crashes.

Erase disk Completely erase disk files which will not be restored.

Remove Windows Login Password 3 steps for whole password remove process.

Recover the files Recover the deleted files without Windows system.

Transfer the data Transfer the important files of the computer with system.

Free TrialFree TrialNow 2000 people have downloaded!
Step 2: Create a Bootable USB or CD/DVD
Launch Renee PassNow and insert a USB flash drive or blank CD/DVD into the computer. Select the option to create a bootable media. Follow the on-screen instructions to complete the process.
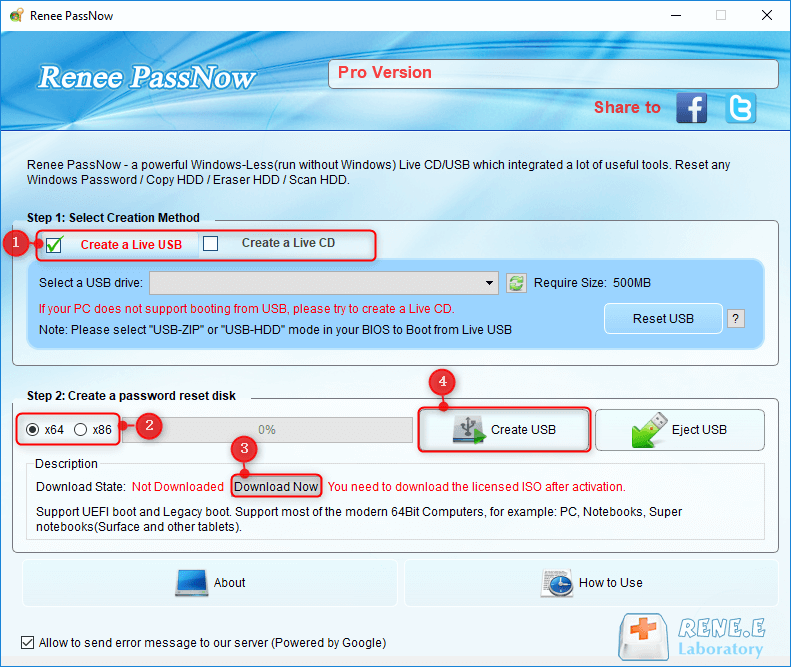
Create New Windows 10 Password Reset Disk with Renee PassNow
Step 3: Boot the Locked Server from the Bootable Media
Insert the bootable USB or CD/DVD into the locked Windows computer. Restart the computer and enter the BIOS settings by pressing the appropriate key (usually F2 or Delete). Configure the boot order to prioritize the bootable media.
Common Server:
Server TypeEnter boot menu method
DELLPress the F12 key repeatedly before the Dell logo appears on the screen.
HPPress the F9 key multiple times when the HP logo is displayed.
Common Computers:
BIOS NameEnter boot menu method
ASRockDEL or F2
ASUSDEL or F2 for PCs/ DEL or F2 for Motherboards
AcerDEL or F2
DellF12 or F2
ECSDEL
Gigabyte / AorusDEL or F2
Lenovo (Consumer Laptops)F2 or Fn + F2
Lenovo (Desktops)F1
Lenovo (ThinkPads)Enter then F1
MSIDEL
Microsoft Surface TabletsPress and hold Power and Volume Up buttons
Origin PCF2
SamsungF2
ToshibaF2
ZotacDEL
HPEsc/ F9 for \`Boot Menu\`/ Esc/ F10/ Storage tab/ Boot Order/ Legacy Boot Sources
INTELF10
Boot the target PC with the created password reset USB/CD/DVD.
Step 4: Select password reset function
After successfully booting from the bootable media, Renee PassNow will load. Select “PassNow!” function after booting from the new created Windows password reset disk.
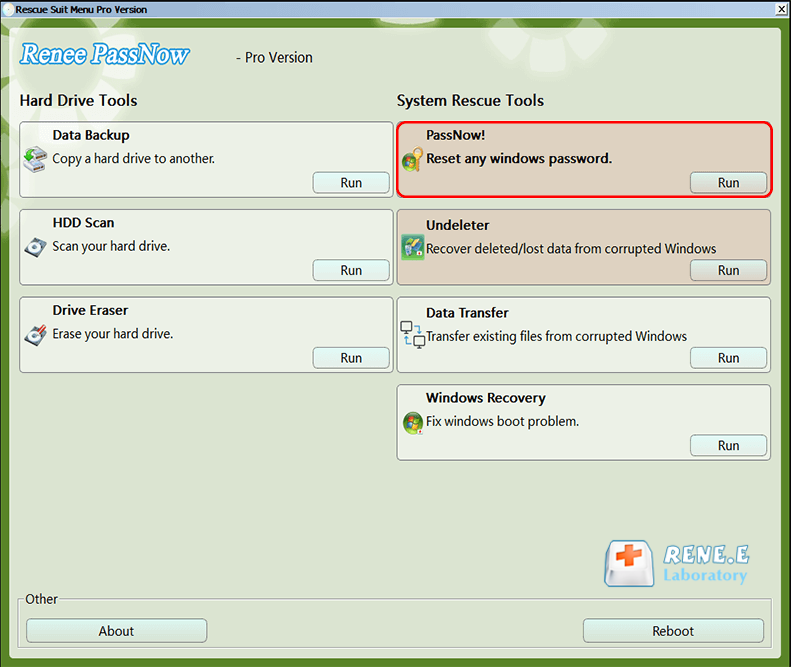
After loading into main interface, please select the “PassNow!” function.
Step 5: Resetting the Password
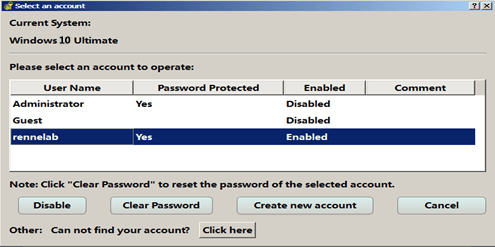
Choose the user account for which you want to reset the password. Then, click on the “Clear Password” button. Renee PassNow will remove or reset the password for the selected user account.
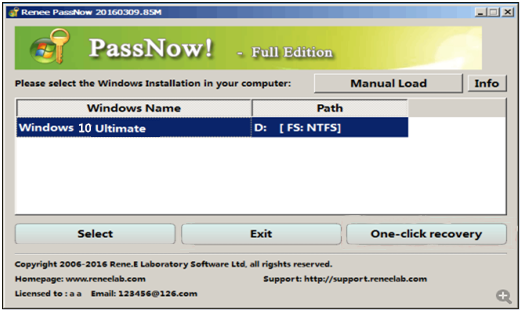
Select target Windows system in the list
Select target user account in the list
Step 6: Reboot the PC
Once the password is reset, remove the bootable media from the PC and restart the computer. You will now be able to log in to Windows Account without a password.
Step 7: You should now be able to log in to your Windows 10 account with your new password. Once logged in, you can reset your Windows 10 Hello PIN using the regular methods.
Remember to keep your login password and Windows 10 Hello PIN safe and secure to avoid any future complications. But if you do happen to forget your password, now you know four different methods to reset it and regain access to your computer.
Tips:Make sure to download the appropriate version of Renee PassNow based on your computer’s operating system.

Troubleshooting Tips for Windows 10 Hello PIN Reset

Common issues while resetting PIN : PIN reset not working or not appearing as an option

When it comes to resetting your PIN for Windows 10 Hello, there are a few common issues that users may encounter. These can range from the PIN reset not working at all, or the option to reset the PIN not appearing. In this chapter, we will discuss these issues and provide some troubleshooting tips to help you resolve them.
If you have already tried the previous method of using Renee PassNow to reset your login password but are still having trouble resetting your PIN, there are a few things you can try. First, make sure that you are using the correct Microsoft account to reset the PIN. If you have multiple accounts linked to your device, make sure you are using the one associated with the PIN you are trying to reset.
If you are still unable to reset your PIN, you may need to check for any available updates for Windows 10. Sometimes, certain updates can affect the functionality of the PIN reset process. To check for updates, go to Settings > Update & Security > Windows Update and click on Check for Updates. If there are any available updates, make sure to install them and then try resetting your PIN again.
If the PIN reset option is not appearing at all, it could be due to a group policy restriction or a third-party antivirus software blocking the feature. To check if there are any restrictions in place, go to Settings > Accounts > Sign-in options and make sure the option to Allow Windows Hello PIN to be reset on this device is turned on.
If you have a third-party antivirus software installed, try disabling it temporarily and then try resetting the PIN again. If this solves the issue, you may need to adjust the software’s settings to allow for PIN resetting.
If none of these solutions work, you may need to reset your device completely. This will erase all data and settings, so it should be used as a last resort. To reset your device, go to Settings > Update & Security > Recovery and click on Get started under Reset this PC. Follow the prompts to reset your device and then try setting up a new PIN once it is complete.
In summary, troubleshooting issues with resetting your Windows 10 Hello PIN can be frustrating, but there are several steps you can take to resolve the problem. Make sure to check your Microsoft account, install any available updates, check for restrictions, and temporarily disable any third-party antivirus software. If all else fails, resetting your device may be necessary.

Common issues while resetting PIN : Error messages during PIN reset process

When it comes to resetting your Windows 10 Hello PIN, there are a few common issues that may arise. These can include error messages during the PIN reset process, which can be frustrating and prevent you from successfully resetting your PIN. In this chapter, we will discuss some troubleshooting tips for handling these errors and ensuring a smooth PIN reset process.
Step 1: Before attempting to reset your PIN, make sure that you are connected to the internet. This is necessary for the reset process to work properly.
Step 2: If you encounter an error message during the PIN reset process, the first thing you should do is try again. Sometimes, the error may be due to a temporary glitch or connection issue. If the problem persists, move on to the next step.
Step 3: Check your Windows 10 updates. Sometimes, outdated software can cause problems with the PIN reset process. Make sure your computer is up to date and try again.
Step 4: If the error message is related to your Microsoft account, make sure you are signed in with the correct account. You can check this in your account settings.
Step 5: If none of the above steps work, you can try using the Command Prompt to reset your PIN. Open the Command Prompt as an administrator and type in the following command:

net user [username] *

Replace [username] with your actual username and press Enter. You will be prompted to enter a new PIN.
If you are still unable to reset your PIN after following these steps, it may be due to a more technical issue with your computer. In this case, it is recommended to contact Microsoft support for further assistance.
It is important to note that resetting your PIN will also remove any saved biometric data, such as fingerprints or facial recognition, so you will need to set those up again after resetting your PIN.
Another common error message that users may encounter during the PIN reset process is “The PIN is too common“. This means that the PIN you are trying to use is too easy to guess and does not meet the complexity requirements. In this case, try choosing a more unique and complex PIN, such as a combination of letters, numbers, and special characters.
If you are resetting your PIN because you have forgotten it, make sure to choose a new PIN that is easy for you to remember but difficult for others to guess. Avoid using personal information, such as birthdates or phone numbers, as these can be easily guessed by someone with malicious intent.
In conclusion, while encountering error messages during the Windows 10 Hello PIN reset process can be frustrating, there are a few simple troubleshooting tips that can help you overcome these issues. By following these steps, you can successfully reset your PIN and ensure the security of your device.

Troubleshooting steps to resolve PIN reset issues : Checking Windows updates and system requirements

In the previous topic, we discussed common issues that users may encounter while resetting their Windows 10 Hello PIN. In this chapter, we will delve into troubleshooting steps and tips to resolve these issues and successfully reset your PIN.
Step 1: Check for Windows Updates
If you are experiencing issues with resetting your Windows 10 Hello PIN, the first step you should take is to check for any available Windows updates. These updates often contain bug fixes and patches that could resolve any PIN reset issues you may be facing.
To check for updates, go to Settings > Update & Security > Windows Update. Click on Check for updates and follow any prompts to install any available updates.
Step 2: Check System Requirements
Next, make sure that your system meets the minimum requirements for resetting your Windows 10 Hello PIN. These requirements include:
  • Having a Microsoft account linked to your device
  • Having a PIN set up on your device
  • Having a working internet connection
If you do not meet these requirements, you may encounter errors while attempting to reset your PIN. Make sure to fulfill these requirements before proceeding with the PIN reset process.
Step 3: Disable Antivirus and Firewall
Sometimes, third-party antivirus software or firewalls can interfere with the PIN reset process. To rule out this possibility, temporarily disable any antivirus or firewall software on your device and attempt to reset your PIN again.
Step 4: Use Troubleshooter
If you are still having trouble resetting your PIN, you can try using the built-in troubleshooter for PIN issues. To access it, go to Settings > Update & Security > Troubleshoot > Additional troubleshooters. Look for Windows Hello PIN and click on Run the troubleshooter. Follow any prompts and let the troubleshooter detect and resolve any issues.
If the troubleshooter is unable to resolve the issue, you may need to contact Microsoft support for further assistance.
By following these troubleshooting tips, you should be able to resolve any issues you may encounter while resetting your Windows 10 Hello PIN. Remember to always keep your system updated and meet the necessary requirements to ensure a smooth PIN reset process.

Troubleshooting steps to resolve PIN reset issues : Verifying account settings and permissions

Having trouble resetting your PIN on Windows 10? You are not alone. Many users face issues with resetting their PIN, but luckily there are some troubleshooting steps you can take to resolve these problems. In this chapter, we will discuss the importance of verifying your account settings and permissions in troubleshooting a PIN reset issue.
The first step in troubleshooting a PIN reset issue is to make sure you have the correct account settings in place. To do this, open the Start menu and click on Settings. Then, click on Accounts and select Sign-in options from the left-hand menu. Scroll down to the Privacy section and make sure the Use my sign-in info to automatically finish setting up my device after an update or restart option is turned on.
If this option is already turned on and you are still having trouble resetting your PIN, you may need to check your account permissions. To do this, go back to the Accounts section in Settings and click on Family & other users from the left-hand menu. Scroll down and click on the user account you are experiencing PIN reset issues with. Make sure the Account type is set to Administrator and that the user has permission to change their password.
If the above steps do not resolve your PIN reset issue, you may need to try resetting your PIN using a console command. To do this, open the Start menu and type cmd to open the Command Prompt. Then, enter the command

net user username 123456 /domain

replacing username with the username of the account you are having trouble resetting the PIN for. This will allow you to reset the PIN for that specific account.
Another solution to consider is removing and re-adding the PIN. To do this, go back to the Sign-in options section in Settings and click on Remove under the Pin option. Then, restart your device and go back to the Sign-in options section to add a new PIN.
If none of these troubleshooting steps solve your PIN reset issue, you may need to contact Microsoft Support for further assistance. They can help you troubleshoot the issue and potentially provide a solution to reset your PIN.
Remember, it is important to verify your account settings and permissions when trying to resolve a Windows 10 Hello PIN reset issue. By following these troubleshooting tips, you can hopefully get back to using your PIN for easy sign-in to your device.

Best Practices for PIN Management and Security

Creating a strong and memorable PIN : Tips for choosing a secure PIN

In our previous chapter, we discussed troubleshooting tips for resetting your Windows 10 Hello PIN. Now, let’s turn our attention towards the importance of creating a strong and memorable PIN for better PIN management and security.
Step 1: Before choosing a PIN, it is important to understand the role of a PIN and how it differs from a password. While a password can consist of letters, numbers, and special characters, a PIN is a numeric only code. This means that there are only 10 possible options for each character (0-9). Therefore, it is crucial to choose a PIN that is long enough to provide a sufficiently complex combination of numbers.
Step 2: The most secure PINs are typically 8-12 characters long. While it may seem tempting to use a shorter PIN for convenience, it is important to remember that shorter PINS are easier to guess or crack. The longer the PIN, the more combinations there are, making it more difficult for someone to guess or use brute force methods to crack it.
Step 3: Avoid using easily guessable combinations such as sequential numbers (1234), repeated numbers (1111), or common patterns (2580). These types of PINs can be easily guessed by someone trying to access your device without your permission.
Step 4: Instead, opt for a random combination of numbers that are not easily associated with you. For example, you can use numbers from your favorite song or a special date in your life. Just make sure to mix them up and add in some extra numbers to make it more difficult to guess.
Step 5: Another way to create a secure PIN is to use a passcode that corresponds to the pattern on a keypad. For example, if your PIN is 1478, you can visualize the pattern on a keypad as an “L” shape, making it more difficult for someone looking over your shoulder to guess.
Step 6: Finally, make sure to never share your PIN with anyone else. This includes family members, friends, or even trusted individuals. Keep your PIN to yourself and change it periodically for added security.
By following these steps, you can create a strong and memorable PIN for better PIN management and security. Remember to also regularly check and update your account settings and permissions to further enhance the security of your device and personal information.

Enabling multi-factor authentication (MFA) for enhanced security : How to set up MFA for Windows 10

In today’s digital world, having a strong and secure PIN is crucial for protecting your personal and sensitive information. However, just having a strong PIN may not be enough to prevent unauthorized access to your Windows 10 device. That’s where multi-factor authentication (MFA) comes in.
MFA is a security measure that requires users to provide two or more forms of authentication before gaining access to a device or account. This adds an extra layer of security and makes it more difficult for attackers to gain access, even if they have your PIN. In this chapter, we will guide you through the process of setting up MFA for your Windows 10 device.
If you have followed our previous chapter on creating a strong and memorable PIN, you already have a strong PIN in place. Now, let’s add MFA to further enhance the security of your device.
Step 1: Go to the Start Menu and click on the gear icon to open the Settings menu. Alternatively, you can press the Windows key + I to directly open the Settings menu.
Step 2: In the Settings menu, click on “Accounts” and then select “Sign-in options” from the left panel.
Step 3: Under the “Manage how you sign in to your device” section, click on the “Add” button under the “Other options” section.
Step 4: Select “Windows Hello PIN” from the list of options and click on the “Add” button.
Step 5: Follow the prompts to create your PIN again. This will be used as your primary form of authentication.
Step 6: Once your PIN is set, click on the “Set up” button under the “Windows Hello PIN” section to set up additional security measures.
Step 7: You will be prompted to verify your identity using your existing PIN. Once verified, click on the “Next” button.
Step 8: Select “Add security info” to add an additional form of authentication.
Step 9: You can choose to add a phone number or an email address as your second form of authentication. Follow the prompts to complete the process.
Step 10: Once you have successfully set up your MFA, you can choose to require it for sign-in, which will prompt for both your PIN and your additional form of authentication.
With MFA enabled, even if someone manages to guess or obtain your PIN, they will still need your additional form of authentication to gain access to your device. This significantly increases the security of your device and protects your sensitive information.
Remember to keep your PIN and your additional form of authentication information secure. Never share it with anyone and choose a strong and memorable PIN to keep your device and personal information safe.

Conclusion

In conclusion, mastering the resetting methods for your Windows 10 Hello PIN is essential for maintaining the security of your device. Whether you choose to reset through the Settings app, the lock screen, or through Azure Active Directory, it’s important to follow the step-by-step instructions carefully. In case of any issues, troubleshooting tips such as checking for updates, verifying account settings, and enabling multi-factor authentication can help resolve them. Additionally, creating a strong and memorable PIN and setting up multi-factor authentication can provide enhanced security for your device. With a strong understanding of the Windows 10 Hello PIN, you can ensure the safety of your login information and protect your device from unauthorized access. So take the time to familiarize yourself with these methods and implement them for a secure and hassle-free login experience on your Windows 10 device.