11 August 2023John Weaver Senior Program Developer
Last update by Emma Johnson at 1 March 2024
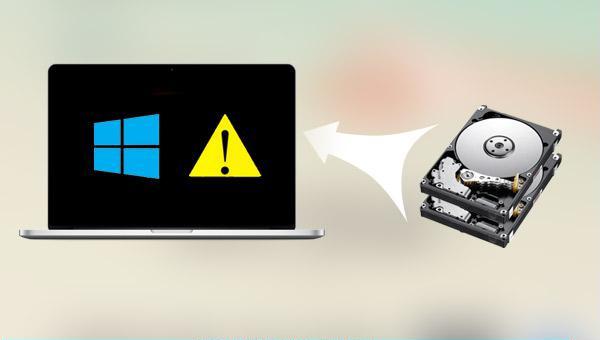
Summary Struggling with a Windows system that won't boot after migrating or cloning to a new hard drive? Uncover the common culprits behind startup failures and explore effective solutions to get your system up and running in our comprehensive guide.
I. Reasons why Windows cannot be started from the cloned hard disk
Solid-state drives are popular for their speed and stability. Users often migrate Windows systems to solid-state drives for faster performance or clone failing system disks to resolveinstability issues. However, there are common reasons why cloned hard drives may not start, regardless of whether they are solid-state or mechanical.
1, The cloned hard drive is not set as the first boot item , which will cause the computer to start from the original system disk, and the boot order needs to be changed in the BIOS.
2, The partition style of the cloned hard disk does not match the boot mode . If the partition style of the cloned hard disk is GPT, use the UEFI boot mode; if it is MBR, use the Legacy boot mode. Make sure the partition styles match between the original and target hard disks. Learn more about MBR and GPT differences here.
3. No full clone of the system hard drive, if the cloning process is not completed smoothly or the capacity of the cloned hard disk is not enough to accommodate all the data of the original system disk, that is, the cloned hard disk is missing some data, the cloned hard disk will not be able to start.
4. The primary partition of the cloned hard disk is not set as the active partition, which can affect the system startup as the startup files of the operating system are stored in the primary partition.
After understanding the reasons that may cause the cloned hard disk to fail to start, let’s take a look at the specific solutions.
II. How to start Windows from the cloned hard disk?
1. Set the cloned hard disk as the first boot item in the BIOS
After cloning the hard disk, you need to change the boot sequence in the BIOS, the steps are as follows:
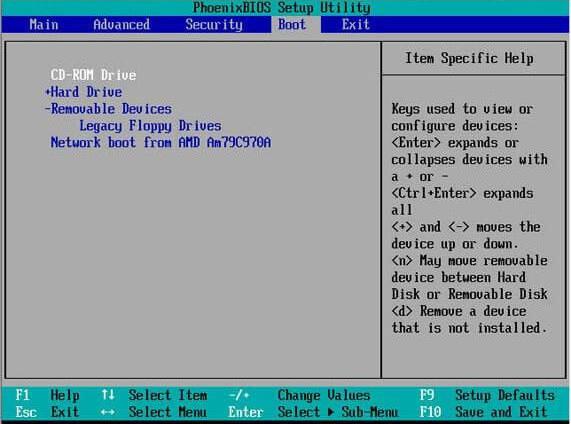
① Make sure the cloned hard disk is connected to the computer, restart and continuously press the shortcut key to enter BIOS settings (usually F2, F8, F12, Del). Check different brands of motherboards for how to enter BIOS and modify boot order: How to Enter BIOS and Modify Boot Order.
② After entering the BIOS, use the arrow keys to select the Boot tab, and set the cloned hard disk as the first boot item.
③ Press F10 to save the settings, then restart the computer to check whether it can be started smoothly.
2. Check whether the partition style of the cloned hard disk matches the boot mode
If the partition style of the cloned hard disk is GPT, use UEFI boot mode. If it is MBR, use Legacy boot mode. Confirm the partition style of the cloned hard disk with the following steps:
Phase 1: Confirm the partition format of the cloned hard disk
① Connect the cloned hard disk to the computer and start the computer using the original system disk. If the cloned hard disk is set as the first boot item, access the BIOS to set the original system disk as the first boot item.
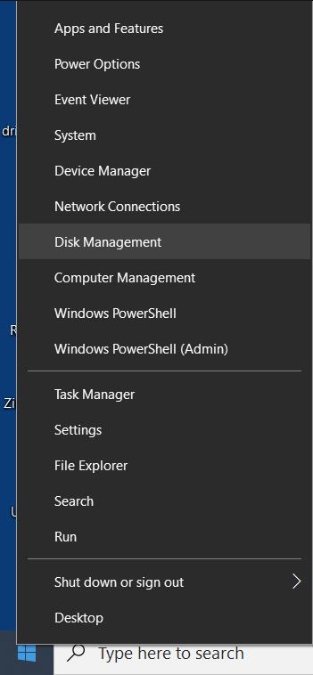
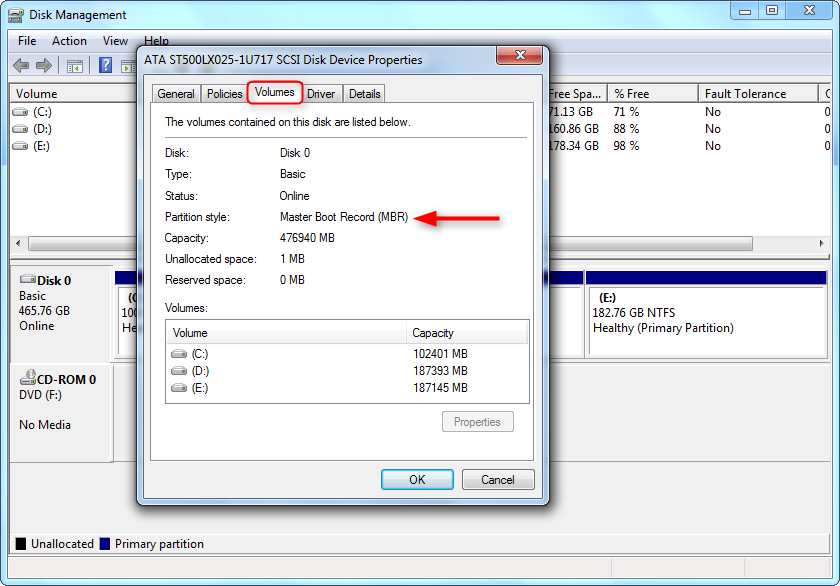
② After booting from the original system disk, right-click the start menu and select (Disk Management).
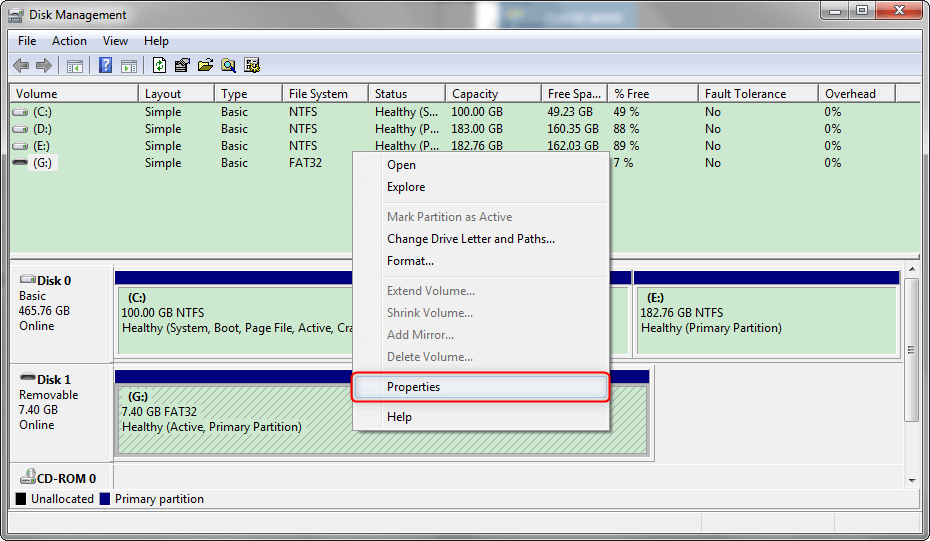
③ Right-click the cloned hard disk and select (Properties).
④ Switch to the (Volume) tab, view (Partition style), here is MBR, need to use Legacy boot mode.
Phase 2: Set the boot mode according to the partition type of the cloned hard disk
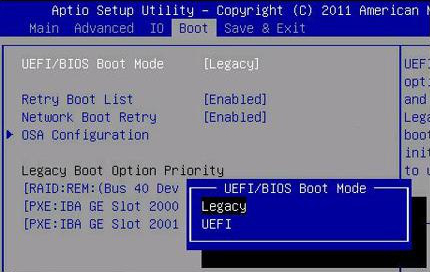
① Restart the computer, and click the shortcut key continuously after the screen appears to Enter BIOS .
② Use arrow keys to select (Boot) tab, then choose (UEFI/BIOS Boot Mode), and press Enter key. Select boot mode based on hard disk partition type – Legacy for MBR, UEFI for GPT. Set cloned hard disk as first startup item.
③ Press F10 to save the settings, then restart the computer.
Stage 3: If the computer does not support UEFI boot mode, the clone hard disk needs to be changed from GPT to MBR partition format
Some computers do not support the UEFI boot mode, so you need to change the partition format of the cloned hard disk to MBR to match the Legacy boot mode. Proceed as follows:
① Keep the cloned hard disk connected to the computer and start the computer through the original system disk. If the cloned hard disk is set as the first boot item, enter the BIOS again to set the original system disk as the first boot item.
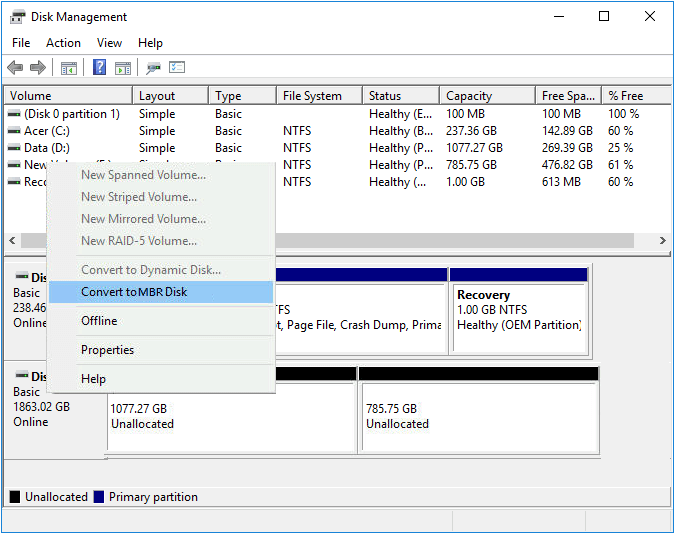
② After booting from the original system disk, right-click the start menu and select (Disk Management).
③ Delete all partitions of the cloned hard disk, so that the entire hard disk is in an unallocated state, right-click on the hard disk, and select (Convert to MBR disk). Then clone the system disk to the target hard disk again and change the boot sequence in the BIOS.
3. Full system cloning with professional Renee Becca
Renee Becca is a tool specifically designed for system and hard disk data backup and restoration. It offers incremental/differential backup technology to save time and disk space. In addition to system backup, it supports system migration, partition backup, hard disk backup, file backup, and disk cloning.
Renee Becca - Reliable Data Backup & Restore Software
Quick Backup files at up to 3,000MB/min.
Fullfill different backup needs Supports system backup, disk / partition backup, file backup and disk clone.
Intelligent Automatically analyze the differences between source and backup data.
Convenient Support VSS, allowing to freely view webpages when backing up system.
Highly compatible Supports various files and storage devices.
Quick Backup files at up to 3,000MB/min.
Fullfill different backup needs Backup for disk, partition and system. Save disk space by backing up incremental /differential data.
Highly compatible Supports various files and storage devices.
Renee Becca offers system migration and system hard disk cloning functions. System migration allows transferring the system to another hard disk, while system hard disk cloning creates an identical hard disk. The steps for system migration are as follows:
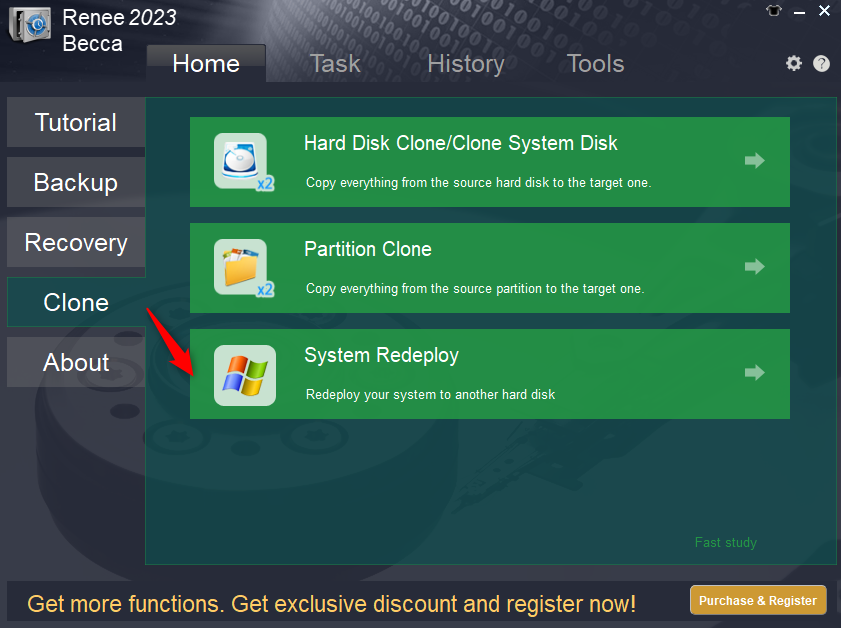
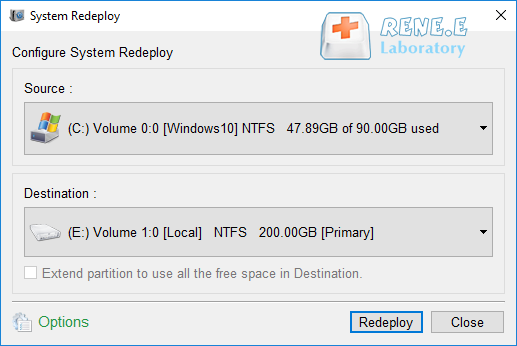
Step 1: Connect the target hard disk to the computer, download, install and run Renee Becca on the computer, and select the (System Redeploy) option in the main interface (Clone) column.
Step 2: Select the source and target location in the pop-up “System Redeploy” window. The system disk is usually the default source, and the pre-replaced hard disk is the target location. Click the (Redeploy) button to start the system migration process. Wait for the progress bar to reach 100% for a successful migration. Remove the old hard disk, install the new one, and set it as the first boot item in the BIOS.
Kind tips The total capacity of the new hard disk needs to be greater than the size of the system to be migrated; in addition, since all data in the target disk will be erased during the system migration, please check whether there is important data in the target disk before the official system migration, and if so, please prepare in advancefile backup .
4. Set the main partition of the cloned hard disk as the active partition
If the cloned hard disk cannot be started, it may also be because the main partition where the system startup files are located has not been set as an active partition. You can set the active partition through the command line. Proceed as follows:
① Connect the cloned hard disk to the computer, so that the computer starts from the original system disk.
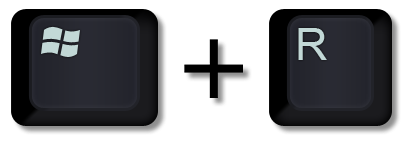
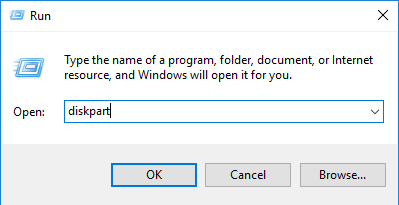
② After booting from the old hard disk, press the (Windows icon + R) key to open the run box, then type (diskpart), and press the (Enter) key.
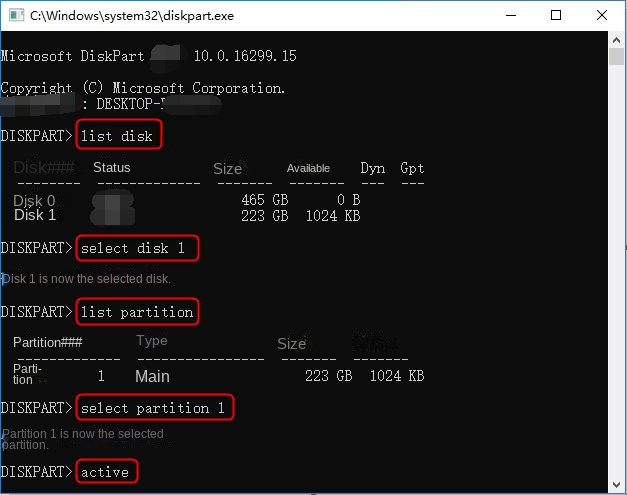
③ In the pop-up window, enter the following commands in sequence. Each time you enter a command, you need to click the (Enter) key once.
list disk
(will list all disks in the computer)
select disk 1
(Select the disk whose disk number is 1, it can be judged by the capacity, please replace the number according to the actual situation)
list partition
(list partitions)
select partition 1
(Select partition 1, which is the main partition of the system, please replace the number according to the actual situation)
active
(make it the active partition)
④ After completing the above commands, restart the computer.
Kind tipsIf you are not sure about the cloned disk and partition information, you can right-click the start menu and select (Disk Management), and you can view the detailed information in the disk list.
Amanda J. Brook : In this authoritative article, we'll clarify the distinction between backup and cloning, their optimal uses, and provide step-by-step...