author avatar
    Specialist of Customer Service Dept.
 

Summary
Learn how to effectively downgrade from Windows 10 to Windows 7 with this helpful article. Discover various solutions for a smooth transition.


downgrade windows 10 to windows 7

I. Preparation before Windows 10 is downgraded to Windows 7: backup data

To safely downgrade from Windows 10 to Windows 7, back up important data first using a professional software like Renee Becca. Detailed function introduction and operation method can be found at Renee Becca.

1. What is Renee Becca?

Renee Becca is a tool specifically designed for system and hard disk data backup and restoration. It offers incremental/differential backup technology to save time and disk space, supporting system backup, partition backup, hard disk backup, file backup, and disk cloning.
Renee Becca - Reliable Data Backup & Restore Software

Quick Backup files at up to 3,000MB/min.

Fullfill different backup needs Supports system backup, disk / partition backup, file backup and disk clone.

Intelligent Automatically analyze the differences between source and backup data.

Convenient Support VSS, allowing to freely view webpages when backing up system.

Highly compatible Supports various files and storage devices.

Quick Backup files at up to 3,000MB/min.

Fullfill different backup needs Backup for disk, partition and system. Save disk space by backing up incremental /differential data.

Highly compatible Supports various files and storage devices.
Free TrialFree Trial 2000 users have downloaded and enjoy Renee Becca!

2. How to backup data with Renee Becca?

Backing up data with Renee Becca is very simple, the specific steps are as follows:
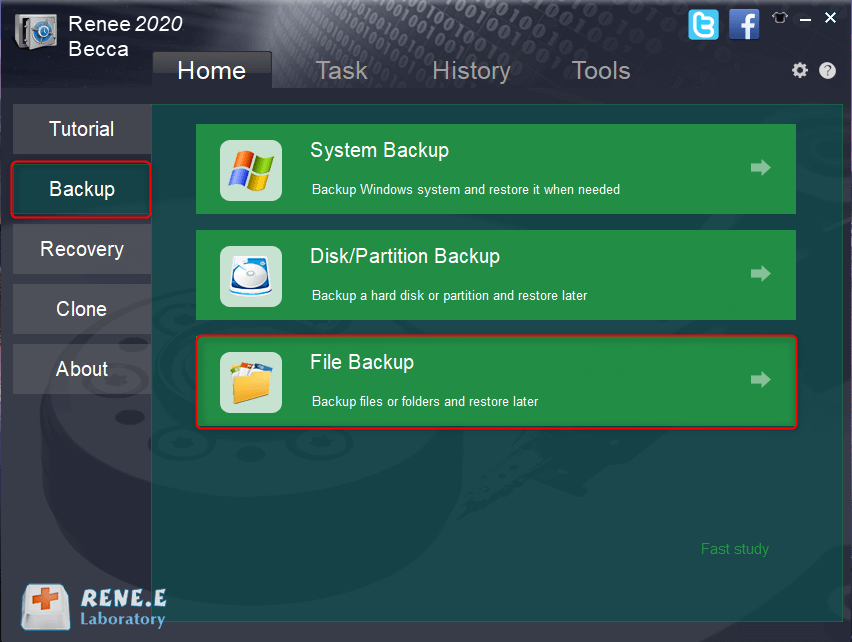
Step 1: Download, install and run Renee Becca on the computer, and select the (File Backup) option in the main interface (Backup) column.
click to back up files in renee becca
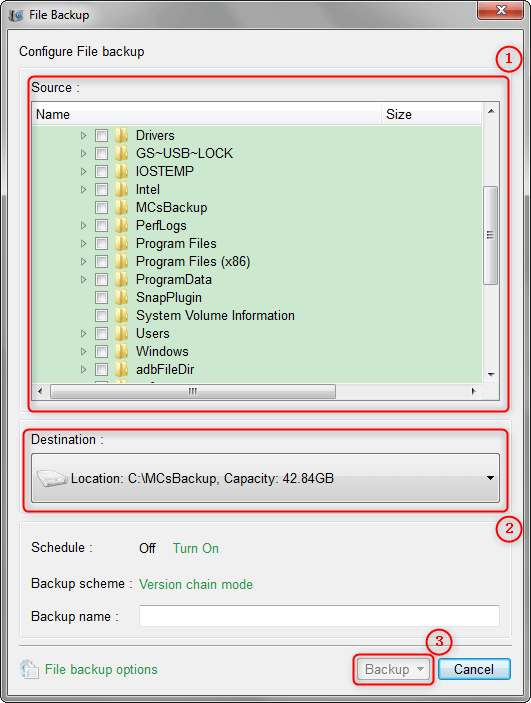
Step 2: Next, select all the files that need to be backed up in source file (device), and select the hard disk partition to store the backup data in destination.
backup files
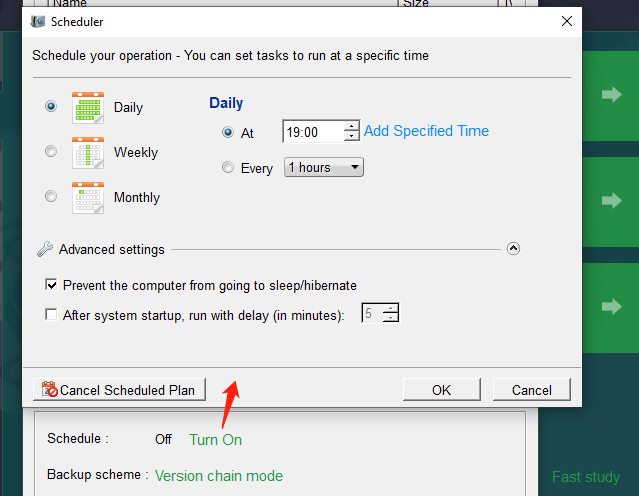
In addition, in (task plan), you can make a daily/weekly/monthly automatic backup plan and click (confirm) to enable the automatic backup function.
file backup schedule on Renee Becca
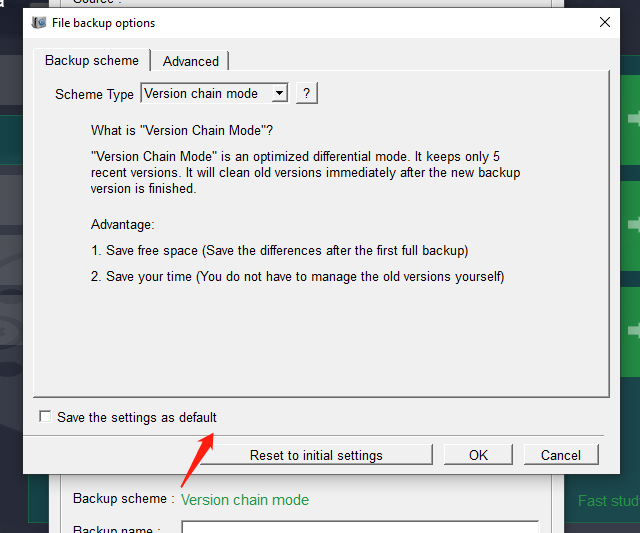
In Renee Becca, you can choose from 5 backup schemes: version chain mode, single version mode, overall mode, incremental mode, and differential mode.
backup mode of file backup on Renee Becca
Renee Becca has 5 backup plans to choose from:
Version chain mode: Only the latest 5 versions are kept, and useless old versions are automatically deleted after the backup is complete.
Single version mode: Only the most recent version is kept, and the previous version is automatically deleted after the backup is complete.
overall pattern: Create a full backup.
Incremental mode: After the initial full backup, only incremental backups are created.
diff mode: After the initial full backup, only differential backups are created. You can view the difference between incremental backup and differential backup.
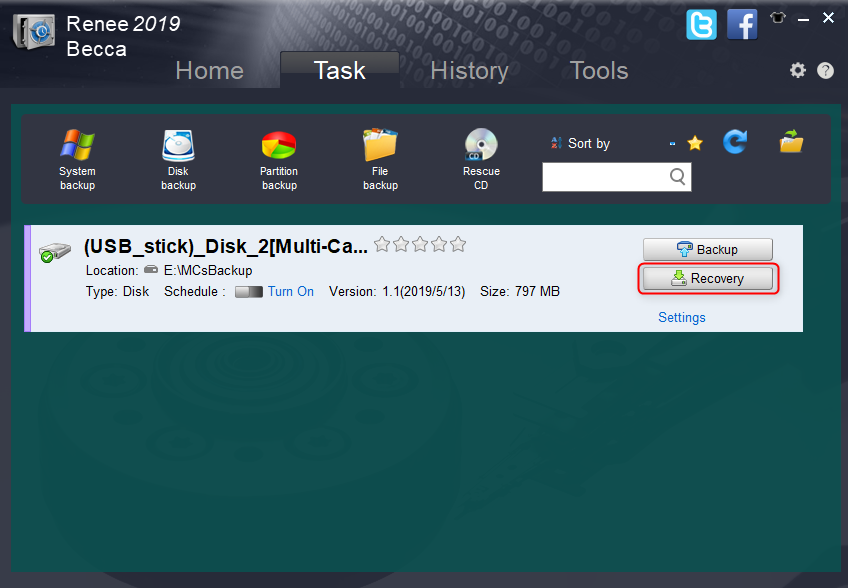
Step 3: Click the (Backup Now) button to execute the backup file command based on your settings. Monitor the progress of all backup tasks on the task bar. Use the (Restore) button to restore files to the specified hard disk when needed.
click to recover data
Step 4: Finally, select the location where the files are to be restored, and click the (Restore) button.

II. How to downgrade Windows 10 to Windows 7?

1. Use system backup

Before upgrading to Windows 10, the system will prompt and advise users to back up important files to prevent upgrade failure. If you have backed up your system, you can follow these steps to revert from Windows 10 to Windows 7:
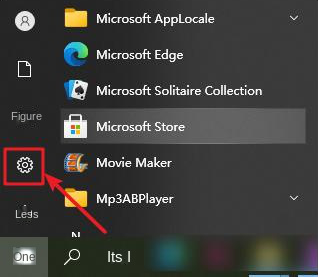
Step 1: Run the Windows 10 computer, click (Start)-(Settings) in the lower left corner (or directly use the shortcut key Windows+I).
start menu settings
Step 2: Next, go to the (Update and Security) option.
windows updates and security
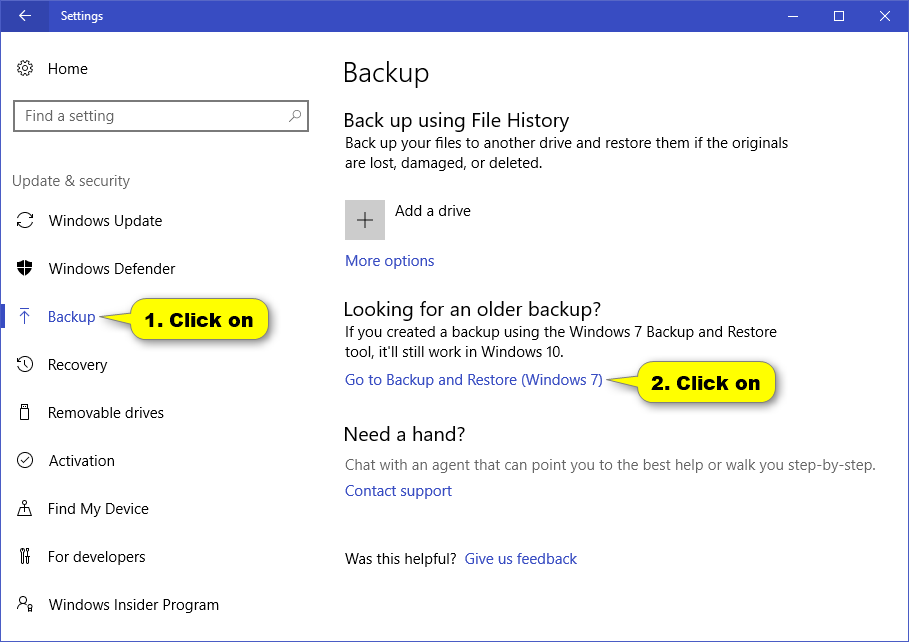
Step 3: Select (Backup) in the function bar on the left, then click (Go to “Backup and Restore” (Windows 7)) in the “Looking for older backups” section on the right. Find the Windows 7 system backup in “Backup” and follow the steps to restore the system.
Click on Go to Backup and Restore Windows 7 option

2. Use the Fall Back to Windows 7 option

Microsoft allows users to return their system to Windows 7 within 10 days after upgrading from Windows 7 to Windows 10. Here’s how to roll back to Windows 7:
Step 1: Boot up the Windows 10 system, click on Start > Settings at the bottom left (or press Windows+I as a shortcut), and then choose Update & Security.
windows updates and security
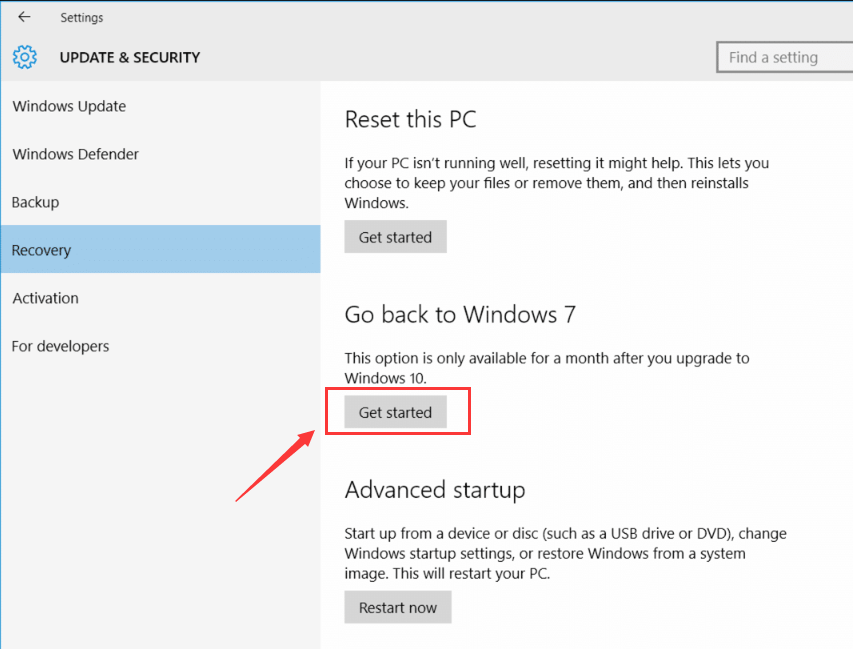
Step 2: Find the (Restore) option on the left, click the (Start) button under “Go Back to Windows 7″ on the right to initiate the system rollback command, easily reverting from Windows 10 to Windows 7.
go back to windows 7

3. Use third-party software to restore Windows 7

If you have backed up your Windows 7 system with third-party software like Renee Becca, you can restore it to your computer using the following steps:
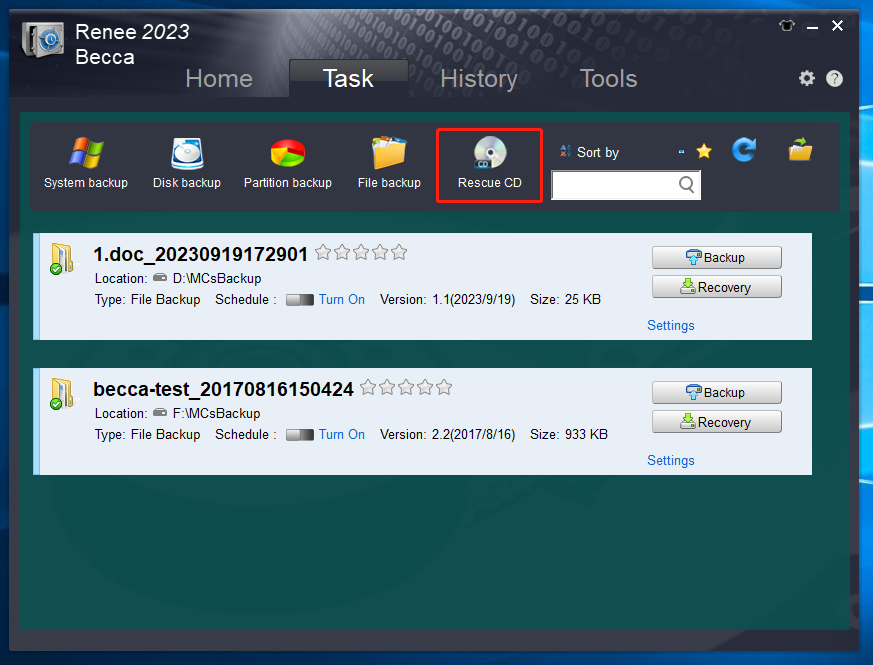
Step 1: Open Renee Becca, switch to the (task) tab, and click (rescue disk).
rescue CD
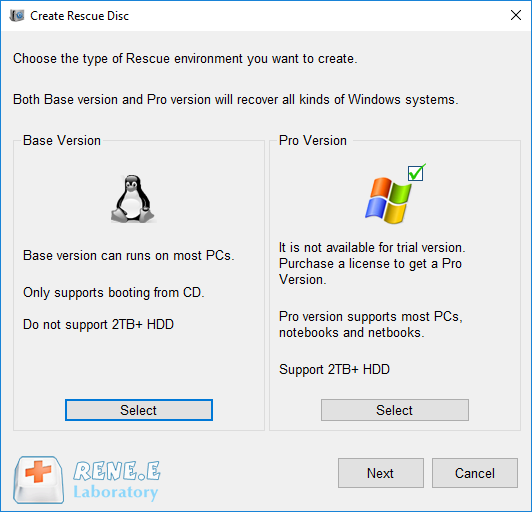
Step 2: Select the type of rescue disk to create. Please select according to your disk and computer conditions. After the selection is complete, please click (Next) to create a startup disk.
make a rescue disc with renee becca
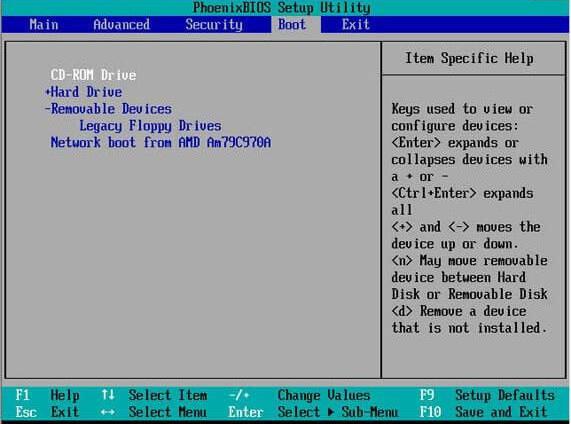
Step 3: Connect the USB/CD rescue disk to the computer you need to restore, and enter the BIOS to change the boot sequence to boot from the USB/CD (that is, boot from the rescue disk).
BIOS setup boot order
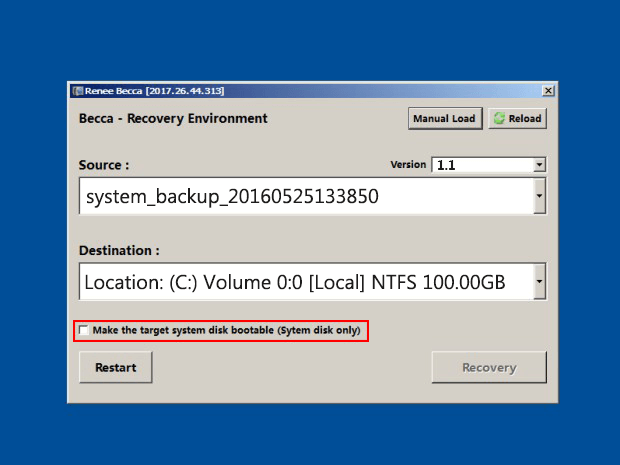
Step 4: After successful startup, select the backup version and target partition you need to restore in the window, and select (make the target disk bootable). Finally, click (Restore). Click here to learn more about system backup and restore.
recover system from rescue CD
Kind tipsIf none of the above three methods for returning Windows 10 to Windows 7 is suitable for you, then you may need to reinstall the system through the Windows 7 installation medium. It is recommended to search for the corresponding Windows 7 image file (usually an ISO file) on the Internet and create an installation medium (U disk/CD) before installing.