author avatar
    Technology Manager of Test Dept.
 

Summary
Learn how to remove the shortcut virus from your computer's hard disk and recover lost data without any hassle. Solve the problem effectively with this informative article.


how to remove shortcut virus

I. A Brief Introduction to Shortcut Viruses

Generally speaking, a shortcut virus is a combination Trojan and worm that hides or deletes the original files on the infected device and then replaces them all with generated shortcuts. That is to say, the virus will hide all the folders on the root directory, and then create a shortcut with the same name as the folder. Since many people don’t know when they were infected with the virus, when the user clicks on the shortcut, the virus will run and be automatically added to the startup project.
So how does the virus spread? Usually two of the following:
1. You clicked a shortcut link or downloaded a file containing a shortcut virus from a browser.
2. A file containing a shortcut virus is launched, and then it replicates the virus and further infects other files and programs in your device.
That is to say, when your hard disk is attacked by a shortcut virus, all files, folders and even programs will be converted into shortcut files, and you will not be able to open or access the original files normally. If you double-click the shortcuts of these viruses, it will create an opportunity for these viruses to spread and further damage your data, system, etc.
After understanding the definition of the shortcut virus and how it spreads, let’s learn how to remove it.

II. How to remove shortcut virus?

When you find that there is a shortcut virus in your computer, it is generally recommended to use anti-virus software to scan and clear it. If it cannot be cleared, you can also press F8 key to enter the safe mode when turning on the computer, and install the latest version of anti-virus software to scan and kill it. If you still can’t solve it, please try the following two methods.

1. Use the CMD command to delete the shortcut virus

There are certain operational risks in using the CMD command to delete the shortcut virus. It is recommended that experienced users use this method to solve the problem. The specific operation steps are as follows:
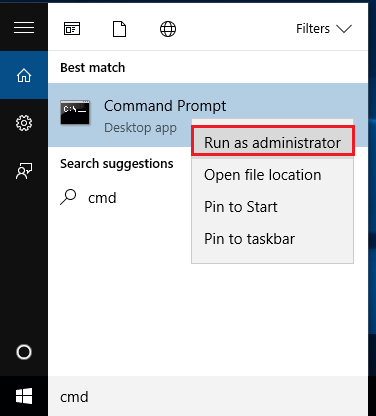
Step 1: Connect the virus-infected hard disk to the computer, search (cmd) in the search box in the lower left corner, and select (run as administrator) to open the command prompt tool.
run command prompt as administrator in start menu
Step 2: Next, in the command prompt window that opens, type (H:) (H refers to the letter of the hard drive that is infected with the virus). Next enter the command ( del *.lnk ) and press the (Enter) key to delete the lnk file. lnk files are shortcuts or links that can point to original files, folders, or applications. In addition, you can also type (del autorun.xxx) (xxx is the extension of the shortcut virus) and press the (Enter) key. The file extension can be replaced with .exe, .vbs, .lnk, .ini, etc. according to the extension of the source file, and repeat this step. This command will delete shortcut files and remove existing shortcut viruses from your drive.
Step 3: Next, continue to enter ( attrib -s -r -h *.* /s /d /l ) and press the (Enter) key. Alternatively, you can also enter ( attrib -h -r -s /s /d H:\*.* ) (you can replace “H:” with the letter of the infected hard drive) and press the (Enter) key to display hidden files on the hard drive. After the command is executed, enter the (EXIT) key and press the (Enter) key to close the command prompt window.
Attrib command parameter description:
attrib: Attributes assigned to files or directories can be displayed, set, or removed.
-h: Clear the hidden file attribute.
-r: Clear the read-only file attribute.
-s: Clear system file attributes.
/s: Applies attrib and any command-line options to matching files in the current directory and all subdirectories.
/d: Applies attrib and any command-line options to a directory.
/l: Apply attrib and any command-line options to the symlink, not the symlink’s target.
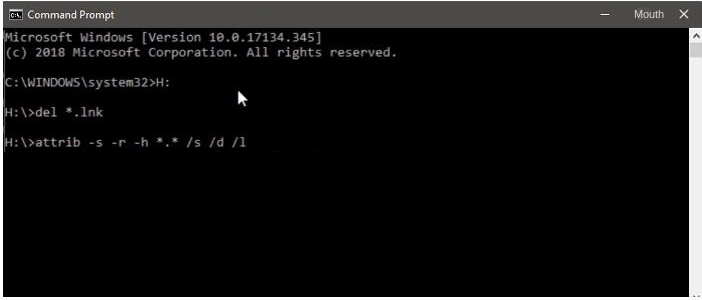
Type the show hidden files command
The above method is to delete the shortcut virus files from the hard disk, this way may not be able to delete some hidden virus files on the computer. Therefore, you can also try to clear the virus through the registry.

2. Use the registry to permanently remove shortcut viruses

The registry on Windows is a database that stores things like the operating system and applications, settings, and more. When your hard disk is infected by a shortcut virus, a new subkey is added to the Windows registry that contains information about the virus. Therefore, you can use the Registry Editor to delete the shortcut virus through the following steps, the specific steps are as follows:
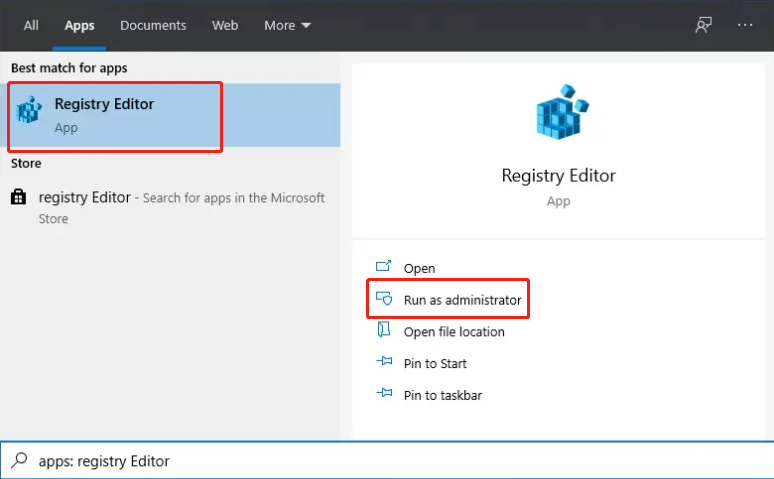
Step 1: Type (regedit) in the search box, then right-click (Registry Editor) and select (Run as administrator).
run registry editor as administrator
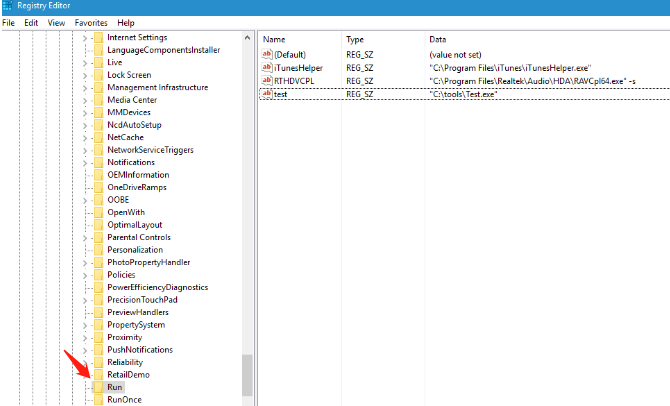
Step 2: Next, find the HKEY_CURRENT_USER – Software – Microsoft – Windows – CurrentVersion – Run option.
Step 3: Under (Run), check whether there are registry entries named “WXCKYz”, “ZGFYszaas”, “OUzzckky”, “odwcamszas” and so on. If so, right-click them and select (Delete) to delete these viruses from the registry. After the deletion is complete, restart the computer.
delete the files of Run folder
After the virus is cleared, if your data is lost, you need to use professional hard disk data recovery software to retrieve the lost data. Below we take Renee Undeleter as an example to teach you how to recover data from the hard disk.

III. Use Renee Undeleter to recover data from hard drive

1. What is Renee Undeleter?

Renee Undeleter is a software specially designed to restore various data files. When you accidentally delete important files, empty the recycle bin, or format the disk/storage, you can use this tool to find the lost data back. This software covers four functional modules, including file recovery, format recovery, partition recovery and image creation, so it can help you solve many data loss problems that may occur during system use in an all-round way, which is very convenient.
Hot Topic - ADsRenee Undeleter – Simple & Powerful Software for Data Recovery

Easy to use Recover data by 3 steps;

Multiple scan modes Fast partition scan, whole partition scan and whole disk scan;

Supported file types Image, video, audio, text, email and so on;

Image creation Create a partition image to read and back up data;

Supported devices SD card, SDHC, SDXC, USB flash drive, hard disk and computer.

Easy to use Recover data by 3 steps;

Multiple scan modes Fast partition/whole partition/whole disk scan;

Supported devices SD card/USB/hard disk.

Free TrialFree TrialFree Trial 800 people have downloaded!
2. How to recover hard disk data with Renee Undeleter?

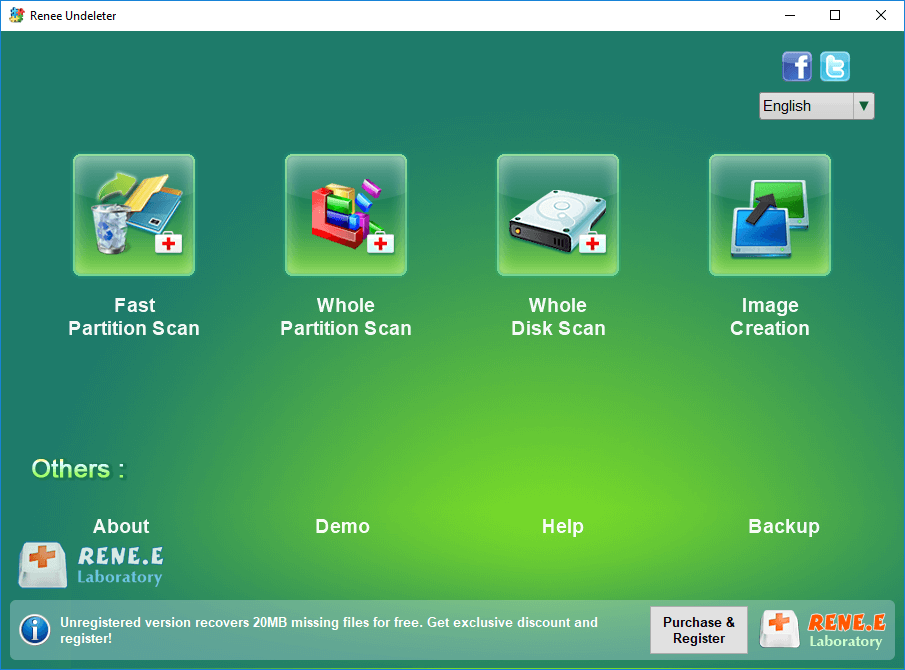
Step 1: Download, install and run Renee Undeleter, select the option Whole Disk Scan in the main interface. This option will scan the entire hard disk, so do not install the software to any partition of the hard disk that needs to be scanned. In the hard disk that does not need to be scanned, otherwise it will not be able to use Whole Disk Scan to scan. If the lost data is not much and the lost time is not long, you can also use Fast Partition Scan and Whole Partition Scan modes to save scanning time.
Note: Do not install on the disk that needs to restore data, so as not to cause data overwriting.
select whole disk scan in renee undeleter
Data recovery function introduction:

Fast Partition Scan: Quickly retrieve files lost due to accidental deletion or emptying the recycle bin.

Whole Partition Scan: Quickly recover files lost due to inaccessible or formatted partitions.

Whole Disk Scan: It can analyze and obtain partition information, and fully scan the entire partition.

Image Creation: You can create a mirror image for a partition to back up the current partition state.
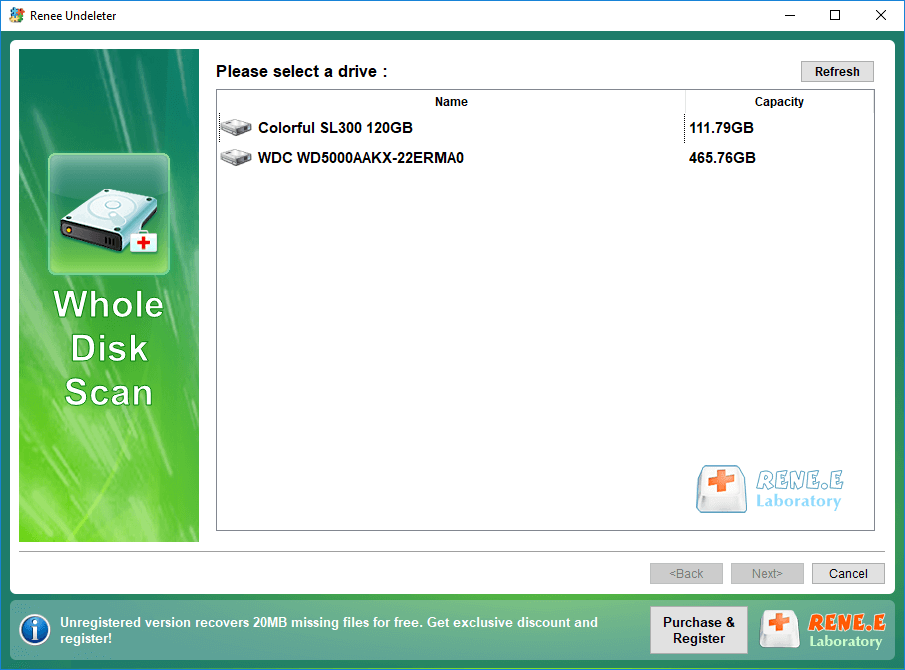
Step 2: Next, select the disk device to be scanned and then click Next. Select default setting on the advanced setting interface.
select a disk to recover in renee undeleter
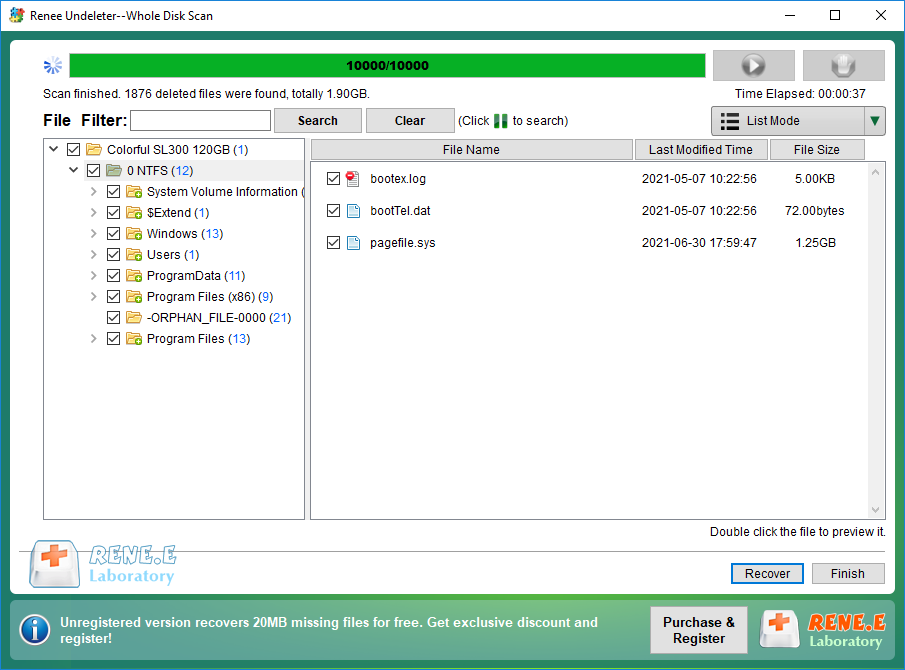
Step 3: After that, the software will analyze the disk device. After scanning, you can double-click the file in the preview window on the right to preview it, then select the file you want to restore, and click the Recover button in the lower right corner to restore the selected file.
select taget files to recover with renee undeleter
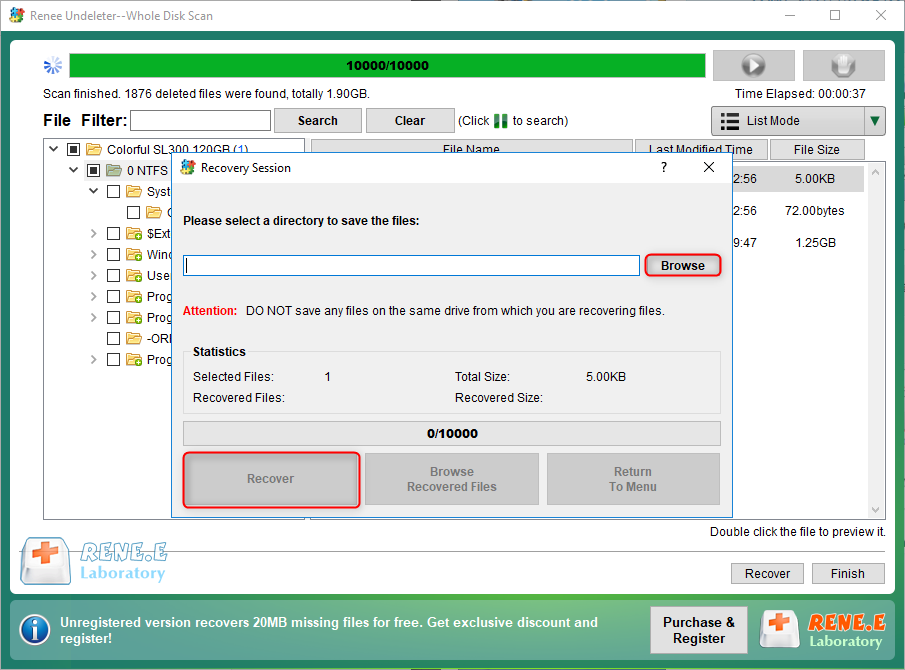
Step 4: Next, select the target folder, click Browse to select another disk to save the recovered files, and then click the Recover button to start the file recovery command, you just need to wait patiently.
recover files from whole disk scan with renee undeleter