

Unlock the Hidden Default Administrator Account in Windows 7: Lenovo Edition

Summary
Unlock the hidden default administrator account in Windows 7 for Lenovo and regain control of your computer with methods like using the Windows command prompt or Renee PassNow. Don't let the default administrator password stop you from accessing your Lenovo laptop.
Table of contents
| Windows Version | Administrator Default Password | Account status |
|---|---|---|
| Windows 7 | Blank (disabled by default) | Disabled by default |
| Windows Version | How to Enter Windows safe mode | limitations |
|---|---|---|
| Windows XP | Press the F8 key before the Windows XP logo appears. Use the arrow keys to select Safe Mode at the Advanced Boot Options menu. | None |
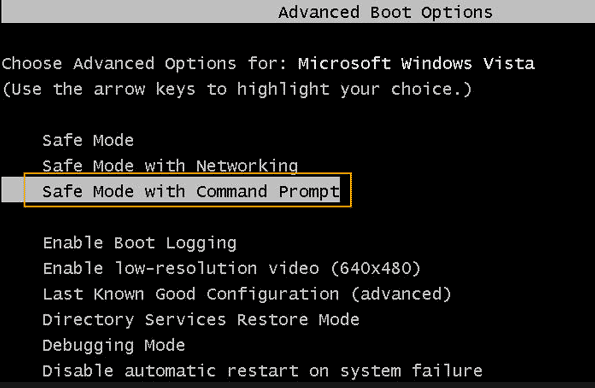
| Windows Vista | Press F8 before the Windows Vista logo appears. Use the arrow keys to select Safe Mode at the Advanced Boot Options menu. Another method is to type ‘msconfig’ in the Start menu’s Search field/ click the Boot tab/ check the Safe boot option/ select an option below/ and click OK/ then Restart. | When you reboot Windows after using the msconfig method/ it will take you back into Safe mode. So/ while still in Safe Mode/ launch msconfig and uncheck the Safe boot option. |
| Windows 7 | Press the F8 key before the Windows 7 logo appears. Use the arrow keys to select Safe Mode at the Advanced Boot Options menu. Another option is to insert the original installation disc/ select Repair your computer/ and then choose Command Prompt to run commands. Alternatively/ you can type ‘msconfig’ in the Start menu’s Search field/ click the Boot tab/ check the Safe boot option/ select an option below/ and click OK/ then Restart. | When you reboot Windows after using the msconfig method/ it will take you back into Safe mode. So/ while still in Safe Mode/ launch msconfig and uncheck the Safe boot option. |
| Windows 8 | If you can boot into Windows/ restart the computer and press the Shift and F8 keys before the Windows logo appears. If that doesn’t work/ you can also try using the Shift and Restart keys at the login window. From the Choose an option screen/ select Troubleshoot/ then Advanced options/ and finally Startup Settings. Click Restart and then press the F4 key to boot into Safe Mode. Another method is to type ‘msconfig’ in the Start menu’s Search field/ click the Boot tab/ check the Safe boot option/ select an option below/ and click OK/ then Restart. | When you reboot Windows after using the msconfig method/ it will take you back into Safe mode. So/ while still in Safe Mode/ launch msconfig and uncheck the Safe boot option. |
| Windows 10 | If you can boot into Windows/ restart the computer and press the Shift and F8 keys before the Windows logo appears. If that doesn’t work/ you can also try using the Shift and Restart keys at the login window. From the Choose an option screen/ select Troubleshoot/ then Advanced options/ and finally Startup Settings. Click Restart and then press the F4 key to boot into Safe Mode. Safe Mode with Networking is also available by selecting the corresponding option in the Advanced Boot Options menu. Another method is to type ‘msconfig’ in the Start menu’s Search field/ click the Boot tab/ check the Safe boot option/ select an option below/ and click OK/ then Restart. | When you reboot Windows after using the msconfig method/ it will take you back into Safe mode. So/ while still in Safe Mode/ launch msconfig and uncheck the Safe boot option. |
net user administrator /active:yes
net user administrator *

Remove Windows Login Password 3 steps for whole password remove process.
Recover the files Recover the deleted files without Windows system.
Transfer the data Transfer the important files of the computer with system.
Multifuctional Data transfer, data recovery, bootable problem recovery can be run without system.
Highly compatible Windows 11/10/8.1/8/7/XP/Vista. UEFI boot.
Remove Login Password Support Windows 11/10/8.1/8/7/XP/Vista. UEFI boot.
Recover the files Recover the deleted files without Windows system.
Transfer the data Transfer the important files of the computer with system.
| BIOS Name | Enter boot menu method |
|---|---|
| Lenovo (Consumer Laptops) | F2 or Fn + F2 |
| Lenovo (Desktops) | F1 |
| Lenovo (ThinkPads) | Enter then F1 |

- Boot from Windows 7 Installation Media: Start by inserting the Windows 7 Setup DVD or a USB flash drive with the Windows 7 installation files into your computer. Restart the system and access the boot menu to select the Windows 7 Installation Media.
- Select System Recovery Options: After booting from the Installation Media, choose your preferred language settings, and then click on “Repair your computer” to access the System Recovery Options.
- Launch Command Prompt: Within the System Recovery Options, select “Command Prompt” from the available options. This will open a Command Prompt window.
- Navigate to the System32 Folder: In the Command Prompt window, type the following command and press Enter:
cd /d C:\Windows\System32
net user administrator /active:yes
exit
- Boot into Windows 7 System Recovery: Restart your computer and access the System Recovery Options again using the Windows 7 Installation Media as mentioned earlier.
- Launch Command Prompt: Select “Command Prompt” from the System Recovery Options to open the Command Prompt window.
- Navigate to the System32 Folder: Type the command
cd /d C:\Windows\System32
net user administrator [new_password]
exit
Relate Links :
Factory Resetting Windows 7 Without Password: A Step-by-Step Guide

13-10-2023
Amanda J. Brook : Struggling to factory reset your Windows 7 PC without a password? Look no further! In this article, we...
The Ultimate Guide to Recovering Your Forgotten Laptop Password

10-10-2023
John Weaver : Having trouble accessing your laptop because you've forgotten your password? Don't stress, we've got you covered with this...
Reset Password on Toshiba Laptop Satellite P855
20-10-2023
Jennifer Thatcher : Unlock your Toshiba Satellite P855 by learning various methods to reset passwords, including using the jumper, Renee PassNow,...
Regaining Access to Your Windows 10 Laptop: Methods to Reset Your Forgotten Password
10-10-2023
Jennifer Thatcher : Locked out of your Windows 10 laptop because you've forgotten your password? Don't panic, here are 5 methods...

