author avatar
    Senior Product Manager
 

Summary
Struggling to factory reset your Windows 7 PC without a password? Look no further! In this article, we have listed four different methods that will guide you through the process step-by-step. From accessing the recovery partition to using specialized tools like Renee PassNow and Ophcrack, this article covers it all. Don't let a forgotten password hold you back from resetting your PC. Read on to find out how.


Have you recently purchased a second hand computer running on Windows 7 and found yourself locked out due to a forgotten password? Or perhaps you just want to reset your Windows 7 to factory settings without the need for a password? Whatever the reason may be, we’ve got you covered. In this chapter, we will explain the significance of the password on a second hand computer, specifically the Windows 7 account password. Knowing this information will help you successfully reset your computer and gain access once again. So let’s dive in and unravel the mystery of the Windows 7 account password.

Reveal : Windows 7 Account Password on a Second-Hand Computer

When buying a used computer or laptop with Windows 7, the seller might not give you the original account and password. You might have to enter the account and password when resetting the system, as shown below:
windows 7 factory reset without password
Ensuring Security and Privacy
One of the primary reasons why the Windows 7 account password is vital on second-hand computers is to ensure the security and privacy of the previous owner’s data. Without the password, it would be relatively easy for anyone to gain access to personal files, emails, and other confidential information stored on the system. By having a password in place, the previous owner ensures that their data remains safe and inaccessible to unauthorized individuals.
This article presents two methods for users to address similar issues.
The first method involves utilizing third-party software, such as Renee PassNow, to remove the account password and then deciding whether to reset it. This method allows users to choose whether to retain the system and software on the original device.
The second method involves bypassing the password and directly performing a system reset. This method is suitable when the system and software on the device are not needed.

Method 1 : Accessing the Recovery Partition for Windows 7 Factory Reset without Password

In many instances, the Recovery Partition can be utilized to bypass the password and perform a factory reset on a computer or laptop, even without knowing the password.When it comes to entering the recovery partition on your PC or laptop, the process may vary depending on the manufacturer and model. In this section, we will provide step-by-step instructions for different PC brands.

Recovery Partitions of Desktop PCs

Method 1: Dell
For Dell computers, follow these steps to enter the recovery partition:
Step 1: Power on your Dell computer and repeatedly press the “F8” key until the “Advanced Boot Options” screen appears.

Step 2: Use the arrow keys to select “Repair Your Computer” and press “Enter“.

Step 3: Select your keyboard layout and click “Next“.

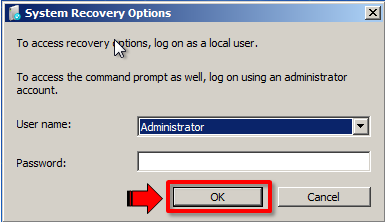
Step 4: Enter your username and password, and then click “OK“.

Step 5: In the “System Recovery Options” window, select “Dell Factory Image Restore” or “Dell Factory Restore” and click “Next“.

Step 6: Follow the on-screen instructions to complete the recovery process.

Method 2: HP
For HP computers, the steps to enter the recovery partition are as follows:
Step 1: Turn on your HP computer and repeatedly press the “F11” key until the “HP Recovery Manager” screen appears.

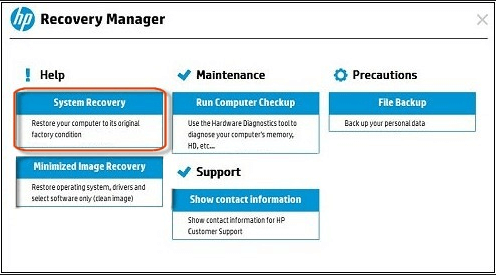
Step 2: In the “HP Recovery Manager” window, select “System Recovery” and click “Next“.

Step 3: Choose the “Minimized Image Recovery” option and click “Next“.

Step 4: Follow the on-screen instructions to complete the recovery process.

Method 3: Lenovo
If you have a Lenovo computer, the steps to enter the recovery partition are slightly different:
Step 1: Start your Lenovo computer and repeatedly press the “F12” key until the “Boot Menu” screen appears.

Step 2: Use the arrow keys to select the “HDD Recovery” option and press “Enter“.

Step 3: In the “Lenovo OneKey Recovery” window, select “Restore to factory default” or “Restore from initial backup” and click “Next“.

Step 4: Follow the on-screen instructions to complete the recovery process.

Method 4: ASUS
ASUS computers have a different method to enter the recovery partition:
Step 1: Power on your ASUS computer and repeatedly press the “F9” key until the “Windows Boot Manager” screen appears.

Step 2: Select your language and click “Next“.

Step 3: Enter your username and password, and then click “OK“.

Step 4: In the “ASUS Preload Wizard” window, select the “Restore factory settings” option and click “Next“.

Step 5: Follow the on-screen instructions to complete the recovery process.

These are just a few examples of how to enter the recovery partition for different PC brands. Remember to consult your computer’s manual or the manufacturer’s website for specific instructions for your model.
Note: The steps mentioned above are specific to entering the recovery partition. If you need instructions on how to save or capture a custom Windows image using Command Prompt and DISM, please refer to the additional context provided in the previous sections.
PC BrandHow to access recovery partition
DellPower on your Dell computer and repeatedly press the ‘F8′ key until the ‘Advanced Boot Options’ screen appears. Use the arrow keys to select ‘Repair Your Computer’ and press ‘Enter’. Select your keyboard layout and click ‘Next’. Enter your username and password/ and then click ‘OK’. In the ‘System Recovery Options’ window/ select ‘Dell Factory Image Restore’ or ‘Dell Factory Restore’ and click ‘Next’. Follow the on-screen instructions to complete the recovery process.
HPTurn on your HP computer and repeatedly press the ‘F11′ key until the ‘HP Recovery Manager’ screen appears. In the ‘HP Recovery Manager’ window/ select ‘System Recovery’ and click ‘Next’. Choose the ‘Minimized Image Recovery’ option and click ‘Next’. Follow the on-screen instructions to complete the recovery process.
LenovoStart your Lenovo computer and repeatedly press the ‘F12′ key until the ‘Boot Menu’ screen appears. Use the arrow keys to select the ‘HDD Recovery’ option and press ‘Enter’. In the ‘Lenovo OneKey Recovery’ window/ select ‘Restore to factory default’ or ‘Restore from initial backup’ and click ‘Next’. Follow the on-screen instructions to complete the recovery process.
ASUSPower on your ASUS computer and repeatedly press the ‘F9′ key until the ‘Windows Boot Manager’ screen appears. Select your language and click ‘Next’. Enter your username and password/ and then click ‘OK’. In the ‘ASUS Preload Wizard’ window/ select the ‘Restore factory settings’ option and click ‘Next’. Follow the on-screen instructions to complete the recovery process.
OtherRestart your computer. If you see a message asking you to Press any key to boot from DVD/ do so. If you don’t see the message/ you might need to change the boot order in your computer’s BIOS settings so that it first starts from the disk or USB. When you see the Install Windows page/ tap or click Repair your computer link to start the Windows Recovery Environment. In the Windows Recovery Environment/ on the Choose an option screen/ click Troubleshoot. Click Advanced Options and then click on Startup Repair. After this complete the repair and see if you are able to boot into your computer.

Recovery Partitions of Laptops

Dell:
To factory reset a Dell laptop using the recovery partition, restart the laptop and repeatedly press the F8 key until the Advanced Boot Options menu appears. Select “Repair Your Computer” and choose the language preferences. Then, click on “Dell Factory Image Restore” to initiate the factory reset process.
Asus:
Asus laptops have a built-in recovery partition that allows for factory resetting. Turn off the device and then press and hold the F9 key while turning it back on. Keep holding the F9 key until the Asus Recovery partition is launched. Select the language and click “Next.” Then, choose the “Restore Factory Settings” option and follow the prompts to complete the factory reset. More detailed instructions can be found on Asus’ support page here.
Lenovo ThinkPad:
Factory resetting a Lenovo ThinkPad laptop requires turning off the device and pressing the F11 key repeatedly during startup. This will open the Lenovo Recovery partition. Choose the “Restore Your System” option and click “Next.” Follow the on-screen instructions to proceed with the factory reset process. Lenovo provides a step-by-step guide on their support page here.
Acer:
Acer laptops can be factory reset by turning off the device and then pressing and holding the Alt and F10 keys simultaneously while turning it back on. This will launch the Acer Recovery Management utility. Select “Restore System to Factory Default” and click “Next” to initiate the factory reset.
Apple:
MacBooks and other Apple laptops have a different method for factory resetting. Restart your laptop and hold down the Command and R keys until the Apple logo appears. This will boot your laptop into macOS Recovery. From there, select “Disk Utility” and click “Continue.” Choose your startup disk and click “Erase.” Once the erase process is complete, exit Disk Utility and select “Reinstall macOS” to perform a factory reset. For more information, you can refer to Apple’s support page here.
MSI:
MSI laptops often have a recovery partition that allows for easy factory resetting. Turn off the laptop and press the F3 key multiple times during startup. This will bring up the MSI Recovery Manager. Choose the “System Recovery” option and follow the on-screen instructions to initiate the factory reset. More detailed instructions can be found on MSI’s support page or user manual.
Surface:
Factory resetting a Microsoft Surface laptop can be done by shutting down the device and then pressing and holding the Volume Up button. While still holding the Volume Up button, press the Power button to turn on the laptop. Release the Volume Up button when the Surface logo appears. Select “Troubleshoot” and then “Reset this PC” to perform the factory reset. Microsoft provides more detailed instructions here.
HP:
HP laptops have a built-in recovery partition that allows for factory resetting. Power off the laptop and press the F11 key repeatedly during startup. This will open the HP Recovery Manager. Select “System Recovery” and follow the prompts to begin the factory reset process. More detailed instructions can be found on HP’s support page here.
Advent:
To perform a factory reset on an Advent laptop, restart your computer and immediately start tapping the F8 or F10 key. This will bring up the recovery tools on your hard drive. Follow the on-screen prompts to restore your computer to its original factory settings.
Brand NameHow to Enter Recovery Partition
AcerPress Left Alt + F10 Keys
AdventTap F10 until ‘Starting System Recovery’ appears
AsusPress F9 or use installation disc
DellPress F8 to bring up Advanced Boot Options
eMachinesPress Left Alt Key + F10
FujitsuPress F8
GatewayPress Alt + F10 Keys
HPPress F11 repeatedly
LenovoPress F11
LGPress F11
Packard BellPress and hold the ALT key while pressing repeatedly the F10 key
SamsungPress F4
Sony VaioTap F10 until the ‘Edit Boot Options’ screen is displayed
ToshibaPress 0 (zero)
AOMEI OneKey RecoveryUse ‘F11′ or ‘A’ key/ or directly select the boot menu at startup
Microsoft SurfacePress and hold the Volume Down button on the Surface while pressing the Power button

Method 2 : Using Renee PassNow to Reset Windows 7 Password

If you have forgotten your Windows 7 password and are locked out of your account, you can easily reset the password using a tool called Renee PassNow. This software allows you to regain access to your account in just a few simple steps. Follow the instructions below to reset your Windows 7 password using Renee PassNow.
Tips:If your account is Microsoft Account, Renee PassNow will convert this account to Local account. After resetting login password, you need to connect your account to your Microsoft Account again.
To reset your Windows password using Renee PassNow, follow these steps:
Step 1: Download and Install Renee PassNow
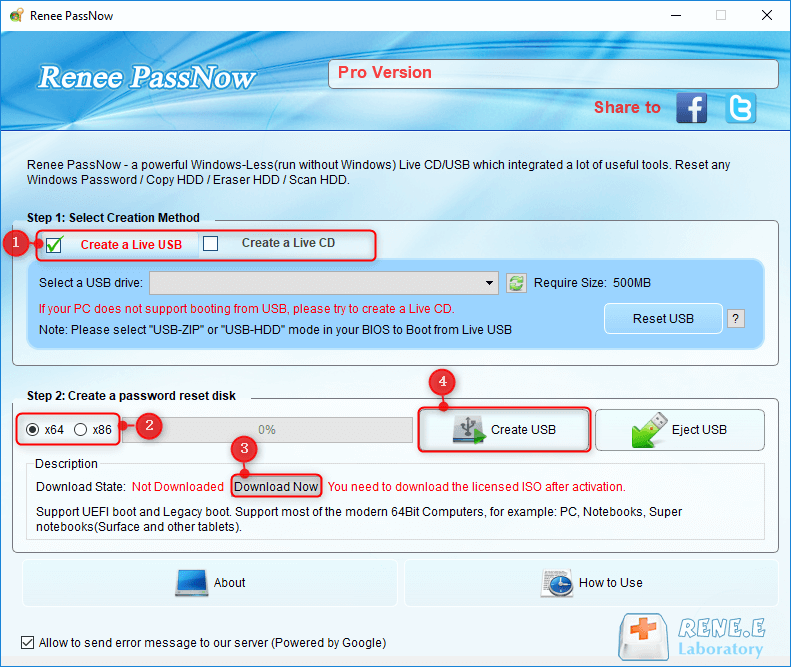
Start by downloading Renee PassNow from the official website and install it on a different computer that you can access. You can choose the appropriate version based on your computer’s operating system.
Renee PassNow – Professional Windows System Rescue Tool

Remove Windows Login Password 3 steps for whole password remove process.

Recover the files Recover the deleted files without Windows system.

Transfer the data Transfer the important files of the computer with system.

Fix Windows startup error Fix various Windows startup failures or crashes.

Erase disk Completely erase disk files which will not be restored.

Remove Windows Login Password 3 steps for whole password remove process.

Recover the files Recover the deleted files without Windows system.

Transfer the data Transfer the important files of the computer with system.

Free TrialFree TrialNow 2000 people have downloaded!
Step 2: Create a Bootable USB or CD/DVD
Launch Renee PassNow and insert a USB flash drive or blank CD/DVD into the computer. Select the option to create a bootable media. Follow the on-screen instructions to complete the process.
Create New Windows 10 Password Reset Disk with Renee PassNow
Step 3: Boot the Locked Server from the Bootable Media
Insert the bootable USB or CD/DVD into the locked Windows computer. Restart the computer and enter the BIOS settings by pressing the appropriate key (usually F2 or Delete). Configure the boot order to prioritize the bootable media.
Common Server:
Server TypeEnter boot menu method
DELLPress the F12 key repeatedly before the Dell logo appears on the screen.
HPPress the F9 key multiple times when the HP logo is displayed.
Common Computers:
BIOS NameEnter boot menu method
ASRockDEL or F2
ASUSDEL or F2 for PCs/ DEL or F2 for Motherboards
AcerDEL or F2
DellF12 or F2
ECSDEL
Gigabyte / AorusDEL or F2
Lenovo (Consumer Laptops)F2 or Fn + F2
Lenovo (Desktops)F1
Lenovo (ThinkPads)Enter then F1
MSIDEL
Microsoft Surface TabletsPress and hold Power and Volume Up buttons
Origin PCF2
SamsungF2
ToshibaF2
ZotacDEL
HPEsc/ F9 for `Boot Menu`/ Esc/ F10/ Storage tab/ Boot Order/ Legacy Boot Sources
INTELF10
Boot the target PC with the created password reset USB/CD/DVD.
Step 4: Select password reset function
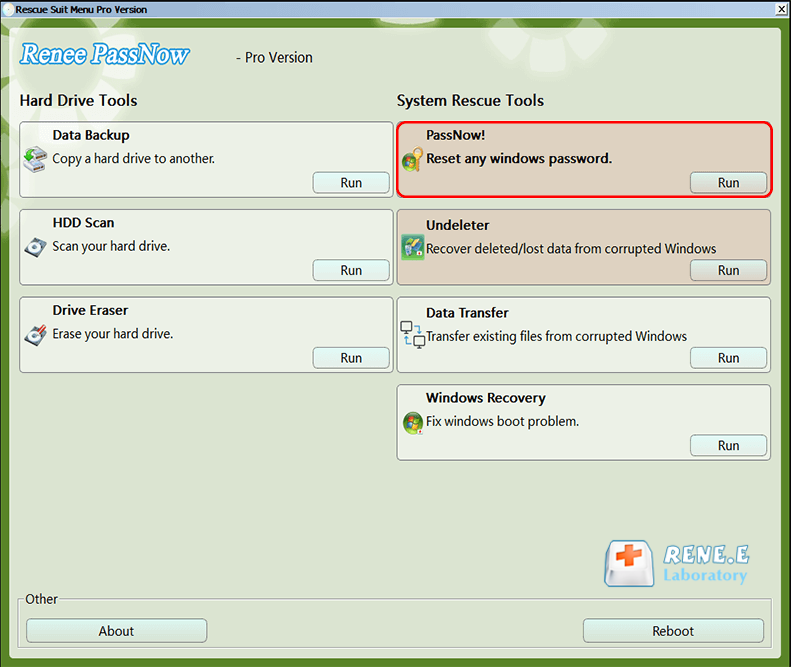
After successfully booting from the bootable media, Renee PassNow will load. Select “PassNow!” function after booting from the new created Windows password reset disk.
After loading into main interface, please select the “PassNow!” function.
Step 5: Resetting the Password
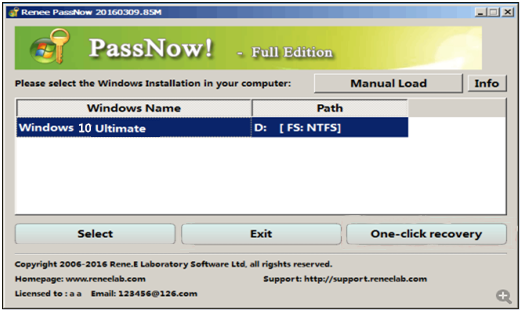
Choose the user account for which you want to reset the password. Then, click on the “Clear Password” button. Renee PassNow will remove or reset the password for the selected user account.
Select target Windows system in the list
Select target user account in the list
Step 6: Reboot the PC
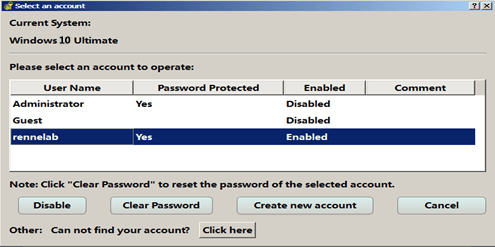
Once the password is reset, remove the bootable media from the PC and restart the computer. You will now be able to log in to Windows Account without a password.
Step 7: Factory Reset your Computer without password
It is important to note that there are alternative methods available, such as using Hiren’s BootCD or modifying registry values, as mentioned in the additional context. However, for simplicity and ease of use, Renee PassNow is a recommended solution for resetting the Windows 7 password.
Pros:
  • Easy to use
  • Step-by-step instructions
  • Can create bootable USB or CD

Cons:

  • Requires access to a different computer

Method 3 : Using command prompt commands and actions required to reset Windows 7 without the need for a password.

One effective method to factory reset Windows 7 without the need for a password is by using the command prompt. This method is useful if you don’t have important data stored on your computer or if you have already created a recovery drive. Here is a step-by-step guide on how to do it:
Step 1: Start by turning off your Windows 7 computer and then turning it back on. When the logo of your computer appears, press and hold the corresponding key to access the recovery partition. The key varies depending on the manufacturer and model of your PC. For example, on Dell computers, press the “F8” key, on HP/Lenovo, press “F11,” on Samsung, press “F4,” and on Sony, press “F10.” Consult the manufacturer’s documentation for the specific key for your computer.
Step 2: Once you’ve entered the recovery partition, the next screen will display specific instructions on the icons to click for an effective system restore. For example, on an HP computer, choose “System Recovery” below the “I need help immediately” option in the recovery manager. The names of the recovery partition may vary depending on the manufacturer, such as Acer eRecovery or Acer Recovery Management, Asus Recovery Partition or AI Recovery, Dell Factory Image Restore, DataSafe, Dell Backup & Recovery, HP System Recovery or Recovery Manager, Lenovo Rescue and Recovery or ThinkVantage Recovery, and so on.
System Recovery HP recovery
Step 3: In the next screen, you will see two options: “Back up your files first (recommended)” and “Recover without backing up your files.” Choose the option that suits your situation. It is highly recommended to back up your data before proceeding with the factory reset. Once you’ve made your selection, click “Next” to format the entire hard drive and erase all data. Remember, this is your last chance to back up your files as all your data, including documents and programs, will be permanently lost.
Step 4: After formatting the hard drive, your computer will reboot. During startup, press the “F8” key continuously until the “Advanced Boot Options” menu appears. From the menu, select “Safe Mode with Command Prompt” and press “Enter.
Safe Mode with Command Prompt windows 7
Step 5: The computer will now start in safe mode with a command prompt. Type in the following command and press “Enter“:

net user Administrator *

Now you will be prompted to enter a new password for the Administrator account. Type in your desired password and press “Enter” again. You can leave the password blank if you prefer.
Step 6: After successfully setting a new password, restart your computer once again. This time, let it start normally.
After following these steps, your Windows 7 computer will be factory reset without the need for a password. Keep in mind that this process will restore your computer to its original configuration when you first purchased it, deleting all your files, programs, and settings. Therefore, it’s crucial to back up any important data beforehand.
Note: If you don’t have a recovery partition or the “Advanced Boot Options” menu is not accessible, there are alternative methods to factory reset Windows 7 without a password. One such method is using the Windows 7 Installation disk or a third-party software like Passper WinSenior. These methods offer different approaches to reset Windows 7 back to its factory settings, but it’s essential to exercise caution and ensure you have proper backups before proceeding with any method.
Using the command prompt or other methods to factory reset Windows 7 without a password provides reliable solutions for various scenarios. Whether you’ve forgotten your password or you’re preparing your computer for resale, these methods can help you restore your Windows 7 computer to its original state. Remember to carefully follow the instructions and prioritize data backup to avoid any potential data loss.
Pros:
  • Effective method to factory reset without a password
  • Can be done using the command prompt
  • No need for important data stored or a recovery drive

Cons:

  • May permanently delete all data and files
  • Need to back up data beforehand
  • Alternative methods may be necessary if recovery partition or Advanced Boot Options menu is not accessible

Method 4: Using Ophcrack to Retrieve Windows 7 Password on Secondhand Computers

In the previous chapter, we discussed how to reset Windows 7 without a password using specific command prompt commands. However, there is another option that can be used to retrieve the password of a secondhand computer running on Windows 7 – using a password recovery tool like Ophcrack.
Ophcrack is a free and open-source software that is specifically designed to crack Windows passwords. It uses a combination of brute-force and rainbow tables to recover the passwords, making it a powerful tool for retrieving forgotten or lost Windows passwords.
If you have purchased a secondhand computer and do not have the password to access the Windows 7 account, you can follow these steps to use Ophcrack to retrieve the password:
Step 1: Download and Install Ophcrack
The first step is to download Ophcrack from its official website and install it on a separate computer (not the one you want to retrieve the password for). Ophcrack is available for Windows, Linux, and Mac operating systems.
Step 2: Create a Bootable USB Drive
Once Ophcrack is installed on your computer, you will need to create a bootable USB drive for it using a tool like Rufus or Universal USB Installer. This USB drive will be used to boot the computer with the forgotten password.
Step 3: Boot from the USB Drive
Insert the USB drive into the computer with the forgotten password and restart it. As the computer boots up, press the designated key to enter the boot menu and select the USB drive as the boot device.
Launch Ophcrack
Step 4: Crack the Password
Once the computer boots up from the USB drive, Ophcrack will automatically start and begin the process of cracking the Windows 7 password. This may take some time depending on the complexity of the password.
Step 5: Retrieve the Password
Once Ophcrack has successfully cracked the password, it will display the password on the screen. Note down the password and use it to log in to the Windows 7 account on the secondhand computer.
Ophcrack main menu
Using Ophcrack is a faster and more efficient way of retrieving a forgotten Windows 7 password on a secondhand computer compared to other methods. However, it may not work if the password is too complex or if the computer has been upgraded from an older version of Windows.
With this method, you can easily gain access to a secondhand computer and reset the password to your own liking. It is always recommended to change the password after retrieving it to ensure the security of your device.
Pros:
  • Free and open-source software
  • Powerful tool for retrieving forgotten or lost Windows passwords
  • Faster and more efficient way of retrieving a forgotten Windows 7 password on a secondhand computer compared to other methods

Cons:

  • May not work if the password is too complex
  • May not work if the computer has been upgraded from an older version of Windows

Troubleshooting Tips for Common Issues During Factory Reset

Factory resetting your Windows 7 computer is a useful way to get rid of any accumulated junk and start fresh. However, sometimes the process may not go as smoothly as planned, and you may encounter some issues. Here are some common problems that you may face during the factory reset process and how to troubleshoot them.
Stuck at “Preparing Your Desktop”
One of the most common issues that may occur during a factory reset is getting stuck at the “Preparing Your Desktop” screen. This usually happens because of corrupted system files or hardware issues. If this happens, try restarting your computer and running the factory reset again. If the problem persists, you may need to run a system scan using the Command Prompt. Open the Command Prompt by clicking on the Start menu and typing “cmd” into the search bar. Then, type in the command

sfc /scannow

and hit Enter. This will scan and repair any corrupted system files that may be causing the issue.
Unable to Access Recovery Options
Another common problem that may arise during the factory reset process is not being able to access the recovery options. This can happen if your computer’s recovery partition is damaged or missing. In this case, you may need to use a Windows installation disc or a USB drive with a Windows installation media to access the recovery options. If you don’t have one, you can create one using another computer by following the instructions on the Microsoft website.
Incorrect Password
If you’re trying to factory reset your Windows 7 computer and are prompted for a password, but you don’t remember setting one up, it could be a problem with the keyboard layout. Make sure that you’re using the correct layout and try entering the password again. If that doesn’t work, you can try using the default Windows 7 password which is usually left blank. If all else fails, you can use a password recovery tool like Ophcrack as mentioned in our previous topic.
Unexpected Shutdown
During the factory reset process, if your computer shuts down unexpectedly, it could be due to overheating or a faulty power source. Make sure that your computer is not overheating and check your power source. If the problem persists, you may need to run a hardware diagnostic test to check if there are any issues with your hardware. You can access the diagnostic tool by pressing F12 during startup.
No Progress After Several Hours
If you’ve been waiting for several hours and there’s still no progress on the factory reset, it could be because the process is stuck. You can try restarting your computer and running the factory reset again. If the problem persists, it could be due to incompatible or outdated drivers. You can try updating your drivers before running the factory reset again.

Conclusion

In conclusion, resetting a Windows 7 password on a second-hand computer can seem like a daunting task, but with the right methods and tools, it can be easily accomplished. Whether you have access to the recovery partition or need to use a third-party software like Renee PassNow or Ophcrack, there are multiple options available to successfully reset the password without factory resetting the entire system. Additionally, familiarizing yourself with the specific command prompt commands and being aware of common troubleshooting issues can help ensure a smooth and successful process. With this step-by-step guide, you can easily reset a Windows 7 password and gain access to your second-hand PC or laptop. Remember to always proceed with caution and follow the instructions carefully to avoid any potential data loss.