author avatar
    Senior Product Manager
 

Summary
Discover the benefits of migrating your operating system to an SSD and learn how to do it with our step-by-step guide. Find out how to back up your data and test for success, as well as potential challenges to look out for. Upgrade your system's speed and performance today by migrating your OS to an SSD.
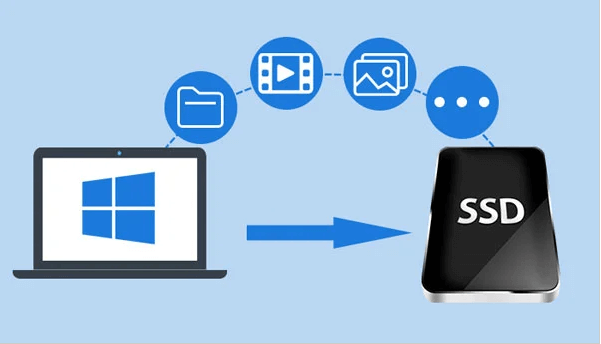

As technology continues to advance, many computer users are looking for ways to optimize their system’s performance. One popular method is to migrate their operating system (OS) to a solid-state drive (SSD). This process involves transferring your OS from a traditional hard drive to a faster, more efficient SSD, resulting in improved speed and overall system responsiveness. In this chapter, we will explore the benefits of migrating your OS to an SSD, as well as some common reasons for making the switch. Whether you are a gamer, professional, or everyday computer user, read on to discover how migrating to an SSD can enhance your computing experience.

Benefits of Migrating Your OS to an SSD

Migrating your operating system (OS) to a Solid State Drive (SSD) offers numerous benefits that can greatly enhance your computing experience. In this chapter, we will delve into the key advantages of migrating to an SSD and the common reasons for doing so. Whether you’re a casual user seeking improved speed and performance or a professional looking to optimize your workflow, migrating your OS to an SSD is a practical and reliable solution that is certainly worth it.
Improved Speed and Performance: One of the main reasons for migrating to an SSD is the significant increase in speed and overall performance. SSDs have faster read and write speeds compared to traditional Hard Disk Drives (HDDs), resulting in quicker boot times, reduced application loading times, and seamless multitasking. Tasks such as launching apps, opening files, and accessing data become much faster and more responsive. For instance, a system with an SSD can typically boot to the Start Menu in under 10 seconds, whereas this process can take much longer on an HDD.
Saving Time and Effort: Migrating your operating system to an SSD can be a complex and time-consuming task, especially if you choose to reinstall all your software and search for license keys manually. However, using professional software simplifies this process significantly. It allows for a smooth and hassle-free migration, saving you valuable time and effort.
migrate os to ssd
Ensuring Data Integrity: Professional software is designed to ensure the integrity of your data during the migration process. It copies only the used data sectors, resulting in a faster copying speed compared to a fresh installation. This means that your files, settings, and preferences will be transferred to the new SSD accurately and without any data loss.
Seamless Migration Experience: By using professional software, you can enjoy a seamless migration experience. The software provides a user-friendly interface and step-by-step instructions, making the process easy to follow even for those with limited technical knowledge. This ensures a smooth transition from your old system to the new SSD without any major disruptions or complications.
Considering these compelling benefits, it’s no surprise that many users choose to migrate their OS to an SSD. Whether you’re a professional looking to improve your workflow or a casual user seeking a faster and more efficient system, an SSD can greatly enhance your computing experience and make your tasks easier and more enjoyable.
In conclusion, migrating your OS to an SSD is a highly worthwhile decision, given the numerous benefits it provides. It’s crucial to back up your data before initiating the migration process and to follow each step carefully to ensure a successful switch. By choosing a reliable SSD and using professional migration tools, you can confidently migrate your OS to an SSD and unlock the full potential of your computer’s performance.

Importance of Backing Up Your Data Before OS Migration

Before proceeding with the migration process, it is crucial to back up all of your data from the current OS drive. This is a crucial step that should not be overlooked as it can prevent potential data loss in case of any issues during the cloning process.
Creating a full system backup ensures that all of your files, settings, and applications are safely saved and can be restored if needed. It acts as a safety net, giving you peace of mind and minimizing any potential risks during the transition to an SSD.
Without a proper backup, any errors or interruptions during the cloning process can result in permanent data loss. This is especially important if you have important documents, photos, or other irreplaceable files on your computer. Renee Becca can help you back up and restore important data in your computer, such as programs, system configuration, etc.
Back up data
In conclusion, backing up your data before cloning your OS to an SSD is crucial for a successful migration process. It minimizes the risk of data loss, saves time and effort, and allows you to restore your system to its previous state if needed. Not backing up your data can result in potential permanent data loss, making it a necessary step before proceeding with the migration process.
For a step-by-step guide on how to transfer your OS to an SSD using Renee Becca, please refer to the following chapters.

Method 1: Transferring Your OS to an SSD with Renee Becca

If you’re looking to upgrade your computer’s storage to a Solid State Drive (SSD), one of the most important steps is to transfer your operating system (OS) to the new drive. This will ensure that your computer boots up faster and runs smoother. In this chapter, we will discuss the step-by-step guide for transferring your OS to an SSD using Renee Becca.
Renee Becca is a tool specially used for system/hard disk data backup and restoration. It can help you back up and restore important data in your computer, such as programs, system configuration, emails, photos, videos, documents, bookmarks, etc. In addition, you can also use it to clone disk and system data. The software provides three cloning methods, including hard disk cloning/cloning system hard disk; partition cloning and system migration. You can choose the most suitable cloning method according to your different needs.
Here is a guide on how to use Renee Becca for cloning your Windows system to the SSD.
Hot Topic - ADsRenee Becca – Safe and Quick System Migration to SSD

Automatic 4K alignment Improves SSD performance during system migration.

Support GPT and MBR Automatically adapt to the suitable partition format.

Support NTFS and FAT32 Redeploy various files in different file systems.

Back up quickly Back up files at up to 3,000MB/min.

Overall backup schedule Support system redeployment/system backup/partition backup/disk backup/disk clone.

Automatic 4K alignment Improve SSD performance

Support GPT and MBR Intelligently adapt to a partition format

Support NTFS and FAT32 Redeploy files in different file systems
Free TrialFree TrialNow 2000 people have downloaded!
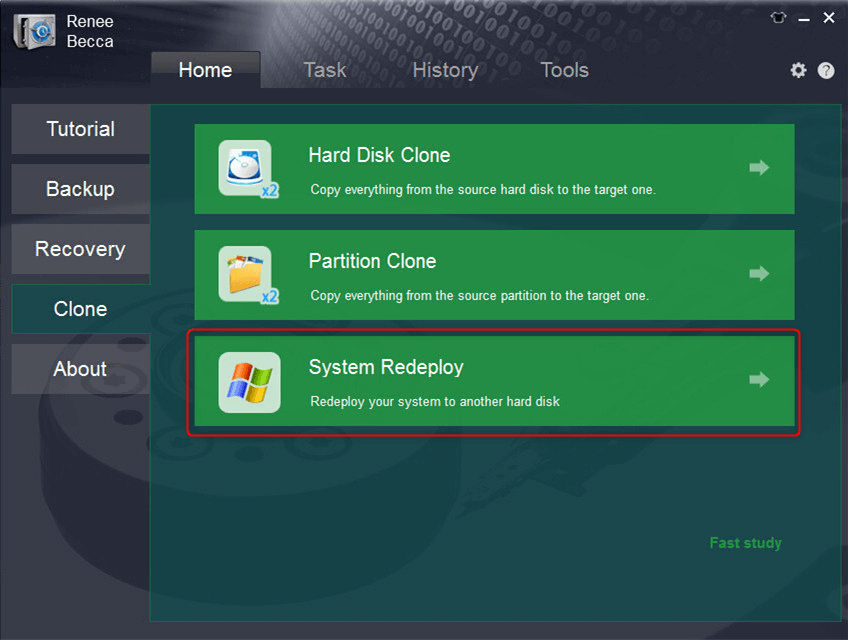
Step 1: Launch Renee Becca and click “System Redeploy” function in “Clone”.
select system redeploy function in renee becca
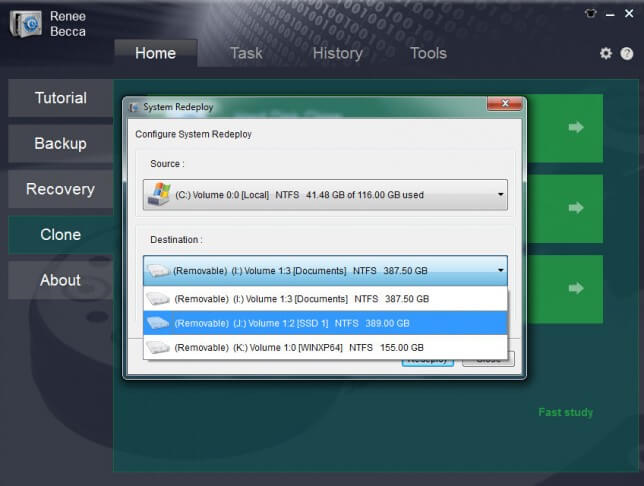
Step 2: Please select the original disk which saves Windows system and the target disk. Then click “Redeploy” to process the system migration.
select target disk and desination in system redeploy function in renee becca
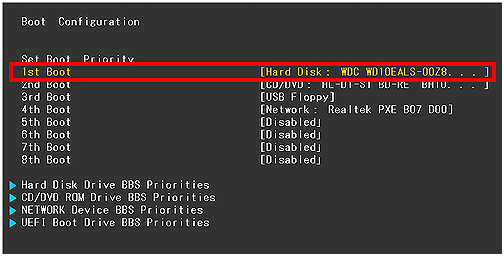
Step 3: After clone finish, please selec the new disk in BIOS as the boot disk. Then you can start the computer from the newly installed hard disk with the original system.
migrate os to ssd
Here is a list of BIOS shortcut keys for different brands. Alternatively, you can observe the BIOS shortcut keys displayed on the screen during booting.
BIOS NameMethodThe Key or Keys
AcerPress Del or F2 immediately after powering onDel/ F2
CompaqPress F10 while the cursor in the top right corner of the screen is blinkingF10
DellPress F2 when the Dell logo appears/ or press every few seconds until the message Entering Setup appearsF2
eMachinesPress Tab or Del while the eMachine logo displays on the screenTab/ Del
FujitsuPress F2 once the Fujitsu logo appearsF2
GatewayPress the F1 key repeatedly after restarting the computerF1
HPPress the F1/ F10/ or F11 key after restarting the computerF1/ F10/ F11
IBMPress F1 immediately after powering on the computerF1
LenovoPress F1 or F2 after powering on the computerF1/ F2
NecPress F2 to enter the BIOS SetupF2
Packard BellPress F1/ F2/ or Del to enter BIOSF1/ F2/ Del
SamsungPress F2 to start the BIOS setup utilityF2
SharpPress F2 after the computer startsF2
SonyPress F1/ F2/ or F3 after turning on the computerF1/ F2/ F3
ToshibaPress F1 or Esc after powering on to access BIOSF1/ Esc
ARLTPress Del or F11 when the respective message is shownDel/ F11
By following these simple steps, you can seamlessly transfer your Windows OS to a new SSD using Renee Becca. This method eliminates the need for a fresh installation, saving you time and effort. Enjoy the improved performance and faster boot times that come with a new SSD!
Overall, using Renee Becca for OS migration offers a simple and hassle-free way to transfer your operating system to an SSD. However, it is important to note that this method may not be suitable for those with limited technical knowledge.
Pros:
  • Allows safe migration of operating system without fresh installation.
  • Simple steps for a smooth and hassle-free transfer.
  • Improves performance and faster boot times with new SSD.

Cons:

  • Doesn't have a Mac version.

On that note, we encourage you to check out the next chapter which discusses another popular method for transferring your OS to an SSD using Norton Ghost. It is always recommended to have multiple options and choose the one that works best for you. Good luck!

Method 2: Transferring Your OS to an SSD with Norton Ghost

In addition to using Renee Becca, there is another reliable method for transferring your operating system (OS) to a solid state drive (SSD) – using Norton Ghost. This software-based migration method offers a user-friendly step-by-step guide that can help you successfully migrate your OS to an SSD. Follow the instructions below to learn how to use Norton Ghost for OS migration.
Step 1: Connect the SSD to Your Computer
The first step is to physically connect the SSD to your computer. If you’re using a desktop, shut down your computer and open the case. Connect the SSD to an available SATA port using the appropriate cables. For laptops, you may need a USB-to-SATA adapter or an external enclosure to connect the SSD externally.
Step 2: Download and Install Norton Ghost
Download and install Norton Ghost on your computer. You can find the download link on Norton’s website. Once installed, open the program.
Step 3: Back Up Your System
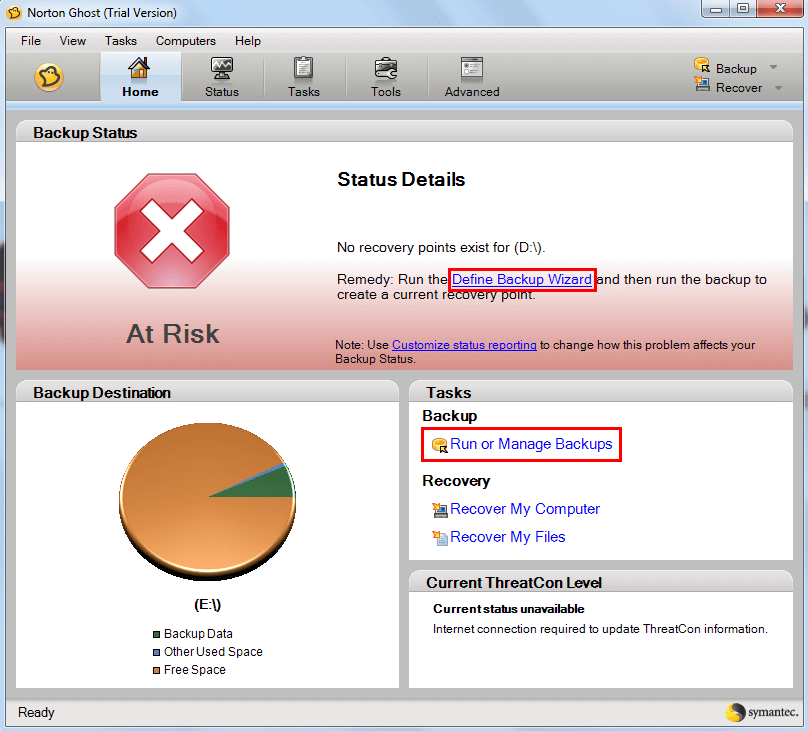
Before proceeding with the migration process, it is important to create a full backup of your system. This will serve as a restore point in case any issues occur during the migration. In Norton Ghost, click on “Backup” and select “Full Drive Backup“. Follow the instructions to create a backup of your OS and all system files.
back up system
Step 4: Perform the Migration
Once the backup is complete, click on “Recovery” in Norton Ghost and then select “Copy My Hard Drive“. Choose your current OS drive as the source and the SSD as the destination. Click “Next” and follow the prompts to start the migration process. Once completed, your OS will be transferred to the SSD.
Step 5: Set the SSD as the Boot Drive
Restart your computer and enter the BIOS/UEFI by pressing the appropriate key during startup. Locate the Boot Options or Boot Priority settings and select the SSD as the primary boot device. Save the changes and exit the BIOS.
Step 6: Verify the Migration Success
After setting the SSD as the boot drive, restart your computer and ensure that it boots up from the SSD. Double-check that all your files, settings, and applications are intact and functioning correctly. If everything looks good, you can clean up and repurpose your old OS drive.
Note:
As with any software-based migration method, there is always a small chance of technical issues or errors occurring. It is recommended to perform a test and verify the success of the migration before relying on the new SSD for everyday use.
Summary
Norton Ghost offers a convenient and straightforward method for migrating your OS to an SSD. With its user-friendly interface and step-by-step guide, you can easily transfer your OS and all system files to the new drive. However, as with all software-based methods, there is a risk of technical issues arising. It is always recommended to perform a test and verify the success of the migration before relying on the new SSD for your everyday tasks.
For potential challenges that may occur during the migration process and how to test and verify a successful OS migration, please refer to the subsequent chapters in this series.
Pros:
  • Convenient and straightforward method for migrating OS to an SSD
  • User-friendly interface and step-by-step guide

Cons:

  • Risk of technical issues or errors occurring

Conclusion

In conclusion, migrating your operating system (OS) to an SSD can provide numerous benefits such as faster boot times, improved performance, and increased storage capacity. Common reasons for making this switch include wanting a faster and more efficient system, upgrading to a larger storage capacity, or prolonging the lifespan of your current computer. However, it is crucial to back up your data before proceeding with the migration and to carefully follow a step-by-step guide to avoid any potential challenges. Methods such as using Renee Becca or Norton Ghost can help make the process smoother and more manageable. Additionally, it is essential to test and verify the success of the OS migration to ensure all data has been transferred correctly. Keeping in mind the potential risks and challenges involved, with proper preparation and careful execution, migrating your OS to an SSD can greatly benefit your overall computing experience.