author avatar
    Specialist of Customer Service Dept.
 

Summary
Migrate OS to SSD Windows 10 for improved speed, performance, and reliability. Use professional clone tools or Windows built-in tool for ease and speed.
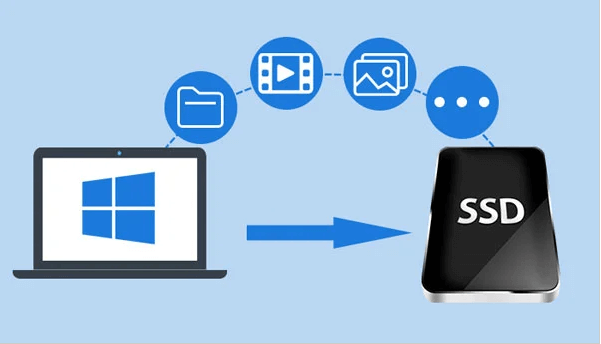


With the increasing popularity of solid state drives (SSDs), many Windows 10 users are looking to migrate their operating system from traditional hard drives to these faster and more efficient storage devices. However, the process of transferring your OS to an SSD can be complex and time-consuming, requiring you to reinstall all of your software and search for license keys. But with the help of professional tools, such as Renee Becca, this process can be simplified and hassle-free. In this chapter, we will discuss the benefits of using professional software to migrate Windows 10 to an SSD, and how Renee Becca can make the process smooth and efficient.

Why Use Professional Clone Tools to Migrate Windows 10

Migrate with Ease and Speed
Migrating your operating system (OS) to a solid-state drive (SSD) can be a daunting task. With the high volumes of data and files that an OS typically holds, the transfer process can take hours or even days to complete. However, with the use of professional migration tools, this process can be significantly faster and more efficient. These tools only copy the used data sectors of your OS, resulting in a quicker transfer compared to a fresh installation that can waste time and money.
Saving Time and Effort: Migrating your operating system to an SSD can be a complex and time-consuming task, especially if you choose to reinstall all your software and search for license keys manually. However, using professional software simplifies this process significantly. It allows for a smooth and hassle-free migration, saving you valuable time and effort.
No Need to Reinstall Software: One of the biggest advantages of using professional software for OS migration is that it eliminates the need to reinstall all your software applications. This can be a tedious and frustrating task, especially if you have a large number of programs installed. With professional software, you can seamlessly transfer all your software to the new SSD without the hassle of reinstalling each one individually.
migrate os to ssd windows 10
Avoiding the Search for License Keys: Another benefit of using professional software is that it eliminates the need to search for license keys. License keys are essential for activating and using licensed software. However, finding and retrieving these keys can be a daunting and time-consuming process. Professional software takes care of this by automatically transferring the license keys along with the software during the migration process.
Ensuring Data Integrity: Professional software is designed to ensure the integrity of your data during the migration process. It copies only the used data sectors, resulting in a faster copying speed compared to a fresh installation. This means that your files, settings, and preferences will be transferred to the new SSD accurately and without any data loss.
Seamless Migration Experience: By using professional software, you can enjoy a seamless migration experience. The software provides a user-friendly interface and step-by-step instructions, making the process easy to follow even for those with limited technical knowledge. This ensures a smooth transition from your old system to the new SSD without any major disruptions or complications.
The benefits of using professional software for OS migration to an SSD are numerous. It saves time, avoids the hassle of reinstalling software and searching for license keys, ensures data integrity, and provides a seamless migration experience. It is a highly recommended option for those looking to upgrade to an SSD without the need for a fresh installation.
Tips:Consider researching and comparing different professional software options for OS migration to ensure you choose the most reliable and user-friendly one.

Methods for Migrating Windows 10 OS to SSD

The process of migrating your operating system (OS) to a solid-state drive (SSD) can seem daunting and complex. However, with the right methods and software, it can be a relatively simple task. There are various methods and software options available to help you migrate your OS to an SSD effectively. In this chapter, we will explore some of the most popular options and their features.

Option 1 : Renee Becca

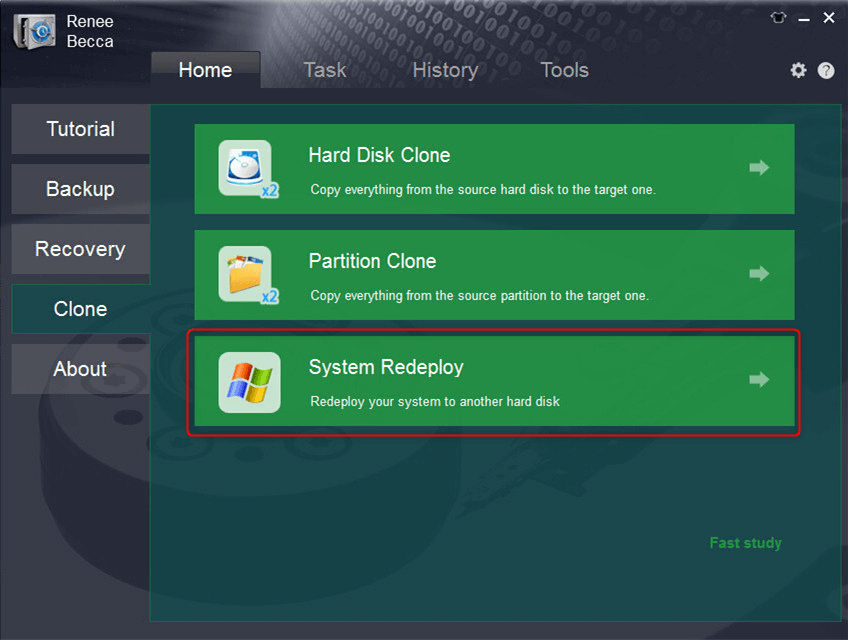
Renee Becca is a comprehensive software that offers multiple features to help you migrate your OS to an SSD. It allows you to clone your entire operating system, including all the files, settings, and applications, to a new SSD with just a few clicks. This software also offers options to resize partitions, optimize SSD performance, and create a bootable rescue media. Furthermore, Renee Becca has a user-friendly interface that makes the migration process easy and hassle-free. The software provides three cloning methods, including hard disk cloning/cloning system hard disk; partition cloning and system migration. You can choose the most suitable cloning method according to your different needs.
Here’s a step-by-step guide on how to use Renee Becca to migrate Windows 10 to an SSD:
Hot Topic - ADsRenee Becca – Safe and Quick System Migration to SSD

Automatic 4K alignment Improves SSD performance during system migration.

Support GPT and MBR Automatically adapt to the suitable partition format.

Support NTFS and FAT32 Redeploy various files in different file systems.

Back up quickly Back up files at up to 3,000MB/min.

Overall backup schedule Support system redeployment/system backup/partition backup/disk backup/disk clone.

Automatic 4K alignment Improve SSD performance

Support GPT and MBR Intelligently adapt to a partition format

Support NTFS and FAT32 Redeploy files in different file systems
Free TrialFree TrialNow 2000 people have downloaded!
Step 1: Launch Renee Becca and click “System Redeploy” function in “Clone”.
select system redeploy function in renee becca
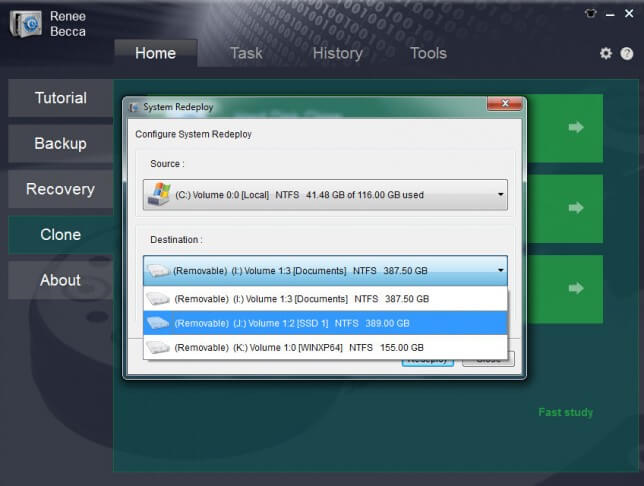
Step 2: Please select the original disk which saves Windows system and the target disk. Then click “Redeploy” to process the system migration.
select target disk and desination in system redeploy function in renee becca
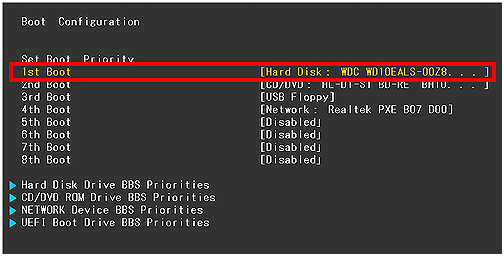
Step 3: After clone finish, please select the new disk in BIOS as the boot disk. Then you can start the computer from the newly installed hard disk with the original system.
change the boot order in hard disk in boot configuration in BIOS
Here is a list of BIOS shortcut keys for different brands. Alternatively, you can observe the BIOS shortcut keys displayed on the screen during booting.
BIOS NameMethodThe Key or Keys
AcerPress Del or F2 immediately after powering onDel/ F2
CompaqPress F10 while the cursor in the top right corner of the screen is blinkingF10
DellPress F2 when the Dell logo appears/ or press every few seconds until the message Entering Setup appearsF2
eMachinesPress Tab or Del while the eMachine logo displays on the screenTab/ Del
FujitsuPress F2 once the Fujitsu logo appearsF2
GatewayPress the F1 key repeatedly after restarting the computerF1
HPPress the F1/ F10/ or F11 key after restarting the computerF1/ F10/ F11
IBMPress F1 immediately after powering on the computerF1
LenovoPress F1 or F2 after powering on the computerF1/ F2
NecPress F2 to enter the BIOS SetupF2
Packard BellPress F1/ F2/ or Del to enter BIOSF1/ F2/ Del
SamsungPress F2 to start the BIOS setup utilityF2
SharpPress F2 after the computer startsF2
SonyPress F1/ F2/ or F3 after turning on the computerF1/ F2/ F3
ToshibaPress F1 or Esc after powering on to access BIOSF1/ Esc
ARLTPress Del or F11 when the respective message is shownDel/ F11
By following these straightforward steps, you can effortlessly migrate your Windows 10 operating system to an SSD using Renee Becca. The software handles all the complex cloning tasks, ensuring that your new SSD is an exact replica of your previous system. With Renee Becca’s user-friendly interface, even beginners can perform the migration without any issues.
With a faster and more reliable SSD, your Windows 10 system will experience improved boot times, faster program loading, and overall enhanced performance. Say goodbye to slow hard drives and embrace the efficiency of an SSD!
Utilizing Renee Becca’s powerful features, you can also explore its comprehensive backup, restore, and cloning functionalities. The software supports system backups, file backups, and disk/partition cloning, making it a versatile data management tool for all your needs.
Pros:
  • Allows safe migration of operating system without fresh installation.
  • Simple steps for a smooth and hassle-free transfer.
  • Improves performance and faster boot times with new SSD.

Cons:

  • Doesn't have a Mac version.

Option 2 : Windows Built-in Tool

Windows 10 has a built-in feature called “System Image Backup” which allows you to create a system image of your OS and restore it to a new SSD. This option creates an exact copy of your OS and all the files, settings, and applications on it. However, it does not offer the option to resize partitions. This method is recommended for users who want a basic, no-frills approach to OS migration.
Step 1: Connect the SSD
The first step is to ensure that your SSD is properly connected to your computer. You can do this by either installing the SSD alongside your existing hard drive or by using a USB to SATA adapter or enclosure to connect it externally. Make sure that the SSD is detected by your computer before proceeding.
Step 2: Create a System Image Backup
1. Now, let’s create a system image backup of your Windows 10 installation:
2. Right-click on the Start menu and select “Settings“.
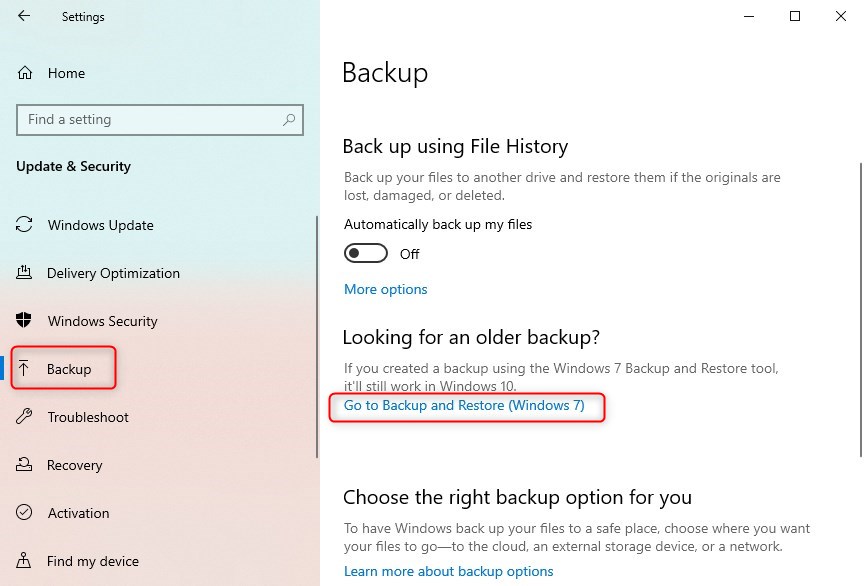
3. In the Settings menu, select “Update & Security” and then click on “Backup” from the left-hand menu.
4. In the Backup menu, click on “Go to Backup and Restore (Windows 7)” listed under the “Looking for an older backup?” category.
Go to Backup and Restore (Windows 7)
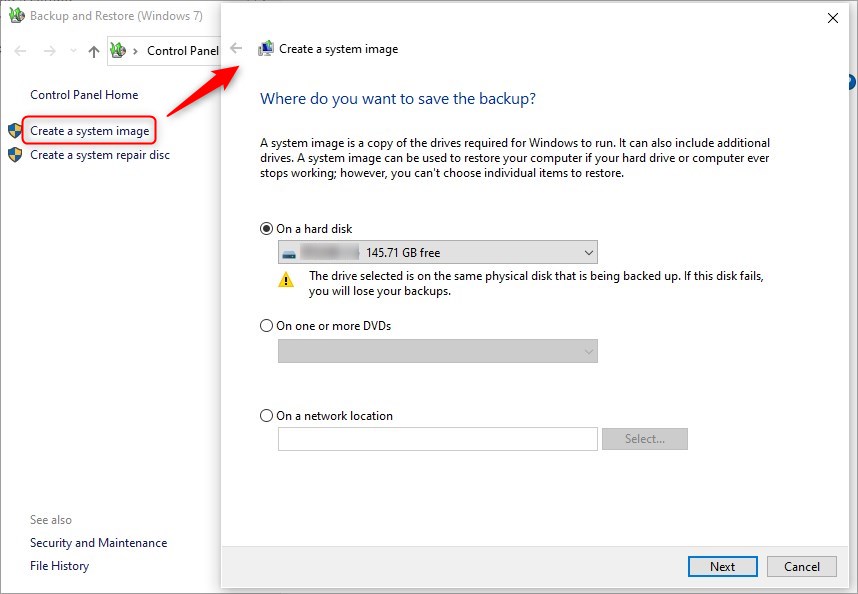
5. In the Control Panel window, select “Create a system image” from the left-hand menu.
6. Choose the destination where you want to save the system image backup. You can select an external hard drive or a network location. Ensure that you have enough storage space available.
7. Select the drives that you want to include in the backup, typically the drive where your Windows 10 installation is located.
8. Click on “Start backup” to begin creating the system image backup. This process may take some time.
create a system image
Step 3: Prepare the SSD
Before restoring the system image backup to the SSD, you need to make sure that it is properly prepared:
  • If the SSD already has data, make sure to backup any important files as the restoration process will erase all data on the SSD.
  • Ensure that the total disk space of the SSD is larger than the used space of your current hard drive.
Step 4: Restore the System Image Backup to the SSD
Once the SSD is ready, you can proceed with restoring the system image backup:
1. Connect the SSD to your computer, either by installing it or using the USB to SATA adapter.
2. Boot your computer from a Windows installation media.
3. Select your language preferences and click “Next” to continue.
4. Click on “Repair your computer” at the bottom left corner.
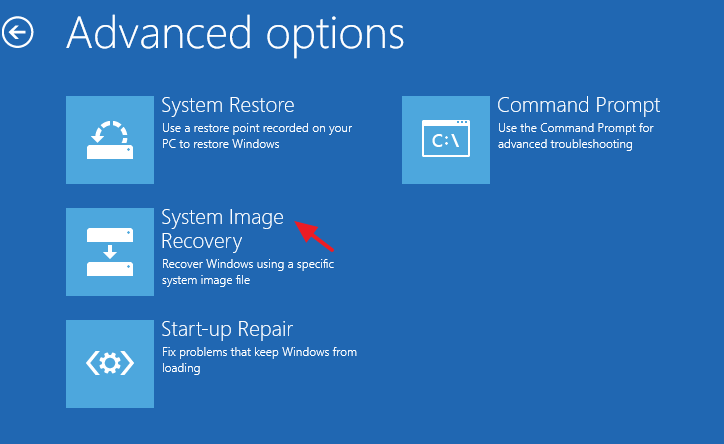
5. In the recovery options, choose “Troubleshoot” and then select “Advanced options“.
6. Select “System Image Recovery” and choose the system image backup that you created earlier. If the backup is saved on a network location, select the appropriate option and provide the network path.
7. Follow the on-screen instructions to restore the system image backup to the SSD.
restore system image
Once the restoration process is finished, you can restart your computer and boot Windows 10 from the SSD. If your computer has only one slot, you may need to replace the hard drive with the SSD. If you have multiple slots, you can simply enter the BIOS and select the SSD as the first boot option.
Using the Windows System Image Backup tool is one method for migrating Windows 10 to an SSD. However, it’s important to note that this method may not be suitable if you are migrating to a smaller SSD or if you want more flexibility in the migration process. In such cases, using third-party software like Renee Becca can provide better options for resizing partitions and copying Windows to a new hard drive.
Pros:
  • Improved performance and speed of the computer
  • Built-in tool available in Windows 10 for migrating the OS
  • Step-by-step guide provided for using the tool

Cons:

  • May not be suitable for migrating to a smaller SSD
  • Limited flexibility in the migration process

Overall, it is important to choose a reliable and reputable software or method for OS migration to ensure that your data is transferred safely and efficiently. It is also recommended to backup all your important files before starting the migration process to avoid any potential data loss.

Conclusion

In conclusion, migrating your OS to an SSD can greatly improve the speed, performance, and reliability of your computer. By using professional tools, such as Renee Becca, you can easily transfer your operating system without the hassle of reinstalling software and searching for license keys. This results in faster copying speeds and avoids wasting time and money on a fresh installation. Upgrade your computer today and experience the benefits of an SSD for your operating system.