author avatar
    Senior Program Developer
 

Summary
Migrate OS to SSD Windows 7 for enhanced performance and responsiveness. Use migration tools like Renee Becca for a reliable and efficient process.


Upgrading to a solid-state drive (SSD) is a smart decision, especially if you’re still using a traditional hard drive on your Windows 7 computer. With its faster boot-up times, improved performance, and enhanced durability, an SSD can significantly enhance your overall computing experience. However, transferring your operating system (OS) from the old hard drive to the new SSD might seem daunting. Luckily, there are reliable migration tools available that make the process smooth and hassle-free.
In this article, we will guide you through the steps to migrate your OS to an SSD on a Windows 7 system, ensuring a seamless transition and maximum benefits from your new drive.
transfer wondows 7 to ssd

Advantages of Using Migration Tools to Migrate Windows 7 to SSD

Save Time

Migration tools are a valuable asset when it comes to migrating the operating system to an SSD in Windows 11. These tools streamline the process and eliminate the need for manual intervention, ultimately saving valuable time for users. Users no longer need to spend a lot of time reinstalling software and finding license keys for those software.

No Data Loss

One way migration tools simplify the migration process is by automatically transferring all the necessary files and settings from the old operating system to the new SSD. These tools can detect and migrate the operating system, applications, and personal files seamlessly, ensuring a smooth transition without the risk of data loss or missing files.

Maximize Performance

Migration tools also take care of tasks such as partitioning the SSD, optimizing system settings, and updating drivers. The tools can automatically identify the optimal partition size for the operating system, ensuring efficient utilization of the SSD’s storage capacity. Additionally, they can tweak various system settings to maximize performance on the new hardware.
In conclusion, automation tools are a time-saving solution for migrating the operating system to an SSD in Windows 7. They simplify the process by automatically transferring files, optimizing settings, and scheduling migrations. With tools like Renee Becca, users can enjoy a hassle-free migration experience while maximizing the performance and efficiency of their new SSD.

Using a Reliable Software Tool for Migrating Windows 7 OS to an SSD

Renee Becca is recommended here. It is a tool specially used for system/hard disk data backup and restoration. It can help you back up and restore important data in your computer, such as programs, system configuration, emails, photos, videos, documents, bookmarks, etc.
In addition, you can also use it to clone disk and system data. The software provides three cloning methods, including hard disk cloning/cloning system hard disk; partition cloning and system migration. You can choose the most suitable cloning method according to your different needs.
Here is a guide on how to use Renee Becca for cloning your Windows 7 OS to an SSD.
Hot Topic - ADsRenee Becca – Safe and Quick System Migration to SSD

Automatic 4K alignment Improves SSD performance during system migration.

Support GPT and MBR Automatically adapt to the suitable partition format.

Support NTFS and FAT32 Redeploy various files in different file systems.

Back up quickly Back up files at up to 3,000MB/min.

Overall backup schedule Support system redeployment/system backup/partition backup/disk backup/disk clone.

Automatic 4K alignment Improve SSD performance

Support GPT and MBR Intelligently adapt to a partition format

Support NTFS and FAT32 Redeploy files in different file systems
Free TrialFree TrialNow 2000 people have downloaded!
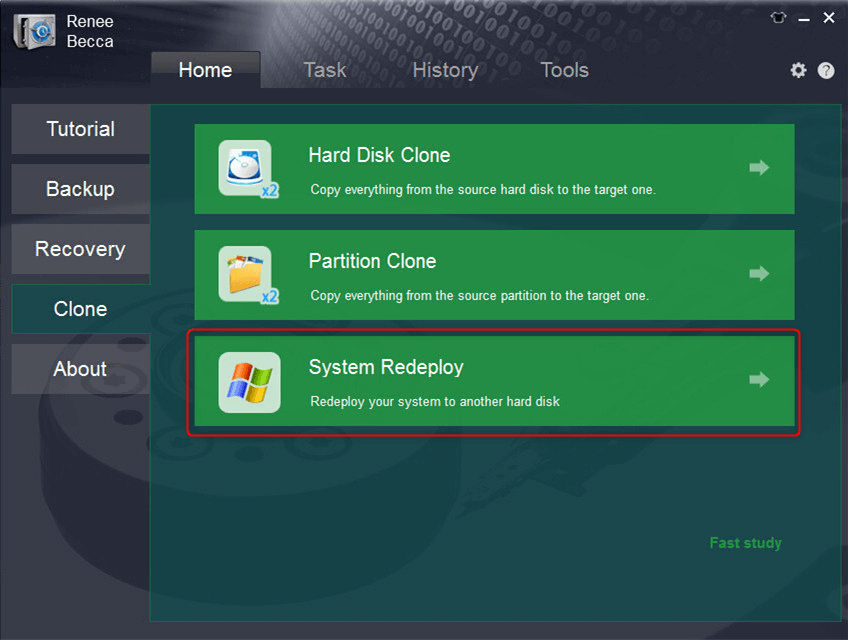
Step 1: Launch Renee Becca and click “System Redeploy” function in “Clone”.
select system redeploy function in renee becca
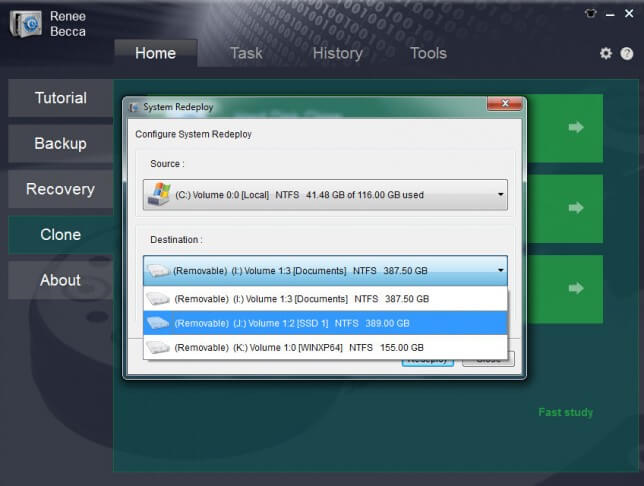
Step 2: Please select the original disk which saves Windows system and the target disk. Then click “Redeploy” to process the system migration.
select target disk and desination in system redeploy function in renee becca
By following these simple steps, you can seamlessly transfer your Windows OS to a new SSD using Renee Becca. This method eliminates the need for a fresh installation, saving you time and effort. Enjoy the improved performance and faster boot times that come with a new SSD!
Pros:
  • Allows safe migration of operating system without fresh installation.
  • Simple steps for a smooth and hassle-free transfer.
  • Improves performance and faster boot times with new SSD.

Cons:

  • Doesn't have a Mac version.Paid software.

Verifying Cloned OS on SSD: Essential Steps for Ensuring Proper Functioning

After successfully migrating your Windows 7 OS to the SSD using the selected software tool as explained in the previous step, it is crucial to verify that the cloned OS is functioning correctly on the new drive. This step is necessary to ensure a smooth transition and to avoid any potential issues.
Follow these step-by-step instructions to verify the cloned OS on the SSD:
Step 1: Shut down your computer completely and ensure both the SSD and the old hard drive are properly connected to your computer.
Step 2: Power on your computer and access the BIOS settings by pressing the designated key during the boot process.
To change the boot order, you will need to access the system BIOS or UEFI settings. The specific method for accessing these settings may vary depending on your computer’s manufacturer, but it usually involves pressing a specific key (such as F2, F10, or Del) during the boot process. The following list is for reference only.
To find the shortcut key for entering the BIOS, carefully observe the black screen before the Windows logo appears during boot. This screen showcases the motherboard brand icon and the BIOS shortcut key. Consider recording the boot process to review the video and confirm the shortcut key.
BIOS NameMethodThe Key or Keys
AcerPress Del or F2 immediately after powering onDel/ F2
CompaqPress F10 while the cursor in the top right corner of the screen is blinkingF10
DellPress F2 when the Dell logo appears/ or press every few seconds until the message Entering Setup appearsF2
eMachinesPress Tab or Del while the eMachine logo displays on the screenTab/ Del
FujitsuPress F2 once the Fujitsu logo appearsF2
GatewayPress the F1 key repeatedly after restarting the computerF1
HPPress the F1/ F10/ or F11 key after restarting the computerF1/ F10/ F11
IBMPress F1 immediately after powering on the computerF1
LenovoPress F1 or F2 after powering on the computerF1/ F2
NecPress F2 to enter the BIOS SetupF2
Packard BellPress F1/ F2/ or Del to enter BIOSF1/ F2/ Del
SamsungPress F2 to start the BIOS setup utilityF2
SharpPress F2 after the computer startsF2
SonyPress F1/ F2/ or F3 after turning on the computerF1/ F2/ F3
ToshibaPress F1 or Esc after powering on to access BIOSF1/ Esc
ARLTPress Del or F11 when the respective message is shownDel/ F11
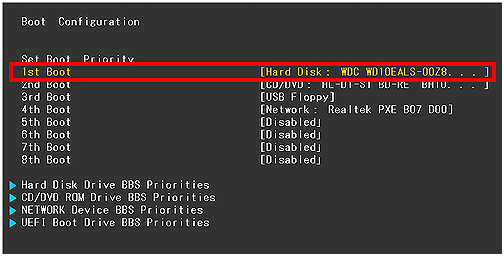
Step 3: In the BIOS settings, navigate to the “Boot” or “Startup” tab. Set the SSD as the primary boot device. This ensures that your computer will boot from the cloned OS on the SSD. In the boot order settings, you should see a list of available storage devices.
change the boot order in hard disk in boot configuration in BIOS
Step 4: Save the changes in the BIOS settings and exit the BIOS.
Step 5: As your computer restarts, it should now boot from the SSD. Once the login screen appears, enter your credentials and log in to the Windows 7 OS on the SSD.
Step 6: Take some time to navigate through the system and ensure that all your applications, files, and settings are intact. Open various programs, access files, and perform tasks to ensure everything is functioning as expected.
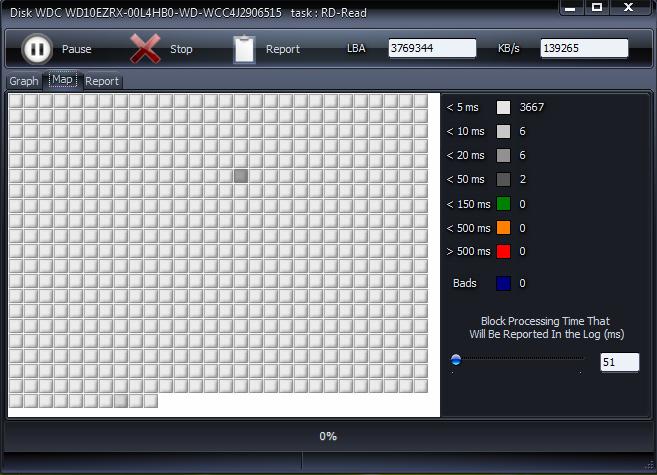
Step 7: Pay close attention to system performance. Since SSDs offer faster read and write speeds compared to traditional hard drives, you should notice improved system responsiveness and faster boot times. You can check the performance of the new SSD by running disk diagnostic tools to assess its health and ensure that it is functioning optimally.
scan hard disk
By following these steps, you can verify the cloned OS on the SSD by booting from the new drive and ensuring everything is functioning properly. This crucial step helps you ascertain a successful migration and ensures a seamless transition to the faster and more efficient SSD.

Conclusion

In conclusion, migrating your Windows 7 operating system to an SSD can greatly enhance your computer’s performance and responsiveness. By transferring your OS to an SSD, you will experience faster boot times, quicker application launches, and improved overall system efficiency. With this seamless transition, you can fully utilize the benefits of solid-state drive technology without losing any data or programs. Upgrade your system today and enjoy the enhanced speed and efficiency that an SSD can bring to your Windows 7 experience.