author avatar
    Specialist of Customer Service Dept.
 

Summary
Unleash the full potential of your system by transferring your operating system from SSD to NVMe. This informative guide covers the benefits of NVMe technology, step-by-step instructions for the transfer process, and tips for selecting the right NVMe SSD for your needs. Say goodbye to slow boot times and hello to enhanced performance with this upgrade.


Welcome to our latest article on how to transfer your operating system (OS) from a SATA SSD to a NVMe solid-state drive (SSD). As technology continues to advance, we are constantly seeking to improve the speed and performance of our systems. One way to do this is by upgrading from a SATA SSD to a NVMe SSD. But what exactly is the difference between these two technologies and how does it affect system speed? Furthermore, with so many options available in the market, how do you select the right NVMe SSD based on your performance requirements and budget constraints? In this chapter, we will delve deeper into the world of SSDs and provide you with all the information you need to make an informed decision.

Difference between SATA SSD and NVMe Technology

In the world of computing, speed is everything. Whether you’re a gamer, a graphic designer or simply a regular user, having a fast and responsive system is crucial for a smooth and efficient experience. With that in mind, the introduction of Solid State Drive (SSD) technology has transformed the computing industry, providing significantly faster data transfer speeds compared to traditional Hard Disk Drives (HDDs).
transfer os from ssd to nvme
SATA SSDs
SATA (Serial Advanced Technology Attachment) is a popular interface used to connect storage devices, including SSDs, to a computer’s motherboard. This technology has been around for decades and has undergone several improvements, resulting in faster data transfer speeds.
NVMe SSDs
Non-Volatile Memory Express (NVMe) is a newer technology that was specifically designed for SSDs. It utilizes the PCIe (Peripheral Component Interconnect Express) interface, which is commonly used for graphics cards, to connect to the computer’s motherboard. This allows for significantly faster transfer speeds compared to SATA SSDs.
Impact on System Speed
The biggest difference between SATA and NVMe technology is their impact on system speed. Since NVMe SSDs use the faster PCIe interface, they can provide read/write speeds that are 5-6 times faster than SATA SSDs, resulting in faster boot times, faster loading of applications and faster data transfer.
sata vs nvme speed
Additionally, NVMe SSDs have significantly lower latency, meaning they can process data requests much quicker, resulting in a more responsive system.
In the next chapter, we will discuss the necessary steps to prepare for the upgrade, including backing up important data and ensuring compatibility with your motherboard.

Preparing for the Upgrade: Backing Up Important Data and Ensuring Compatibility with Your Motherboard

Ensuring Compatibility with Your Motherboard
Additionally, it is important to ensure that your motherboard is compatible with NVMe technology. While most modern motherboards support NVMe, some older models may require a BIOS update or may not be compatible at all. Check your motherboard’s manual or manufacturer’s website to confirm compatibility before proceeding with the upgrade. If your motherboard is not compatible, you may need to purchase an adapter or consider upgrading your motherboard.
It is also worth noting that NVMe SSDs require a PCIe or M2 slot, so make sure your motherboard has an available slot before purchasing an NVMe SSD.
Different SSD interfaces, SATA, M.2, PCIe
Understanding the difference between SATA SSD and NVMe technology is important in preparing for the upgrade. SATA SSDs use the older SATA interface, while NVMe SSDs use PCIe or M2 interface, resulting in significantly faster speeds. This means that if your motherboard is compatible, upgrading to an NVMe SSD can greatly improve your system’s performance. However, if your motherboard is not compatible, or if you do not have a PCIe slot available, you will not be able to take advantage of the faster speeds offered by NVMe technology.

Cloning Your Operating System to NVMe SSD Using Renee Becca Software

In order to transfer your operating system from SSD to NVMe SSD, you will need to clone the current OS using specialized software. Using Renee Becca software, the process can be completed easily and without any data loss.
Renee Becca is a tool specially used for system/hard disk data backup and restoration. It can help you back up and restore important data in your computer, such as programs, system configuration, emails, photos, videos, documents, bookmarks, etc. In addition, you can also use it to clone disk and system data. The software provides three cloning methods, including hard disk cloning/cloning system hard disk; partition cloning and system migration. You can choose the most suitable cloning method according to your different needs.
In addition, Renee Becca supports 4K align and Cloning from larger partition to smaller partition. These functions can better assist you in completing system and data migration.
Here is a guide on how to use Renee Becca for cloning your Windows system to an SSD.
Step 1: Download and install Renee Becca software on your computer. This software is compatible with Windows operating systems.
Hot Topic - ADsRenee Becca – Safe and Quick System Migration to SSD

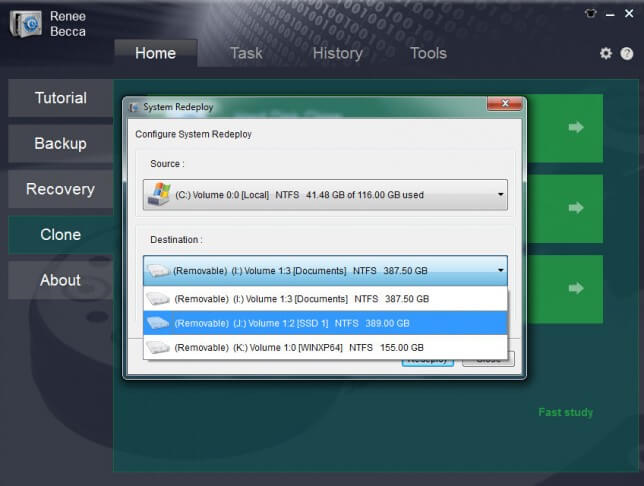
Automatic 4K alignment Improves SSD performance during system migration.

Support GPT and MBR Automatically adapt to the suitable partition format.

Support NTFS and FAT32 Redeploy various files in different file systems.

Back up quickly Back up files at up to 3,000MB/min.

Overall backup schedule Support system redeployment/system backup/partition backup/disk backup/disk clone.

Automatic 4K alignment Improve SSD performance

Support GPT and MBR Intelligently adapt to a partition format

Support NTFS and FAT32 Redeploy files in different file systems

Free TrialFree TrialNow 2000 people have downloaded!
Step 2: Connect the new NVMe SSD to your computer. Make sure it is recognized by the system before proceeding.
Connect the new NVMe SSD to your computer
Step 3: Open Renee Becca software and click “System Redeploy” in the “Clone” option from the main interface.
select system redeploy function in renee becca
Step 4: Select the source disk, which is your current SSD, and the target disk, which is the new NVMe SSD. Make sure the target disk has enough space to accommodate the data from the source disk.
Step 5: Click on “Redeploy” to start the cloning process. The software will begin copying all the data from your SSD to the NVMe SSD.
select target disk and desination in system redeploy function in renee becca
Step 6: Once the cloning process is completed, click on “Finish” to exit the software.
There are a few things to keep in mind during this process. Firstly, make sure your computer is connected to a stable power source to avoid any interruptions during the cloning process. Secondly, do not use the computer for any other tasks while the cloning is in progress. This can cause errors and result in data loss.
In addition, it is important to regularly check for updates to Renee Becca software. This will ensure you have the latest version and can avoid any potential issues during the cloning process.
Cloning your current operating system to the new NVMe SSD using Renee Becca software is a simple and quick process. It eliminates the need for a clean installation of Windows and ensures all your data is transferred seamlessly. However, it is important to be cautious and follow the steps carefully to avoid any potential errors or data loss.
Pros:
  • User-friendly interface
  • Efficient cloning process
  • Allows you to preview the source and destination drives

Cons:

  • Paid subscription required for full access to all features
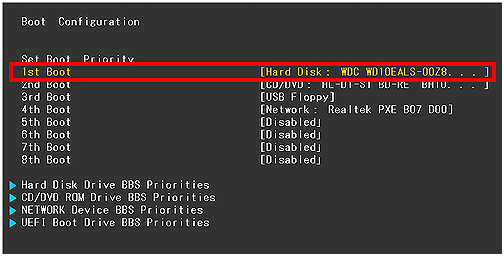
If you encounter any issues during the cloning process, you can refer to the next chapters which will guide you in replacing the SATA SSD with the NVMe SSD and configuring BIOS settings to boot from the new drive.

Replacing the SATA SSD with the NVMe SSD and Configuring BIOS Settings to Boot from the New Drive

As technology advances, more and more people are looking to upgrade their computer hardware for faster and improved performance. One of the most popular upgrades is replacing the traditional SATA SSD with a much faster NVMe SSD. This not only increases the speed of data transfer, but also enhances overall system performance. However, simply installing the new NVMe SSD is not enough. In order to fully utilize its capabilities, the BIOS settings need to be configured to boot from the new drive. In this chapter, we will discuss how to replace your SATA SSD with an NVMe SSD and configure BIOS settings to boot from the new drive.
Replacing the SATA SSD with the NVMe SSD
Before we get started, it is important to ensure that your computer meets the basic requirements for using an NVMe SSD as a boot drive. This includes newer hardware, an M.2 PCI-E x4 slot, and UEFI boot mode. If your computer does not meet these requirements, you may need to upgrade certain components or use a PCIe x4 adaptor to make it compatible.
Once you have confirmed that your computer meets the basic requirements, the first step is to physically install the new NVMe SSD. This involves opening your computer case, locating the M.2 PCI-E x4 slot, and inserting the NVMe SSD into the slot. Make sure to secure it in place with the appropriate screws and then close your computer case.
Connect the new NVMe SSD to your computer
Configuring BIOS Settings
Step 1: After the cloning process is complete, we need to change the boot order in the BIOS settings to set the NVMe SSD as the primary boot drive. To do this, you will need to enter your computer’s BIOS settings. The method to access BIOS settings may vary depending on your computer, so please refer to your computer’s manual for specific instructions.
Here is a list of BIOS shortcut keys for different brands. Alternatively, you can observe the BIOS shortcut keys displayed on the screen during booting.
BIOS NameMethodThe Key or Keys
AcerPress Del or F2 immediately after powering onDel/ F2
CompaqPress F10 while the cursor in the top right corner of the screen is blinkingF10
DellPress F2 when the Dell logo appears/ or press every few seconds until the message Entering Setup appearsF2
eMachinesPress Tab or Del while the eMachine logo displays on the screenTab/ Del
FujitsuPress F2 once the Fujitsu logo appearsF2
GatewayPress the F1 key repeatedly after restarting the computerF1
HPPress the F1/ F10/ or F11 key after restarting the computerF1/ F10/ F11
IBMPress F1 immediately after powering on the computerF1
LenovoPress F1 or F2 after powering on the computerF1/ F2
NecPress F2 to enter the BIOS SetupF2
Packard BellPress F1/ F2/ or Del to enter BIOSF1/ F2/ Del
SamsungPress F2 to start the BIOS setup utilityF2
SharpPress F2 after the computer startsF2
SonyPress F1/ F2/ or F3 after turning on the computerF1/ F2/ F3
ToshibaPress F1 or Esc after powering on to access BIOSF1/ Esc
ARLTPress Del or F11 when the respective message is shownDel/ F11
Step 2: Once you have entered the BIOS settings, look for the boot order or boot priority settings. Here, you should see a list of boot devices. Select the NVMe SSD as the first boot device and save the changes. This will ensure that your computer boots from the new NVMe SSD instead of the old SATA SSD.
change the boot order in hard disk in boot configuration in BIOS
Step 3: Finally, save the changes and exit the BIOS settings. Your computer will now boot from the new NVMe SSD, providing you with faster speed and improved performance.
Tips:If your computer is using Legacy BIOS instead of UEFI, you will need to change the boot order to set the NVMe SSD as the first boot device.
Overall, upgrading from a SATA SSD to an NVMe SSD has numerous benefits, including significantly faster speed and improved performance. However, it is important to make sure your computer meets the requirements and to properly configure the BIOS settings for the new NVMe SSD. This will ensure that your computer boots from the new drive and takes full advantage of its capabilities.
Next, we will discuss how to verify the successful transfer and performance enhancement after cloning to the NVMe SSD using tools such as CrystalDiskInfo or CrystalDiskMark. Make sure to read the following chapters for more information.

Verifying Transfer and Performance Enhancement on NVMe SSD

After successfully cloning Windows 10 from the old HDD or SATA SSD to the new NVMe SSD, it is crucial to verify the transfer and ensure that there is a performance enhancement. This can be done using tools like crystalDiskInfo or crystalDiskMark.
Checking Transfer with crystalDiskInfo
One of the most reliable tools for checking the transfer of data is crystalDiskInfo. It provides detailed information about the NVMe SSD, including its health status, temperature, and transfer rate. To use this tool:
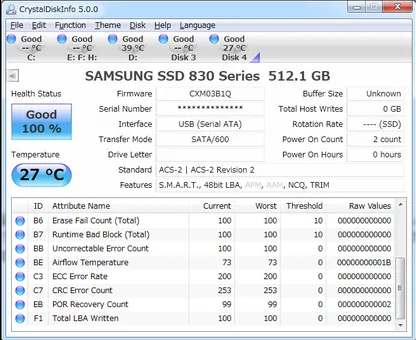
  1. Download and install crystalDiskInfo on your computer.
  2. Open the tool and select the NVMe SSD from the list of drives.
  3. The tool will display the NVMe SSD’s information, including its transfer rate and health status.
  4. If the health status is “Good” and the transfer rate is higher than the old drive, then the transfer was successful.

use CrystalDiskInfo to check SSD health

Evaluating Performance with crystalDiskMark
In addition to checking the transfer, it is also essential to evaluate the performance of the NVMe SSD. crystalDiskMark is a popular benchmarking tool that can assess the read and write speeds of the drive. To use this tool:
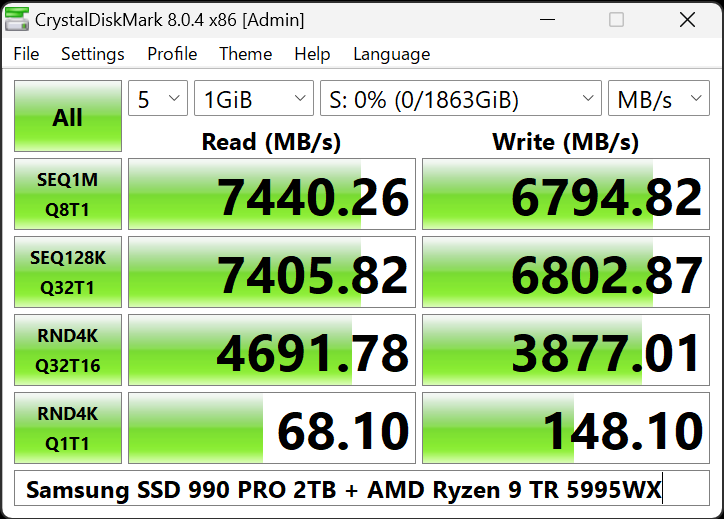
  1. Download and install crystalDiskMark on your computer.
  2. Open the tool and select the NVMe SSD from the list of drives.
  3. Click on the “Start” button to begin the benchmarking process.
  4. Once completed, the tool will display the read and write speeds of the NVMe SSD.
  5. If the speeds are higher than the old drive, then there has been a performance enhancement.

CrystalDiskMark

After successfully cloning Windows 10 from the old HDD or SATA SSD to the new NVMe SSD, it is essential to verify the transfer and ensure that there is a performance enhancement. This can be done using tools like crystalDiskInfo or crystalDiskMark. These tools provide detailed information about the NVMe SSD’s health status, temperature, transfer rate, and performance. By following the steps mentioned above, you can easily verify the transfer and determine if there has been a performance enhancement on the NVMe SSD.
However, it is important to note that the performance enhancement may not be significant in all cases. Factors such as the quality and age of the old drive, as well as the configuration and settings of the new NVMe SSD, can affect the results.
Tips:It is recommended to also consider other factors before determining if the transfer was successful and if there is a performance enhancement.

Conclusion

In conclusion, upgrading your system drive from a SATA SSD to an NVMe SSD can significantly enhance your system’s speed and performance. By understanding the differences between these two technologies and selecting the right NVMe SSD for your needs, you can ensure a smooth and successful transfer process. Remember to back up important data and check compatibility before starting the cloning process with a reliable software like Renee Becca. Once the cloning is complete, replace the SATA SSD with the NVMe SSD and configure BIOS settings for booting from the new drive. Lastly, verify the successful transfer and performance enhancement with a tool like crystalDiskInfo or crystalDiskMark. With these steps, you can easily upgrade to NVMe technology and enjoy the benefits it offers. Keep your system running at top speed with this simple yet powerful upgrade.