author avatar
    Senior Program Developer
 

Summary
Learn how to migrate your operating system to an SSD for free with these simple and efficient methods. Say goodbye to costly software and time-consuming reinstallation. Discover the best tools for a hassle-free OS transfer to SSD.


The process of migrating your operating system (OS) to a solid-state drive (SSD) can bring numerous benefits such as faster boot times and improved overall system performance. However, for those looking to make the switch, it can also come with its fair share of challenges. One of the most common hurdles when transferring your OS to an SSD is ensuring that it is properly aligned with the drive’s 4K sector size. Additionally, there may be instances where the OS partition is larger than the capacity of the new SSD, requiring a transfer to a smaller drive. In this chapter, we will discuss these common challenges and provide helpful tips on how to overcome them for a seamless and successful OS migration to your SSD.

Common Challenges When Transferring Your OS to an SSD and How to Overcome Them

Transferring your operating system to a new solid-state drive (SSD) can greatly improve the performance and speed of your computer. However, this process can also come with its own set of challenges. In this chapter, we will discuss two common challenges that arise when transferring your OS to an SSD and provide solutions to overcome them.
Facing the 4K Alignment Issue
One of the first challenges you may encounter when transferring your operating system to an SSD is the 4K alignment issue. This occurs when the partition of your old hard drive does not align with the 4K sector of the new SSD, resulting in slower performance and potentially causing damage to your SSD over time.
Fortunately, there are several ways to overcome this issue. The most common solution is to use a third-party software, such as Renee Becca, to align the partition before transferring it to the SSD. Some SSD manufacturers also provide their own alignment tool that you can use. And if you are transferring your OS to an SSD that is the same size as your old hard drive, it is unlikely that the 4K alignment issue will occur.
4K alignment
Transferring OS Partition to a Smaller SSD
If you are transferring your operating system to a smaller SSD, you may face the challenge of fitting all of your data onto the new drive. This can be tricky because you cannot simply shrink the current partition and transfer it over, as this could result in loss of data.
To overcome this challenge, there are a few different methods you can try. The first is to use a cloning software, such as Renee Becca, to transfer your OS partition to the smaller SSD.
Another option is to manually transfer your data from the old hard drive to the new SSD. This involves using a disk imaging tool to create an image of your OS and then recover it to the new SSD. This method may require a bit more technical knowledge, but it is a free and effective way to overcome the challenge of transferring to a smaller SSD.
Transferring your operating system to an SSD can greatly improve the performance of your computer, but it can also come with its own set of challenges. The two challenges we discussed in this chapter were the 4K alignment issue and transferring an OS partition to a smaller SSD. To overcome these issues, we recommend using third-party software to align partitions and transfer data. However, as with any major change to your computer, it is important to make sure you have a backup of all your important data before proceeding.
In the next chapter, we will discuss the first method for transferring your OS to an SSD using freeware Clonezilla. This method is completely free and widely used, making it a great option for those looking to save money on transferring their OS to an SSD.

Method 1: Using Freeware Clonezilla for OS Transfer

Transferring your operating system to a solid-state drive (SSD) can substantially improve your computer’s performance. Clonezilla, a powerful and free disk cloning software, can be used to complete this process efficiently, even when migrating to a smaller SSD.
To prepare for migration, you should first ensure that the data on your current OS partition will fit on the smaller SSD. Here’s how to approach this:
Step 1. Install the SSD in your computer using a USB connection cable or directly into the SSD slot if it’s an NVMe or M.2 SSD. In Disk Management, initialize the SSD to the same partition style (MBR or GPT) as your OS drive.
migrate os to ssd free
Step 2. Back up your data externally, if necessary. It’s advisable to prevent any data loss that might occur during the migration by saving your valuable information on an external hard drive.
Step 3. Download Clonezilla ISO from Clonezilla.org and Create a Clonezilla live media.
Step 4. Boot from the Clonezilla live media and select the “device-device” cloning mode. Opt for the “advanced” or “EXPERT” mode for additional settings.
device device clone
Step 5. Start the cloning process, and once completed, ensure to set the cloned SSD as the primary boot device in your computer’s BIOS settings.
However, it’s important to acknowledge that Clonezilla might not be the most user-friendly tool for novices due to its text-based interface and complex options. Additionally, the software requires a working knowledge of disk structures and the ability to navigate through its menus. Thus, users looking for a simpler solution may lean towards using software like Renee Becca, which boasts an easier process with a graphical user interface.
Pros:
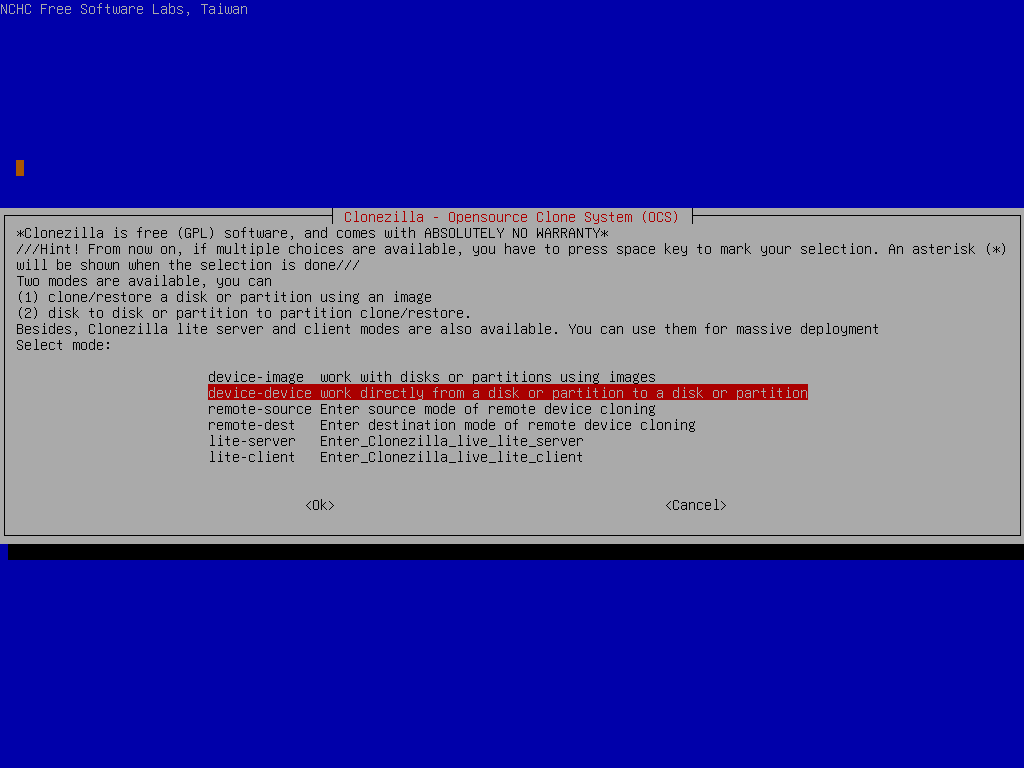
  • Wide hardware compatibility
  • Free to use
  • Need to create a Live USB or CD to use its functions

Cons:

  • Complexity may deter less experienced users
  • Does not support 4K-align

Method 2: Utilizing Renee Becca for easy and efficient OS migration

In the previous chapter, we discussed Method 1: Using Freeware Clonezilla for OS Transfer and its advantages and disadvantages. However, if you are looking for a more user-friendly and efficient way to migrate your OS to SSD for free, you should consider Method 2 using Renee Becca.
Renee Becca is a powerful and comprehensive software designed specifically for OS migration and backup. It allows users to easily transfer the operating system, applications, drivers, and personal files to a new disk while ensuring the system can start normally from the destination disk. This tools support 4K-align and Transfer OS partition to a smaller size SSD.
The following are the detailed steps to migrate OS to SSD using Renee Becca:
Step 1: Download and Install Renee Becca
First, you need to download and install Renee Becca on your computer. It is compatible with Windows 10/8.1/8/7/XP/Vista and supports both 32-bit and 64-bit systems.
Hot Topic - ADsRenee Becca – Safe and Quick System Migration to SSD

Automatic 4K alignment Improves SSD performance during system migration.

Support GPT and MBR Automatically adapt to the suitable partition format.

Support NTFS and FAT32 Redeploy various files in different file systems.

Back up quickly Back up files at up to 3,000MB/min.

Overall backup schedule Support system redeployment/system backup/partition backup/disk backup/disk clone.

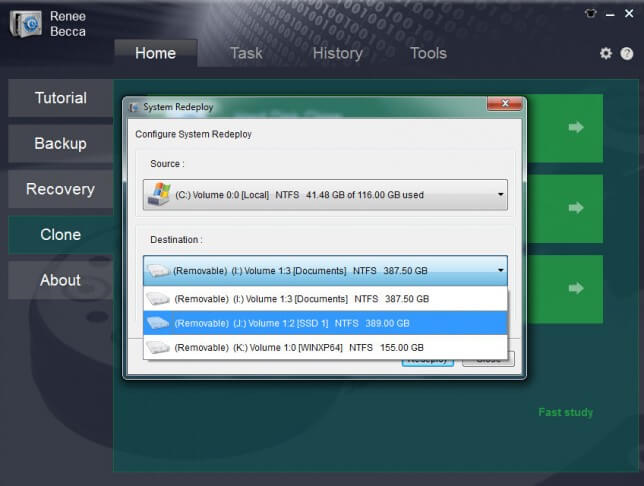
Automatic 4K alignment Improve SSD performance

Support GPT and MBR Intelligently adapt to a partition format

Support NTFS and FAT32 Redeploy files in different file systems

Free TrialFree TrialNow 2000 people have downloaded!
Step 2: Launch Renee Becca. Selecting the Cloning Option. Click “System Redeploy” function in “Clone”.
After launching the software, you will see its main interface. From there, click on the “System Redeploy” feature, which is specifically designed for OS migration.
select system redeploy function in renee becca
Step 3: Choosing the Source and Target Drives
Please select the original disk which saves Windows system and the target disk. Then click “Redeploy” to process the system migration.
In this step, you need to select the source disk where your current operating system is installed and the destination disk where you want to transfer the OS. Note: Make sure the destination disk has enough space to accommodate the OS and other files.
select target disk and desination in system redeploy function in renee becca
Step 4: Start the OS Migration Process
Once everything is set, you can click on the “Start” button to begin the OS migration process. After it is completed, you will see a message saying “Clone completed successfully“.
Tips:If you are using Windows 10, you may encounter an activation issue after the OS migration process. In this case, you can click on “Troubleshooting” in the activation window and follow the instructions to activate your Windows 10 again.
That’s it! Your operating system has now been successfully transferred to the new disk using Renee Becca.
Now that you have successfully migrated your OS to SSD using Renee Becca, you can enjoy the enhanced performance and more disk space.
Pros:
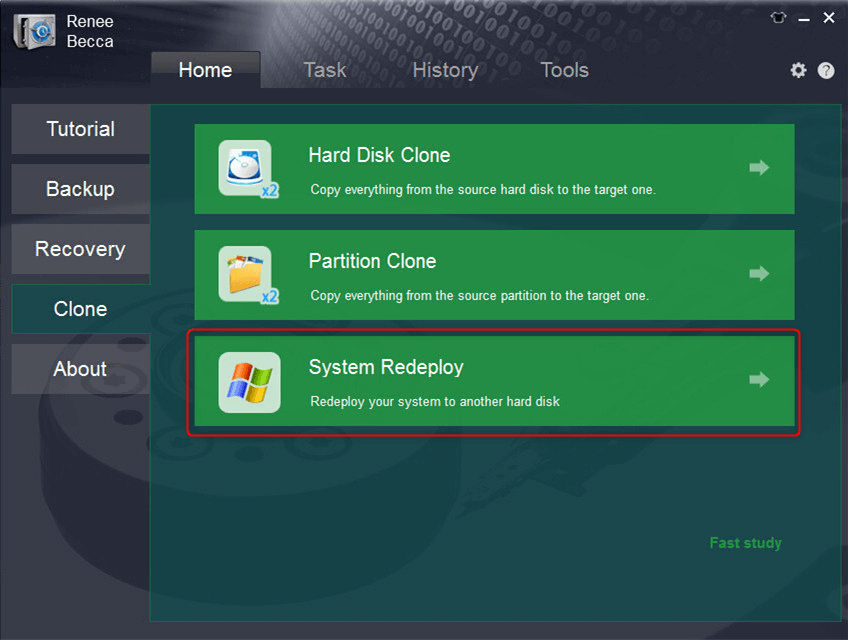
  • Easy to use and user-friendly interface
  • Comprehensive features for OS migration and backup
  • Option to customize clone settings
  • Compatible with all versions of Windows

Cons:

  • Not completely free - only offers a 30-day free trial

For a more user-friendly and hassle-free OS transfer process, you can also consider Method 3: Using Gparted which will be discussed in the next chapter.

Method 3: Using Gparted for a User-Friendly OS Transfer Process

While Renee Becca is a great tool for easy and efficient OS migration, you may prefer a free method that doesn’t require any software. That’s where Gparted comes in. Gparted is a user-friendly disk partitioning tool that can also be used for transferring your operating system to an SSD. Here’s how to do it:
Step 1: The first step is to download and install Gparted on your computer. It is available for free on various websites, so make sure to download it from a trusted source.
Step 2: Once Gparted is installed, insert your new SSD into your computer. Make sure to connect it properly and turn on your computer.
Step 3: Open Gparted and select your current hard drive from the list of available disks. Note: Make sure to select the correct disk to avoid any accidental data loss.
Step 4: Right-click on your current hard drive and select “Copy“.
Step 5: Once the copying process is complete, right-click on your new SSD and select “Paste“. This will copy all the data from your old hard drive to the new SSD.
Step 6: After the paste is completed, right-click on your old hard drive and select “Unmount“. Then, right-click on your new SSD and select “Manage Flags“. Make sure to check the “boot” and “esp” flags for your new SSD. This will make it bootable.
Step 7: Reboot your computer and go into your BIOS settings. Make sure to change the boot order so that your new SSD is the first boot device.
Step 8: Save the changes and exit the BIOS. Your computer should now boot from the new SSD, containing your operating system and all your data.
With this method, you can easily transfer your operating system to an SSD without spending any money on software. However, it is important to note that Gparted can be a bit complicated for beginners and requires some technical knowledge. If you are not familiar with disk partitioning, it is recommended to use Renee Becca or seek professional help to avoid any mistakes.
Pros:
  • Free
  • User-friendly
  • No software required

Cons:

  • Requires some technical knowledge
  • Potentially risky for beginners

In the next chapter, we will discuss a method for advanced users with Linux Live CD. Make sure to check it out if you are comfortable with command-line operations and want more control over the OS transfer process.

Method 4: Using Free dd command for advanced users with Linux Live CD

The dd command is a powerful tool for copying data between different devices or disks. In this case, we can use it to transfer our operating system to a new SSD. However, this method is recommended for advanced users with some experience using the command line in a Linux environment. It requires a Linux Live CD and some knowledge of basic commands. If you are not familiar with these, it is recommended to use Method 3: Using Gparted for a User-Friendly OS Transfer Process instead.
To begin, you will need to download and burn a Linux Live CD, such as Ubuntu, onto a USB drive or DVD. Then, insert the USB drive or DVD into your computer and boot from it. This will take you to a Linux environment where you can use the dd command.
Step 1: Find the names of your source and destination disks by using the command

lsblk

. The source disk is your current hard drive, usually labeled /dev/sda and the destination disk is your new SSD, often labeled /dev/sdb.
Step 2: Use the

dd

command to copy the entire contents of your source disk to your destination disk. The syntax is

dd if=source of=destination

. For example, if your source disk is /dev/sda and your destination disk is /dev/sdb, the command would be

dd if=/dev/sda of=/dev/sdb

. Note that this command will erase all data on the destination disk, so double check that you have the correct disks before proceeding.
Step 3: Once the command finishes, you will have an exact copy of your source disk on the destination disk. However, the partition sizes will still be the same as the original source disk. We need to use another command to resize the partitions to fit the new SSD.
Step 4: Use the command

parted -l

to view the partitions on your destination disk. Take note of the name of the partition that contains your operating system, usually labeled /dev/sdb1.
Step 5: Use the command

parted /dev/sdb

to enter the parted interactive mode. Replace /dev/sdb with the name of your destination disk. Then, use the

resizepart

command followed by the partition number to resize the partition. For example, if your operating system partition is /dev/sdb1, the command would be

resizepart 1

. You will then be prompted for the new size of the partition. Enter the size in megabytes, or use the

max

command to use the maximum available space. Finally, use the

quit

command to exit the parted interactive mode.
Step 6: The last step is to resize the file system of the resized partition. Use the command

resize2fs /dev/sdb1

, replacing /dev/sdb1 with the name of your resized partition. This will resize the file system to fit the new partition size.
Once all the steps are completed, you can remove the Linux Live CD and restart your computer. Your operating system should now be successfully transferred to your new SSD.
Note: The dd command can be dangerous if used incorrectly, so it is important to double check all commands and make sure you have the correct disks before proceeding. It is also recommended to make a backup of your important data before attempting this method.
Overall, using the dd command for migrating your operating system to an SSD is a quick and efficient method for advanced users. However, it requires some knowledge of Linux commands and can be risky if not done correctly. It is recommended to use this method only if you are comfortable with the command line and have some experience with Linux systems. Otherwise, Method 3: Using Gparted for a User-Friendly OS Transfer Process is a more user-friendly alternative.
Pros:
  • Quick and efficient method for advanced users
  • Allows for copying data between different devices or disks

Cons:

  • Requires knowledge of Linux commands
  • Can be risky if not done correctly

For more recommendations and precautions for a successful OS transfer to SSD, please refer to the subsequent chapters.

Recommendations and Precautions for a Successful OS Transfer to SSD

Step 1: Begin by assessing the condition of your Solid State Drive (SSD) using CrystalDiskInfo. Checking the health status is crucial, as experiences have shown that system updates or driver installations might impact the SSD’s performance. After downloading and installing, run it to evaluate the SSD’s health and SMART data before migration.
Step 2: Verify the SSD’s performance using benchmarking tools like CrystalDiskMark or AS SSD, which can provide a more detailed performance analysis. It is important to ensure the SSD is functioning properly before the migration due to reports of abnormal behavior and slow load times in the SSD toolbox. Install and run CrystalDiskMark to test the read/write speeds. Although AS SSD is a more precise tool, for convenience, CrystalDiskMark’s results should also be included for comparison.
use crystaldiskmark or crystaldiskinfo to check SSD status
Step 3: Use software that automatically aligns partitions during the OS cloning process. Users report that not just any cloning software will suffice, as they need to manage specific challenges such as 4K alignment and transferring an OS partition to a smaller SSD. Tools like Renee Becca handle these tasks adeptly.
Step 4: In case of performance degradation, disconnect any secondary drives to evaluate only the SSD’s performance. This step is essential as user experience points out that issues often arise after routine updates, which could be attributed to system conflicts or secondary drive interference.
Step 5: If facing slow SSD Toolbox responsiveness or degraded performance, consider using an alternative version of the SSD Toolbox. For instance, if you are experiencing issues with SSD Toolbox version 3.5.1, try using a previous version like 3.4.6 to ascertain if the problem persists. This can help isolate whether the issue is with the particular version of the Toolbox being used.
Step 6: For persistent issues, Intel® recommends a secure erase and system OS reinstall as a final measure. This process restores the SSD closer to its factory state, which could resolve performance issues. Given that SSD performance can degrade over time due to data writes and drive fills, this action may be necessary despite SMART data not indicating any warnings.
To encapsulate, monitoring SSD health with CrystalDiskInfo and performance with tools like CrystalDiskMark is integral for successful OS migration. Despite these precautions, there may be instances of degraded performance or abnormal behavior, potentially resolved by isolating the drive or reverting to older versions of software tools. However, if issues continue, further steps may be required, such as secure erasing the SSD or even reinstalling the operating system to restore performance, particularly in cases where the SSD is an older model. Users should not overlook these interventions, as they are informed by the collective experience and expertise of the user community and support professionals.

Conclusion

In conclusion, transferring your OS to an SSD can provide a significant boost in speed and performance for your computer. However, it can also be a time-consuming and daunting task, especially for beginners. In this guide, we have discussed various freeware options such as Clonezilla, Renee Becca, Gparted, and dd, that can help you migrate your OS to an SSD without any cost. Each method has its own advantages and we have also covered common challenges and how to overcome them. It is important to carefully follow recommendations and precautions, such as 4K aligning and transferring OS partition to a smaller SSD, to ensure a successful and hassle-free migration process. With the right software and tools, you can easily transfer your OS to an SSD and enjoy improved performance and efficiency without the need for a complete system reinstallation.