author avatar
    Specialist of Customer Service Dept.
 

Summary
Learn how to clone a boot drive to a Samsung SSD with the help of Samsung Data Migration software and Renee Becca. Follow our step-by-step guide for a safe and seamless process of hard disk cloning.


Moving the Windows operating system to an SSD can significantly enhance computer speed and improve user experience in the fast-paced digital era. Samsung offers the Samsung data migration software to facilitate disk cloning for those who prefer cloning disks to Samsung SSD. Additionally, professional system cloning software like Renee Becca offers easy-to-use features for system and disk cloning. This article provides a comprehensive guide on the complete boot drive cloning process.

Stage 1: Preparing Your System and Data for Cloning

Before beginning the process of cloning your boot drive to a Samsung SSD, it is important to make the necessary preparations to ensure a smooth and successful transition. This chapter will guide you through the step-by-step process of preparing your system and data for cloning.
Step 1. Backing up your data
Before making any changes to your boot drive, it is crucial to back up all your important files and data. This is a precautionary step to prevent any potential data loss during the cloning process. You can use external storage devices such as external hard drives, USB flash drives, or cloud storage services to create a backup of your files.
Hot Topic - ADsRenee Becca – Professional, Reliable Tools for Data Backup and Recovery

Quick Back up files at up to 3,000MB/min.

Overall Support system backup, disk/partition backup, file backup and disk clone.

Intelligent Automatically analyze the data differences between the source files and the backup files and save disk space by backing up incremental/differential data.

Convenient Support VSS, allowing to freely view web pages during the backup of the operating system.

Highly compatible Support various files and storage devices.

Quick Back up at up to 3,000MB/min

Overall System/partition/disk backup

Incremental/differential technology Save disk space

Free TrialFree TrialNow 2000 people have downloaded!
 
Step 2. Compatibility check
Ensure that your Samsung SSD is compatible with your existing system. Check the specifications and requirements of the SSD to verify compatibility. It is important to consider factors such as the interface type (SATA, NVMe), form factor (2.5-inch, M.2), and capacity.
Step 3. Verify available space
Check the available space on your Samsung SSD to ensure it has sufficient capacity to accommodate all the data from your current boot drive. Take into account the size of your existing boot drive, including the operating system, applications, and personal files. If your SSD does not have enough space, you may need to upgrade to a larger capacity drive.
Step 4. Update firmware
Check for any firmware updates for your Samsung SSD and update it to the latest version. Firmware updates often address various issues and improve the performance and compatibility of the drive. Visit the official Samsung website or use their SSD management software to download and install any available updates.
Step 5. Disable disk encryption
If your current boot drive is encrypted, you will need to disable disk encryption before starting the cloning process. This step ensures that the cloning software can properly access and clone the data from your boot drive. Disable any disk encryption software or features that might be active on your system.
By following these necessary preparations, you can ensure a seamless and trouble-free process when cloning your boot drive to a Samsung SSD. These steps will help safeguard your data and ensure compatibility, setting the stage for a successful cloning experience.
Tips: Compatible with existing system.Sufficient capacity for data storage.Firmware updates improve performance and compatibility.

Stage 2: Step-by-Step Guide to Installing and Initializing Your Samsung SSD

To install your Samsung SSD and ensure smooth functionality, you need to follow a few simple steps. Here’s a step-by-step guide to help you physically connect the SSD to your computer and properly initialize it:
Step 1: Shut down your computer and unplug it from the power source. It’s crucial to work on a completely powered-off system to avoid any damage.
shut down the PC
Step 2: Open your computer’s case. This step might vary depending on your computer model, but generally, you’ll need to remove a few screws or slide off a side panel. Refer to your computer’s user manual if you’re unsure of the process.
NO_TRANS:open the computer's case
Step 3: Locate an available drive bay inside your computer. This is where you’ll install the Samsung SSD. If it’s a desktop computer, it usually has separate drive bays. In laptops, the SSD might replace the existing hard drive.
Step 4: Connect the Samsung SSD to your computer. Using the provided SATA cable, connect one end to the SATA port on the SSD and the other end to an available SATA port on your motherboard. Ensure a snug and secure connection.
Step 5: If your Samsung SSD requires power, locate an available SATA power cable from your power supply unit (PSU) and connect it to the SSD. This provides the necessary power to the drive.
Step 6: Carefully place the Samsung SSD into the drive bay, ensuring it is properly seated. Secure it in place using the screws or brackets provided with your computer case.
NO_TRANS:install SSD in a PC
Step 7: Once the physical installation is complete, close your computer’s case and plug it back into the power source.
Step 8: Power on your computer and launch your operating system.
NO_TRANS:power on the computer
Step 9: If the Samsung SSD doesn’t appear in “My Computer” or “This PC,” you’ll need to initialize it. Open your computer’s “Disk Management” utility (accessible through the Control Panel or by right-clicking the Start button and selecting “Disk Management”).
disk management
Step 10: Locate the Samsung SSD in the list of drives. It should be labeled as “unallocated” or “not initialized.”
Step 11: Right-click on the SSD and select “Initialize Disk.” Choose the desired partition style (MBR or GPT) and follow the prompts to complete the initialization process.
initialize the disk
Step 12. After the initialization, right-click on the unallocated space and select “New Simple Volume.” Follow the instructions to allocate a drive letter and format the Samsung SSD.
new volume on a disk
 
Congratulations! You have successfully installed and initialized your Samsung SSD. Now you can start cloning the boot drive to your Samsung SSD. Two practical methods will be introduced below.
 

Stage 3: Selecting the Best Cloning Software for Samsung SSD

Choosing the right cloning software is a crucial step in the process of cloning a Samsung boot drive. With numerous options available in the market, it is essential to select a reliable and efficient software that ensures a seamless transfer of data to the new Samsung SSD.

Option 1: Samsung Data Migration software

One highly recommended option for Samsung SSD users is the Samsung Data Migration software. Developed specifically by Samsung, this software is designed to optimize the cloning process and ensure the highest level of compatibility with Samsung SSDs.
NO_TRANS:Samsung data migration software
User-friendly interface
The software provides a simple and intuitive step-by-step guide, making it easy even for beginners to navigate through the cloning process.
Range of advanced features that enhance the cloning experience
It allows users to selectively migrate data, enabling them to choose specific files and folders to transfer to the new SSD. This feature is particularly useful for those who want to conserve storage space or only transfer essential files.
Ensure data integrity during the cloning process
It performs a sector-by-sector transfer, ensuring that all data, including the operating system and application settings, are replicated accurately on the new SSD. This ensures a smooth transition and minimizes the risk of data loss or corruption.
 
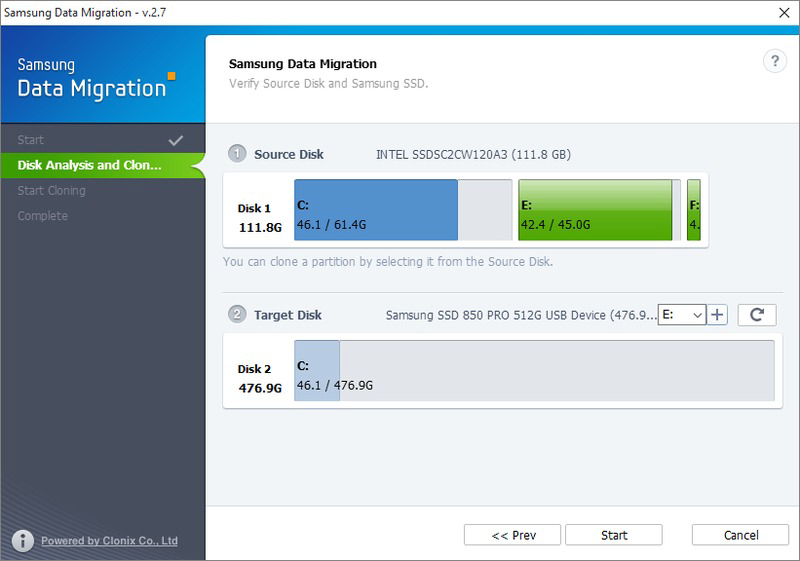
Overall, choosing the right cloning software is crucial for a successful cloning process. Samsung Data Migration software stands out as an excellent choice for Samsung SSD users due to its user-friendly interface, advanced features, and compatibility with Samsung SSD.
Besides Samsung Data Migration software, Renee Becca is a professionnal hard disk cloning software. It’s simple to use it.
Pros:
  • User-friendly interface.
  • Advanced features.
  • Compatibility with Samsung SSD.

Cons:

  • Cloning failure trouble.

Option 2: Clone the boot drive with Renee Becca

Renee Becca is specially designed to help computer users to clone disk and migrate system. Renee Becca can not only to clone disk (including system)/partitions, but also supports to migrate system to other disk/partitions perfectly. Besides, Renee Becca is also reliable on data backup and restore. It can backup and restore disks,system, partitions, folders and even files. It can perfectly clone system/partition/disk to new one, make the 4K Alignment automatically when migrating system. Help you get the best performance of SSD, migrate system with MBR/GPT partition table and migrate system with FAT/NTFS file system.
Step 1: Download and Install Renee Becca
Start by downloading Renee Becca from the official website and install it on your computer.
Renee Becca - Reliable Data Backup & Restore Software

Quick Backup files at up to 3,000MB/min.

Fullfill different backup needs Supports system backup, disk / partition backup, file backup and disk clone.

Intelligent Automatically analyze the differences between source and backup data.

Convenient Support VSS, allowing to freely view webpages when backing up system.

Highly compatible Supports various files and storage devices.

Quick Backup files at up to 3,000MB/min.

Fullfill different backup needs Backup for disk, partition and system. Save disk space by backing up incremental /differential data.

Highly compatible Supports various files and storage devices.

Free TrialFree Trial 2000 users have downloaded and enjoy Renee Becca!
Step 2: Choose the clone function
Then, open Renee Becca. Select [Clone] – [Hard Disk Clone/Clone System Disk]. You can use the external enclosure and the data reader to connect the hard disk to the computer when the hard disk is not installed in the computer.
clone function of Renee Becca
Step 3: Select the source and target disk
Next, select the source disk and the destination disk. Drag to adjust the size of each partition. If you clone the system disk, you can check the option [Make target disk bootable (System disk only)]. Finally, click on [Clone] to clone the data to the target disk.
select the source and target disk
Step 4: Modify the boot order
After cloning process completes, select the SSD as the first boot option via BIOS settings next time when the PC boots. After you go into BIOS, use the arrow key to choose the “Boot” tap and select the hard disk as the first boot option. Then, press F10 to save the settings. Then restart your PC.
NO_TRANS:boot order
After computer boots from the hard disk successfully, format the original system disk to make use of the disk space. Or you can remove the original hard disk after the PC shuts down. Start the PC from the new hard disk and reconnect the original hard disk to PC for system disk formatting.
Pros:
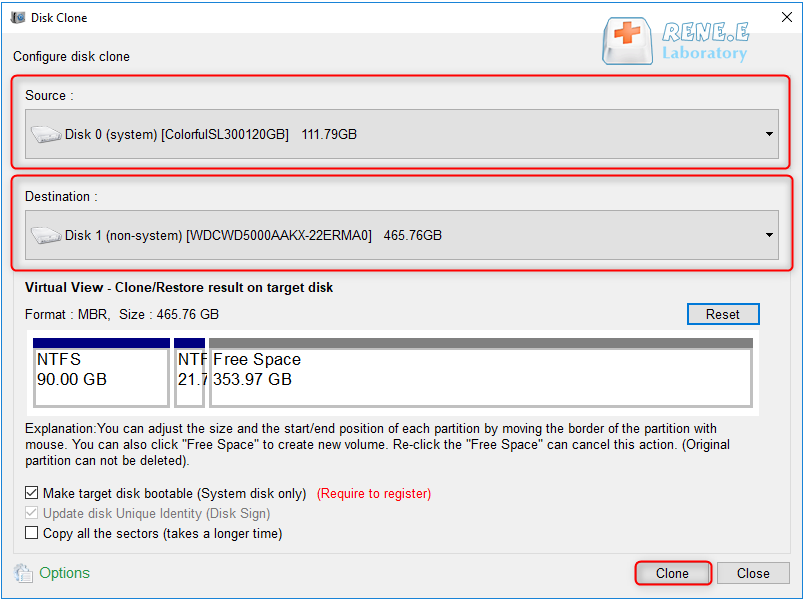
  • Provides a reliable alternative to clone HDD to SSD
  • Offers an intuitive interface and step-by-step instructions
  • Simplifies the process of cloning a hard disk

Cons:

  • Requires downloading and installing third-party software
  • Need to purchase a license code.

Conclusion

In conclusion, the Samsung Data Migration and Renee Becca offer a seamless and efficient solution for users looking to upgrade their storage capacity and enhance their system’s performance. With its easy installation process and compatibility with various operating systems, it proves to be a reliable choice for both beginners and experienced computer enthusiasts. By providing faster boot times, quicker file transfers, and overall improved productivity, this innovative product undoubtedly proves its worth in the world of technology. Say goodbye to sluggish systems and hello to a smoother computing experience with the Samsung Data Migration and Renee Becca.