

How to factory reset Windows 10 without password?

Summary
Learn how to factory reset Windows 10/11 without a password. Explore built-in recovery options, third-party password reset tools, and other reliable methods.
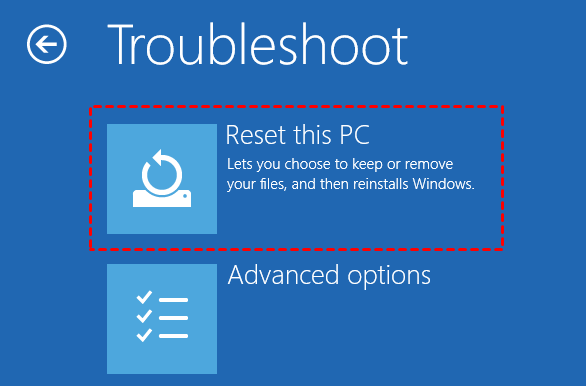
Have you ever found yourself locked out of your own Windows device because you forgot your password? It’s a frustrating situation that can happen to anyone. But fear not, there is a solution! With the Windows reset feature, you can regain access to your computer without the need for a password. This powerful tool allows you to restore your device to its original factory settings, effectively wiping out any existing password barriers. In this article, we will guide you step-by-step on how to reset your Windows without the need for a password. So, let’s get started and get you back in control of your device!

- Can reset Windows 10/11 without a password
- Does not require any additional software
- Easy to follow steps
- Can be done with physical access to the computer
Cons:
- Removes all personal files and settings
- Requires backing up important data before proceeding
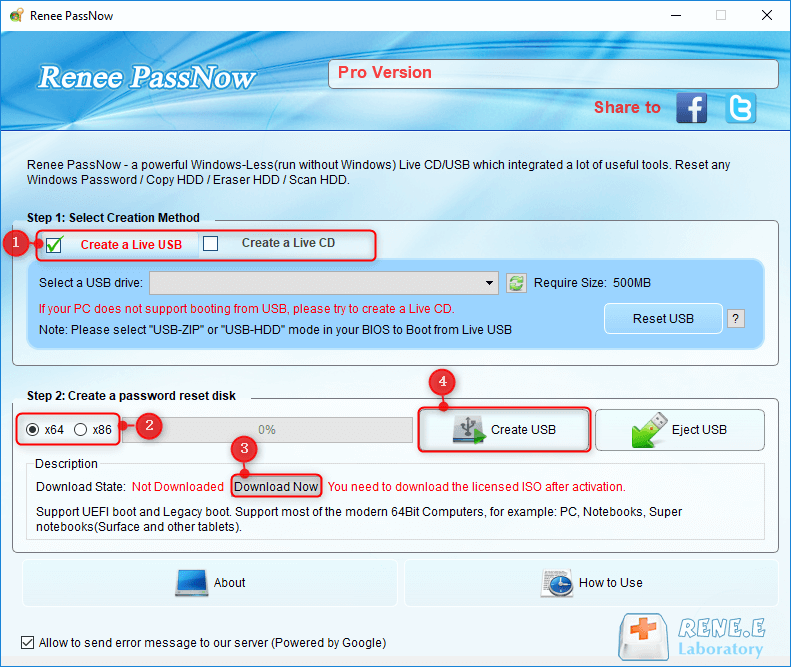
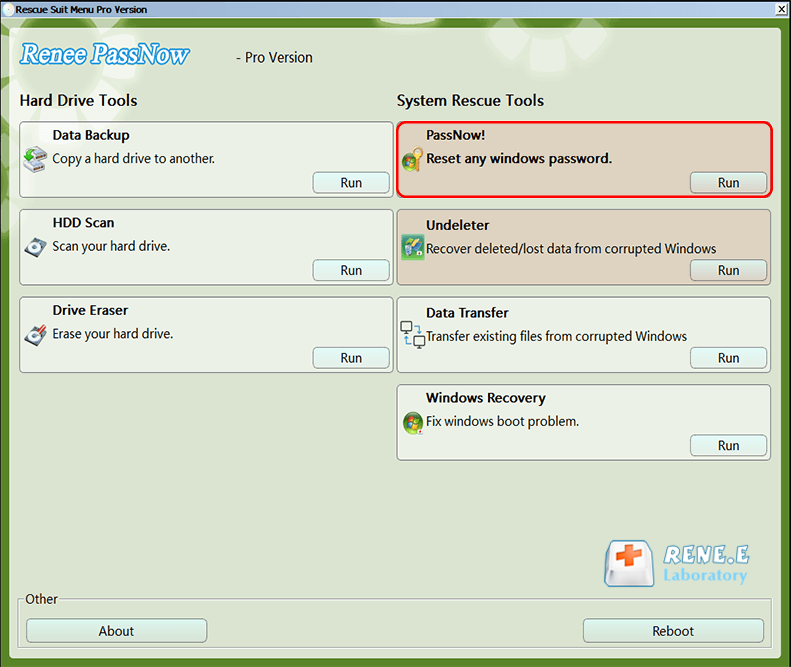
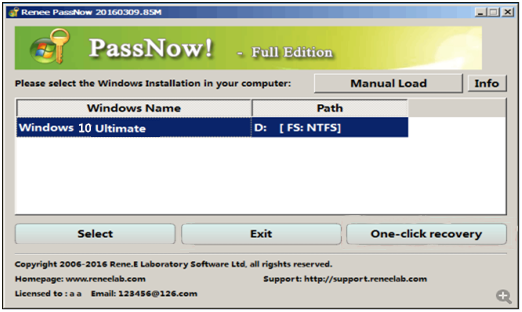
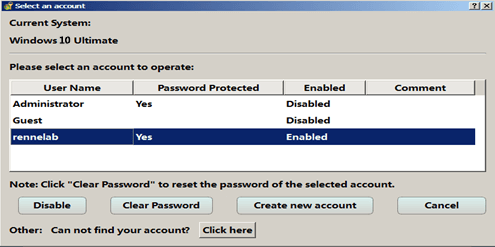
Resetting your Windows password can be a simple and straightforward process with the help of a tool like Renee Passnow. This versatile software allows you to bypass any forgotten passwords and gain access to your Windows system again. Here, we will provide you with step-by-step instructions on how to use Renee Passnow effectively.

Remove Windows Login Password 3 steps for whole password remove process.
Recover the files Recover the deleted files without Windows system.
Transfer the data Transfer the important files of the computer with system.
Multifuctional Data transfer, data recovery, bootable problem recovery can be run without system.
Highly compatible Windows 11/10/8.1/8/7/XP/Vista. UEFI boot.
Remove Login Password Support Windows 11/10/8.1/8/7/XP/Vista. UEFI boot.
Recover the files Recover the deleted files without Windows system.
Transfer the data Transfer the important files of the computer with system.
Step 2: Create a Bootable USB or CD/DVD

A local account is the most basic and traditional type of user account in Windows. It is tied to a specific device and does not require an internet connection or an email address to be created. When setting up a local account, the user needs to choose a username and password that will grant them access to that particular device only. While it lacks the convenience of syncing data across multiple devices, a local account ensures greater privacy and security as it does not rely on cloud-based services.
A domain account is typically used in business or enterprise environments where multiple devices are connected to a central server. These accounts are managed by the organization’s administrator and provide access to network resources and services. When a user logs in with a domain account, their credentials are authenticated by the Active Directory domain controller, and they gain access to resources based on their assigned permissions. Domain accounts offer centralized user management, enhanced security features, and the ability to share files and collaborate across different devices within the network.
A Microsoft account is an online account provided by Microsoft and offers integration with various Microsoft services such as OneDrive, Xbox Live, and Microsoft 365 subscriptions. It requires an email address to sign up or can be created using an existing Outlook.com or Hotmail.com account. By signing in with a Microsoft account, users can easily access their personalized settings, passwords, and other data across multiple devices. Additionally, Microsoft accounts provide features like automatic system encryption and the ability to quickly restore activation and settings.
Microsoft Entra ID is a newer option in the lineup of Windows account types. It is part of Azure Active Directory and is managed by an organization’s administrator. Microsoft Entra ID offers advanced security features, syncing settings across devices, and seamless integration with Microsoft 365 and Office 365 services. Organizations that use these services already have a Microsoft Entra ID/Azure AD account.
Understanding the different types of user accounts in Windows is crucial for users to make informed choices when setting up their devices. Whether it’s a local account for personal use, a domain account for enterprise networks, a Microsoft account for seamless integration with Microsoft services, or a Microsoft Entra ID for organizational management, Windows provides flexibility to cater to diverse user needs.
It’s important to note that the additional context provided does not directly relate to the topic of user accounts in Windows. Therefore, no specific changes or additions are required to the existing answer.
| Account Type | Features | Password storage location | Advantage |
|---|---|---|---|
| Local Account | Does not require an internet connection or an email address to be created | Stored locally on the device | Ensures greater privacy and security as it does not rely on cloud-based services |
| Domain Account | Managed by the organization’s administrator/ provides access to network resources and services | Authenticated by the Active Directory domain controller | Offers centralized user management/ enhanced security features/ and the ability to share files and collaborate within the network |
| Microsoft Account | Integration with various Microsoft services/ requires an email address to sign up | Stored securely by Microsoft | Allows easy access to personalized settings/ passwords/ and data across multiple devices/ provides features like automatic system encryption and quick restoration of activation and settings |
| Microsoft Entra ID (formerly Azure Active Directory) | Managed by an organization’s administrator/ offers advanced security features and syncing settings across devices | Managed by Azure Active Directory | Seamless integration with Microsoft 365 and Office 365 services |
copy d:windowssystem32utilman.exe d:windowssystem32utilman.exe.bak
copy d:windowssystem32cmd.exe d:windowssystem32utilman.exe
net user username newpassword
| Product Name | Features | Application Scenario |
|---|---|---|
| Renee Passnow | Comprehensive solution for resetting Admin passwords on Windows systems/ including Windows 10. Allows users to create a bootable USB or CD/DVD with WinPE to reset the password. User-friendly interface and step-by-step instructions. | Resetting Admin passwords on Windows systems/ Recover data from corruptted Windows/ Clone hard disk |
| Lazesoft Recover My Password | Simple and efficient way to reset Admin passwords on Windows systems/ including Windows 10. Supports advanced features such as password recovery from SAM files/ account unlocking/ and account management. User-friendly interface and clear instructions. | Resetting Admin passwords on Windows systems |
| Offline NT Password & Registry Editor | Open-source WinPE product that can effectively reset Admin passwords on Windows systems/ including Windows 10. Can be run from a bootable USB or CD/DVD created with WinPE. Powerful command-line capabilities for password reset. | Resetting Admin passwords on Windows systems |
| PCUnlocker | Comprehensive solution for resetting Admin passwords on Windows systems/ including Windows 10. Provides a bootable USB or CD/DVD with WinPE for password reset. User-friendly interface and step-by-step instructions. | Resetting Admin passwords on Windows systems |
| Windows PE | Windows Preinstallation Environment (WinPE) is a lightweight version of Windows that allows users to boot into a command prompt or graphical interface. It can be used to reset Windows Admin passwords by creating a bootable USB or CD/DVD. Requires Windows installation media or recovery media. | Resetting Admin passwords on Windows systems |
| Ventoy | Open-source software that allows users to create a bootable USB drive with multiple ISO files. Can be used to create a bootable USB with WinPE for resetting Windows Admin passwords. Supports various operating systems and subscription services. Additional features include persistence support/ boot WIM file/ Windows VHD Boot/ Linux vDisk Boot/ DUD Plugin/ Password Plugin/ Conf Replace Plugin/ Menu Class/ Menu Alias/ Menu Extension/ Memdisk Mode/ TreeView Mode/ Disk Layout MBR/ Disk Layout GPT/ and Search Configuration. | Creating a bootable USB with WinPE for password reset |
In conclusion, being locked out of your Windows device due to a forgotten password can be incredibly frustrating. Fortunately, with the right steps and tools, you can reset your Windows system without the need for a password. It is important to remember to follow the instructions carefully and proceed with caution to avoid any potential data loss or system damage. By utilizing the available options and resources, you can regain access to your Windows device and continue using it seamlessly.
Relate Links :
How to Reset Windows XP Password without Password Reset Disk
27-01-2022
Ashley S. Miller : Want to get some important data from the old Windows XP computer but can not login without the...
[Solved] How to Reset Windows Vista Password with or without Reset Disk

05-05-2023
Amanda J. Brook : Want to get important data back from previous Vista computer but can not login without the password which...
Reset Windows 10 Administrator Password without Data Lost

05-01-2021
John Weaver : Forgot Windows 10 admin password? Try every possible password combinations and methods from Microsoft but none of them...
How to Reset Windows 10 Password without Reset Disk?
28-04-2023
Amanda J. Brook : Forgot Windows 10 login password? No matter you are using administrator, local account or the Microsoft account, you...

