author avatar
    Technology Manager of Test Dept.
 

Summary
Upgrade to a faster system by easily cloning your OS from HDD to SSD on Windows 11/10 with this step-by-step guide. Learn how to select the right tools, prepare your SSD, and handle post-clone actions. Address common FAQs and ensure a smooth transition with this efficient cloning process using Renee Becca.


As technology continues to advance, the use of solid-state drives (SSDs) in computers has become increasingly popular due to their faster performance and durability compared to traditional hard disk drives (HDDs). However, switching from an HDD to an SSD can be a daunting task for many, especially when it comes to transferring the operating system (OS) and all its files. Fortunately, with the help of cloning, this process can be made much easier. In this chapter, we will guide you through the pre-cloning preparation, where we will discuss the importance of selecting the right tools and preparing your SSD for the cloning process.

Pre-cloning Preparation – Selecting the Right Tools and Getting Your SSD Ready

Ensure the Old HDD has an Operating System (OS) Installed
Before beginning the cloning process, it is essential to check that your old HDD has an operating system installed. Without an OS, your computer will not be able to boot, and even if the cloned SSD has bad sectors, it may not boot either.
Fix Any Bad Sectors on the Old HDD
It is crucial to fix any bad sectors on your old HDD before cloning. These bad sectors can cause issues during the cloning process and affect the performance of your new SSD. You can use built-in tools like chkdsk in Windows to scan and fix any bad sectors.
scan and fix any bad sectors in Windows
Purchase a Compatible SSD with Enough Space
Make sure to purchase an SSD that is compatible with your computer’s form factor and has enough space to store all your data from the old HDD. It is acceptable if the new SSD is not initialized, as the cloning process will take care of that.
Disconnect Unnecessary Devices
To avoid any interruptions during the cloning process, it is best to disconnect any USB storage devices, external displays, printers, and other peripherals from your computer.
If Using a Laptop with One Hard Drive Bay, Use a USB-to-SATA Adapter
If your laptop has only one hard drive bay, you will need to use a USB-to-SATA adapter to connect the new SSD to your computer. This will allow for a smooth cloning process.
clone os from hdd to ssd
Choose the Right Cloning Software
Selecting the right cloning software is crucial for a successful cloning process. Renee Becca is a highly recommended option, as it is a powerful disk cloning software with advanced features and options. It is fully compatible with the latest version of Windows 11.
Cloning your OS from HDD to SSD offers several advantages, such as faster speed and improved performance. It also allows you to keep all your programs and settings intact. However, the cloning process may not be as straightforward as a fresh installation of the OS. It also requires the use of additional hardware and software.
select system redeploy function in renee becca
Summary
In summary, before starting the cloning process, it is crucial to ensure that your old HDD has an OS installed and that any bad sectors are fixed. It is recommended to create a backup of your data and disconnect any unnecessary devices. If using a laptop with one hard drive bay, a USB-to-SATA adapter will be needed. Choosing the right software is also important. After completing the pre-cloning preparation, you can move on to the next chapter to learn about the detailed walkthrough of transferring your OS using Renee Becca, an efficient cloning software.

Cloning with Renee Becca – A detailed walkthrough of transferring your OS using this efficient cloning software.

Renee Becca is a powerful all-in-one cloning software that can efficiently transfer your OS from HDD to SSD. This software not only clones your OS, but also supports backing up and restoring your system, disk wiping, and disk health checking. In addition, Renee Becca supports 4K align and Cloning from larger partition to smaller partition. These functions can better assist you in completing system and data migration.
In this chapter, we will provide a step-by-step guide on how to use Renee Becca to clone your OS to a new SSD drive.
Step 1: Download and install the software
The first step is to download and install Renee Becca on your computer. Keep in mind that the software is only compatible with Windows operating systems. Once the installation is complete, launch the software.
Hot Topic - ADsRenee Becca – Safe and Quick System Migration to SSD

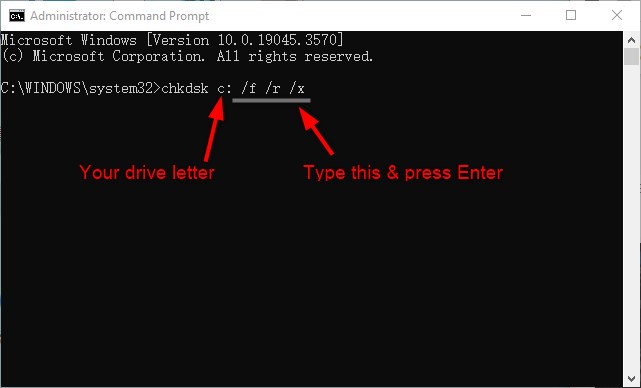
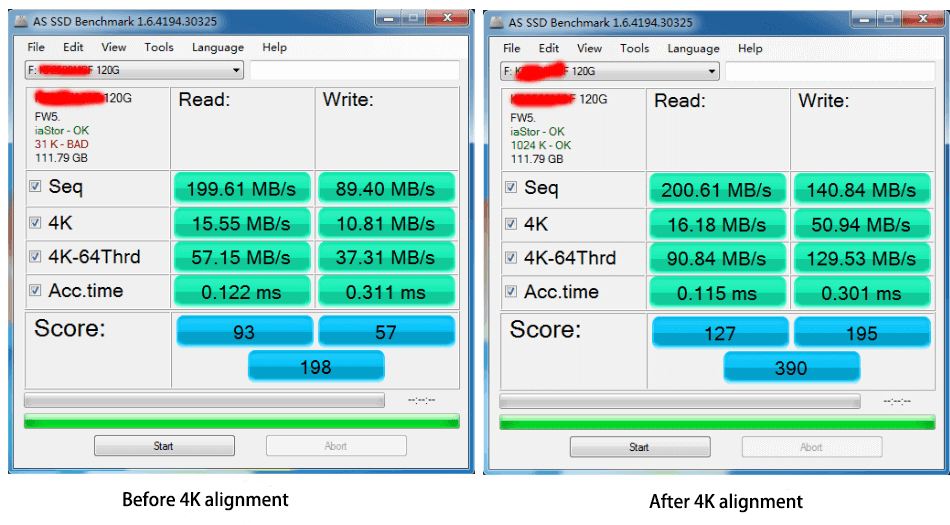
Automatic 4K alignment Improves SSD performance during system migration.

Support GPT and MBR Automatically adapt to the suitable partition format.

Support NTFS and FAT32 Redeploy various files in different file systems.

Back up quickly Back up files at up to 3,000MB/min.

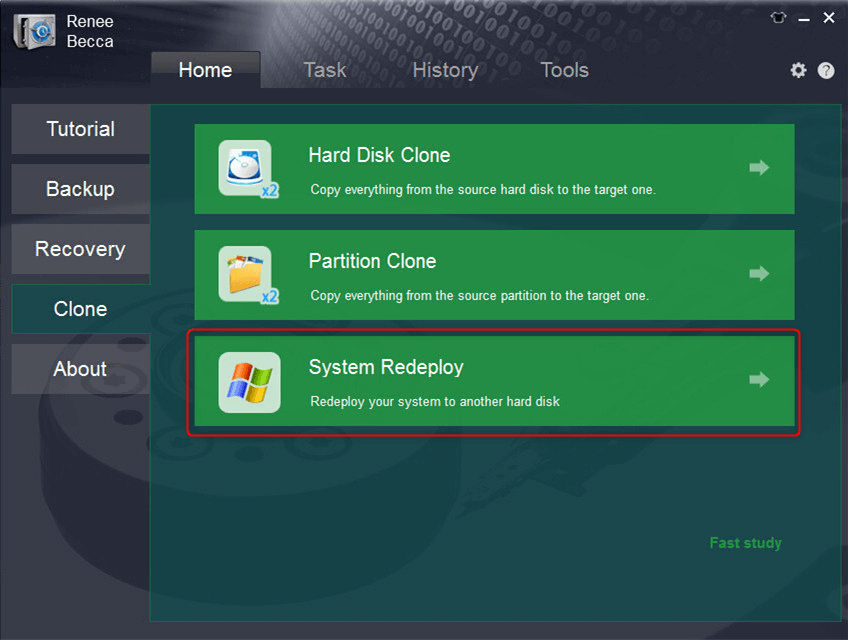
Overall backup schedule Support system redeployment/system backup/partition backup/disk backup/disk clone.

Automatic 4K alignment Improve SSD performance

Support GPT and MBR Intelligently adapt to a partition format

Support NTFS and FAT32 Redeploy files in different file systems
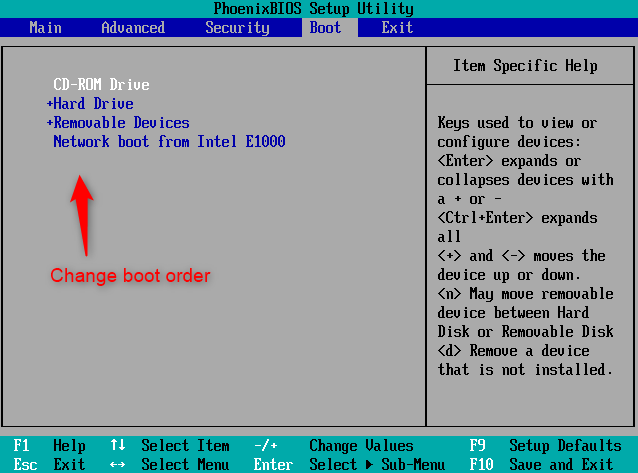
Free TrialFree TrialNow 2000 people have downloaded!
Step 2: Connect the new SSD to your computer. Make sure it is recognized before proceeding.
Before cloning your OS, make sure your SSD is ready for the process. You can refer to the previous chapter “Pre-cloning Preparation – Selecting the Right Tools and Getting Your SSD Ready” for more detailed instructions.
Different SSD interfaces, SATA, M.2, PCIe
Step 3: click “System Redeploy” in the “Clone” option from the main interface.
Then, select the source drive (HDD) and the destination drive (SSD) for the cloning process. Make sure to select the correct drives to avoid any data loss.
select system redeploy function in renee becca
Step 4: Click on “Redeploy” to start the cloning process. The software will begin copying all the data from your HDD to the SSD.
select target disk and desination in system redeploy function in renee becca
Step 5: Restart your computer and change the boot order.
Once the cloning process is complete, restart your computer and enter the BIOS settings. Change the boot order to make the SSD the primary boot device. Save the changes and exit. Your computer will now boot from the SSD.
Here is a list of BIOS shortcut keys for different brands. Alternatively, you can observe the BIOS shortcut keys displayed on the screen during booting.
BIOS NameMethodThe Key or Keys
AcerPress Del or F2 immediately after powering onDel/ F2
CompaqPress F10 while the cursor in the top right corner of the screen is blinkingF10
DellPress F2 when the Dell logo appears/ or press every few seconds until the message Entering Setup appearsF2
eMachinesPress Tab or Del while the eMachine logo displays on the screenTab/ Del
FujitsuPress F2 once the Fujitsu logo appearsF2
GatewayPress the F1 key repeatedly after restarting the computerF1
HPPress the F1/ F10/ or F11 key after restarting the computerF1/ F10/ F11
IBMPress F1 immediately after powering on the computerF1
LenovoPress F1 or F2 after powering on the computerF1/ F2
NecPress F2 to enter the BIOS SetupF2
Packard BellPress F1/ F2/ or Del to enter BIOSF1/ F2/ Del
SamsungPress F2 to start the BIOS setup utilityF2
SharpPress F2 after the computer startsF2
SonyPress F1/ F2/ or F3 after turning on the computerF1/ F2/ F3
ToshibaPress F1 or Esc after powering on to access BIOSF1/ Esc
ARLTPress Del or F11 when the respective message is shownDel/ F11
Cloning with Renee Becca is a quick and efficient way to transfer your OS from HDD to SSD. It offers various features and options to ensure a successful cloning process. However, always make sure to back up your data before proceeding with any cloning process.
Pros:
  • User-friendly interface
  • Efficient cloning process
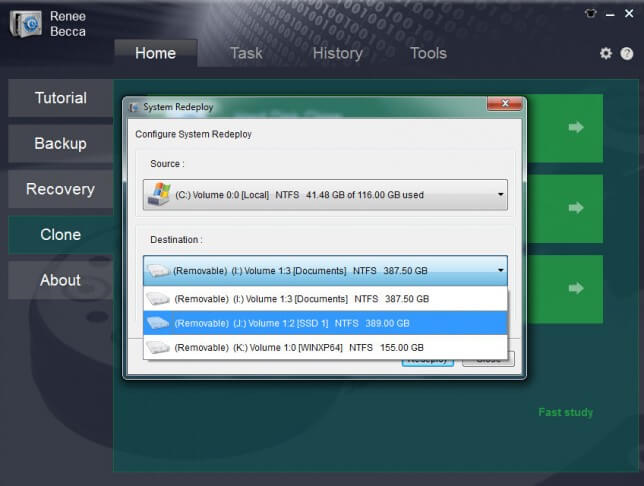
  • Allows you to preview the source and destination drives

Cons:

  • Paid subscription required for full access to all features

Make sure to check if everything is working properly. Test all applications and programs to see if they are functioning as expected. If you encounter any issues, you can refer to the next chapter “Post-clone Actions – What to do after successfully cloning your OS to ensure a smooth transition.” for troubleshooting steps.

Post-clone Actions – What to do after successfully cloning your OS to ensure a smooth transition

After successfully cloning your OS from HDD to SSD using Renee Becca, there are a few post-clone actions that you need to perform to ensure a smooth transition. These actions are crucial for the proper functioning of your SSD and to avoid any potential issues in the future. In this chapter, we will discuss these post-clone actions in detail and guide you on how to carry them out effectively.
Step 1: Verify Boot Priority
After cloning your OS to your SSD, it is crucial to make sure that your computer’s boot priority is set to the SSD. This will ensure that your computer boots from the SSD instead of the old HDD. You can check and change the boot priority in the BIOS or UEFI settings of your computer.
change the boot order
Step 2: Check the SSD Alignment
Once you have completed the cloning process, the first thing you need to do is check the alignment of your SSD. SSD alignment is essential for optimal performance and longevity of your drive. If the alignment is not correct, it can cause slow performance and decrease the lifespan of your SSD. To check the alignment, you can use a free tool like “SSD Alignment Checker”.
Check the SSD Alignment
Step 3: Check and Enable TRIM
TRIM is a command that helps your operating system identify the unused space on your SSD and free it up for new data. This process is crucial for maintaining the performance and lifespan of your SSD.
You can check if TRIM is enabled by opening the Command Prompt and typing "fsutil behavior query DisableDeleteNotify". If the result is "DisableDeleteNotify = 0", it means TRIM is enabled. If not, you can enable it by entering the command "fsutil behavior set DisableDeleteNotify 0".
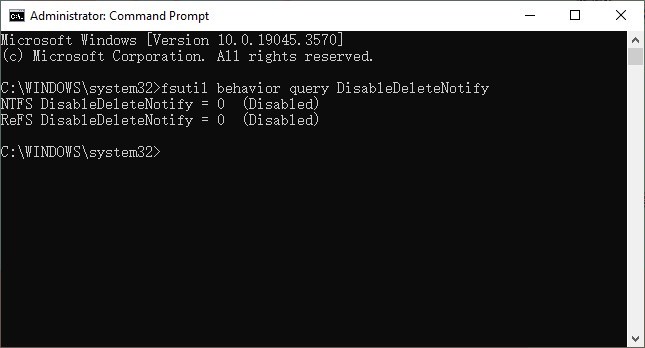
Check and Enable TRIM
Step 4: Update Drivers and Firmware
Updating your SSD drivers and firmware is crucial for the optimal performance and compatibility of your drive. You can update your drivers and firmware by going to the manufacturer’s website and downloading the latest updates for your specific model. It is recommended to regularly check for updates and install them to keep your SSD running smoothly.
Step 4: Disable Defragmentation
Defragmentation is a process that rearranges the data on your hard drive to improve performance. However, SSDs function differently than traditional HDDs and do not require defragmentation. In fact, defragmentation can cause unnecessary wear and tear on your SSD, decreasing its lifespan. Therefore, it is essential to disable defragmentation on your SSD by going to the Control Panel and selecting “Defragment and Optimize Drives”.
Defragment and Optimize Drives
These five post-clone actions are essential to ensure a smooth transition after cloning your OS from HDD to SSD. By following these steps, you can avoid any potential issues and improve the performance and longevity of your SSD. Make sure to regularly check for updates and perform these actions to keep your SSD running smoothly.
The advantage of performing these post-clone actions is that it ensures the proper functioning and longevity of your SSD. By checking the alignment, enabling TRIM, disabling defragmentation, and updating drivers and firmware, you can avoid potential issues and improve the overall performance of your drive. But it may require some technical knowledge and time to perform these actions. However, the benefits outweigh the effort, and it is crucial to ensure the proper functioning and lifespan of your newly cloned SSD.
To learn more about OS cloning and solving common issues related to it, make sure to check out our next chapter on “Addressing Common Cloning FAQs – Solving typical issues and questions related to OS cloning from HDD to SSD”. We will cover some commonly asked questions and provide solutions to help you with any potential problems during the cloning process.

Addressing Common Cloning FAQs

When it comes to cloning an OS from HDD to SSD, there are often many questions and concerns that arise. In this chapter, we will address some of the most common questions and provide solutions to the typical issues that may arise during the cloning process.
What is the best way to clone an OS to an SSD?
The best way to clone an OS to an SSD is by using a professional Windows migration tool, such as Renee Becca. Manually copying files from the system partition to the SSD can cause boot issues in the future.
How do I transfer an OS to an SSD?
To transfer an OS to an SSD, you will need a target SSD with enough disk space and a cloning tool. Renee Becca is a highly recommended cloning tool for Windows 10. Before cloning, it is important to note that the data and partitions on the target disk will be deleted, so make sure to back up important data beforehand.
What should I do after successfully cloning my OS?
After successfully cloning your OS, there are a few post-clone actions that will ensure a smooth transition to the new drive. These include updating drivers, disabling unnecessary services, and optimizing the SSD for better performance.
Not enough unallocated space on the target disk.
If there is not enough unallocated space on the target disk, the operation will delete and remove existing partitions and data. To avoid this, back up important data to an external hard drive before cloning.
Unable to boot from the clone target disk.
If you encounter issues booting from the clone target disk, make sure to adjust the boot order in the BIOS and select the clone target disk as the first boot option.
Cloning an OS from HDD to SSD can be a smooth and seamless process if done correctly. Using a professional OS migration tool and following the proper steps and precautions will ensure a successful clone. With the right tools and knowledge, the transition to an SSD can greatly improve the performance of your system.

Conclusion

In conclusion, upgrading your system from HDD to SSD is a straightforward process with the right tools and preparation. In this article, we discussed the necessary steps to successfully clone your OS on both Windows 11 and 10 platforms using a software like Renee Becca. We also covered post-clone actions such as updating drivers and clearing old files to ensure a smooth transition. Additionally, common FAQs related to the cloning process were addressed, providing solutions to potential issues that may arise. By following this guide, you can experience the speed and performance benefits of having your OS on an SSD without the hassle of a clean install. Don’t let a slow HDD hold you back, try cloning your OS to an SSD today and see the difference for yourself.