author avatar
    Specialist of Customer Service Dept.
 

Summary
Discover the top 5 methods to perform a factory reset on your Lenovo ThinkPad running Windows 7 without needing a password. From using OneKey Recovery to creating Windows 7 installation media, these easy solutions will have your laptop back to factory settings in no time.
Are you having trouble accessing your Lenovo ThinkPad due to a forgotten password? Or maybe your laptop is experiencing persistent issues that a simple restart won’t fix? Whatever the case may be, performing a factory reset can often be the solution to these problems. And fortunately, Lenovo has made it easy for users to do so with their OneKey Recovery feature. In this article, we will guide you through the steps on how to perform a factory reset on a Lenovo ThinkPad running Windows 7 without requiring a password. Specifically, we will focus on the method of using the Nova button, which is a convenient and efficient way to access the OneKey Recovery feature. So, without further ado, let’s get started with Method 1: Access and use the OneKey Recovery feature on a Lenovo ThinkPad to perform a factory reset, using the Nova button.

Method 1: Access and Use the OneKey Recovery Feature on a Lenovo ThinkPad (Using Nova Button)

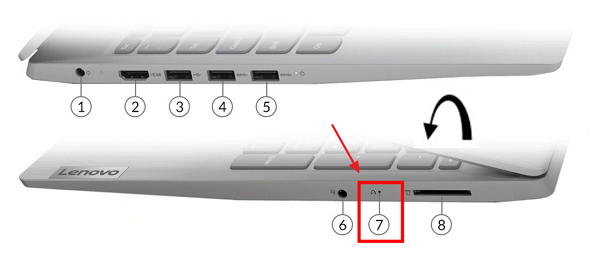
The OneKey Recovery feature on a Lenovo ThinkPad allows users to easily perform a factory reset without the need for a password. This feature is particularly useful if you have forgotten your Windows 7 password and are unable to access your computer. The Nova button, located on the side of your ThinkPad, can be used to initiate the factory reset process.
novo button on lenovo laptop
Step 1: Power Off Your ThinkPad
The first step in performing a factory reset using the OneKey Recovery feature is to power off your ThinkPad. Make sure to save any unsaved work and close any open applications before proceeding.
Step 2: Locate and Press the Nova Button
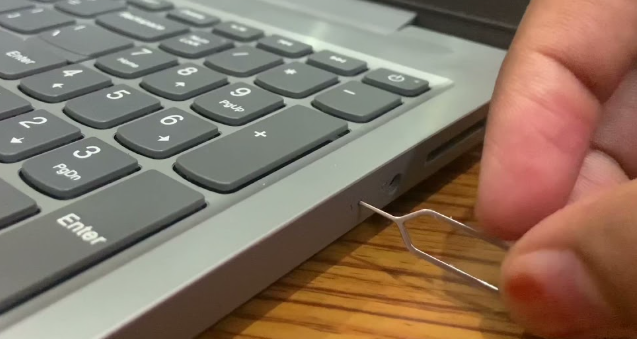
Once your ThinkPad is powered off, locate the Nova button on the left side of your laptop. It is a small, recessed button that may require a paperclip or similar object to press. Press and hold the button for about 1-2 seconds to initiate the OneKey Recovery process.
factory reset lenovo thinkpad windows 7 without password
Step 3: Select OneKey Recovery Option
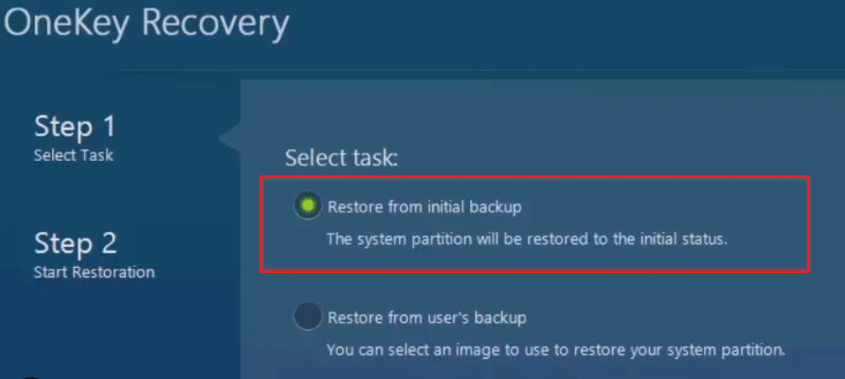
After pressing the Nova button, your ThinkPad will boot into the OneKey Recovery mode. You will see a screen with two options: “Restore from initial backup” or “Restore from user backup“. Select the “Restore from initial backup” option to perform a factory reset.
lenovo one key recovery Restore from initial backup
Step 4: Confirm Factory Reset
Next, you will be prompted to confirm the factory reset. This process will erase all data on your computer, so make sure to have a backup of any important files. Click “Next” to proceed.
Step 5: Factory Reset Process
Once you have confirmed the factory reset, the process will begin. It may take some time for the reset to complete, so be patient. Your computer will restart multiple times during the process.
Step 6: Reset Complete
After the factory reset is complete, your ThinkPad will restart and boot into a freshly installed version of Windows 7. You will be prompted to go through the initial setup process, just like when you first got your computer.
Conclusion
The OneKey Recovery feature on a Lenovo ThinkPad makes performing a factory reset without a password quick and easy. By following these steps, you can easily reset your ThinkPad and regain access to your computer. Make sure to always have a backup of your important files before performing a factory reset.

Method 2: Using Renee PassNow to Reset Windows Password and Factory Reset Lenovo ThinkPad

In the previous chapter, we discussed how to use the OneKey Recovery feature on a Lenovo ThinkPad to perform a factory reset. However, if the recovery partition of your lenovo laptop is lost or deleted, you may not be able to access this feature. In such cases, you can use a third-party tool called Renee PassNow to reset your Windows password and then proceed with the factory reset process.

Resetting Windows 7 Password

The first step in this method is to reset your Windows 7 password using Renee PassNow. To do this, you will need to download and install the program on a different computer and create a bootable USB drive or CD. You can find detailed instructions on how to do this on the Renee PassNow website. Once you have created the bootable media, follow these steps:
To reset your Windows 7 password using Renee PassNow, follow these steps:
Step 1: Download and Install Renee PassNow
Start by downloading Renee PassNow from the official website and install it on a different computer that you can access. You can choose the appropriate version based on your computer’s operating system.
Renee PassNow – Professional Windows System Rescue Tool

Remove Windows Login Password 3 steps for whole password remove process.

Recover the files Recover the deleted files without Windows system.

Transfer the data Transfer the important files of the computer with system.

Fix Windows startup error Fix various Windows startup failures or crashes.

Erase disk Completely erase disk files which will not be restored.

Remove Windows Login Password 3 steps for whole password remove process.

Recover the files Recover the deleted files without Windows system.

Transfer the data Transfer the important files of the computer with system.

Free TrialFree TrialNow 2000 people have downloaded!
Step 2: Create a Bootable USB or CD/DVD
Launch Renee PassNow and insert a USB flash drive or blank CD/DVD into the computer. Select the option to create a bootable media. Follow the on-screen instructions to complete the process.
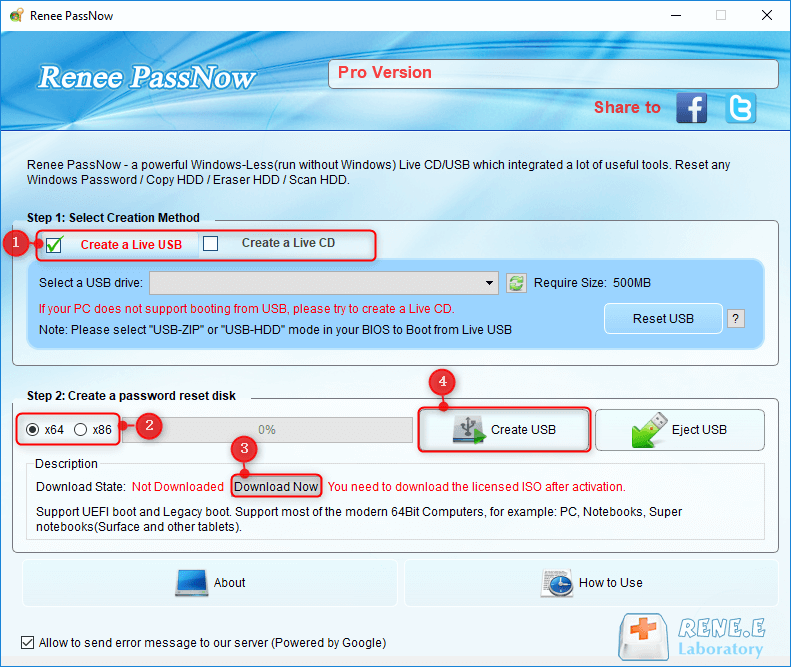
Create New Windows 10 Password Reset Disk with Renee PassNow
Step 3: Boot the Locked Server from the Bootable Media
Insert the bootable USB or CD/DVD into the locked Windows computer. Restart the computer and enter the BIOS settings by pressing the appropriate key (usually F2 or Delete). Configure the boot order to prioritize the bootable media.
Common Server:
Server TypeEnter boot menu method
DELLPress the F12 key repeatedly before the Dell logo appears on the screen.
HPPress the F9 key multiple times when the HP logo is displayed.
Common Computers:
BIOS NameEnter boot menu method
ASRockDEL or F2
ASUSDEL or F2 for PCs/ DEL or F2 for Motherboards
AcerDEL or F2
DellF12 or F2
ECSDEL
Gigabyte / AorusDEL or F2
Lenovo (Consumer Laptops)F2 or Fn + F2
Lenovo (Desktops)F1
Lenovo (ThinkPads)Enter then F1
MSIDEL
Microsoft Surface TabletsPress and hold Power and Volume Up buttons
Origin PCF2
SamsungF2
ToshibaF2
ZotacDEL
HPEsc/ F9 for `Boot Menu`/ Esc/ F10/ Storage tab/ Boot Order/ Legacy Boot Sources
INTELF10
Boot the target PC with the created password reset USB/CD/DVD.
Step 4: Select password reset function
After successfully booting from the bootable media, Renee PassNow will load. Select “PassNow!” function after booting from the new created Windows password reset disk.
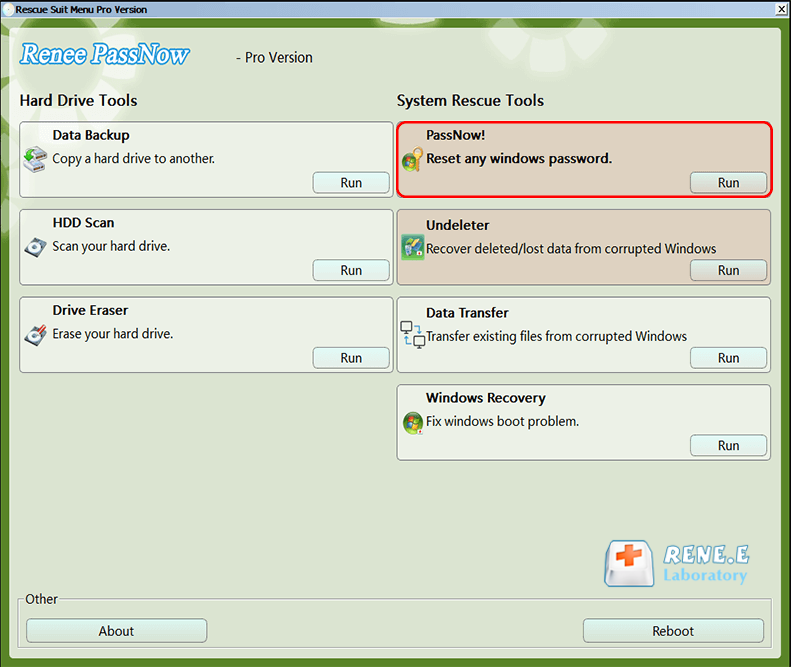
After loading into main interface, please select the “PassNow!” function.
Step 5: Resetting the Password
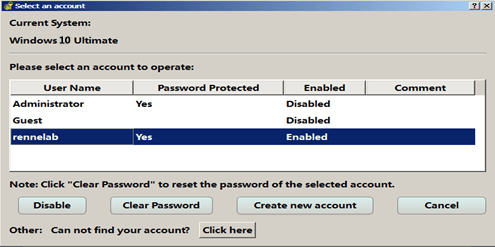
Choose the user account for which you want to reset the password. Then, click on the “Clear Password” button. Renee PassNow will remove or reset the password for the selected user account.
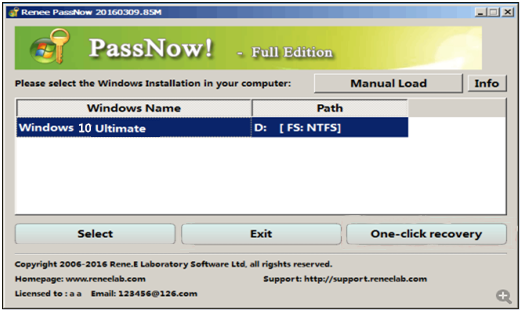
Select target Windows system in the list
Select target user account in the list
Step 6: Reboot the PC
Once the password is reset, remove the bootable media from the PC and restart the computer. You will now be able to log in to Windows Account without a password.
Factory Resetting Lenovo ThinkPad

Once you have successfully reset your Windows password, you can proceed with the factory reset process. Follow the steps outlined in the previous chapter for Method 1 to access the OneKey Recovery feature. Select the Restore from initial backup option and follow the instructions to complete the factory reset.
Conclusion
Using Renee PassNow is an effective method to reset your Windows password and then perform a factory reset on your Lenovo ThinkPad. This tool also has other features such as data backup and recovery, making it a useful program for any computer user. However, it is important to keep your password secure and make a note of it to avoid any inconvenience in the future.

Method 3: Utilizing the Advanced Boot Options method

If the previous methods of performing a factory reset on your Lenovo ThinkPad did not work, don’t worry. There is still another option available that you can try. This method involves using the Advanced Boot Options menu to reset your device. This method is especially useful if you have forgotten your password and are unable to access your computer normally. Here is how you can use the Advanced Boot Options method to factory reset your Lenovo ThinkPad without a password:
Step 1: Accessing the Advanced Boot Options menu
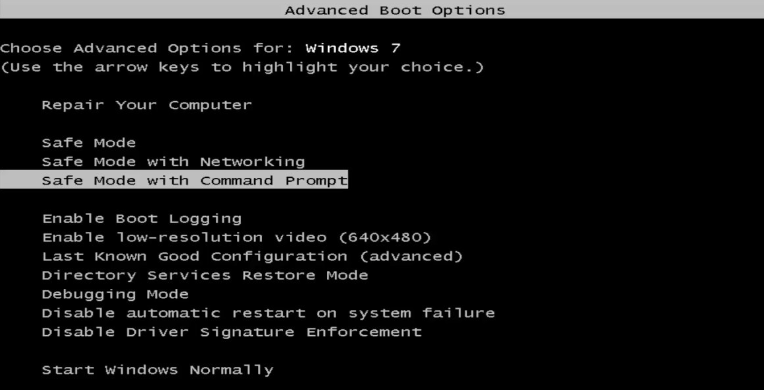
To start, you will need to access the Advanced Boot Options menu on your Lenovo ThinkPad. This menu provides a range of troubleshooting options for your computer, including the ability to reset your device to its factory settings. To access this menu, restart your computer and press the F8 key repeatedly until the Advanced Boot Options menu appears on your screen.
Step 2: Selecting the “Repair Your Computer” option
Once you have accessed the Advanced Boot Options menu, use the arrow keys on your keyboard to navigate to the “Repair Your Computer” option. Press Enter to select it.
advanced boot options windows 7 repair your computer
Step 3: Choosing the “Factory Image Restore” option
Next, you will need to select the “Factory Image Restore” option from the list of system recovery options. This will start the recovery process and reset your Lenovo ThinkPad to its factory settings.
Step 4: Confirming the reset
Before the reset begins, you will be prompted to confirm your choice. Press Enter to continue with the reset. This process may take some time, so be patient and do not interrupt it.
Step 5: Completing the reset
Once the reset is complete, your Lenovo ThinkPad will restart automatically. You will then need to go through the initial setup process again, just like when you first purchased the device.
This method utilizes the recovery partition on your Lenovo ThinkPad to perform a factory reset, which means you do not need to enter a password to initiate the reset. However, it is important to note that this method will erase all data on your device, so make sure to back up any important files before proceeding.
Additionally, the Advanced Boot Options method can be accessed even if your computer is not booting up properly, whereas the Windows Recovery Function can only be accessed from within the operating system.
However, both methods will erase all data on your device, so it is important to back up any important files before proceeding.

Method 4 : Creating Windows 7 Installation Media to reinstall

In addition to the methods mentioned earlier, you can also use the option of creating Windows 7 Installation Media DVD or USB drive to reinstall Windows 7 without the need for a password. This method is extremely helpful when you do not have access to the Recovery partition or if your system is not booting up properly.
To create the Windows 7 Installation Media, you will need a blank DVD or a USB drive with at least 4GB of storage space. You can download the official Windows 7 ISO from the Microsoft website or use the installation disc that came with your Lenovo ThinkPad.
Step 1: Download and install Windows DVD/USB Download Tool
First, you need to download and install the Windows DVD/USB Download Tool from the Microsoft website. This tool will help you create a bootable installation media for Windows 7.
If you do not have a Windows Installation media, you may download Windows Installation Creation Tools here:
Windows VersionDownload LinkRequirement
Windows 7https://learn.microsoft.com/lifecycle/products/windows-7PC with a working Internet connection/ a blank USB flash drive or DVD with at least 8 GB of available storage space/ a product key
Windows 8/8.1https://www.microsoft.com/software-download/windows8Same to above
Windows 10https://www.microsoft.com/software-download/windows10Same to above
Windows 11https://www.microsoft.com/software-download/windows11Same to above
Step 2: Insert blank DVD or USB drive
Insert a blank DVD or a USB drive into your system. Make sure that it has at least 4GB of storage space and all the data on it will be erased.
Step 3:Launch the Windows DVD/USB Download Tool
Launch the Windows DVD/USB Download Tool and select the option to create a bootable disc or USB drive depending on your preference.
Step 4: Choose Windows 7 ISO file
Next, click on the Browse button and select the Windows 7 ISO file that you downloaded earlier or insert the installation disc for your Lenovo ThinkPad.
Step 5: Create installation media
Once you have selected the ISO file, click on Next and the tool will start creating the installation media for you.
Once the installation media is created, you can use it to boot up your Lenovo ThinkPad and perform an install. You can follow the steps mentioned in Method 3 to access the Advanced Boot Options and select the option to reinstall Windows 7. This time, you will not be prompted for a password as you will be using the installation media.
After the installation is completed, remove the installation media and your Lenovo ThinkPad will boot up with a fresh copy of Windows 7.
Conclusion
The option of creating a Windows 7 Installation Media is a useful tool for resetting your Lenovo ThinkPad without the need for a password. It is also a great solution if your system is not booting up properly. Make sure to keep the installation media handy in case you need to perform a factory reset in the future.

Conclusion

In conclusion, there are several methods to perform a factory reset on your Lenovo ThinkPad running Windows 7 without needing a password. We explored the use of OneKey Recovery, Renee PassNow, Windows Recovery Function, Advanced Boot Options, and creating Windows 7 Installation Media. These methods provide options for users who have forgotten their password or are unable to access their device. It is important to carefully consider which method is best for your specific situation and follow the instructions carefully to avoid any potential data loss. With these options available, you can easily reset your Lenovo ThinkPad and start fresh without the hassle of a forgotten password. Remember to regularly backup your important data to prevent any future frustration in case you need to perform a factory reset.