author avatar
    Technology Manager of Test Dept.
 

Summary
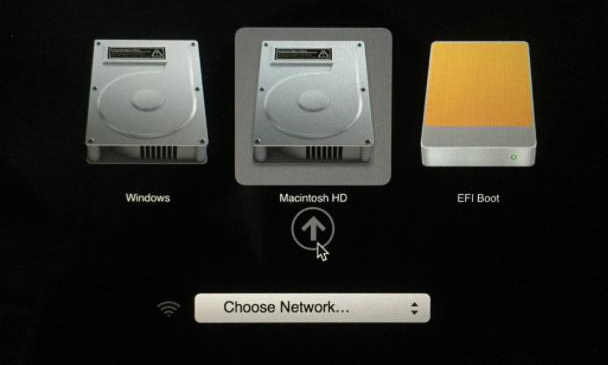
After you replace the old hard drives with a better-performing mechanical or solid-state drives, you should know how to change the boot drive to make your computer start from the new hard disk.


how to change boot drive

I. Before replacing the boot hard disk, back up the old hard disk data (optional)

If you want to replace an old hard drive with poor performance with a new one, before replacing it, it is recommended to back up the data on the old hard drive in advance for emergencies. The following takes Renee Becca as an example to introduce the specific steps of hard disk backup. The operation is very simple, even a computer novice can successfully complete the backup operation.

1. What is Renee Becca

with Renee Becca, the reliable and efficient tool for system and hard disk data backup and restoration. Preserve your crucial data, from programs and system configuration to emails, photos, videos, documents, and bookmarks, without worrying about running out of space or wasting time. Thanks to its advanced incremental/differential backup technology, Renee Becca helps you optimize your backups and restore them seamlessly. Whether you need to backup an entire partition, clone a hard disk, or migrate your system, Renee Becca has you covered. Choose Renee Becca and keep your data safe.
Renee Becca - Reliable Data Backup & Restore Software

Quick Backup files at up to 3,000MB/min.

Fullfill different backup needs Supports system backup, disk / partition backup, file backup and disk clone.

Intelligent Automatically analyze the differences between source and backup data.

Convenient Support VSS, allowing to freely view webpages when backing up system.

Highly compatible Supports various files and storage devices.

Quick Backup files at up to 3,000MB/min.

Fullfill different backup needs Backup for disk, partition and system. Save disk space by backing up incremental /differential data.

Highly compatible Supports various files and storage devices.

Free TrialFree Trial 2000 users have downloaded and enjoy Renee Becca!

2. How to use Renee Becca to back up the hard disk?

It is very simple to use Renee Becca to back up a hard disk or partition. The specific steps are as follows:
Step 1: Download, install and run Renee Becca on the computer, select the (hard disk/partition backup) option in the main interface (backup) column. This option can back up the data of the entire hard disk or partition. If you only need to back up individual important data, you can also use the (file backup) function.
backup data in disks and partitions
To back up your hard disk, start by selecting the source file device and destination partition in Renee Becca. For partition-specific backups, use the option in the top right corner. For recurring backups, select from one of Renee Becca’s five backup plans, including version chain, single version, overall, incremental, and differential modes.
Step 3: Finally, click the (Backup Now) button to start executing the hard disk backup command according to your settings.

II. How to change the boot hard disk?

After installing or connecting the new system hard disk to the computer, you can try to change the boot hard disk according to the following operation guide. The following will explain the detailed steps of changing the boot hard disk for Windows and Mac computers respectively, please continue reading.

1. Change the boot hard disk on a Windows computer

To change the boot hard disk on a Windows computer, you need to enter the BIOS settings and change the preference of the boot device to a new hard disk. Specific steps are as follows:
Step 1: Press the specific key continuously during the boot process to enter the BIOS interface. (Due to different brands of computers or motherboards, it may be F2, F8, F10, F12, ESC or Del, etc. You can carefully observe the prompts when starting up)
Press the DEL key to enter the BIOS setup
Efficiently change your boot order by locating the Boot Priority option. While the UEFI BIOS visual interface allows you to utilize your mouse, alternatively you may use the arrow keys to maneuver through the hard disk, placing the operating system-containing hard disk in the top an optimal boot order. Save your settings and relaunch the computer for successful booting from a new hard drive.
uefi set boot order

2. Change the startup hard disk on the Mac computer

If the Mac computer has dual systems installed, or you want to start the USB flash drive/hard disk containing the Windows To Go workspace from the Mac computer, you need to know how to change the startup hard disk on the Mac computer. Because the Mac computer does not contain some drivers or other supporting software necessary for the operation of the Windows system, when the Mac computer starts the Windows hard disk for the first time, you need to download the Windows supporting software. The following will introduce the entire process. If you want to directly understand the Mac For how to change the startup hard disk on the computer, skip to step 3 below.
Step 1: Prepare a U disk with at least 8GB or more (not the USB device where the Windows To Go workspace is located), and connect it to the Mac computer. Start the Mac computer, run (Boot Conversion Assistant), click (Operation) on the top menu bar, and select (Download Windows Support Software).
Open Boot Camp Assistant
Step 2: Store the downloaded WindowsSupport folder in the prepared USB flash drive. Then shut down the Mac computer and remove the USB drive.
WindowsSupport store
Step 3: Connect the USB flash drive/hard disk where the Windows To Go workspace is located to the Mac computer, preferably directly to the USB port of the Mac computer itself. Press and hold the (Option) key when starting the Mac computer until the boot switching menu appears. In this interface, you can choose a different hard disk to start the computer. For example, select (EFI Boot) here to access the Windows system. After the Mac computer successfully boots from the hard disk containing the Windows system, the touchpad and keyboard of the Mac computer may not be available, so you need to connect an external mouse to make some settings (such as selecting the region and setting the user name, etc.).
mac boot switch menu
Step 4: After entering the Windows system, connect the USB flash drive where the WindowsSupport folder is stored. If the USB port of the Mac computer is not enough, you can use a USB hub. Run the BootCamp.exe file in the WindowsSupport folder to install the driver. After the installation is complete, the built-in keyboard, touchpad, Bluetooth, Wi-Fi and other functions of the Mac computer can be used normally.
The above are the detailed steps to change the boot hard disk in Windows and Mac systems, I hope it will be helpful to everyone. If you need to replace the old hard drive, it is recommended to use Renee Becca to back up the important data in the old hard drive to a safe and stable new hard drive, because the old hard drive may fail due to various factors, such as natural aging or falling bumps, etc. Physically damaged, the important data on the old hard drive will not be accessible at that time. Click the button below to download a free trial of Renee Becca, safe and effective!
Hot Topic - ADsProfessional Data Backup & Restore Software - Renee Beccadata bacup software Renee Becca

Provides multiple functions like backup, restore, clone, system migration.

Clone all data (including system) in HDD to smaller SSD or larger HDD. Disk could boot PC after clone finished.

Supports to migrate Windows to SSD with a few clicks.

4K alignment will be processed when clone disk, migrate system, restore disk or system.

Backup & restore system/disk/folder. Auto backup plans are available.

Provides functions like backup, restore, clone, system migration.

Clone all data (including system) in HDD to smaller SSD or larger HDD.

Backup & restore system/disk/folder. Auto backup plans are available.

Compatible with: Windows 10 / 8.1 / 8 / 7 / Vista / XP / 2008 / 2012(32bit/64bit) / Server 2008

Free TrialFree Trial

5000 people have downloaded and made the disk clone successfully!