18 August 2023Amanda J. Brook Senior Product Manager
Last update by James Smith at 2 May 2024
Summary How to use movie maker? Get a free video editing for Windows 10 users, with seamless sharing across OneDrive, Facebook, Vimeo, YouTube, and Flickr.
I. How to use Movie Maker software in Windows 10 system?
As a free video editing tool, Windows Movie Maker can better help Windows users to perform video editing operations, such as editing and splitting videos; adjusting video playback speed; adding music, special effects and other functions to videos.
In fact, it is not difficult to use Movie Maker software in Windows 10 system. The specific usage method is as follows:
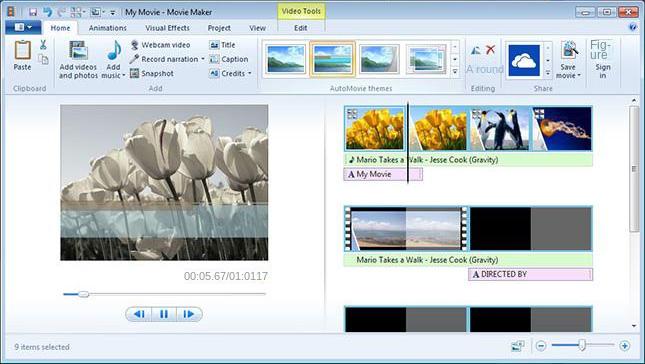
1. How to add videos and photos?
Follow these steps to create your video project with Windows Movie Maker:
Download and install Windows Movie Maker on your computer.
Open the program and click on the ‘Add videos and Photos’ button to import your media files.
Utilize the function menu bar at the top of the screen to edit your video and image files as needed.
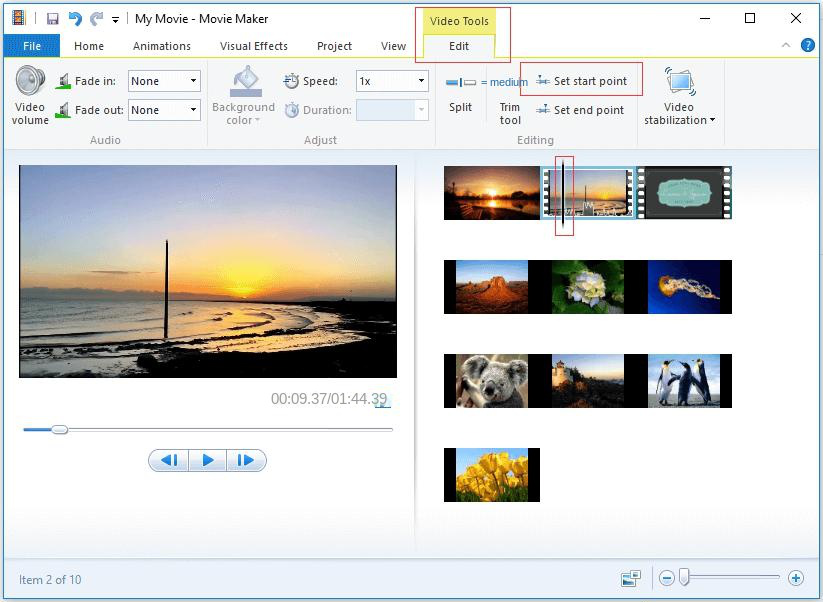
2. How to edit video?
Use the trimming tool provided by Windows Movie Maker to help you trim off unwanted content at the beginning or end of the movie. The specific operation method is as follows:
To crop a video, go to the top function menu bar and choose Edit. Select the video you wish to crop and click Set start point from the top menu. Drag the Crop line to adjust the area you want to crop. Once done, click Set end point to finalize the video edit.
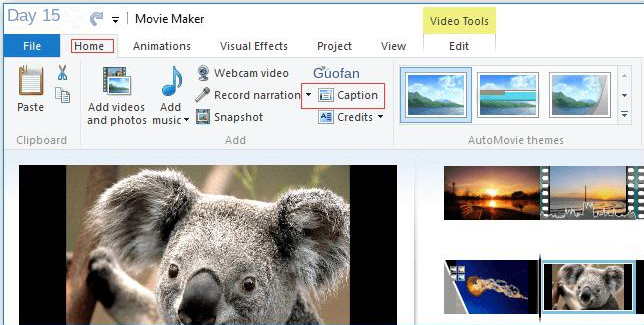
3. How to add text to video?
To add a title or subtitle to a video, simply navigate to the Home tab located in the upper function menu bar. Select the video you wish to edit, and then click on the ‘Caption’ button. This will prompt a text box to appear over the video, where you can input your desired text.
After finalizing your content edits, proceed to the top menu bar and select ‘File’ > ‘Save file’ to store your video in the desired directory. The instructions provided herein address elementary functions within Windows 10 Movie Maker. Beyond the basics, the application boasts a suite of supplementary capacities such as volume control, video effects, and tailorable export preferences, which you are encouraged to explore via direct interaction.
TipsWindows Movie Maker support ended on January 10, 2017, with the last update in 2012, leading to potential crashes and unsaved content. However, Renee Video Editor Pro is a suitable alternative, offering standard editing features found in Windows Movie Maker and additional screen recording capabilities, making it a more versatile option in the video editing software market. Let’s explore its features and how to use them.
II. A video editing software that can perfectly replace Windows Movie Maker
1. What is Renee Video Editor Pro?
Renee Video Editor Pro is a versatile application that encompasses video recording, editing, and format conversion functionalities. Its robust screen recording feature offers a customizable selection of recording areas, dimensions, watermarks, cursor appearances, audio inputs, and output formats. Additionally, it boasts support for setting up automatic recording schedules, making it the perfect tool for effortlessly capturing online movies, video conferences, gaming sessions, software guides, and more with just a single click.
This software elevates the video post-production process, offering a suite of comprehensive tools. With this application, users can seamlessly engage in editing, merging, cropping, rotating, flipping, and infuse their projects with creativity by adding animations and transitions. Flexibility is at your fingertips, allowing you to effortlessly switch filter styles, dub, add music, remove sound effects, and even import or create subtitles to enhance the viewer’s experience.
Renee Video Editor Pro – Multi-function Video Editing Software
Screen RecordingRecord screen and webcam in Windows computer.
Cut Videos & AudiosUsers are free to cut videos and audios clips with setting start and end time.
Multiple Edit ToolsMerge, crop, rotate, cut and transform video easily. Change and add background music, subtitles and remove watermark from video.
Format ConversionSupport to convert videos and audios into different formats.
Screen Recording Record screen and webcam in Windows computer.
Multiple Edit ToolsCut Videos & Audios Users are free to cut videos and audios clips with setting start and end time.
Multiple Edit ToolsMerge, crop, rotate, cut and transform video easily. Change and add background music, subtitles and remove watermark from video.
Format ConversionSupport to convert videos and audios into different formats.
3000 users have downloaded and edited videos with fun!
2. How to use Renee Video Editor Pro?
(1) How to use the video editing function of Renee Video Editor Pro?
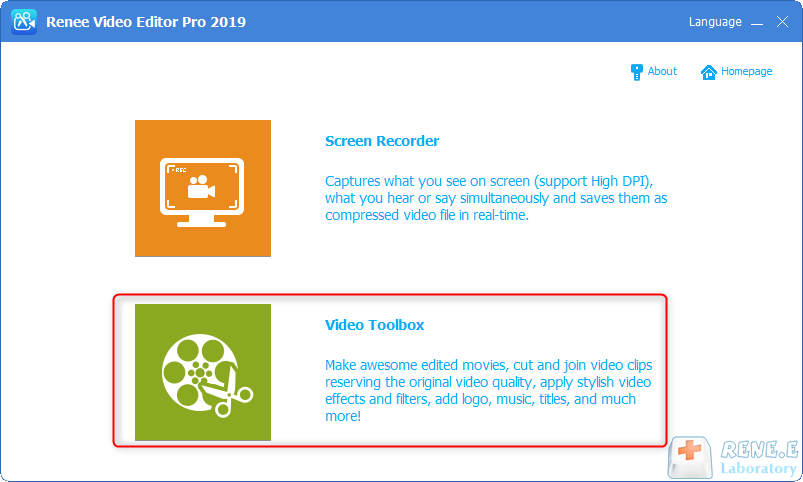
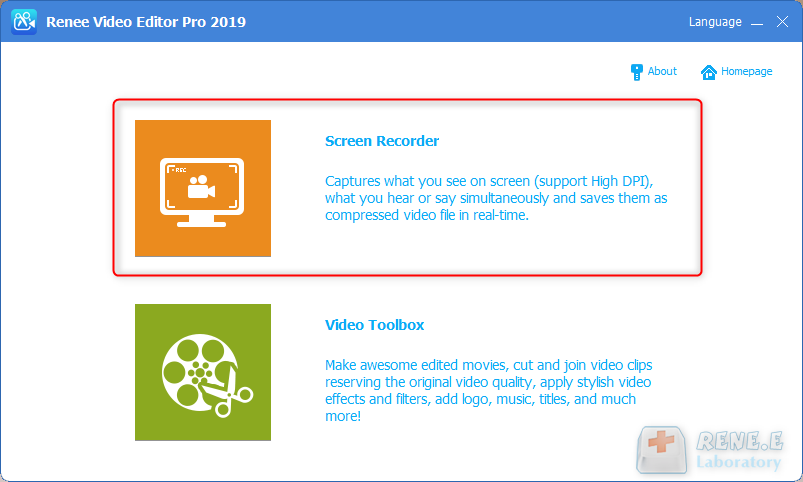
Step 1: After downloading and installing, run Renee Video Editor Pro, and click the (Video Toolbox) button to enter the video editing interface.
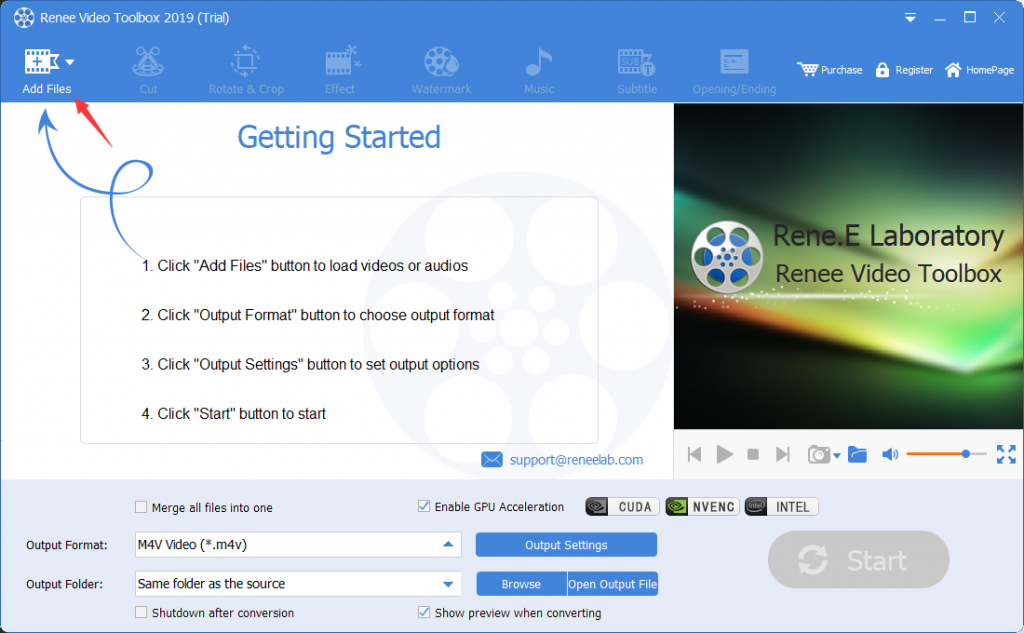
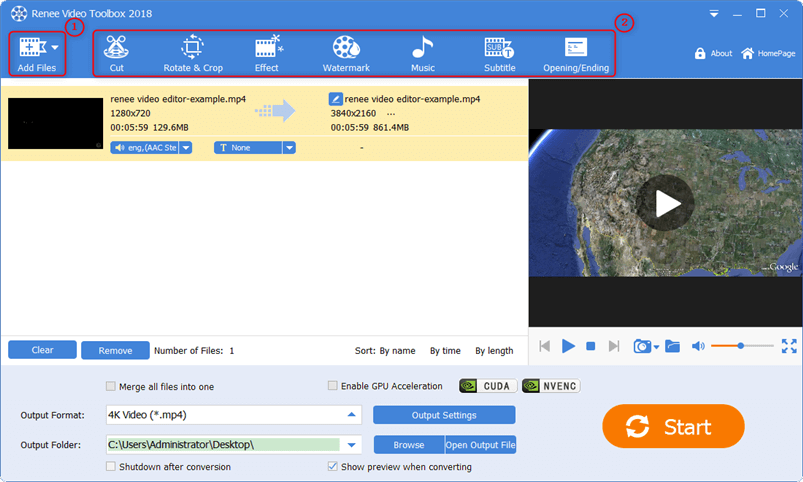
Step 2: Find the (Add File) button and import the video file to be edited into Renee Video Editor Pro.
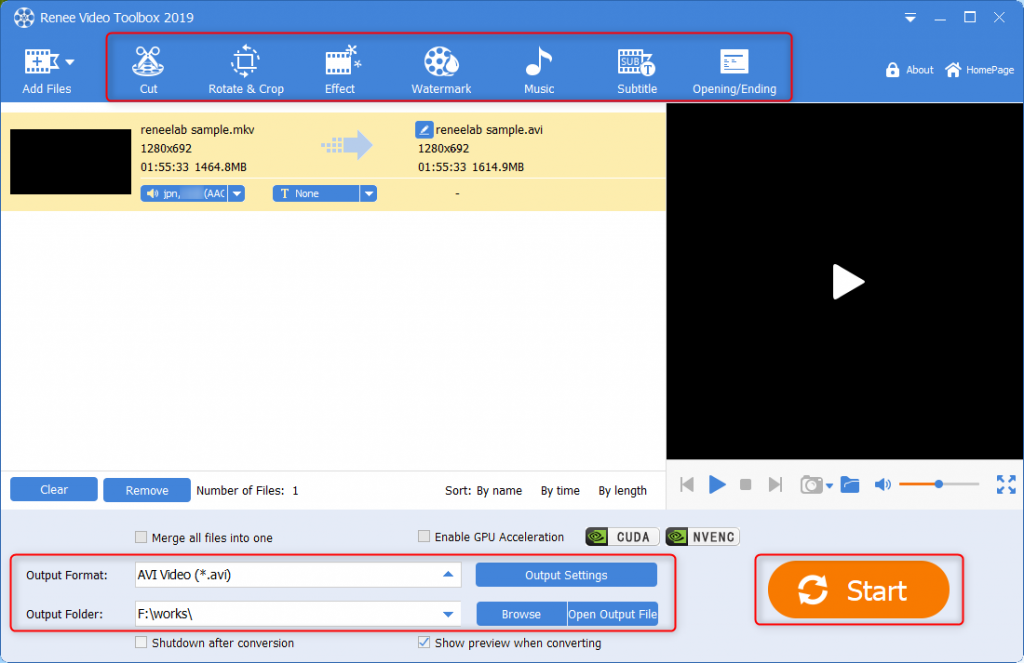
Step 3: After uploading the video file, utilize the editing tools in the top menu bar to cut, rotate, crop, apply special effects, and add watermarks, music, subtitles, and intro/outro sequences. Additionally, tailor the key output parameters such as video quality, size, bit rate, and frame rate in the (Output Settings).
Description of the editing function:
Cut: Trim video clips; adjust playback speed.
Rotate and crop: Rotate the video 90/180/270 degrees clockwise, flip the video horizontally or vertically; crop the size of the video screen.
Effect: Add filter effects, zoom effects or volume effects to your video.
Watermark: Add text, pictures, video or graphic watermarks to video files; you can also remove watermarks from videos.
Music: You can import audio files into the video, or directly record the sound of the computer or microphone and import it into the video; it can also remove the original audio of the video.
Subtitle: Import or create subtitles into the movie, and customize the position, font and size of subtitles.
Step 4: After completing the video editing, select the preferred output device or video format. Then, specify the save directory in the output folder, and press the Start button to quickly process and export the video to your designated location.
Note: If you are sure of the video format you need, you can enter the desired video format in the search box of (Output Format), which will help you quickly select a suitable format.
(2) How to use the screen recording function of Renee Video Editor Pro?
Renee Video Editor Pro’s screen recording feature enables the capture of both dynamic and static content on your screen. Utilize the Video Toolbox provided to craft unique DIY videos. Here’s a guide on how to use the screen recording function of this software.
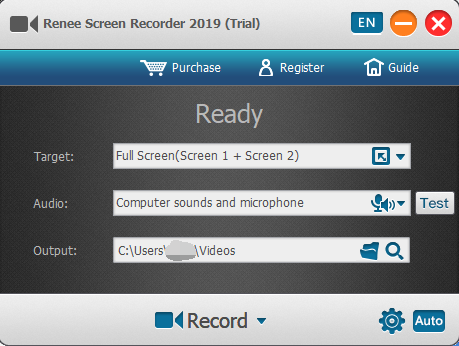
Step 1: After opening Renee Video Editor Pro, click the (Screen Recorder) option on the main page.
Step 2: In the ready-to-record interface, set the content to be recorded (Target), (Audio), and (Output).
Tips
Description of Recording Settings:
Target: Options include full screen, custom area, or camera feed.
Audio: Select from computer audio, microphone, or mute.
Output: Set the location to save recordings.
Step 3: In addition, click the (small gear) icon in the lower right corner, and you can further personalize the recording format, video quality, resolution, video frame rate, output directory, cursor display effect, watermark, etc.
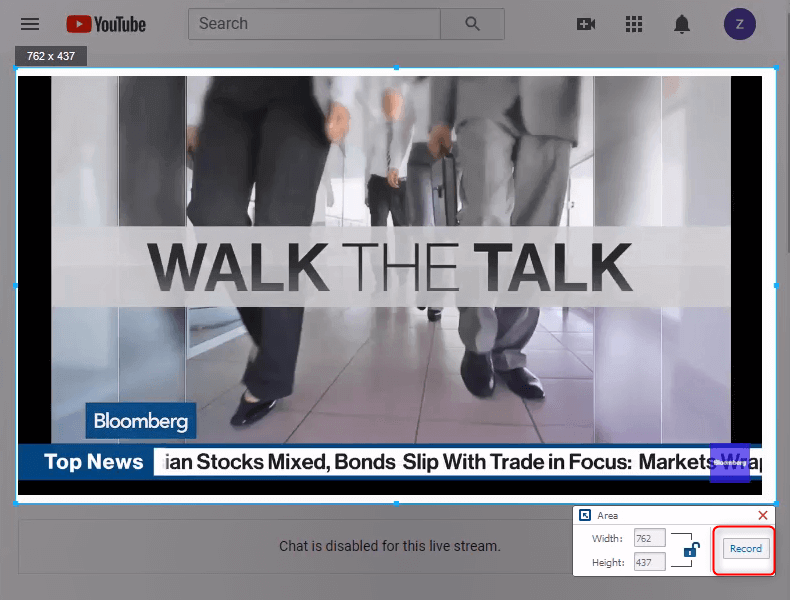
Step 4: After all the recording settings are completed, return to the “Ready to Record” interface, click the (Start Recording) button, you can select the area you want to record, and then click the (Record) button to start the recording command.
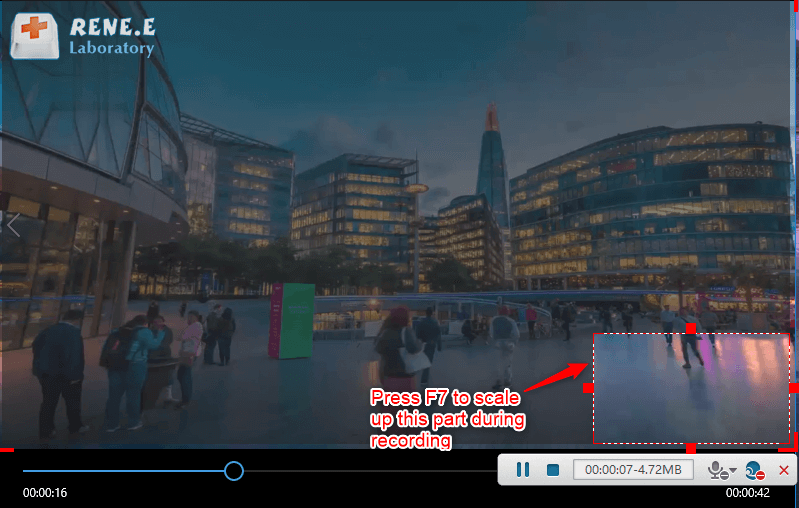
Step 5: You have the flexibility to pause or resume the recording whenever you need. To conclude and save your video, simply click the square button located in the lower right of the recording panel. This will save the video to the designated folder in the chosen format.
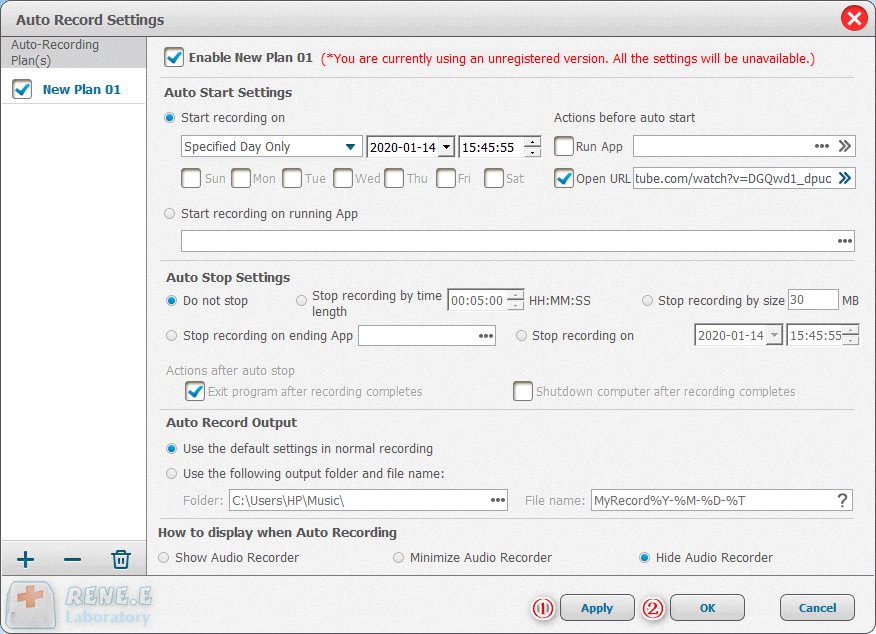
Renee Video Editor Pro includes an automatic recording feature which can be engaged by clicking the (Auto) button located at the bottom right of the recording interface. This functionality empowers users to schedule recordings for events such as video call conferences, by delineating start and stop times, sound source, output directory, and file name. Once configured, the application will automatically record the screen at the predetermined time, ensuring a seamless and hassle-free recording experience.