author avatar
    Specialist of Customer Service Dept.
 

Summary
Learn how to easily transfer your operating system to a new SSD in this comprehensive guide. Say goodbye to slow boot times and hello to improved speed and reliability for your system. We'll cover all the steps, including choosing the best cloning software and setting your new SSD as the boot drive.


Are you looking to upgrade your computer’s storage capabilities and enhance its performance? One way to do so is by migrating your operating system to a new solid state drive (SSD). This process involves transferring all your system files, programs, and settings from your old hard drive to the new SSD. However, before you begin the migration process, it is crucial to ensure that everything is ready for a smooth and successful transfer. In this chapter, we will discuss the necessary preparations you need to make before migrating your OS to a new SSD. By following these steps, you can avoid any potential issues and have a hassle-free experience. Let’s get started!

Preparation

Before migrating your operating system to a new SSD, it is crucial to ensure that everything is in order. A proper preparation will not only save you time and effort, but it will also reduce the risk of data loss. In this chapter, we will discuss the steps you need to take in order to prepare for a successful migration process.
Checking for Compatibility
Before migrating your OS to a new SSD, it is essential to make sure that the new drive is compatible with your system. Check the specifications of both your current hard drive and the new SSD to ensure that they are a match. This includes the size, interface, and form factor of the drive. If they are not compatible, you may need to consider getting a different drive or using a different method for migration.
If you want to install a M.2 SSD, please make sure your PC have the M.2 interface.
migrate os to new ssd
Updating Your Operating System and Drivers
In order for the migration process to go smoothly, it is best to have the latest updates for your operating system and drivers. This will not only improve compatibility but also reduce the chances of encountering errors during the migration process. Make sure to check for any updates and install them before proceeding with the migration.
Please enable Windows Update to ensure Windows always contains the latest drivers.
Cleaning Up Your System
Before moving your OS to a new SSD, it is a good idea to clean up your system. This means getting rid of any unnecessary files, programs, or settings that may take up unnecessary space on your new drive. It is also recommended to run a disk cleanup and defragmentation to optimize the performance of your new SSD.
Disabling Antivirus and Firewall
To avoid any conflicts or interruptions during the migration process, it is best to temporarily disable your antivirus and firewall. These programs may flag the migration software as a potential threat and prevent it from completing the process. Make sure to turn them back on after the migration is complete.
After following these preparation steps, you are now ready to proceed with migrating your OS to a new SSD. Remember to carefully follow the instructions of the migration software and make sure to double-check everything before starting the process. A well-prepared migration will not only ensure a smooth transfer of your operating system but also protect your data from any potential risks.
In the next chapter, we will discuss the importance of using reliable and efficient cloning software like Renee Becca for OS migration. This software will make the migration process easier and more efficient, ensuring a successful transfer of your operating system to a new SSD.

Steps to Clone Your OS to a New SSD Using Renee Becca

If you are looking to upgrade your computer’s storage by adding a new SSD, transferring your OS to the new drive is crucial. This can be easily done with the help of reliable software like Renee Becca. In this chapter, we will guide you through the process of cloning your OS to a new SSD using Renee Becca.
Renee Becca is a tool specially used for system/hard disk data backup and restoration. It can help you back up and restore important data in your computer, such as programs, system configuration, emails, photos, videos, documents, bookmarks, etc. In addition, you can also use it to clone disk and system data. The software provides three cloning methods, including hard disk cloning/cloning system hard disk; partition cloning and system migration. You can choose the most suitable cloning method according to your different needs.
Here is a guide on how to use Renee Becca for cloning your Windows system to the SSD:
Step 1: Connect Your SSD to Your Computer
To begin with, connect your new SSD to your computer using a connection cable or by inserting it into the M.2 SSD slot. Make sure that your computer can detect the SSD before proceeding with the next steps.
Connect the SSD/M.2 to the PC
Step 2: Install and Launch Renee Becca Professional
Download and install the Renee Becca Professional software on your computer. Once installed, launch the program to get started.
Hot Topic - ADsRenee Becca – Safe and Quick System Migration to SSD

Automatic 4K alignment Improves SSD performance during system migration.

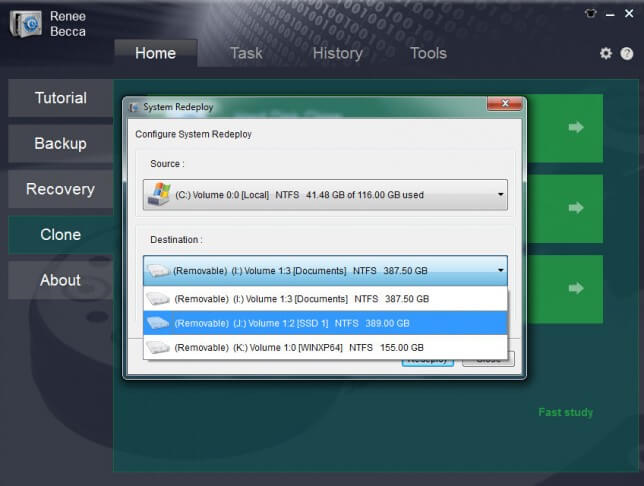
Support GPT and MBR Automatically adapt to the suitable partition format.

Support NTFS and FAT32 Redeploy various files in different file systems.

Back up quickly Back up files at up to 3,000MB/min.

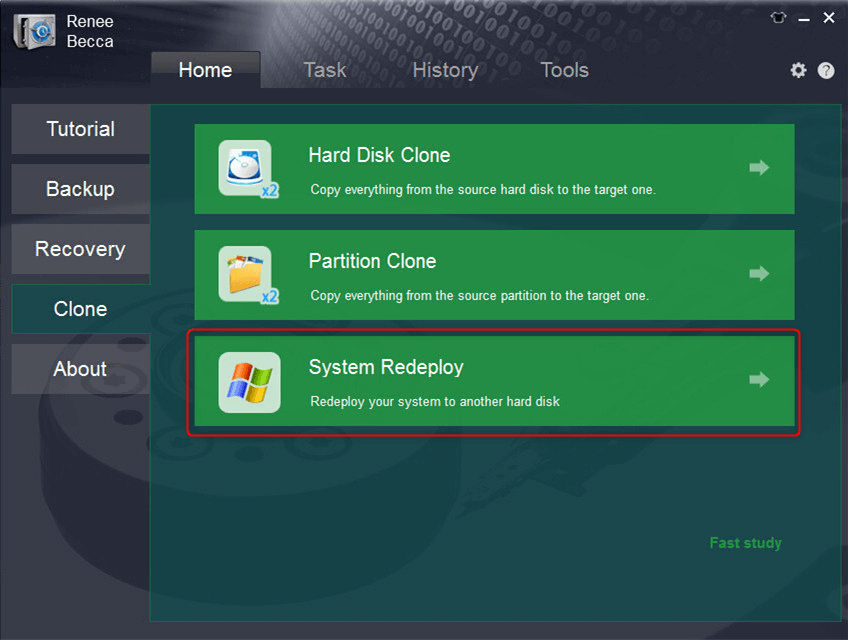
Overall backup schedule Support system redeployment/system backup/partition backup/disk backup/disk clone.

Automatic 4K alignment Improve SSD performance

Support GPT and MBR Intelligently adapt to a partition format

Support NTFS and FAT32 Redeploy files in different file systems

Free TrialFree TrialNow 2000 people have downloaded!
Step 3: Selecting the Cloning Option. Click “System Redeploy” function in “Clone”.
select system redeploy function in renee becca
Step 4: Choose Your Source and Destination Drives
The “System Clone” wizard will run. Here, you need to select your current OS drive as the source and an unallocated space on your new SSD as the destination drive. If there is no unallocated space, you can choose to delete all partitions on the SSD to make room for the OS.
select target disk and desination in system redeploy function in renee becca
Step 5. Completing the Cloning Process
The cloning process may take some time depending on the size of your system drive and the speed of your SSD. Once the process is completed, you will receive a notification. You can then disconnect the SSD from your computer and shut down your system.
By following these simple steps, you can seamlessly transfer your Windows OS to a new SSD using Renee Becca. This method eliminates the need for a fresh installation, saving you time and effort. Enjoy the improved performance and faster boot times that come with a new SSD!
Summary
The process of cloning your OS to a new SSD using Renee Becca is straightforward and can be completed in just a few simple steps. It is important to make sure that your source drive has enough space for the cloning process and that your new SSD can be detected by your computer. Advantages of using Renee Becca for this process include its user-friendly interface and reliable performance. However, it is important to pay attention to the instructions and make sure that all data is backed up before starting the cloning process. In case of any errors, you can refer to our subsequent chapters on verifying a successful migration.
Pros:
  • Allows safe migration of operating system without fresh installation.
  • Simple steps for a smooth and hassle-free transfer.
  • Improves performance and faster boot times with new SSD.

Cons:

  • Doesn't have a Mac version.

Setting Your New SSD as the Boot Drive

After the cloning process is complete, you will need to change the boot order on your computer to set the SSD as the primary boot drive. This can be done in the BIOS settings.
Common Server to Enter BIOS:
Server TypeEnter boot menu method
DELLPress the F12 key repeatedly before the Dell logo appears on the screen.
HPPress the F9 key multiple times when the HP logo is displayed.
Common Computers to Enter BIOS:
BIOS NameEnter boot menu method
ASRockDEL or F2
ASUSDEL or F2 for PCs/ DEL or F2 for Motherboards
AcerDEL or F2
DellF12 or F2
ECSDEL
Gigabyte / AorusDEL or F2
Lenovo (Consumer Laptops)F2 or Fn + F2
Lenovo (Desktops)F1
Lenovo (ThinkPads)Enter then F1
MSIDEL
Microsoft Surface TabletsPress and hold Power and Volume Up buttons
Origin PCF2
SamsungF2
ToshibaF2
ZotacDEL
HPEsc/ F9 for `Boot Menu`/ Esc/ F10/ Storage tab/ Boot Order/ Legacy Boot Sources
INTELF10
Please refer to your Computer or laptop manual to find the way to configure the BIOS. If your computer uses Legacy BIOS, change the boot order to set the SSD as the first boot device. If the BIOS mode is UEFI, select the SSD as the boot drive. Save the changes and exit the BIOS screen.
Summary
Setting your new SSD as the boot drive is a crucial step in the OS migration process. It ensures that your computer will boot from the new SSD and that you will experience faster speed and improved performance. To set the new SSD as the boot drive, you must initialize it, clone your OS to it, and change the boot order in the BIOS settings. Once completed, verify that your computer is booting from the SSD successfully.
If you encounter any issues during this process, make sure to double-check your steps and consult your computer’s manual or manufacturer’s website for further assistance. In the next chapters, we will discuss the benefits of migrating your OS to an SSD in more detail.

Verifying a Successful Migration

After completing the OS migration process, it is important to verify that the transfer was successful. This step is crucial as it ensures that your new SSD is functioning properly and that your operating system has been successfully transferred. In this chapter, we will discuss how to verify a successful OS migration and the steps you can take to ensure that your new SSD is working correctly.
Step 1: Check Your SSD’s Status
The first step in verifying a successful migration is to check the status of your new SSD. Connect the SSD to your computer and make sure it is being detected by your system. If your SSD is not being detected, there may be an issue with the connection or the installation process. In this case, you will need to troubleshoot the problem before moving forward.
You may use freeware like Crystaldiskinfo or Crystaldiskmark to check your SSD status:
use crystaldiskmark or crystaldiskinfo to check SSD status
Step 2: Manually Check System Files
If you do not have backup and migration software, you can manually check your system files to ensure they have been transferred correctly. Open File Explorer and navigate to your new SSD. Make sure all of your important system files, such as your boot files, are present on the new drive. You can also compare the file sizes and dates to your old drive to make sure they match.
migrate os to new ssd
Next, we will discuss how to set your new SSD as the boot drive to ensure that your system boots from the new SSD. This step is the final piece of the OS migration process and is crucial for proper functioning of your new SSD.

Frequently Asked Questions

Migrating your operating system (OS) to a new solid-state drive (SSD) can seem like a daunting task, especially for those who are not familiar with computer hardware and software. To help ease your worries, we have gathered some of the most commonly asked questions about OS migration and provided thorough answers to help guide you through the process.
1. Do I need any special tools to migrate my OS to a new SSD?
Yes, you will need a few tools to ensure a smooth and secure migration process. These tools include a Windows PC, a screwdriver (if your current SSD is not easily accessible), a new SSD, a connection cable or M.2 SSD slot, backup software or tool, and OS migration software. It’s important to have these tools ready before starting the migration process to avoid any setbacks.
2. What are the benefits of migrating my OS to an SSD?
Migrating your OS to an SSD can bring numerous benefits, including improved speed, reliability, and performance. SSDs have faster data reading and writing speeds, resulting in quicker boot and load times for your computer. They also have a lower failure rate compared to traditional hard drives, making them a more reliable storage option. Additionally, newer systems are optimized for SSD storage, allowing for a smoother and more efficient overall performance.
3. Can I just move my OS to the new SSD without transferring any other data?
Yes, you can move just your OS to a new SSD using a professional cloning tool such as Renee Becca. This is a popular option for those who are limited on storage space and want to avoid reinstalling all their applications. However, if you have enough space on your new SSD, it’s recommended to also transfer your personal files and applications for a more seamless experience.
4. How long does it take to move my OS to a new SSD?
The time it takes to move your OS to a new SSD depends on several factors, including the data volume, the speed of the cloning program, read and write speeds of the drives involved, and your computer’s system specifications. On average, the process can take between 20 minutes to 1 hour. However, this may vary depending on your specific circumstances.
5. Is there an alternative to cloning my OS to the new SSD?
If you don’t want to use a cloning tool, you can also clean install the OS on your new SSD. However, this involves more steps and can be more cumbersome. It also means you will need to reinstall all your previous applications and configure your settings again.
Migrating your OS to a new SSD can bring numerous benefits such as improved speed, reliability, and performance. It is recommended to have all the necessary tools ready before starting the process and to consider transferring your personal files and applications as well. While clone migration is a popular option, clean installing the OS is also possible but may require more time and effort. Whichever method you choose, make sure to follow instructions carefully and backup your data beforehand for a smooth and successful migration.

Conclusion

In summary, migrating your operating system to a new SSD can greatly improve the speed, reliability, and performance of your computer. By following the steps outlined in this comprehensive guide, you can easily transfer your OS to a new SSD and set it as your boot drive. The key is to properly prepare for the migration process and choose reliable cloning software, such as Renee Becca. With its user-friendly interface and reliable performance, Renee Becca ensures a successful transfer of your OS to the new SSD. After verifying the successful migration, you can enjoy the benefits of your new SSD and its faster, more efficient operation. Hopefully, this guide has addressed any concerns or questions you may have had about migrating your OS to a new SSD. Thank you for reading and happy computing!