author avatar
    Technology Manager of Test Dept.
 

Summary
Learn how to easily and cost-effectively move your Windows 10 installation from a larger hard drive to a smaller SSD without losing any data. Follow our step-by-step guide and utilize free tools to reduce data volume, select the right cloning software, and troubleshoot common issues - all while upgrading to a smaller but better performing SSD.


Are you looking to upgrade your computer’s storage capacity without breaking the bank? One cost-effective solution is to migrate your Windows 10 operating system to a smaller SSD. Not only will this free up space on your primary storage drive, but it can also improve your computer’s performance. However, before you start the migration process, there are a few steps you need to take to ensure a smooth transition. In this chapter, we’ll walk you through the first step: reducing the data volume on your current hard drive. By cleaning up unnecessary files and defragmenting your drive, you’ll create more space and make the cloning process more efficient. So let’s get started!

Reducing Data Volume Before Cloning

Before migrating Windows 10 to a smaller SSD, it is important to reduce the data volume on your current hard drive. This will ensure that the cloning process is successful and that all your files will fit onto the new, smaller drive. Here are some steps you can follow to reduce the data volume on your hard drive:
Step 1: Clean up unnecessary files. Over time, your hard drive can become cluttered with temporary files, old downloads, and other unnecessary data. These files not only take up space, but can also slow down your computer. Use a disk cleanup tool (such as CCleaner) to remove these unnecessary files and free up some space on your hard drive.
migrate windows 10 to smaller ssd free
Step 2: Uninstall unused programs. Take a look at the programs installed on your computer and see if there are any that you no longer use. Uninstalling these programs can free up a significant amount of space on your hard drive.
Step 3: Compress large files. If you have files that are not frequently accessed, you can compress them to save space on your hard drive. To do this, right-click on the file and select "Properties". Under the "General" tab, click the "Advanced" button and check the box next to "Compress contents to save disk space".
Compress contents to save disk space
Step 4: Defragment your hard drive. As you use your computer, files can become fragmented (meaning they are split into multiple parts and stored in different areas of the hard drive). This can slow down your computer and take up more space than necessary. Use the built-in Disk Defragmenter tool in Windows 10 to rearrange these fragmented files and free up space on your hard drive.
Defragment your hard drive
By following these steps, you can reduce the data volume on your hard drive and prepare it for cloning to a smaller SSD. Now that you have reduced the data volume on your hard drive, it is time to move on to the next step: selecting the right cloning software.
In the next chapter, we will discuss free options for cloning software with a focus on the Renee Becca software and its backup and restore capabilities.

Selecting the right cloning software, including free options, with a focus on Renee Becca for its backup and restore capabilities.

After reducing the data volume on your Windows 10 system, the next step is to select the right cloning software to migrate your system to a smaller SSD. There are many options available, including both paid and free solutions. In this chapter, we will focus on Renee Becca for its backup and restore capabilities, and also mention some other free alternatives that you may want to consider.
Step 1: Do Your Research
Before making a decision, it is important to research and compare different cloning software options. This will help you understand the features and limitations of each solution, and determine which one best suits your needs. Some important factors to consider include ease of use, compatibility with your system and hardware, and of course, cost.
Step 2: Consider Renee Becca
One of the top choices for disk cloning software is Renee Becca. This powerful solution offers a user-friendly interface and a wide range of features, including system backup and restore, disk/partition clone, and system migration. With its backup and restore capabilities, you can easily create an exact copy of your Windows 10 system and transfer it to a smaller SSD. You can also use Renee Becca to resize partitions and manage disk space efficiently.
Back up data
Step 3: Explore Other Free Options
If you are on a budget, there are also some free disk cloning software options that you can consider. Some examples include Clonezilla, Macrium Reflect, and EaseUS Todo Backup. These solutions offer similar features to Renee Becca, such as system backup and clone, and can also help you migrate to a smaller SSD. However, they may have more limited capabilities and may be more difficult to use compared to paid solutions.

Option 1: Cloning Windows 10 to Smaller SSD Using Renee Becca

When it comes to migrating Windows 10 to a smaller SSD, there are several options available. One of these options is to use Renee Becca, a professional disk cloning software developed by Rene.E Laboratory. This option is best for users who want to ensure data integrity and alignment when cloning to a smaller SSD. In this chapter, we will discuss how to use Renee Becca to clone a larger HDD to a smaller SSD.
Renee Becca is a tool specially used for system/hard disk data backup and restoration. It can help you back up and restore important data in your computer, such as programs, system configuration, emails, photos, videos, documents, bookmarks, etc. In addition, you can also use it to clone disk and system data. The software provides three cloning methods, including hard disk cloning/cloning system hard disk; partition cloning and system migration. You can choose the most suitable cloning method according to your different needs.
In addition, Renee Becca supports 4K align and Cloning from larger partition to smaller partition. These functions can better assist you in completing system and data migration.
Here is a guide on how to use Renee Becca for cloning your Windows system to an SSD.
Step 1: Download and install Renee Becca software on your computer. This software is compatible with Windows operating systems.
Hot Topic - ADsRenee Becca – Safe and Quick System Migration to SSD

Automatic 4K alignment Improves SSD performance during system migration.

Support GPT and MBR Automatically adapt to the suitable partition format.

Support NTFS and FAT32 Redeploy various files in different file systems.

Back up quickly Back up files at up to 3,000MB/min.

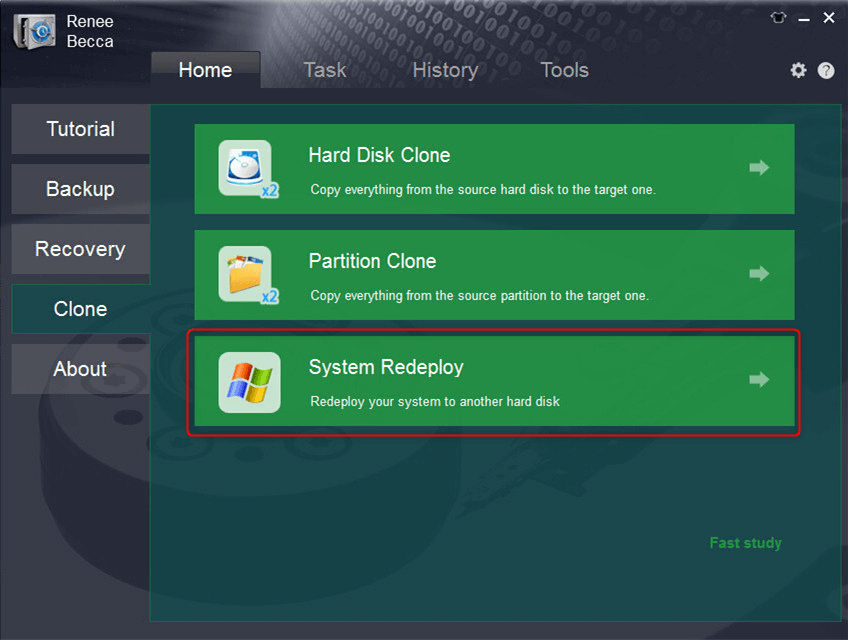
Overall backup schedule Support system redeployment/system backup/partition backup/disk backup/disk clone.

Automatic 4K alignment Improve SSD performance

Support GPT and MBR Intelligently adapt to a partition format

Support NTFS and FAT32 Redeploy files in different file systems

Free TrialFree TrialNow 2000 people have downloaded!
Step 2: Launch Renee Becca and click “System Redeploy” in the “Clone” option from the main interface.
select system redeploy function in renee becca
Step 3: Select the source disk, which is your current SSD, and the target disk.
Step 4: Click on “Redeploy” to start the cloning process. The software will begin copying all the data from your SSD to the SSD.
select target disk and desination in system redeploy function in renee becca
Step 5: The cloning process may take some time depending on the size of the HDD and the speed of your computer. Once it’s completed, you will see a pop-up message.
Step 6: Finally, restart your computer and change the boot order in BIOS to boot from the cloned SSD.
Using Renee Becca to clone a larger HDD to a smaller SSD is the best option for users who want to ensure data integrity and alignment during the cloning process. By following these steps, you can easily migrate Windows 10 to a smaller SSD without any data loss.
Pros:
  • User-friendly interface
  • Efficient cloning process
  • Allows you to preview the source and destination drives

Cons:

  • Paid subscription required for full access to all features

In conclusion, using Renee Becca is the best option for users who want to ensure data integrity and alignment when cloning to a smaller SSD. However, if you are looking for a free option, then you can check out the next chapter on using Gparted to migrate Windows 10 to a smaller SSD.

Option 1: Using Freeware Clonezilla to Migrate Windows to Smaller SSD

If you want to clone Windows 10 to a smaller SSD without having to reinstall the operating system from scratch, one option is to use freeware Clonezilla. This open-source disk imaging and cloning software can be run from a live CD or USB flash drive, making it a versatile option for migrating your system to a smaller SSD.
Step 1: Connect your SSD to your computer and start Clonezilla. You can download Clonezilla from the official website and create a bootable CD or USB drive.
download Clonezilla
Step 2: Select the “Disk to Local Disk” option and choose your source disk as the larger HDD and the target disk as the smaller SSD.
Step 3: You can choose to either clone the entire disk or just the used sectors. The latter option can save time and disk space.
Step 4: You will then be prompted to choose the whether to use “Beginner Mode” or “Expert Mode“. Beginner mode is recommended for first-time users.
choose Beginner mode
Step 5: Next, you will be asked to select the partitions you want to clone. Here, you need to make sure the original partition is smaller than the target SSD so that it can fit.
Step 6: After selecting the partitions, you can decide on the partition size for the target disk. This allows you to make better use of the space on the smaller SSD.
Step 7: You will also have the option to change the boot settings. If you are using a UEFI-based system, you can choose whether to change the boot sequence immediately after the migration is complete. If not, you can manually modify the boot sequence in your computer’s BIOS.
Step 8: After the migration is complete, you will need to change the boot order in your computer’s BIOS if you want to boot from the new SSD.
Overall, using Clonezilla to migrate Windows 10 to a smaller SSD can save you time and effort compared to reinstalling the operating system from scratch. However, it is important to carefully select the partitions you want to clone and ensure that the original partition is smaller than the target SSD.
Pros:
  • Versatile option for migrating system to smaller SSD
  • Supports AES 256-bit encryption for image files
  • Supports various filesystems

Cons:

  • Need to carefully select partitions to clone
  • Original partition must be smaller than target SSD

To learn more about cloning larger HDDs to smaller SSDs and ensuring data integrity, check out the subsequent chapter on “Option 2: Cloning the Larger HDD to a Smaller SSD Using Renee Becca to Ensure 4k Alignment”.

Option 3: Using Freeware Gparted to Migrate Windows to Smaller SSD

In addition to paid software options, there are also free tools available for migrating Windows 10 to a smaller SSD. One popular choice is Gparted, a free and open-source partition editor. This method requires a bit more technical knowledge and may not be suitable for beginners, but can be a cost-effective solution for those on a budget.
To use Gparted for cloning, you will need to create a bootable USB drive or CD with the Gparted software. Once you have the bootable media, follow these steps:
Step 1: Start your computer from the Gparted bootable media by changing the boot order in the BIOS settings.
Step 2: When Gparted launches, you will see a list of all the partitions on your hard drive. Identify the Windows partition, which is usually labeled as “NTFS“.
clone os with gparted
Step 3: Right-click on the Windows partition and select “Copy“.
Step 4: Right-click on the unallocated space on your destination SSD and select “Paste“.
Step 5: In the pop-up window, click “Apply” to start the cloning process.
Once the cloning process is finished, you can shut down your computer and remove the bootable media. Your Windows system should now be successfully cloned onto the smaller SSD.
In conclusion, using freeware like Gparted can be a cost-effective solution for those looking to migrate Windows 10 to a smaller SSD. However, it may not be the most user-friendly option and may come with some technical challenges. If you do run into any issues during the cloning process, be sure to check out the subsequent chapters about finalizing the clone process and troubleshooting any common post-cloning issues.
Pros:
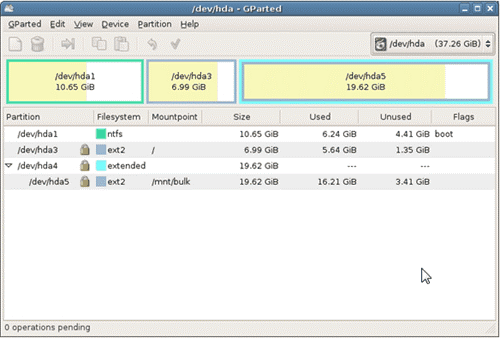
  • Completely free option for cloning Windows system to smaller SSD

Cons:

  • Requires technical knowledge and may not be suitable for beginners
  • Slower process compared to paid cloning software
  • Risk of data loss if not done correctly

Finalizing the Clone Process with Boot Configuration Adjustments and Troubleshooting Common Post-Cloning Issues

After completing the clone process, there are a few final steps you need to take in order to ensure that your new SSD is set up as the boot drive and ready for use.
Step 1: Change Boot Order in BIOS Settings
First, you will need to change the boot order on your computer’s BIOS settings to make sure the SSD is set as the primary boot drive. This is a crucial step, as the computer will not boot from the new SSD unless this change is made.
To access the BIOS settings, you will need to restart your computer and enter the BIOS before the operating system loads. The method for entering the BIOS differs depending on your computer or server type:
Common Servers: To enter the BIOS on a Dell server, press the “F12” key repeatedly before the Dell logo appears. On an HP server, press the “F9” key multiple times when the HP logo is displayed.
Common Computers: Here is a list of BIOS shortcut keys for different brands. Alternatively, you can observe the BIOS shortcut keys displayed on the screen during booting.
BIOS NameMethodThe Key or Keys
AcerPress Del or F2 immediately after powering onDel/ F2
CompaqPress F10 while the cursor in the top right corner of the screen is blinkingF10
DellPress F2 when the Dell logo appears/ or press every few seconds until the message Entering Setup appearsF2
eMachinesPress Tab or Del while the eMachine logo displays on the screenTab/ Del
FujitsuPress F2 once the Fujitsu logo appearsF2
GatewayPress the F1 key repeatedly after restarting the computerF1
HPPress the F1/ F10/ or F11 key after restarting the computerF1/ F10/ F11
IBMPress F1 immediately after powering on the computerF1
LenovoPress F1 or F2 after powering on the computerF1/ F2
NecPress F2 to enter the BIOS SetupF2
Packard BellPress F1/ F2/ or Del to enter BIOSF1/ F2/ Del
SamsungPress F2 to start the BIOS setup utilityF2
SharpPress F2 after the computer startsF2
SonyPress F1/ F2/ or F3 after turning on the computerF1/ F2/ F3
ToshibaPress F1 or Esc after powering on to access BIOSF1/ Esc
ARLTPress Del or F11 when the respective message is shownDel/ F11
Tips:For Legacy BIOS: If your computer uses Legacy BIOS, change the boot order to set the SSD as the first boot device. For UEFI: If the BIOS mode is UEFI, select the SSD as the boot drive.
Step 2: Save Changes and Exit BIOS
After making the necessary changes, save the changes and exit the BIOS screen. Your computer should now boot from the new SSD.
Setting your new SSD as the boot drive is a crucial step in the OS migration process. It ensures that your computer will boot from the new SSD and that you will experience faster speed and improved performance. However, there are a few things to keep in mind:
  • Make sure the SSD has enough capacity to hold all the data from the HDD.
  • Clean up unnecessary files to save space and reduce the time of cloning.
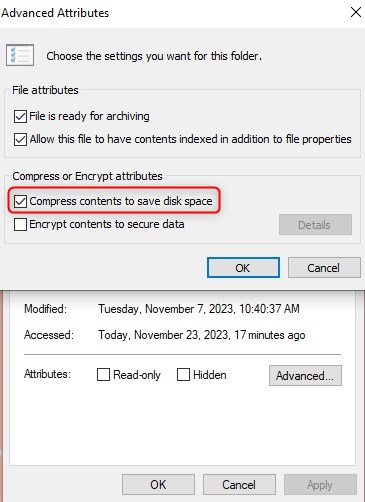
  • Make a compressed backup of the new system in case of future restoration needs.
By following these steps, you can successfully migrate Windows to a smaller SSD and enjoy the benefits of increased speed and performance. Remember to always backup your data before making any changes to your system, and consult your computer manual for specific instructions on accessing and configuring the BIOS.

Conclusion

In conclusion, migrating your Windows 10 installation to a smaller SSD can be a daunting task, but with the right strategies and tools, it can be done successfully without any data loss. By reducing data volume and selecting the appropriate cloning software, such as Renee Becca, the cloning process becomes much easier. The step-by-step methodology provided in this article helps to ensure data integrity and avoid any potential post-cloning issues. Whether you choose to use Clonezilla, Gparted, or Renee Becca, the end result will be a leaner and more efficient system that will run smoothly on your smaller SSD. With these steps in mind, you can confidently upgrade your system without worrying about losing any important data.