author avatar
    Specialist of Customer Service Dept.
 

Summary
Learn how to clone your SSD to HDD in Windows 10/11 with our comprehensive guide, including the best free cloning software and troubleshooting tips. Maximize your storage space and transfer your data securely with Renee Becca. Upgrade your HDD hassle-free and discover the benefits of cloning your SSD. Don't miss this step-by-step tutorial for a successful clone in Windows 10/11!


Solid State Drives (SSDs) have become increasingly popular in recent years due to their faster read and write speeds, making them a preferred choice for storing and accessing data. However, traditional Hard Disk Drives (HDDs) still have a place in the market for their larger storage capacity and affordability. But what if you want to transfer your data from your high-performance SSD to a larger HDD? This is where the concept of cloning comes in. Cloning involves duplicating the contents of one drive onto another, essentially creating an exact copy. In the world of technology, cloning has become a common practice, especially when it comes to transferring data between different types of drives. In this upcoming chapter, we will discuss why you might want to clone an SSD to an HDD in Windows 10/11.

Disk Cloning: Why You Might Want to Clone an SSD to an HDD in Windows 10/11

When it comes to upgrading your hard drive, there are a few options to consider. You can either migrate your current drive to a larger one, or you can switch from a HDD to an SSD. But what if you want to clone your existing SSD to an HDD? While it may seem counterintuitive, there are actually several reasons why you might want to perform this task.
Better Performance for Large Files or Programs
One of the main reasons to clone an SSD to an HDD is for better performance with large files or programs. While SSDs generally have faster read/write speeds than HDDs, they can struggle with larger files or programs that take up a lot of space. By cloning your SSD to an HDD, you can take advantage of the HDD’s larger storage capacity for these types of files.
Cost Efficiency
In some cases, it may simply be more cost-efficient to clone your SSD to an HDD. SSDs tend to be more expensive than HDDs, so if you’re on a budget or don’t need the high-performance capabilities of an SSD, cloning to an HDD can save you money. This is especially true if you already have an HDD lying around that you can use.
Downgrading from an SSD to HDD
Lastly, if you find that an SSD is not meeting your needs and you want to downgrade to an HDD, cloning your SSD to an HDD can be the simplest solution. This allows you to switch back to an HDD without having to reinstall your operating system and all of your programs.
ssd to hdd clone
Easy Data Transfer
Cloning your SSD to an HDD can also be a quick and easy way to transfer all of your data from one drive to another. Instead of manually transferring each file, program, and setting, you can simply clone the entire drive and have everything ready to go on your new HDD.
Summary
As you can see, there are several valid reasons why you might want to clone an SSD to an HDD. Whether it’s for better performance with large files or programs, cost efficiency, compatibility with older systems, easy data transfer, or downgrading from an SSD, cloning can be a useful tool in your hard drive upgrade arsenal.
However, you may not get the same level of performance from an HDD as you would from an SSD. It’s also important to pay attention to any potential compatibility issues with your specific hardware and operating system.
If you’ve decided that cloning your SSD to an HDD is the right choice for you, the next step is to choose the best cloning software for your needs. Check out the next chapter, “Overview of the Best Free Cloning Software for Windows 10/11,” for a breakdown of some of the top options available.

Overview of the best free cloning software tools for Windows 10/11

Introduction to Cloning Software
Upgrading your drive or ensuring your data is securely backed up requires reliable cloning software. In Windows 10/11, there are several free tools that can assist in cloning your SSD to an HDD. These tools can handle a variety of cloning scenarios, from migrating an entire drive to moving a specific partition. Popular choices include Renee Becca, Clonezilla, and GParted, each with their own advantages for tech enthusiasts and casual users alike.
Renee Becca
Renee Becca offers an easy-to-navigate interface and is ideal for users who require a straightforward cloning process. It supports cloning between drives of different sizes and maintains an efficient operation provided the used space on the source SSD does not exceed the capacity of the target HDD.
clone function of Renee Becca
Clonezilla
For precision, efficiency, and control over data migration, Clonezilla is a powerful open-source cloning solution. It allows users to create an exact image of their drive, sector-by-sector, which is invaluable for those with less than three-quarters of their drive space utilized or when cloning smaller SSDs to larger HDDs.
clonezilla
GParted
When detailed partition management is as crucial as the cloning itself, GParted stands out. It caters to users with more technical expertise who appreciate the granular control over their drives during the cloning process.
GParted Download
Summary: Choosing the Right Tool
Ultimately, choosing between Renee Becca, Clonezilla, or GParted will depend on the user’s specific needs and technical skill level. Each tool has its own set of advantages: ease of use, precise data duplication, or advanced partition control, respectively. Users should ensure the target HDD has the necessary capacity, be mindful of overwriting risks, and verify data integrity after cloning. Be aware that if the original drive is nearly full, or if the source SSD is not operational, cloning may not be feasible and other data recovery methods or fresh installations should be considered.

Using Renee Becca to clone SSD to HDD

Renee Becca is a powerful and user-friendly disk cloning software that can help you easily clone SSD to HDD without reinstalling in Windows 11/10/8/7/Vista/XP. With its intuitive interface and step-by-step instructions, you can complete the cloning process quickly and efficiently.
Step 1: Download and Install Renee Becca
If you haven’t already, you can download and install Renee Becca from the official website. Once the installation is complete, launch the program from the desktop or start menu.
Renee Becca - Reliable Data Backup & Restore Software

Quick Backup files at up to 3,000MB/min.

Fullfill different backup needs Supports system backup, disk / partition backup, file backup and disk clone.

Intelligent Automatically analyze the differences between source and backup data.

Convenient Support VSS, allowing to freely view webpages when backing up system.

Highly compatible Supports various files and storage devices.

Quick Backup files at up to 3,000MB/min.

Fullfill different backup needs Backup for disk, partition and system. Save disk space by backing up incremental /differential data.

Highly compatible Supports various files and storage devices.

Free TrialFree Trial 2000 users have downloaded and enjoy Renee Becca!
Step 2: Select “Clone” Function
In the main interface of Renee Becca, select the “Clone” function from the left menu. Then, click on the “Disk Clone” option.
clone function of Renee Becca
Step 3: Select Source and Destination Disk
Next, select the SSD disk that you want to clone as the source disk. Then, select the HDD disk as the destination disk. Make sure to double-check the disks to ensure you are cloning from the correct source to the correct destination.
Step 4: Start Cloning Process
Before starting the cloning process, make sure you have enough free space on the destination disk. If not, you may need to resize the partitions on the source disk to fit the destination disk. Once everything is ready, click on “Clone” to begin the cloning process.
select the source and target disk
Step 5: Wait for the Cloning Process to Complete
The time it takes to complete the cloning process will depend on the size of the SSD and the speed of your computer. You can monitor the progress in real-time and Renee Becca also provides an estimated completion time.
Step 6: Restart Your Computer
Once the cloning process is complete, restart your computer and make sure to boot from the HDD disk. You can change the boot order in your computer’s BIOS or UEFI settings to ensure it boots from the HDD.
Congratulations! You have successfully cloned your SSD to HDD using Renee Becca. It is a quick and efficient way to transfer all your data and programs to a new hard drive. However, there are a few things to keep in mind.
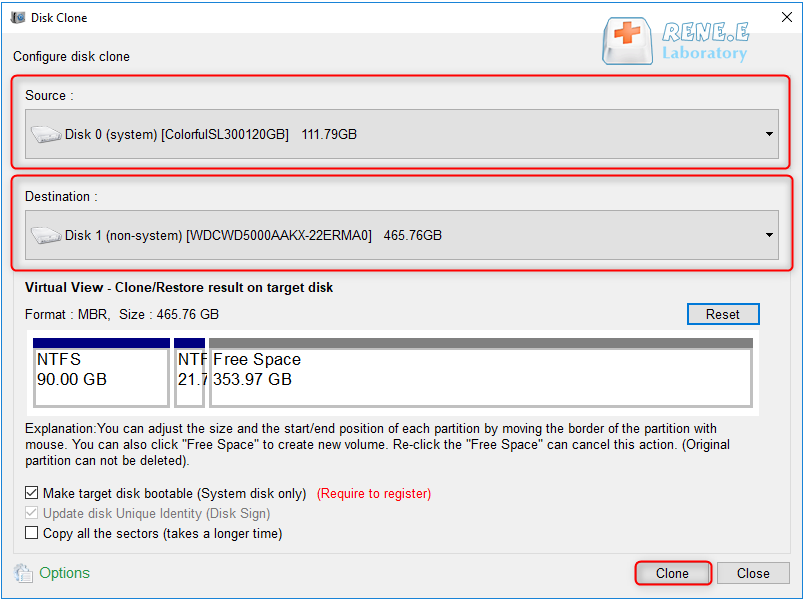
  • Make sure to double-check the source and destination disks before starting the cloning process.
  • If the destination disk is smaller than the source disk, you may need to resize the partitions on the source disk to fit the destination disk.
  • Be patient and allow the cloning process to complete before restarting your computer.
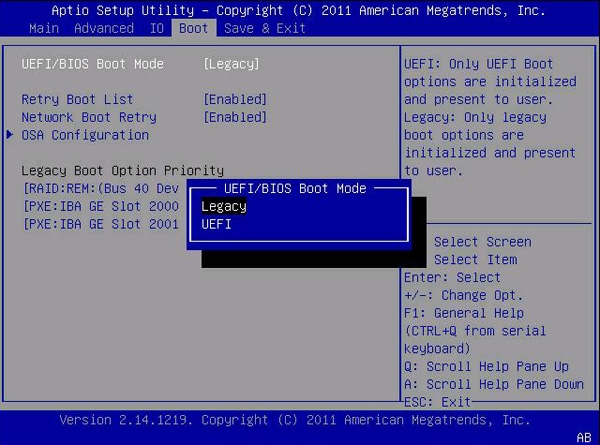
  • After cloning, make sure to change the boot order in your computer’s BIOS or UEFI settings to boot from the HDD.
Pros:
  • Powerful and user-friendly disk cloning software
  • Intuitive interface and step-by-step instructions
  • Quick and efficient way to transfer all data and programs to a new hard drive

Cons:

  • Paid subscription required for full access to all features

For more information on the cloning process, you can refer to the subsequent chapters on using Windows Resource Monitor to monitor the clone process. These chapters will provide you with additional tips and tricks to ensure a successful cloning process.

Extra: Using Windows Resource Monitor to Monitor the Clone Process

When performing an SSD to HDD clone, it is important to monitor the clone process to ensure its successful completion. One way to do this is by using the Windows Resource Monitor, a built-in tool that allows you to view real-time data about hardware and software performance on your computer. By monitoring the clone process, you can see the progress and identify any potential issues that may arise.
Step 1: Open the Windows Resource Monitor by pressing the Windows key and typing “resource monitor” in the search bar. Then, click on the “Resource Monitor” app that appears.
Step 2: In the Resource Monitor window, go to the “Disk” tab and you will see a list of all the drives connected to your computer.
Open Windows Resource Monitor
Step 3: Look for the drive that is being used as the destination for the clone, it should be listed under the “Disk Activity” section.
Step 4: You can now monitor the clone process by looking at the “Disk Activity” section. The “Total (B/sec)” column indicates the amount of data being transferred per second. As the clone progresses, this number should increase.
Disk Activity
Step 5: You can also check the “Response Time” column, which shows the average time it takes for a disk operation to be completed. If you notice a sudden increase in response time, it could indicate a problem with the clone process.
In summary, using the Windows Resource Monitor to monitor the clone process can help you ensure the successful completion of your SSD to HDD clone. By following the steps outlined above, you can easily track the progress of the clone and identify any potential issues that may arise.
While using third-party cloning software, such as Renee Becca, can make the cloning process easier and faster, it is still important to monitor the process to avoid any data loss or interruptions. Additionally, if you encounter any problems during the clone process, you can refer back to the previous chapter “Step 2: Using Renee Becca to clone SSD to HDD” for guidance.
In the next chapters, we will cover how to finalize the clone and ensure successful data transfer, as well as how to use Windows Explorer and CrystalDiskInfo to check the files on the cloned partition and the status of your HDD. With these tools and knowledge, you can easily perform an SSD to HDD clone and upgrade your hard drive without having to reinstall your operating system or applications.

Finalizing the Clone and Ensuring Successful Data Transfer

Step 1: With the cloning process complete, it’s essential to ensure that the data transfer has been successful. Navigate to File Explorer to inspect the cloned HDD. Ensure that all files and folders are present and that the file structure is consistent with the original SSD. Confirm that the sizes of files and the overall disk usage closely match those on the SSD.
open file explorer
Step 2: After confirming the file structure, use CrystalDiskInfo or a similar tool to analyze the health status of the cloned HDD. This will provide you with important information, including the S.M.A.R.T. status, and help you detect any early signs of disk failure or issues related to the cloning process.
use CrystalDiskInfo to check SSD health
Step 3: If discrepancies or errors are detected, you may need to re-clone or troubleshoot the associated issues. Remember to use a powered USB enclosure if you encounter problems with the drive being recognized when connected with a standard USB-to-SATA cable. Issues like insufficient power can prevent the drive from functioning properly, which in turn may affect the ability to verify the clone.
In this chapter, we have outlined the steps to validate the success of your cloning operation from an SSD to an HDD in Windows 10/11, as well as the importance of confirming the health of the cloned drive. These steps are crucial for ensuring that the cloned data is intact and that the drive is functioning correctly.
Understanding the nuances of disk health and considering hardware limitations such as power delivery through USB connections are critical aspects of this process. Users should be cautious of these technicalities, which may necessitate additional equipment or alternative methods of connection. While verification processes add an extra layer of security to your data, they also require a clear understanding of both software tools and potential hardware issues that could impact the outcome of the cloning operation.

Troubleshooting Common Issues Post-Cloning

When you clone an SSD to an HDD in Windows 10/11, understanding the boot process in relation to partition styles is paramount. The cloning process could introduce complications if your system’s firmware setting doesn’t match the partition style of the cloned disk. The transfer might go smoothly, but issues often arise when attempting to boot from the cloned HDD, especially if there’s a discrepancy between UEFI (which commonly uses GPT) and Legacy BIOS (which uses MBR).
To clarify the context, GPT (GUID Partition Table) and MBR (Master Boot Record) are types of partition tables used on a disk. They are not indicators of the disk’s speed or type but rather the schema that defines how data is structured on the disk. While UEFI firmware typically relies on a GPT layout, Legacy BIOS is associated with the MBR layout. Understanding these differences is essential when tackling a non-bootable HDD after cloning, as it suggests a mismatch between the partition style and firmware settings.
Step 1: Confirm the Boot Error
Identify that the problem specifically relates to the failure to boot from the cloned HDD, indicated by an error message or a system that returns to the BIOS/UEFI configuration screen.
Step 2: Access BIOS/UEFI Setup
Reboot the computer, pressing the necessary key (F2, F10, F12, DEL, etc.) to enter the system’s BIOS/UEFI settings.
Here is a list of BIOS shortcut keys for different brands. Alternatively, you can observe the BIOS shortcut keys displayed on the screen during booting.
BIOS NameMethodThe Key or Keys
AcerPress Del or F2 immediately after powering onDel/ F2
CompaqPress F10 while the cursor in the top right corner of the screen is blinkingF10
DellPress F2 when the Dell logo appears/ or press every few seconds until the message Entering Setup appearsF2
eMachinesPress Tab or Del while the eMachine logo displays on the screenTab/ Del
FujitsuPress F2 once the Fujitsu logo appearsF2
GatewayPress the F1 key repeatedly after restarting the computerF1
HPPress the F1/ F10/ or F11 key after restarting the computerF1/ F10/ F11
IBMPress F1 immediately after powering on the computerF1
LenovoPress F1 or F2 after powering on the computerF1/ F2
NecPress F2 to enter the BIOS SetupF2
Packard BellPress F1/ F2/ or Del to enter BIOSF1/ F2/ Del
SamsungPress F2 to start the BIOS setup utilityF2
SharpPress F2 after the computer startsF2
SonyPress F1/ F2/ or F3 after turning on the computerF1/ F2/ F3
ToshibaPress F1 or Esc after powering on to access BIOSF1/ Esc
ARLTPress Del or F11 when the respective message is shownDel/ F11
Step 3: Find the Boot Mode Configuration
Navigate to the Boot or Startup section in BIOS/UEFI and look for the boot mode option that toggles between UEFI and Legacy BIOS modes.
Step 4: Adjust Boot Mode Appropriately
Change this setting to match your cloned HDD’s partition style. For a GPT partition, enable UEFI mode; for an MBR partition, switch to Legacy BIOS mode. Ensure to save changes upon exit.
Adjust Boot Mode
Step 5: Set Correct Boot Priority
Ensure that the cloned HDD is at the top of the boot priority list within your BIOS/UEFI settings.
Step 6: Boot Verification
Save the BIOS/UEFI configuration changes and restart the system to check if it now properly boots from the cloned HDD.
In summary, post-cloning boot issues are often a result of a mismatch between the system’s firmware mode (UEFI or Legacy BIOS) and the partition style (GPT or MBR). It’s critical to align the BIOS/UEFI setting to the partition style used by the cloned disk. UEFI paired with GPT is generally preferred for its support of modern features like secure boot and larger disk capacities. However, if you have a system that doesn’t support UEFI, or you are using certain Linux distributions that might have complications with UEFI, you would need to stick with Legacy BIOS and MBR. It is also important to note that not all motherboards require CPU and RAM to access BIOS/UEFI settings. When making changes in BIOS/UEFI, always make sure all changes are accurately recorded and saved before exiting to ensure successful booting from the cloned disk.

Conclusion

In conclusion, cloning an SSD to an HDD in Windows 10/11 can be a useful process for various reasons, such as preserving data, expanding storage capacity, or upgrading to a larger HDD. However, it is essential to use a reliable cloning software like Renee Becca to ensure a secure and successful transfer of data. In this guide, we discussed the reasons why one might want to perform this process and introduced the best free cloning software tools available. We also provided a step-by-step tutorial using Renee Becca, along with additional tips for monitoring the clone process and troubleshooting common issues. Remember to check the status of your HDD using tools like Windows Explorer and CrystalDiskInfo after the clone to ensure the successful transfer of data. With this ultimate guide, you can confidently clone your SSD to an HDD in Windows 10/11 and enjoy the benefits it offers.