author avatar
    Specialist of Customer Service Dept.
 

Summary
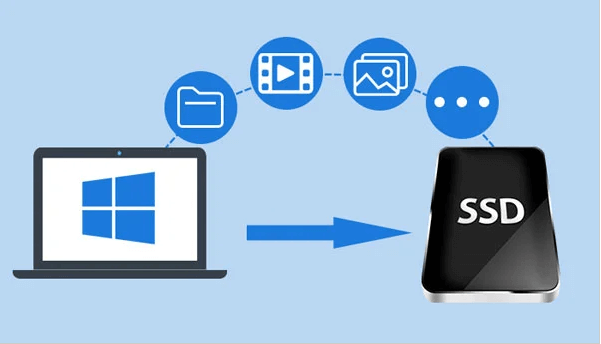
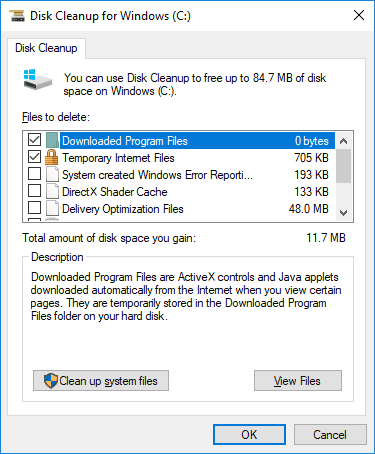
Upgrade to a larger SSD without losing any data by following our step-by-step guide for transferring your operating system. We cover different methods, including cloning and using imaging software, and provide tips for optimizing your new drive. Don't miss out on maximizing your storage space!


Whether you’re upgrading to a faster and larger SSD or simply need to replace a malfunctioning one, transferring your operating system (OS) from one SSD to another can seem like a daunting task. However, with the right preparation and steps, it can be easily accomplished without losing any of your important data. In this chapter, we will guide you through the process of backing up important data, ensuring compatibility between your old and new SSD, and ultimately making a smooth transition to your new SSD without any hassle or data loss. So let’s get started on this important task of transferring your OS to a new SSD.

Preparing for the Transition: Backing up Important Data and Ensuring Compatibility

Before transferring your operating system from one SSD to another, it is important to take the necessary steps to prepare for the transition. This includes backing up important data and ensuring compatibility between the two SSDs.
Step 1: Backing up Your Data
The first step in preparing for the transition is to back up all of your important data. This includes documents, photos, videos, and any other files that you do not want to lose during the transfer process. There are several ways to back up your data, including using an external hard drive, cloud storage services, or a USB drive.
Step 2: Checking Compatibility
It is important to ensure that the new SSD you are transferring your operating system to is compatible with your computer. This includes both physical compatibility (such as the type of connection – SATA, PCIe, etc.) and software compatibility (such as operating system version). Check the specifications of your computer and the new SSD to ensure that they are compatible.
SSD interfaces
Step 3: Updating Drivers and Firmware
Before transferring your operating system, it is recommended to update the drivers and firmware for your computer and the new SSD. This will ensure that both are functioning properly and can communicate effectively during the transfer process.
Step 4: Removing Unnecessary Data
It is also a good idea to remove any unnecessary data from your current SSD before transferring the operating system. This includes temporary files, duplicate files, and unused programs. This will help to reduce the size of the operating system and make the transfer process smoother.
Step 5: Disconnecting External Devices
Before beginning the transfer, make sure to disconnect any external devices (such as printers or external hard drives) from your computer. This will prevent any data loss or errors during the transfer process.
After completing these steps, you are now ready to transfer your operating system from one SSD to another. Remember to follow the instructions carefully and double check all compatibility before proceeding.
In summary, preparing for the transition by backing up important data and ensuring compatibility is crucial for a successful transfer of your operating system from one SSD to another. This includes backing up your data, checking compatibility, updating drivers and firmware, removing unnecessary data, and disconnecting external devices. Following these steps will help to ensure a smooth and successful transfer process.
To learn more about choosing the right method for OS transfer – cloning software vs. system imaging, be sure to check out the subsequent chapters.

Choosing the Right Method for OS Transfer – Cloning Software vs. System Imaging

When it comes to transferring an OS from one SSD to another, there are multiple methods that can be used. However, the two most popular and widely used methods are cloning software and system imaging. Both of these approaches have their own advantages and disadvantages, and it is important to choose the right one based on your specific requirements.
Cloning Software: Making an Exact Copy of Your OS
One of the most common methods for transferring an OS is by using cloning software. This involves making an exact copy of your OS and transferring it to the new SSD. This method is relatively fast and efficient, taking only a fraction of the time compared to other methods such as system imaging. It also ensures that all your files, settings, and applications are transferred to the new SSD, making it an easy and hassle-free process.
transfer os from one ssd to another
System Imaging: Creating a Backup of Your OS
On the other hand, system imaging involves creating a backup of your OS, including all your files and settings. This backup is then transferred to the new SSD, essentially restoring your entire OS to the new drive. This method is safer compared to cloning software, as it creates a complete backup of your system. It also allows for more flexibility, as you can choose which files and settings to transfer to the new drive. However, the process can take longer and may require additional steps such as installing a fresh copy of Windows on the new SSD.
Summarizing the Advantages and Disadvantages
In summary, both cloning software and system imaging offer effective ways to transfer an OS to a new SSD. Cloning software is faster and more efficient, but it may not be as safe as system imaging and may require additional steps to ensure compatibility. On the other hand, system imaging offers more flexibility and ensures a complete backup of your system, but it may take longer and require more technical knowledge.
To learn more about the specific steps involved in using cloning software for a smooth OS migration without data loss, be sure to check out the following chapter on “Method 1: Using Renee Becca for a Smooth OS Migration without Data Loss.” Following these steps will help you seamlessly transfer your OS to a new SSD, ensuring a hassle-free and efficient process.

Method 1: Using Renee Becca for a Smooth OS Migration Without Data Loss

One of the most reliable and efficient methods for transferring OS from one SSD to another is using a cloning software. Renee Becca is a powerful and user-friendly cloning software that allows you to transfer all your OS contents, including files, programs, and system settings, to a new SSD without any data loss.
Renee Becca is a tool specially used for system/hard disk data backup and restoration. It can help you back up and restore important data in your computer, such as programs, system configuration, emails, photos, videos, documents, bookmarks, etc. In addition, you can also use it to clone disk and system data. The software provides three cloning methods, including hard disk cloning/cloning system hard disk; partition cloning and system migration. You can choose the most suitable cloning method according to your different needs.
In addition, Renee Becca supports 4K align and Cloning from larger partition to smaller partition. These functions can better assist you in completing system and data migration.
Here is a guide on how to use Renee Becca for cloning your Windows system to an SSD.
Hot Topic - ADsRenee Becca – Safe and Quick System Migration to SSD

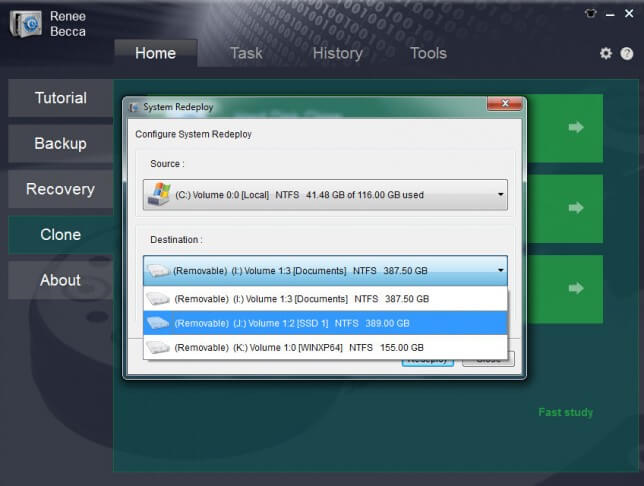
Automatic 4K alignment Improves SSD performance during system migration.

Support GPT and MBR Automatically adapt to the suitable partition format.

Support NTFS and FAT32 Redeploy various files in different file systems.

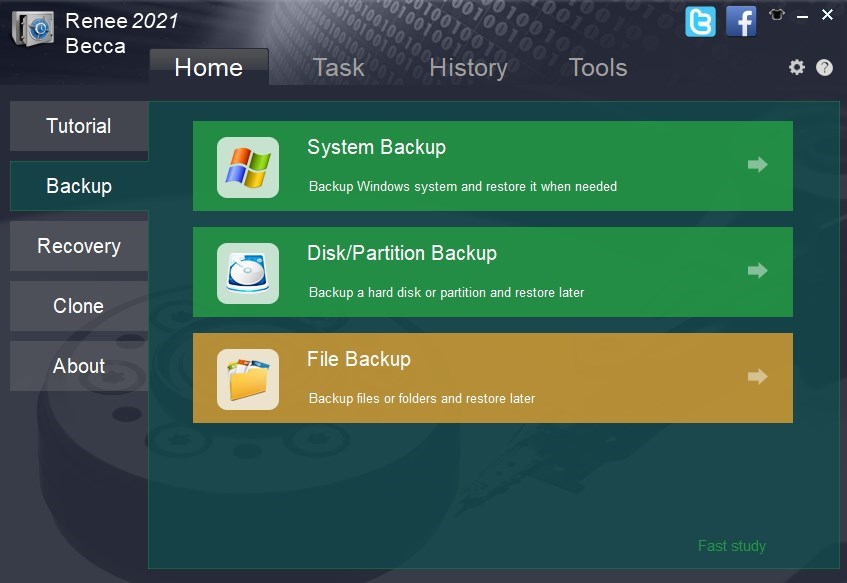
Back up quickly Back up files at up to 3,000MB/min.

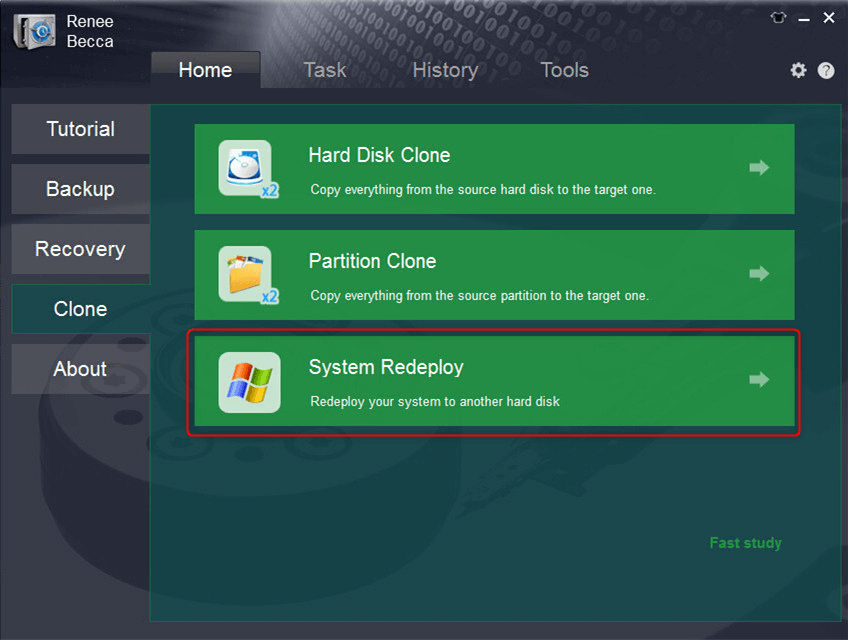
Overall backup schedule Support system redeployment/system backup/partition backup/disk backup/disk clone.

Automatic 4K alignment Improve SSD performance

Support GPT and MBR Intelligently adapt to a partition format

Support NTFS and FAT32 Redeploy files in different file systems

Free TrialFree TrialNow 2000 people have downloaded!
Step 1: Create a Backup of Your System
Before starting the cloning process, it is essential to create a backup of your entire system. In case the cloning process fails, you can use the backup to restore your system to its previous state. Renee Becca offers a “Backup” feature that allows you to create a system image backup of your entire system with just a few clicks.
Back up data
Step 2: Connect the New SSD to Your Computer
After creating a backup, connect the new SSD to your computer via a USB cable. You can then use Renee Becca to inspect the connected SSD and ensure that it has enough space to accommodate all your OS contents.
Connect the SSD/M.2 to the PC
Step 3: Launch Renee Becca and click “System Redeploy” function in “Clone”.
select system redeploy function in renee becca
Step 4: Select the Source and Destination Drives
In the cloning software, select your current SSD as the source drive and the new SSD as the destination drive. Renee Becca also allows you to preview the contents on both drives to ensure that you have selected the correct ones.
select target disk and desination in system redeploy function in renee becca
Step 5: Start the Cloning Process
Once you have selected the source and destination drives, click “Redeploy” to begin the cloning process. Depending on the size of your OS contents, the process may take some time to complete.
Step 6: Reboot Your Computer
Once the cloning process is complete, you will receive a notification. You can then reboot your computer and access your newly transferred OS on the new SSD.
Pros:
  • User-friendly interface
  • Efficient cloning process
  • Allows you to preview the source and destination drives

Cons:

  • Paid subscription required for full access to all features

Summary
Transferring OS from one SSD to another is made easy with the help of reliable cloning software such as Renee Becca. This method ensures a smooth migration process without any data loss. However, it may require a paid subscription for full access to its features. If you prefer using native Windows options, you can check out our next chapter on “Method 2: Executing the Transfer Process with Detailed Instructions for Using Windows System Imaging.”

Method 2: Transferring OS from One SSD to Another Using Windows System Imaging

Step 1: Begin with preparing the SSD for the imaging process. Ensure that all important data is backed up. For Windows 10, go to Settings > Update & Security > Backup and choose “Add a drive” to select an external drive for backup. For Windows 7, use the Backup and Restore option in the Control Panel.
Step 2: Create a system image. On Windows 10, navigate to Control Panel > System and Security > Backup and Restore (Windows 7), and then click on “Create a system image“. Windows 7 users should open the Backup and Restore utility directly from the Control Panel and click the same option.
create a system image
Step 3: Choose the destination for the system image. You can select an external drive, DVDs, or a network location. Click “Next” to proceed.
Step 4: Confirm the drives to be included in the image. The system drive and any other critical partition will be selected by default. Continue by clicking “Next” and then “Start backup“.
Step 5: Once the backup is completed, create a system repair disc or drive. This is crucial for restoring the image to the new SSD. In Windows 10 and 7, access the “Backup and Restore” menu and click “Create a system repair disc” on the left pane.
Create a system repair disc
Step 6: After creating the system image and repair disc, shut down the computer and replace the old SSD with the new one. Boot from the system repair disc or drive by pressing the appropriate F-key during startup to access the boot menu.
Step 7: In the recovery environment, select “Troubleshoot” and then “Advanced options” for Windows 10. For Windows 7, select “Restore your computer using a system image” and then “Next“.
select System Image Recovery
Step 8: Follow the on-screen instructions to restore the system image to the new SSD. When prompted, select the image that you created earlier and proceed with the restoration process.
Step 9: After the restoration is complete, the system will restart. Enter the BIOS setup and ensure that the new SSD is set as the first boot device. Save changes and exit the BIOS.
Step 10: Windows should now boot from the new SSD. Perform a final check to ensure all drivers and hardware are functioning correctly. For Windows 10, activation may be required; if so, access Device Management by right-clicking the Windows button and selecting it from the menu. Update your drivers and reactivate Windows by answering that you have changed your hardware recently when prompted.
access Device Management
Before concluding the process, take note of Windows” unique licensing model. If your version of Windows was preinstalled on your previous device, such as a laptop, you should be aware of OEM licenses which are tied to the machine’s hardware and may not be transferable to a new SSD or computer. To ensure compliance with licensing terms, it’s recommended to check the Microsoft’s guidelines regarding OS transfers. Additionally, should you encounter any missing files after transferring the SSD to a different machine, make sure to perform a standard shutdown using the

shutdown /s /t 0

command in CMD or PowerShell, to ensure a full FAT (file allocation table) update, avoiding the hibernation feature that might prevent visibility of the files.
Pros:
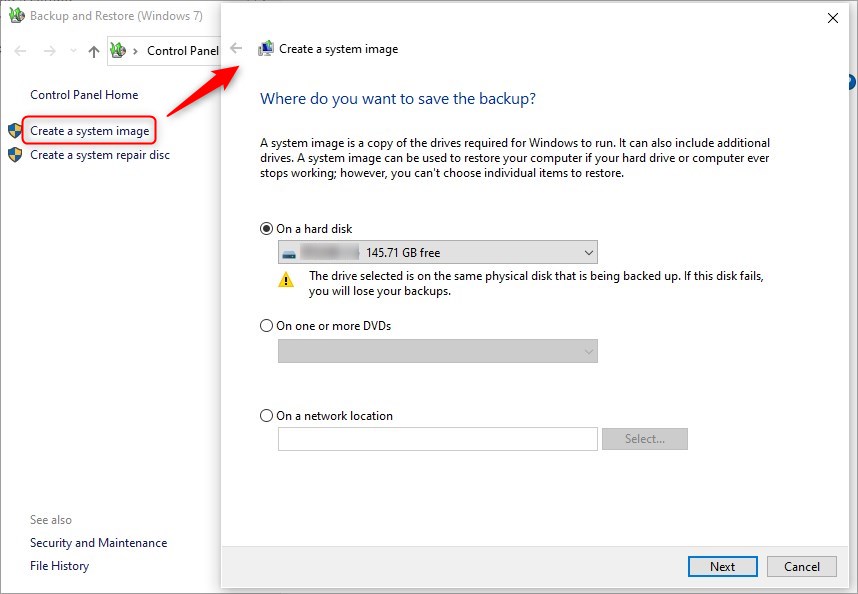
  • Comprehensive backup of the operating system, settings, and installed programs
  • Potentially saving time compared to manual reinstallations
  • Reducing the risk of data loss

Cons:

  • Potential driver inconsistencies and licensing issues when shifting to significantly different hardware
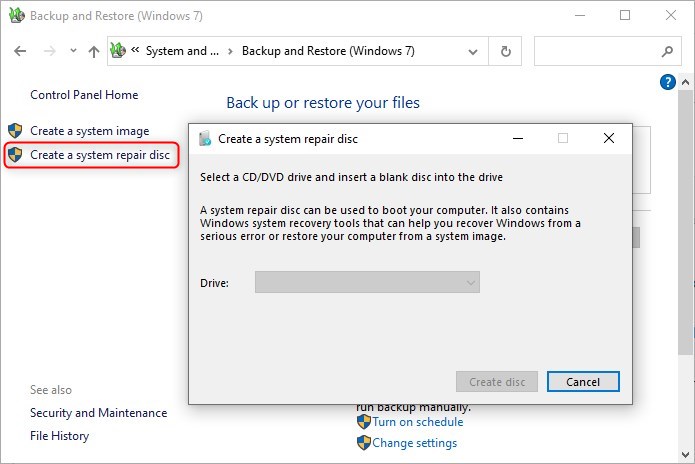
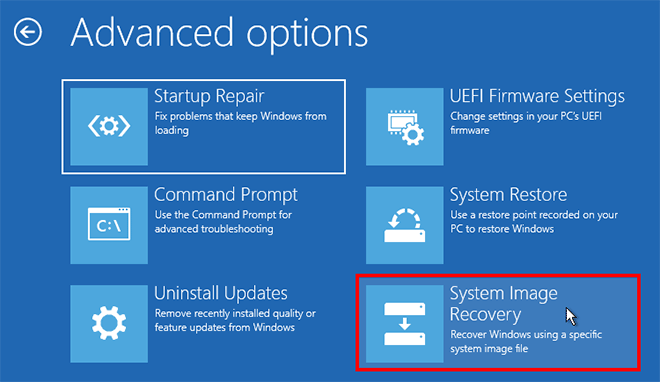
  • Verification of system image and recovery media's integrity is required
  • New SSD's capacity needs to accommodate the image

Always retain clear documentation of your Windows product key, particularly if using it in a recovery or transfer scenario—having a photo or digital copy of the product key sticker can prove invaluable.

Verifying the Transfer to Ensure a Successful OS Migration and System Functionality

After successfully transferring the OS from one SSD to another, it is important to verify the transfer and ensure that the system functionality is not compromised. In this chapter, we will discuss how to verify the transfer and ensure a successful OS migration and system functionality.
Step 1: Go into your BIOS settings to change the boot order. Press a specific key (such as F2 or Delete) during the booting process.
Here is a list of BIOS shortcut keys for different brands. Alternatively, you can observe the BIOS shortcut keys displayed on the screen during booting.
BIOS NameMethodThe Key or Keys
AcerPress Del or F2 immediately after powering onDel/ F2
CompaqPress F10 while the cursor in the top right corner of the screen is blinkingF10
DellPress F2 when the Dell logo appears/ or press every few seconds until the message Entering Setup appearsF2
eMachinesPress Tab or Del while the eMachine logo displays on the screenTab/ Del
FujitsuPress F2 once the Fujitsu logo appearsF2
GatewayPress the F1 key repeatedly after restarting the computerF1
HPPress the F1/ F10/ or F11 key after restarting the computerF1/ F10/ F11
IBMPress F1 immediately after powering on the computerF1
LenovoPress F1 or F2 after powering on the computerF1/ F2
NecPress F2 to enter the BIOS SetupF2
Packard BellPress F1/ F2/ or Del to enter BIOSF1/ F2/ Del
SamsungPress F2 to start the BIOS setup utilityF2
SharpPress F2 after the computer startsF2
SonyPress F1/ F2/ or F3 after turning on the computerF1/ F2/ F3
ToshibaPress F1 or Esc after powering on to access BIOSF1/ Esc
ARLTPress Del or F11 when the respective message is shownDel/ F11
Step 2: Once in the BIOS settings, navigate to the “Boot” tab or menu and look for the option to change the boot order. Make sure to select the cloned SSD as the first boot option.
change the boot order in hard disk in boot configuration in BIOS
Step 3: Save your changes and exit the BIOS settings. Your computer should now reboot from the cloned SSD as the new boot drive.
It is important to perform a verification of the OS transfer to ensure that the system is functioning properly after successfully transferring the OS. In the next chapter, we will discuss some tips on how to optimize and utilize the larger SSD space effectively post-upgrade.

Tips to Optimize and Utilize Larger SSD Space Post-Upgrade

Now that you have successfully transferred your OS from your old SSD to a new one, it’s important to make the most of the larger storage space available. Here are some tips to help you optimize and utilize the space more effectively:
Step 1: Sort out your files and programs.
Before transferring your OS, you may have had to delete some files and programs to make room for the migration. Now that you have more space, it’s a good idea to go through your files and programs and see if there are any that you can re-download or re-install. This will help free up even more space on your new SSD.
Step 2: Use Storage Sense.
This built-in feature in Windows 11/10/8/8.1/7/XP can help you free up space on your SSD by automatically deleting temporary files and emptying your recycle bin. To use Storage Sense, go to “Settings” -> “System” -> “Storage” and turn on the toggle for “Storage Sense“. You can also customize the frequency of when you want it to run.
Use Storage Sense
Step 3: Move user folders to a different drive.
By moving your user folders such as Documents, Pictures, and Downloads to another drive, you can free up more space on your SSD. To move a user folder, go to “Settings” -> “System” -> “Storage” -> “Change where new content is saved” and select a different drive for each category.
Move user folders to a different drive
Step 4: Uninstall unnecessary programs.
Take a look at the programs installed on your new SSD and see if there are any that you no longer use or need. Uninstalling these programs can help free up more space on your SSD.
Step 5: Use disk cleanup.
Similar to Storage Sense, disk cleanup can help you delete unnecessary files on your SSD. To use disk cleanup, right-click on your SSD drive and select “Properties” -> “Disk Cleanup“. It will scan your drive and show you a list of files that you can safely delete to free up space.
run a disk cleanup
Step 6: Use an external hard drive.
If you have a lot of large files such as videos, photos, or games, consider storing them on an external hard drive to free up space on your SSD. This can also make it easier to transfer them to a new computer in the future.
Step 7: Enable compression.
You can also compress files and folders on your SSD to save space. To enable compression, right-click on a file or folder and go to “Properties” -> “Advanced” -> “Compress contents to save disk space“. Keep in mind that compressing files may slightly impact performance.
Compress contents to save disk space
By following these tips, you can effectively utilize and optimize the larger space on your new SSD. However, it’s important to note that constantly filling up your SSD can also impact its performance. Make sure to regularly clean out unnecessary files and programs to keep your SSD running smoothly.
Summary: With a larger SSD, you can have more space for your files and programs. To optimize and effectively utilize this space, make sure to sort out your files and programs, use built-in features like Storage Sense and disk cleanup, move user folders to a different drive, uninstall unnecessary programs, use an external hard drive, and enable compression. However, be mindful of not constantly filling up your SSD to maintain its performance.

Conclusion

In conclusion, upgrading your operating system to a larger SSD can greatly improve your computer’s performance and storage capacity. It is important to prepare for the transition by backing up important data and choosing the right method for OS transfer. Using cloning software like Renee Becca or system imaging can ensure a smooth migration without any data loss. After the transfer, it is essential to verify the result and make use of the larger SSD space effectively. With these tips and methods, you can seamlessly move your operating system to a larger SSD and enjoy the benefits of improved speed and storage. Don’t wait any longer, take the necessary steps to upgrade your SSD today and optimize your computer’s performance.