author avatar
    Specialist of Customer Service Dept.
 

Summary
Discover the benefits of removing password and PIN login on Windows 11. Follow our step-by-step guide to configure Windows settings and use Renee PassNow to reset your password. Say goodbye to the hassle of remembering your login credentials and streamline your user experience on Windows 11.


Windows 11, the latest operating system from Microsoft, has brought significant updates and changes to the way we use our computers. One of these changes is the option to remove the traditional password and PIN login system. While passwords and PINs have been an essential security measure for our devices, they can also be a hassle, especially for those who use their computer frequently. If you’re someone who prefers convenience over security, you’ll be glad to know that Windows 11 allows you to remove the password and PIN login. In this chapter, we will guide you through the process of configuring your Windows settings to remove the login requirements, making accessing your computer quicker and easier.

Method 1 : Configuring Windows to Remove Password and PIN Login

Having to enter a password or PIN every time you log in to your Windows 11 device can be a hassle. Thankfully, Microsoft has made it easy to remove this step and allow for quick access to your desktop. In this guide, we will walk you through the steps to remove the password and PIN login on Windows 11.
Tips:Please consider the security risks before removing password and PIN login.
Step 1: Open the Windows Settings by clicking on the Start button and selecting the gear icon or by searching for “Settings” in the search bar.
selecting the gear icon to configure Windows
Step 2: In the Settings menu, click on the “Accounts” option.
Step 3: On the left-hand side, click on “Sign-in options.
account and sign-in options
Step 4: In the “Require sign-in” section, click on the drop-down menu and select “Never.
Step 5: This will prompt a pop-up window asking you to verify your current password. Enter your password and click “OK.
Step 6: Once you have disabled the password requirement, you can also disable the PIN login. In the “Sign-in options” menu, click on the “Windows Hello PIN” option.
In the "Sign-in options" menu, click on the "Windows Hello PIN" option
Step 7: Click on the “Remove” button to remove your current PIN.
Step 8: You will be prompted to verify your decision. Click on “Remove” to confirm.
Step 9: You may now close the Settings menu and restart your device. When your device boots up, you will no longer be required to enter a password or PIN to access your desktop.
It is important to note that removing the password and PIN login means anyone can access your device without any verification. If you are using a shared device or have sensitive information stored on your computer, it is recommended to keep the password and PIN login enabled for added security.
If you change your mind and want to re-enable the password and PIN login, simply follow the same steps and select “When PC wakes up from sleep” or “If you’ve been away, when should Windows ask for your password” in step 4.
Note: In some cases, the option to remove the password or PIN may be grayed out if your device is connected to a work or school account. If this is the case, you will need to contact your IT department for assistance.
Removing the password and PIN login on Windows 11 can save you time and make it easier to access your device. However, it is important to weigh the security risks and make sure it is the right decision for your specific situation.

Method 2 : Disabling PIN or Login Password on Windows 11 using Group Policy Editor

To remove the PIN or login password requirement on Windows 11 using Group Policy, you can follow these steps:
Step 1: Open Local Group Policy Editor
Press the Windows key + R to open the Run dialog box. Type “gpedit.msc” and press Enter to open the Local Group Policy Editor.
input gpedit.msc in run dialog
Step 2: Navigate to Windows Hello for Business Policies
In the Local Group Policy Editor window, navigate to “Computer Configuration” > “Administrative Templates” > “Windows Components” > “Windows Hello for Business“.
Local Group Policy Editor window Windows Hello for Business
Step 3: Configure Group Policies for Windows Hello for Business
Double-click on the following policies and configure them accordingly:
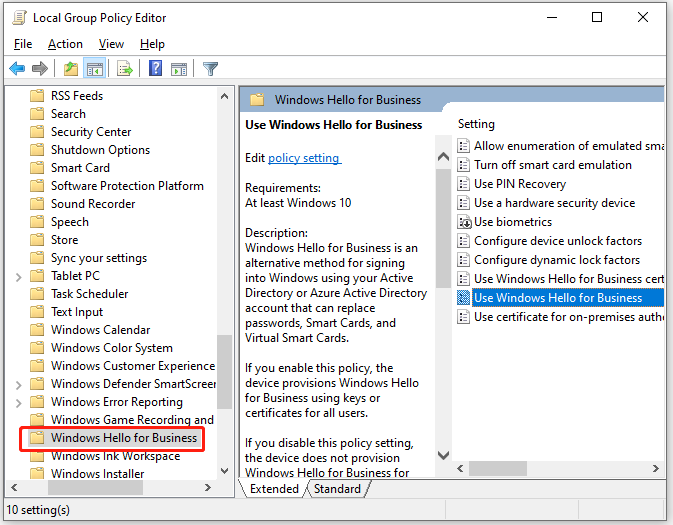
  • “Enable Windows Hello for Business”: Select “Enabled” and click “OK“.
  • “Use certificate for on-premises authentication”: Select “Enable” and click “OK“.
  • “Enable automatic enrollment of certificates”: Select “Enable” and click “OK“.
Step 4: Apply the Changes
Close the Local Group Policy Editor. Now, we need to apply the Group Policy object using security group filtering:
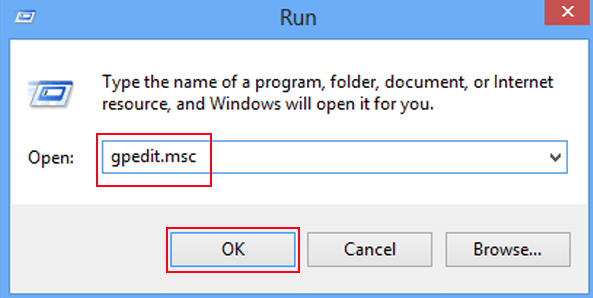
  1. Open the Group Policy Management Console (gpmc.msc).
  2. In the navigation pane, expand the domain and right-click the node that has your Active Directory domain name.
  3. Select “Link an existing GPO” and choose “Enable Windows Hello for Business” or the name of the Windows Hello for Business Group Policy object you previously created.
  4. Select “OK” to apply the Group Policy object.
Review and Validate the Configuration
Before proceeding with the deployment, it’s important to review and validate the configuration to ensure it matches your requirements:
  • Confirm that you have configured the “Enable Windows Hello for Business” policy to the appropriate scope (Computer vs. User).
  • Verify that the “Use certificate for on-premises authentication” policy setting is correctly configured.
  • Ensure that the security settings for the Group Policy object are properly set.
  • Check that the “Apply Group Policy” permission for Domain Users has been removed (Domain Users should only have read permissions).
  • Add the “Windows Hello for Business Users” group to the Group Policy object and grant it the necessary permissions to Apply Group Policy.
  • Confirm that the Group Policy object is linked to the correct locations within Active Directory.
  • If deploying additional Windows Hello for Business Group Policy settings, ensure they are properly configured.
By following these steps and validating the configuration, you can effectively disable the PIN or login password requirement using Group Policy on Windows 11. It’s important to note that the issues mentioned in the additional context, such as the Windows Hello PIN loop and Windows Hello not being available on the device, may be caused by other factors and may require further troubleshooting or device-specific solutions. Consulting Microsoft support or relevant forums can provide additional guidance in resolving these specific issues.

Reliable Tool for Accessing Your Account if forget password - Renee PassNow

Configuring Windows 11 settings to remove the PIN or login password is a great way to improve convenience and save time for users. However, there may be instances where you forget your password and are unable to access your account. In such cases, a reliable tool like Renee PassNow can help you reset the Windows password and regain access to your account.
Tips:If your account is Microsoft Account, Renee PassNow will convert this account to Local account. After resetting login password, you need to connect your account to your Microsoft Account again.
The process of resetting your Windows password with Renee PassNow is simple and straightforward. You can do it in just a few steps and without any technical knowledge.
To reset your Windows password using Renee PassNow, follow these steps:
Step 1: Download and Install Renee PassNow
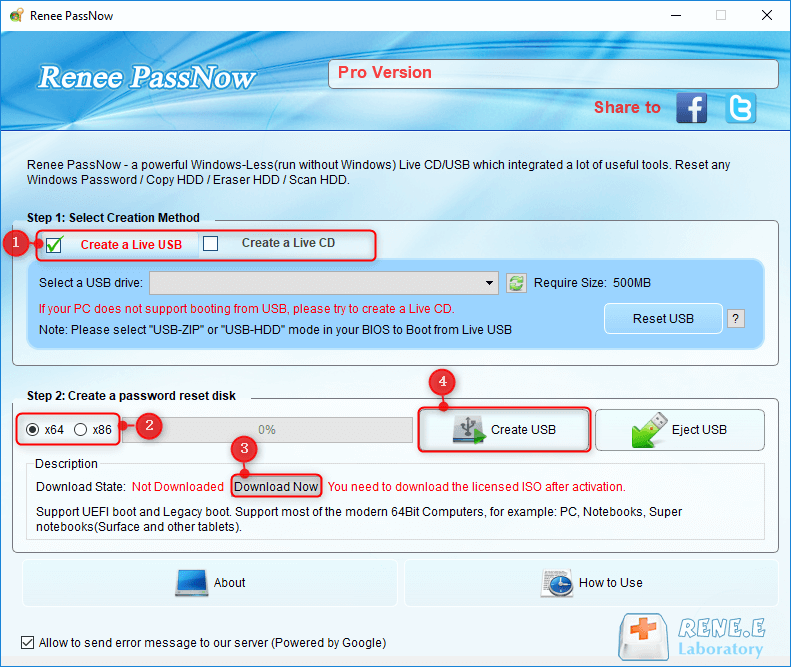
Start by downloading Renee PassNow from the official website and install it on a different computer that you can access. You can choose the appropriate version based on your computer’s operating system.
Renee PassNow – Professional Windows System Rescue Tool

Remove Windows Login Password 3 steps for whole password remove process.

Recover the files Recover the deleted files without Windows system.

Transfer the data Transfer the important files of the computer with system.

Fix Windows startup error Fix various Windows startup failures or crashes.

Erase disk Completely erase disk files which will not be restored.

Remove Windows Login Password 3 steps for whole password remove process.

Recover the files Recover the deleted files without Windows system.

Transfer the data Transfer the important files of the computer with system.

Free TrialFree TrialNow 2000 people have downloaded!
Step 2: Create a Bootable USB or CD/DVD
Launch Renee PassNow and insert a USB flash drive or blank CD/DVD into the computer. Select the option to create a bootable media. Follow the on-screen instructions to complete the process.
Create New Windows 10 Password Reset Disk with Renee PassNow
Step 3: Boot the Locked Server from the Bootable Media
Insert the bootable USB or CD/DVD into the locked Windows computer. Restart the computer and enter the BIOS settings by pressing the appropriate key (usually F2 or Delete). Configure the boot order to prioritize the bootable media.
Common Server:
Server TypeEnter boot menu method
DELLPress the F12 key repeatedly before the Dell logo appears on the screen.
HPPress the F9 key multiple times when the HP logo is displayed.
Common Computers:
BIOS NameEnter boot menu method
ASRockDEL or F2
ASUSDEL or F2 for PCs/ DEL or F2 for Motherboards
AcerDEL or F2
DellF12 or F2
ECSDEL
Gigabyte / AorusDEL or F2
Lenovo (Consumer Laptops)F2 or Fn + F2
Lenovo (Desktops)F1
Lenovo (ThinkPads)Enter then F1
MSIDEL
Microsoft Surface TabletsPress and hold Power and Volume Up buttons
Origin PCF2
SamsungF2
ToshibaF2
ZotacDEL
HPEsc/ F9 for \`Boot Menu\`/ Esc/ F10/ Storage tab/ Boot Order/ Legacy Boot Sources
INTELF10
Boot the target PC with the created password reset USB/CD/DVD.
Step 4: Select password reset function
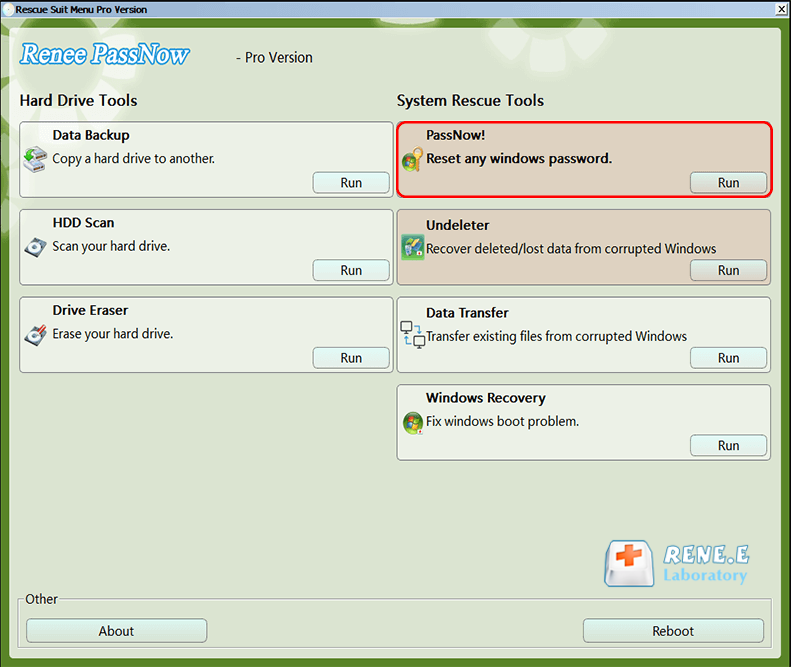
After successfully booting from the bootable media, Renee PassNow will load. Select “PassNow!” function after booting from the new created Windows password reset disk.
After loading into main interface, please select the “PassNow!” function.
Step 5: Resetting the Password
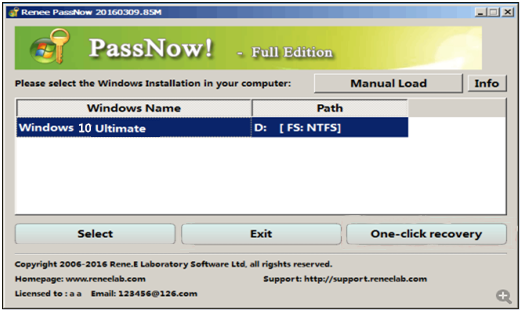
Choose the user account for which you want to reset the password. Then, click on the “Clear Password” button. Renee PassNow will remove or reset the password for the selected user account.
Select target Windows system in the list
Select target user account in the list
Step 6: Reboot the PC
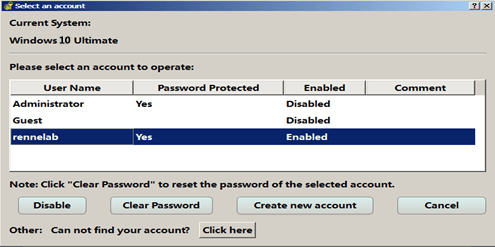
Once the password is reset, remove the bootable media from the PC and restart the computer. You will now be able to log in to Windows Account without a password.
Why Choose Renee PassNow?
Renee PassNow is a reliable and effective tool for resetting Windows passwords. It offers a simple and user-friendly interface, making it accessible to users with all levels of technical knowledge. It also supports all versions of Windows, including Windows 11.
In addition to resetting passwords, Renee PassNow also allows users to backup and recover data, fix Windows boot issues, and erase confidential files permanently. This makes it a comprehensive tool for maintaining and managing your computer.
With Renee PassNow, you no longer have to worry about forgetting your Windows password and being locked out of your account. Simply follow the easy steps mentioned above and regain access to your account in no time.

Additional Tips and Recommendations: Maintaining Security on Windows 11

While the streamlined user experience of Windows 11 may make it tempting to remove your password and PIN login, it’s important to keep in mind the potential risks of doing so. Without these security measures in place, your device may be more vulnerable to unauthorized access. In this chapter, we’ll discuss some additional tips and recommendations for maintaining security on Windows 11.
Enable Windows Hello for Biometric Login
If you want to remove your password and PIN login, consider enabling Windows Hello as an alternative form of authentication. This feature allows you to use biometric data such as your face or fingerprint to log in to your device, providing an extra layer of security. To enable Windows Hello, go to : Settings > Accounts > Sign-in options
and follow the prompts to set up your biometrics.
Use a Strong Password for Your Microsoft Account
If you choose to remove your password and PIN login, make sure you have a strong, unique password for your Microsoft account. This will help protect your personal data and prevent others from accessing your Microsoft services. A strong password should be at least 12 characters long and include a mix of letters, numbers, and special characters.
Consider a Third-Party Password Manager
If you’re concerned about remembering multiple passwords for your online accounts, consider using a third-party password manager. These tools can store all your passwords in a secure, encrypted vault and generate strong passwords for you. Some popular options include 1Password, LastPass, and Bitwarden.
Stay Alert for Suspicious Activity
Even with password and PIN login removed, it’s important to stay vigilant for any suspicious activity on your device or online accounts. Keep an eye out for any unauthorized logins or changes to your settings. If you notice anything out of the ordinary, change your passwords immediately and contact Microsoft for further assistance.
Regularly Update Your Device and Apps
Another important step in maintaining security on Windows 11 is to regularly update your device and apps. These updates often include security patches and bug fixes that can help protect your device from potential threats. Make sure to check for updates frequently or enable automatic updates to keep your device secure.
Stay Educated on Cybersecurity Best Practices
Lastly, staying educated on cybersecurity best practices can go a long way in keeping your device and personal data safe. Keep up with the latest trends and developments in cybersecurity and follow basic guidelines such as avoiding suspicious links and downloads, using unique passwords, and backing up your data regularly.
By following these additional tips and recommendations, you can maintain a high level of security on your Windows 11 device while still enjoying a streamlined login process. With the right precautions in place, you can have peace of mind knowing that your personal data is protected.

Conclusion

In conclusion, removing password and PIN login on Windows 11 has numerous benefits including convenience and improved security. By following the steps to configure Windows settings, users can easily eliminate the need for a PIN or login password. In case of a forgotten password, Renee PassNow provides a reliable solution for resetting it. This streamlined user experience allows for a seamless login process on Windows 11. However, it is important to also consider maintaining security by implementing additional measures such as enabling Windows Hello for biometric login. Overall, removing the password and PIN login on Windows 11 can greatly improve the user experience while also ensuring safety and convenience. So why not give it a try and see the difference for yourself?