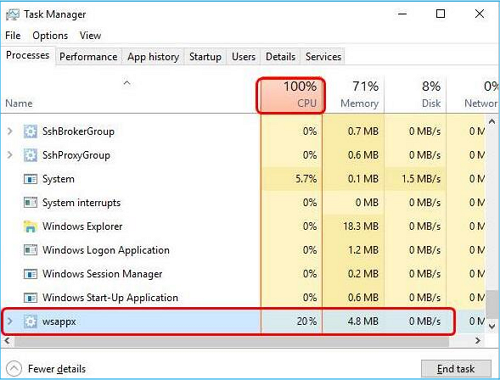
author avatar
    Specialist of Customer Service Dept.
 

Summary
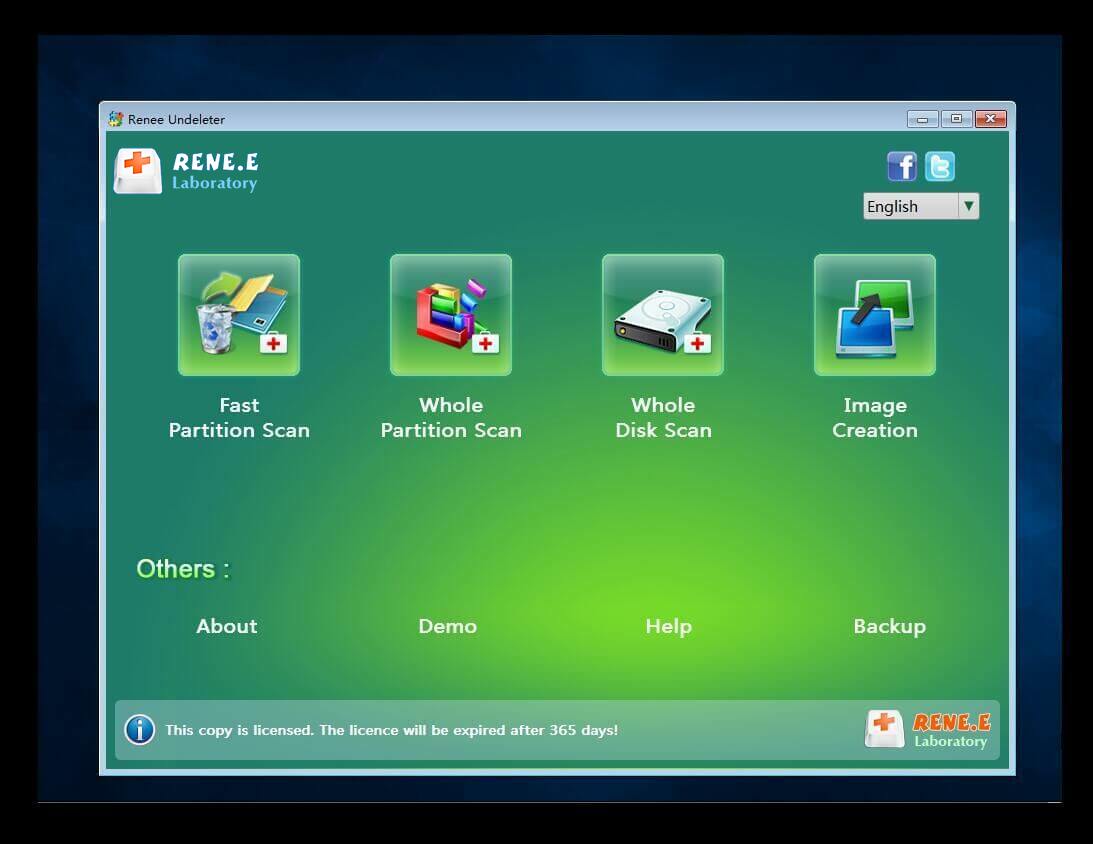
Learn how to solve the problem of 100% CPU usage on Windows 10 with this guide, which analyzes the causes and offers solutions. For the safety of the data, we can use Renee PassNow to transfer or recover the data.


100% CPU Usage on Windows 10

I. What are the reasons for the high CPU usage?

If your computer prompts you that the CPU is being used at 100%, it means that your CPU is working at its maximum capacity, which will directly cause the computer to run severely slow down. So what exactly will cause the CPU usage to reach 100%? The reasons roughly include the following aspects:
●Too many background processes
●The system is unstable
●Virus or Malware
●Windows notification settings
After understanding the reasons that may cause 100% CPU usage, let’s learn some conventional solutions.

II. How to solve the problem of 100% CPU usage on Windows 10?

1. End some processes in the task manager

When there are many processes running in the task manager, it will occupy a high CPU usage rate, thereby affecting the running speed of the computer. Let’s learn how to end the process. The specific steps are as follows:
Press (Ctrl+Shift+Esc) keys at the same time to open the task manager window, click the (CPU) column under the (process) window, you can view the CPU percentage occupied by all applications, and select the process that occupies more CPU And click (End Task) to close programs that do not need or take up more CPU.
end the corresponding process, 100% percent

2. Reset the power plan

Power has a great impact on computer performance. If your computer is in power saving mode, especially when you change the power plan settings, it may cause your CPU usage to become high. Here are the detailed steps to reset the power plan:
Step 1: Run the Windows 10 system, enter (control panel) in the search box in the lower left corner and open the application.
search windows Control Panel
Step 2: Next, select and enter (Hardware and Sound) on the Control Panel page, and then select (Power Options).
Hardware and Sound
Step 3: Next, click on Enter (Change plan settings).
Change power plan settings
Step 4: Click (Restore default settings for this plan) and press the (Save changes) button to complete the command to reset the power plan.

3. Turn off notifications

If all applications in your Windows 10 are set to receive notifications, it will take up more computer resources and may cause the CPU to reach 100%. Some users report that turning off unnecessary notifications has improved the problem of high CPU usage. The specific operation steps are as follows:
Step 1: Run the Windows 10 computer, find (Settings) in the start window in the lower left corner and open it.
settings in Windows
Step 2: Next, select the (System) – (Notification and Operation) option in turn, and then close each notification option on the right.
Windows close notification and actions
The above are three common methods that can solve 100% CPU usage in Windows 10, I hope it will be helpful to you. In addition, because the CPU reaches 100% for a long time, it will affect the performance of the computer. If your computer crashes or cannot enter the system normally, you can also refer to the extended reading below to learn how to transfer and restore important data when the system crashes. method.

III. When the system crashes, use Renee PassNow to transfer or recover important data

1. What is Renee PassNow?

Renee PassNow is a professional system rescue software, which can help Windows users clear Windows account passwords, create new administrator accounts; restore disk/memory card data, recover data after hard disk formatting; transfer disk files; erase or scan Disk files, etc. In addition, this software also supports repairing Windows system problems, such as: repairing MBR boot records, DBR error parameters, 0xc00000e, Windows system startup failure, and some problems that cause black screen or blue screen, etc. As a system rescue tool with various functions, it is perfectly compatible with multiple systems including Windows 10/8.1/8/7/XP/Vista, and can meet the system rescue needs of different users.
Hot Topic - ADsRenee PassNow – 3 Steps to transfer data from the crashed system

Easy to use 3 steps to transfer the files.

Transfer the files Transfer the important files of the computer without system.

Preview the files Preview the files while transferring the data.

Multifuctional Data recovery, Windows password reset, bootable problem recovery can be run without system.

Highly compatible Windows 10/8.1/8/7/XP/Vista. Also supports UEFI boot mode.

Easy to use 3 steps to transfer the files.

Transfer the files Transfer the important files of the computer without system.

Preview the files Preview the files while transferring the data.

Free TrialFree TrialNow 2000 people have downloaded!
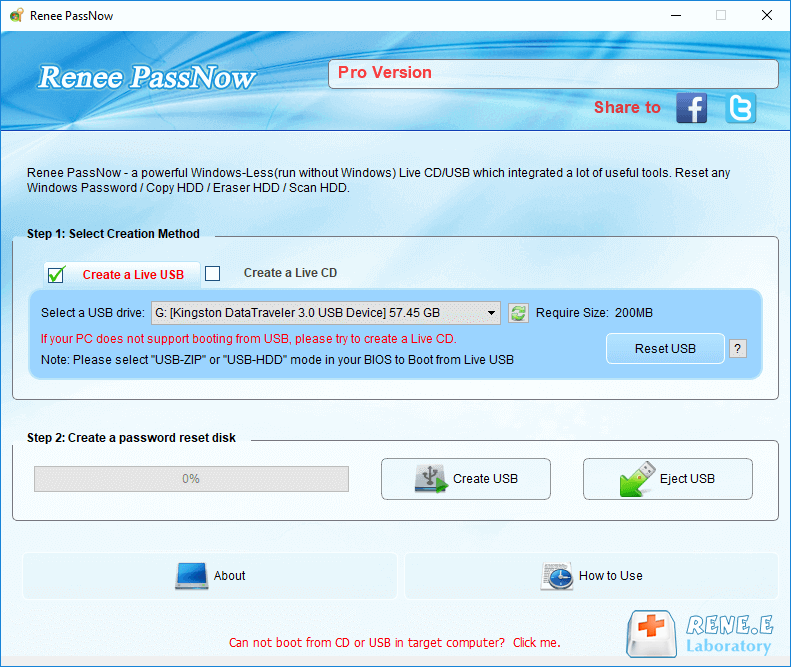
2. How to use Renee PassNow to transfer or recover data?

When the computer cannot be started and used normally, you can create a startup disk through Renee PassNow, and start the computer through the startup disk without entering the Windows system, and then use the data transfer or recovery function provided by the software to perform corresponding operations. Specific steps are as follows:
Step 1: Download and install Renee PassNow on other computers that can log in and run normally, then connect the U disk to the PC, run Renee PassNow, and then check in “Step 1: Choose the creation method” (Create a rescue USB disk) option. (Note: Before performing this operation, please make sure that the important files in the U disk have been saved in other locations, because the operation process will delete all the data in the U disk.)
create a boot media with renee passnow
Step 2: Next, select (x64) or (x86) according to the system type, click the (Download Now) button to download the ISO file, click the (Create Rescue USB) button after the file is downloaded, and click the (Eject USB) button.
use renee passnow to create usb to reset passnword
Step 3: Connect the created boot device to the computer that needs to transfer data, turn on the computer, and then the shortcut key to enter the BIOS will be displayed on the computer screen (the display time of this interface is very short, maybe only one or two seconds), click continuously BIOS shortcut key to enter the BIOS setting interface, and then set the boot U disk as the first in the boot sequence in Boot Priority, then save the settings and restart the computer.
select boot order
Step 4: Wait for a while, after Renee PassNow is loaded, select (Data Transfer). If you need to transfer the data of the entire hard disk, you can also choose the (data backup) function.
data transfer
Step 5: You can click on each disk drive letter (C/D/E/F, etc.) to check whether important files are lost. If not, it is recommended that you transfer them to an external disk. The operation of transferring data is very simple. For example, if you want to transfer the data in the C drive to the G drive, you can first select the C drive on the upper left, select the G drive on the upper right, and then select the files in the C drive, and click the Copy function button in the middle. Disk data can be easily transferred. If there is a file you want to delete, you can also click the (Delete) button in the middle after selecting the file, but the deletion operation cannot be undone, please operate with caution.
transfer data interface
Step 6: If you find that there is data loss, please select the (Undeleter) option on the main interface of the function, and click the (Run) button.
data recovery function in Renee Passnow
Step 7: Select (Whole Disk Scan) to scan the target hard disk.
scan the whole partition with renee passnow recovery function to reinstall windows 7
Step 8: After the scan is complete, select the file to be recovered, click the (Recover) button to execute the data recovery command, please save the file in another external disk, eject the U disk after the recovery is complete, and then repair the computer.
preview before recovery