author avatar
    Specialist of Customer Service Dept.
Last update by Olivia Brown at 12 July 2026

Summary
This guide explains how to create sd card image backup files that capture every sector of an SD card, covering free GUI tools, command-line methods, and integrated recovery software for Windows, Linux, and macOS. It also describes how such images serve as safe workspaces for data recovery without further risk to the original card.


SD cards can fail with little warning. Maybe you plug your card into a laptop and nothing mounts, or you’re prompted to format it before use. Your camera might display “card error” and refuse to take another photo. A Raspberry Pi could stop booting, leaving you with a blank screen. In all these cases, your data is locked inside a card that no longer acts like a normal drive.
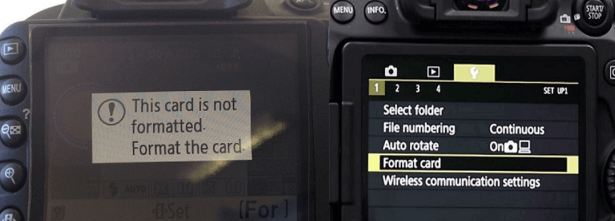
camera say need format sd card
A byte‑to‑byte (sector‑level) image backup captures every bit of the SD card as it exists—partition tables, boot sectors, file allocation tables, directory entries, and even the empty space. This creates a single .img or .dd file: a snapshot of the entire card. It’s fundamentally different from copying files in File Explorer. File copies can’t restore a bootable system or recover data if the file system itself is damaged. Copying to another SD card (cloning) is useful, but saving an image file to your hard drive is even more flexible: you can mount, inspect, and scan it with recovery tools, or duplicate it as often as needed—without ever touching the original card again.
Once you have an image, you can scan for lost files, attempt repairs, or extract data—all without further risk to the physical card.
Here’s a quick compatibility table showing how a byte‑by‑byte image backup works in popular SD card scenarios:
Use CaseSupported File SystemsDoes a Byte‑to‑Byte Image Preserve Bootability & Data?Special Considerations

🍓 Raspberry Pi systems

FAT32 boot, Linux ext4

Yes – image is bootable when restored to a card of equal or larger size.

After restoring to a larger card, expand the Linux partition if needed.

🕹️MiSTer FPGA projects

exFAT or custom Linux layout

Yes – imaging copies the exact MiSTer directory structure and boot files.

Works out of the box; no extra configuration needed.

Nintendo Switch SD expansion 🍄

FAT32/exFAT (Nintendo-specific)

Yes – all game data, screenshots, and updates are captured.

Restored image works on the same console; Nintendo’s format is proprietary but raw copy works.

Professional camera files 📸

FAT32/exFAT

Yes – image preserves DCIM folder and manufacturer‑specific metadata.

Some cameras may reject cards cloned from a different model; a byte‑by‑byte image avoids file‑system quirks.

🚁 Drone footage

FAT32/exFAT (large video files)

Yes – full integrity of high‑bitrate video clips.

Image file will be large (equal to card capacity); ensure you have enough storage.

🤖 Android storage expansion (portable)

FAT32/exFAT

Yes – all photos, videos, and documents are captured.

Portable storage works as expected. Adoptable storage (encrypted, device‑specific) is imaged but may not be readable elsewhere without the encryption key.

Pre-checks before imaging an SD card: card type, health, capacity, and platform support

A few quick checks before imaging will help avoid surprises later. Use this checklist to prepare:

Card specification and actual capacity
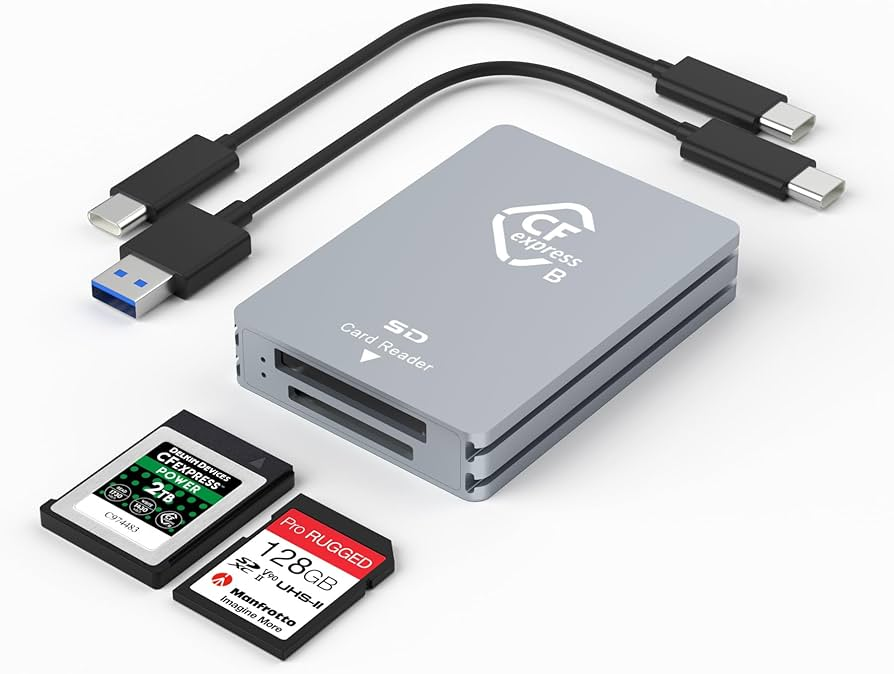
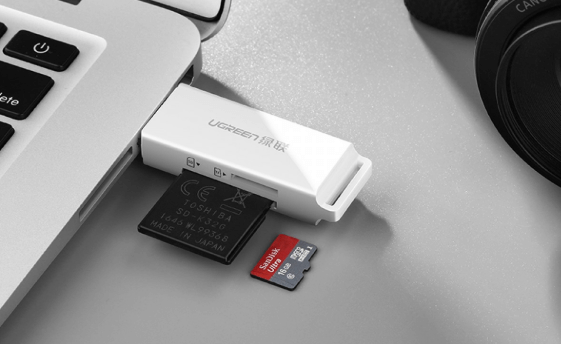
Identify whether your card is SDHC (up to 32 GB), SDXC (64 GB–2 TB), or SDUC (larger). Make sure your card reader and operating system support the card’s size. Older or inexpensive USB readers may not work reliably with SDXC cards.
CFexpress Card reader

Destination drive free space

The image file will be the full size of the card’s capacity (e.g., a 128 GB card creates a 128 GB file), regardless of how much data is used. Confirm your target drive has enough space, plus a little extra.

Operating system file system support

Windows natively reads FAT/exFAT/NTFS. Linux and macOS handle most formats, including ext4. This affects whether you can browse the image after creation—not whether the image itself is valid.

Card health check

Before imaging, make sure the card mounts without read errors. On Windows, use H2testw to check for fake capacity or bad sectors. On Linux, badblocks offers a quick surface scan.
H2testw
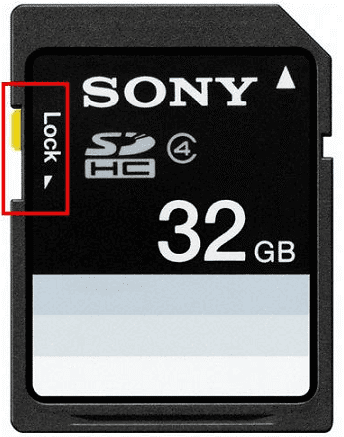
Always lock the physical write‑protect switch on the SD card adapter before connecting it to your computer.
SD card lock switch
Locking the switch prevents any accidental writes, ensuring no software or automatic repair tool can modify the card before a safe image is made.
One last rule: never run chkdsk, fsck, or any formatting or repair tool on a card you hope to recover from until the image is safely stored elsewhere.

On Windows

Free GUI tools like Win32 Disk Imager and balenaEtcher offer a clear, visual interface. You select the source device, specify the output file, and start the process. These tools are user-friendly and minimize the risk of selecting the wrong drive. However, they only create the image; you’ll need separate recovery software to scan it. For a more integrated approach, Renee Undeleter combines imaging and recovery in one tool, so you can both create and scan images without switching programs.

Method 1 : Win32 Disk Imager

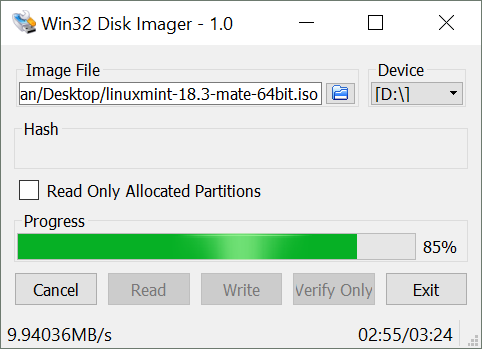
Win32 Disk Imager is a lightweight, no‑frills application that’s long been a favorite for writing and reading raw images. Its simplicity makes it a great first choice for safe backups.
win32 disk imager
Advantages:
  • Clear device list reduces risk of picking the wrong drive
  • Reads entire card to a standard .img file
  • Free and open‑source

Disadvantages:

  • No data recovery features
  • Cannot mount the image for inspection
  • Development updates are sporadic

Method 2 : balenaEtcher

balenaEtcher is best known for burning OS images to USB drives, but it also features a Clone Drive option to save an SD card as an image. Its polished interface is beginner-friendly, with deliberate device selection and system drives hidden by default.
Advantages:
  • Intuitive, modern interface
  • Hides system drives to prevent accidental overwrites
  • Built‑in write verification

Disadvantages:

  • Clone‑to‑image feature is somewhat hidden
  • Installer bundles may offer optional add‑ons (read carefully)
  • Cannot directly mount the image later

Balena Etcher - In the source selection menu, choose Clone Drive

Steps:

1. Install and open balenaEtcher.
2. Click Clone Drive (may be in the main screen’s options).
3. Select your SD card as the source.
4. For the target, pick Image file and set the path and filename.
5. Click Clone and let the process finish.
You’ll get a valid image file, compatible with most recovery and inspection tools.

Method 3 : Renee Undeleter

Renee Undeleter is a Windows data recovery tool with a dedicated Image Creation module. It’s especially valuable when your SD card shows early signs of trouble. Instead of scanning the card directly—which can stress failing hardware—you create a complete sector‑level image of the entire disk. All recovery work is then performed on that read‑only copy. The software never mounts the source card as writable during imaging, so your original data remains untouched.
Renee Undeleter - Powerful Data Recovery SoftwareRenee Undeleter data Recovery software

Easy to use Only simple steps to recover data from storage devices.

Multiple scan modes Fast partition scan, whole partition scan and whole disk scan for different recovery needs.

File types Support to recover pictures, videos, audios, documents, mails, etc.

Supported storage devices Recover data from recycle bin, SD card, external disk, etc.

Supported systems Windows 11,10, 8.1, 8, 7, Vista, XP, 2000 and Mac OS X10.6, 10.7, 10.8+.

Easy to use Only simple steps to recover data from storage devices.

Multiple scan modes - 3 scan modes for different recovery needs.

Supported storage devices Recover data from recycle bin, SD card, external disk, etc.

Free TrialFree TrialFree Trial

3000 users have downloaded Renee Undeleter and found data back!

Unlike standalone imagers such as Win32 Disk Imager, Renee Undeleter can later load the .img file you created and scan it with its recovery modules—Whole Partition Scan or Whole Disk Scan. This means you never have to access the physical card again. If you already have an image from another tool (or a raw .dd file), you can open it directly in Renee Undeleter, bringing everything into one streamlined recovery session.

How the Image Creation module works (overview)
The imaging process is straightforward and follows the safety-first approach:
Step 1: Download, install, and launch Renee Undeleter.

Do not install the software on the SD card you intend to recover, to avoid overwriting any data.

Step 2: Connect the SD card to your PC using a card reader. If the adapter has a write‑protect switch, make sure it’s locked.
SD card lock switch
SD card connect to pc
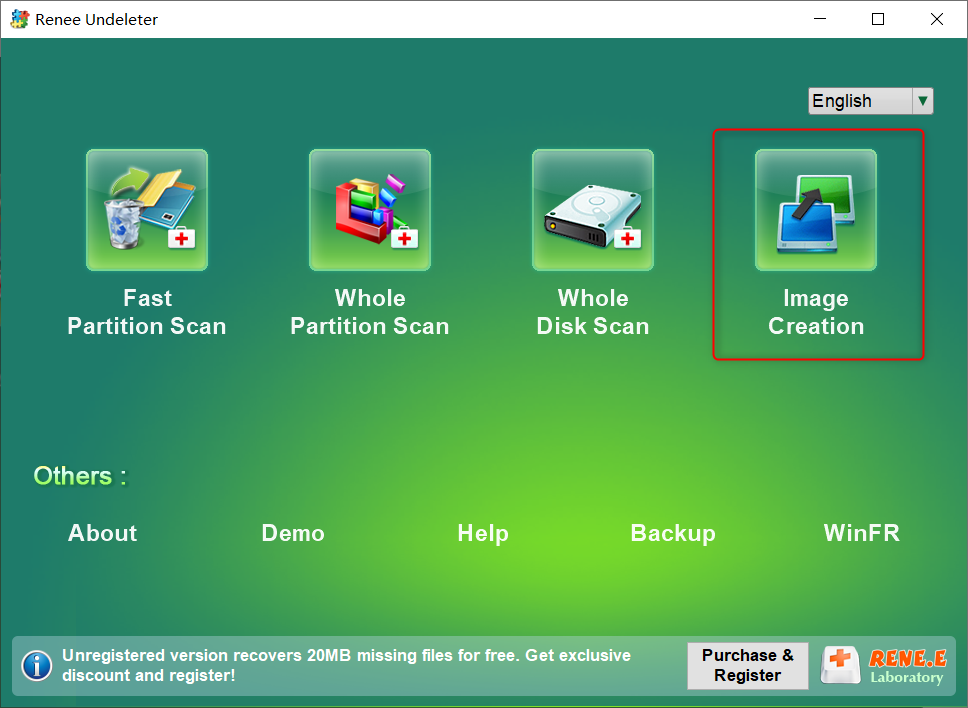
Step 3: In the main interface, select Image Creation.
Create image in Renee Undeleter
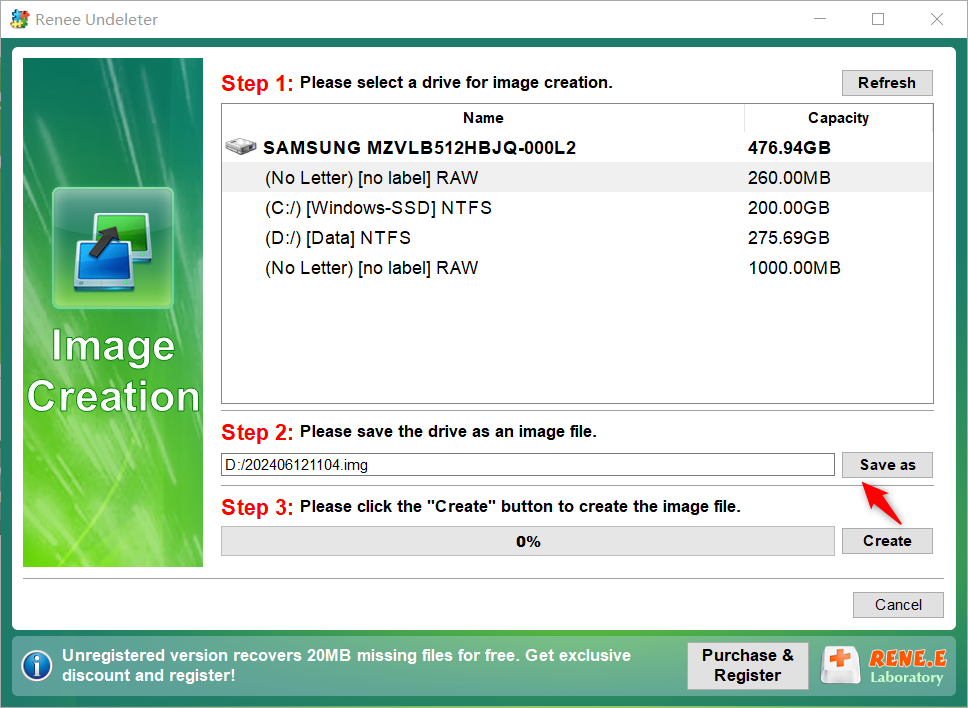
From the drive list, pick the entire SD card disk (for example, “Disk 2”)—not just a partition. Choose a destination folder on a drive with enough free space, then click Create.
Select disk drive in Image Creation
The software creates an uncompressed, byte‑to‑byte image file. The time required depends on your card’s size and reader speed.

Next step: scan the image for lost data
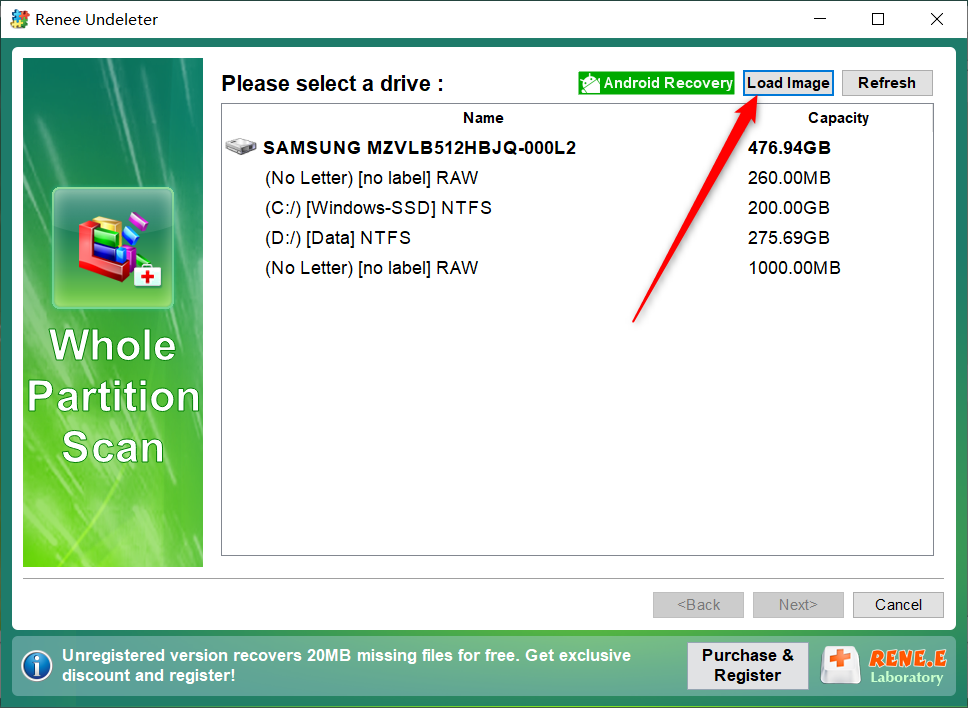
Once your image is ready, switch to Whole Partition Scan and use the Load Image function to select the backup file. The tool scans the image’s partition structure just as if the original card were connected—keeping the physical card disconnected and safe.
load image of Whole Partition Scan
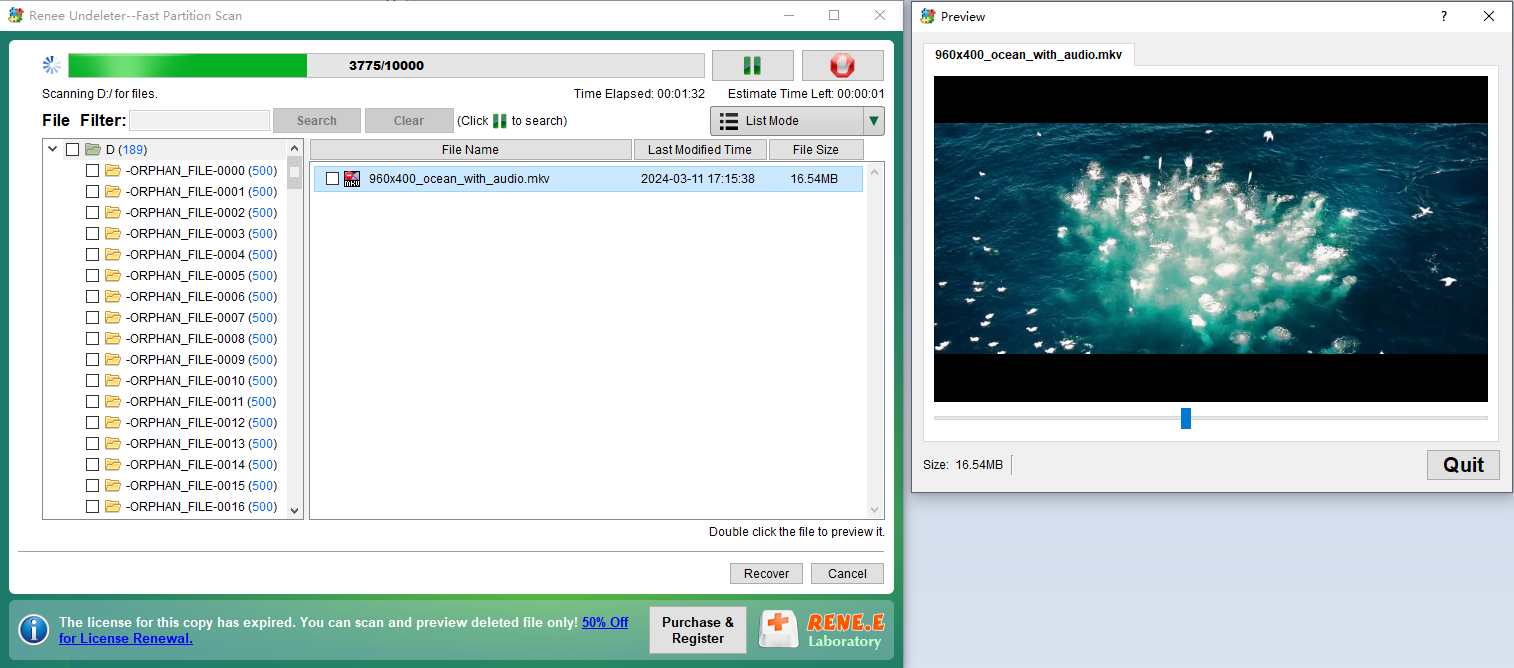
From here, recovery works just like a live scan: preview files, select what you need, and save them to another drive. This image‑first approach is the safest way to begin data recovery.
Renee Undeleter - Powerful Data Recovery SoftwareRenee Undeleter data Recovery software

Easy to use Only simple steps to recover data from storage devices.

Multiple scan modes Fast partition scan, whole partition scan and whole disk scan for different recovery needs.

File types Support to recover pictures, videos, audios, documents, mails, etc.

Supported storage devices Recover data from recycle bin, SD card, external disk, etc.

Supported systems Windows 11,10, 8.1, 8, 7, Vista, XP, 2000 and Mac OS X10.6, 10.7, 10.8+.

Easy to use Only simple steps to recover data from storage devices.

Multiple scan modes - 3 scan modes for different recovery needs.

Supported storage devices Recover data from recycle bin, SD card, external disk, etc.
Free TrialFree TrialFree Trial

3000 users have downloaded Renee Undeleter and found data back!

preview deleted mkv video file

Mounting IMG/DD files on Windows for further use

After creating the image, you may want to browse or recover files without restoring to a physical card. Windows doesn’t natively mount raw .img or .dd files, but these free tools help:
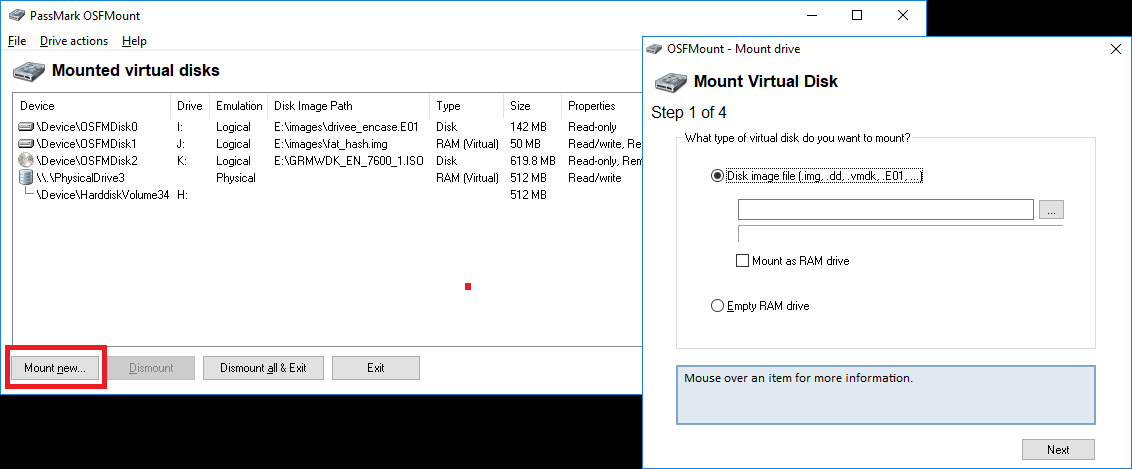
OSFMount – Assigns a drive letter to a raw image. Once mounted, you can use file recovery tools (like Recuva, PhotoRec, or even simple file copy) on the virtual drive.
osfmount_mount_new
7-Zip – 7‑Zip can open some disk image formats—such as ISO, VHD, and certain simple IMG files—but it does not fully support complex raw disk images that contain partition tables or non‑Windows file systems.
Renee Undeleter’s Load Image – As shown earlier, you can open a raw image for deep scanning without needing to mount it separately.

On Linux

The built-in dd command is a universal solution. It works on any card and is scriptable, but it requires caution—mistyping the device path can overwrite your system drive. Always confirm the device name with lsblk before running the command.

Usingddto capture the entire SD card

The dd command is the native Swiss Army knife for imaging. It’s included with every Linux distribution and requires no extra installation.
dd command
Advantages:
  • Available on every Linux system without installation
  • Works on any storage regardless of filesystem
  • Can be scripted and combined with compression

Disadvantages:

  • No confirmation prompt – one wrong device can destroy data
  • Speed depends on block size choice
  • No built‑in progress indicator (some builds support status=progress)

macOS

On macOS, Use diskutil and dd for fast, scriptable imaging. Unmounting the disk before imaging is crucial to avoid corruption. balenaEtcher is also available for macOS and offers a “Clone Drive” feature with a friendly interface.
Advantages:
  • Built‑in, no additional installs
  • Raw device path offers faster reads
  • diskutil provides clear disk descriptions

Disadvantages:

  • Must unmount correctly or image may be corrupt
  • No GUI for the backup process
  • Accidentally imaging the wrong disk is destructive

How to verify the image backup works and store it safely

A backup is only as good as its integrity. After imaging, check the following:

Checksum comparison (ideal)

If the card is still healthy and untouched, generate a SHA‑256 hash for both the image file and the raw device. On Linux/macOS:

sha256sum sd_backup.img

sudo sha256sum /dev/sdX

Identical hashes confirm a perfect copy. On Windows, use:

CertUtil -hashfile sd_backup.img SHA256

Size check

The image file should match the card’s advertised capacity exactly (e.g., 128 GB = 128,000,000,000 bytes). A smaller file may indicate an incomplete image.

Test-mount the image

Mount the image on your intended recovery platform:
- Windows: OSFMount or 7‑Zip
- Linux:

sudo mount -o loop sd_backup.img /mnt/recovery

- macOS: double‑click if supported

Keep the original SD card locked and set aside until all verification and recovery steps are complete.

FAQ

What is the difference between an SD card image backup and cloning?

Cloning writes a byte‑for‑byte copy directly to another physical SD card, creating an identical card you can use immediately. An image backup saves the same data as a single file on your hard drive or network. Images are more versatile: you can keep several versions, mount them read‑only, and scan them for recovery without needing extra hardware.

Why is my image file as large as the whole SD card, even if the card is mostly empty?

A sector‑level image reads every sector, including unused space. The image file matches the card’s full capacity, not just the used data. This ensures the exact layout and any fragments of deleted files are preserved for recovery. If you need a smaller file, compress the image or use tools that save only allocated sectors (but those are not true byte‑for‑byte images).

Can I recover individual files directly from the IMG/DD image without restoring it to a physical card?

Absolutely. Use OSFMount (Windows), mount -o loop (Linux), or native mounting on macOS to assign a drive letter or mount point to the image. Any file recovery utility can then scan the image as if it were a real drive. Renee Undeleter can also load the image directly for deep scanning and file preview, so you never need to write the image back to a physical SD card.
Renee Undeleter - Powerful Data Recovery SoftwareRenee Undeleter data Recovery software

Easy to use Only simple steps to recover data from storage devices.

Multiple scan modes Fast partition scan, whole partition scan and whole disk scan for different recovery needs.

File types Support to recover pictures, videos, audios, documents, mails, etc.

Supported storage devices Recover data from recycle bin, SD card, external disk, etc.

Supported systems Windows 11,10, 8.1, 8, 7, Vista, XP, 2000 and Mac OS X10.6, 10.7, 10.8+.

Easy to use Only simple steps to recover data from storage devices.

Multiple scan modes - 3 scan modes for different recovery needs.

Supported storage devices Recover data from recycle bin, SD card, external disk, etc.
Free TrialFree TrialFree Trial

3000 users have downloaded Renee Undeleter and found data back!

User Comments

Page 1

Leave a Comment


Your comment has been submitted and is awaiting moderation.