
Boot Menu Keys for Laptop Brands: Complete Guide

Summary
This resource provides a comprehensive reference table detailing the specific boot menu keys laptop brands require for accessing startup options and BIOS settings. It outlines systematic troubleshooting procedures for common initialization failures, including Fast Boot conflicts, peripheral recognition issues, and firmware configuration adjustments.


Remove Windows Login Password 3 steps for whole password remove process.
Recover the files Recover the deleted files without Windows system.
Transfer the data Transfer the important files of the computer with system.
Multifuctional Data transfer, data recovery, bootable problem recovery can be run without system.
Highly compatible Windows 11/10/8.1/8/7/XP/Vista. UEFI boot.
Remove Login Password Support Windows 11/10/8.1/8/7/XP/Vista. UEFI boot.
Recover the files Recover the deleted files without Windows system.
Transfer the data Transfer the important files of the computer with system.
UEFI: whenever possible.
| Brand | Boot Menu Key | BIOS/UEFI Key | Special Notes |
|---|---|---|---|
Dell |
F12 |
F2 |
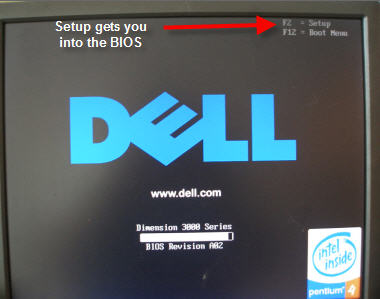
Tap F12 at the Dell logo for the one‑time boot menu. Servers often use F2 for setup. |
HP |
Esc → F9 |
Esc → F10 |
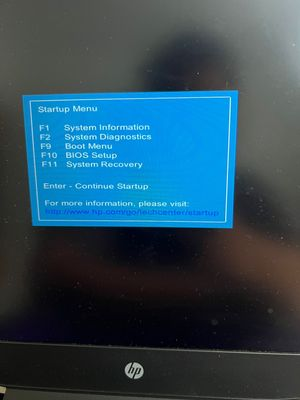
Esc opens the startup menu; F9 selects boot device; F10 enters BIOS. Some models require Fn+F10. |
Lenovo |
F12 / Novo Button |
F1 or F2 |
ThinkPads use F1; IdeaPad/Yoga often use F2. The Novo button (small pinhole) can also access BIOS/boot options. |
ASUS |
Esc (laptops) / F8 (desktops) |
F2 or Del |
Esc is common on newer laptops; desktops often use F8 for boot menu and Del for BIOS. |
Acer |
F12 |
F2 or Del |
F12 may need to be enabled in BIOS first. Desktops frequently use Del. |
MSI |
F11 |
Del |
Gaming laptops and motherboards use F11 for boot menu; Del for BIOS setup. |
Samsung |
F11 or F12 |
F2 |
Galaxy Book laptops usually use F11; some enterprise models use F12. |
Toshiba/Dynabook |
F12 |
F2 or F1 |
Older Toshiba models may use F1; Dynabook continues with F12/F2. |
Microsoft Surface |
Volume Down + Power |
Volume Up + Power |
Hold Volume Down while pressing Power for boot menu; Volume Up + Power for UEFI. |
Apple |
Option (Intel) / Power (Apple Silicon) |
No traditional BIOS |
Intel Macs: hold Option after startup chime. Apple Silicon: press and hold Power for startup options. |
Sony VAIO |
F11 or Esc |
F1/F2/F3/F10 |
Keys vary widely by series; F2 or F3 are most common for BIOS. |
Compaq |
Esc or F9 |
F10 |
Legacy Compaq systems follow HP’s key layout. |
NEC |
F5 |
F2 |
Japanese NEC models often use F5 for boot menu. |
Packard Bell |
F8 |
F1 or Del |
European models: F8 for boot menu, F1/Del for BIOS. |
Intel NUC/Boards |
F10 |
F2 |
F10 opens boot menu; F2 enters BIOS. |
eMachines |
F12 |
Del or Tab |
Discontinued brand, but older PCs still use F12 for boot and Del/Tab for BIOS. |

Fn while tapping the boot key.
Remove Windows Login Password 3 steps for whole password remove process.
Recover the files Recover the deleted files without Windows system.
Transfer the data Transfer the important files of the computer with system.
Multifuctional Data transfer, data recovery, bootable problem recovery can be run without system.
Highly compatible Windows 11/10/8.1/8/7/XP/Vista. UEFI boot.
Remove Login Password Support Windows 11/10/8.1/8/7/XP/Vista. UEFI boot.
Recover the files Recover the deleted files without Windows system.
Transfer the data Transfer the important files of the computer with system.

Why is my laptop ignoring the boot menu key?
Why does my USB drive not appear in the boot menu?
How do I disable Fast Boot so the boot menu key works?
Remove Windows Login Password 3 steps for whole password remove process.
Enable/Create Administrator One click for creating new administrator and enable the disabled account.
Widely Use New version supports UEFI boot model, which can be used on more computers, laptops and even surfaces.
Multifuctional Data transfer, data recovery, bootable problem recovery can be run without system.
Highly compatible Windows 11/10/8.1/8/7/XP/Vista.
Remove Login Password Support Windows 11/10/8.1/8/7/XP/Vista.
Enable/Create Administrator One click for creating new administrator and enable the disabled account.
Easy to use No need of any professional knowledge or password reset disk.
Relate Links :
HP Reset Password Disk: Complete Guide to Unlocking Your HP Laptop Without Losing Data

02-06-2026
John Weaver : This guide outlines the operational mechanics and available alternatives for an hp reset password disk when addressing Windows...
A Seamless Transition: How to Convert Your Laptop's SSD to an HDD

29-11-2023
Jennifer Thatcher : Learn how to seamlessly convert your laptop's SSD to an HDD with ease. Discover compatibility issues, choosing the...
How To Enter BIOS and Change Boot Order?
10-01-2024
Ashley S. Miller : Learn how to enter bios and change boot order for tasks like replacing a hard disk or migrating...
How to Factory Reset A Computer of Various Brands?

22-04-2024
Amanda J. Brook : Discover the definitive guide on how to factory reset a computer while safeguarding your important data for a...



User Comments
Leave a Comment