

Computer Beep Codes and Solutions on Dell, HP and ASUS

Summary
Start up PC but just black screen and computer generate beep sounds? Actually, these beep codes are generated by BIOS and different beep codes represent different problems. Here, we provide detailed information and solution about the beep codes from Dell, HP, ASUS computer and more BIOS manufacturers.
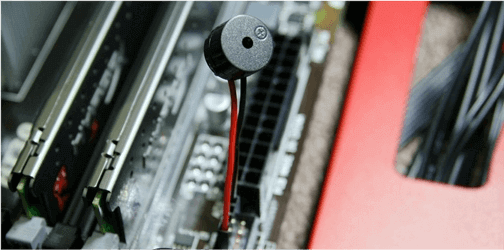
What is the problem? In fact, these beep code is generated by the internal speaker of the computer. On startup, computer will perform a Power-on Self Test which will test all hardware in computer. If some thing wrong, beep code will be generated and tell you what is wrong.
1.Hardware is damaged or has poor connection with motherboard. Also, dust will lead to short circuit.
2. Incorrect settings in BIOS.
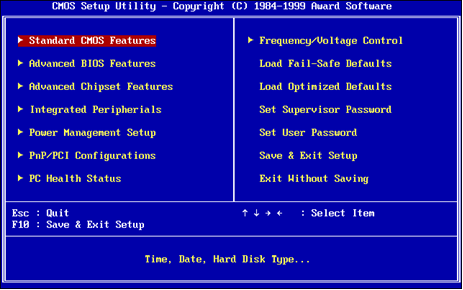
Standing for Basic Input Output System, BIOS is a standard firmware interface. All information of BIOS will be saved in CMOS of motherboard.
Catalog
- Computer POST and Beep Codes of Main Computer Manufacturers
- Dell Beep Codes Diagnostic and Solution
- HP Beep Codes Diagnostic and Solution
- Lenovo – ThinkPad Beep Codes Diagnostic and Solution
- ASUS Beep Codes Diagnostic and Solution
- Beep Codes Diagnostic and Solution of Other BIOS Manufacturers
- Phoenix BIOS Beep Codes Diagnostic and Solution
- Award BIOS Beep Codes Diagnostic and Solution
- AMI (American Megatrends) Beep Codes Diagnostic and Solution
What Should Be Paid Attention to When Encounter Beep Code at the First Time
Long beeps:
Short beeps:
2.Sometimes, beep sound pause for a second and then go on. For example, 1 long beep and 2 short beeps are divided by 1 second pause here.

Automatic 4K alignment Improves SSD performance during system migration.
Support GPT and MBR Automatically adapt to the suitable partition format.
Support NTFS and FAT32 Redeploy various files in different file systems.
Back up quickly Back up files at up to 3,000MB/min.
Overall backup schedule Support system redeployment/system backup/partition backup/disk backup/disk clone.
Automatic 4K alignment Improve SSD performance
Support GPT and MBR Intelligently adapt to a partition format
Support NTFS and FAT32 Redeploy files in different file systems
Computer POST and Beep Codes of Main Computer Manufacturers
Here are some effective way to find out the manufacturer:
1. If your computer is manufactured by some famous computer brands like Dell, HP, Lenovo, ASUS and NEC, BIOS/UEFI inside normally is developed by the brand themselves. So we can find the meaning of beep codes in accordance with the brand.
2. If the BIOS of your computer is not manufactured by famous brands or is assemble by yourself, BIOS inside the computer could be manufactured by AMI (American Megatrends), Phoenix (Phoenix Technologies) and Award. For these computer, we can refer to the manual or Beep Codes Diagnostic and Solution of Other BIOS Manufacturers for the meaning of different beep codes.
Of course, BIOS of virtual machine like Vmware, Virtual PC, VirtualBOX are not included here.
◆ Dell Beep Codes Diagnostic and Solution

Beeps Codes generate by Dell Computers which are manufactured before 2005
Example:
1-1-2 represents 1 beep then 1 beep again finally 2 beeps.
| Beep Codes | Cause and Related Solutions |
| 1-1-2 | Cause: Something wrong with CPU. Solution: Replace the CPU. |
| 1-1-3 | Cause: Fails to read/write to NVRAM. Solution: CMOS which save BIOS information could be damaged. Please remove dust off the motherboard with vacuum cleanser and small brush. If same problem happens, please replace the hardware. |
| 1-1-4 | Cause: CMOS which save BIOS information gets damaged. Solution: Reset BIOS by removing CMOS battery. If it does not work, please replace or refresh CMOS hardware. |
| 1-2-3 | Cause: Fail to read/write to DMA page (Direct Memory Access) of BIOS. Solution: Please remove dust off the motherboard with vacuum cleanser and small brush. Then clean the connectors of RAM with eraser. If it still not work, please replace the RAM. |
| 1-3 | Cause: RAM of video card get damaged. Solution: Replace the video card or the RAM inside the video card. |
| 1-3-1, 1-3-2 through 2-4-4 | Cause: DIMMs not being properly identified or used. Solution: Clean the connector of computer memory card and the slots. Please refer to “BIOS can not Find RAM” for detailed solution. |
| 3-1-1 | Cause: Registry error of IDE slave hard disk. Solution: Change the settings of master/slave disk. Or disconnect the slave IDE disk. |
| 3-1-2 | Cause: Keyboard Controller Failure. Solution: Connect another keyboard or the port. |
| 3-2-4 | Cause: Time-of-day clock get incorrect or keyboard controller failure. Solution: Connect another keyboard or the port. |
| 3-3-3 | Cause: Time-of-day clock get incorrect or keyboard controller failure. Solution: Connect another keyboard or the port. |
| 3-3-4, 3-4-1, 3-4-2 and 3-4-3 | Cause: Video card failure. Solution: Clean the connector of the video card and the slots (Refer to BIOS reports video card failure” for detailed solution). If it still not work, please replace the video card. |
| Beep Codes | Cause and Related Solutions |
| 1 short beep | Cause: Motherboard fails to work, including BIOS damaged and ROM error. Solution: Replace or repair the motherboard. |
| 2 short beeps | Cause: No memory detected. Solution: Clean the connector of the memory and the slots or replace the memory. |
| 3 short beeps | Cause: Chip or Time-Of-Day Clock test failure. Solution: Reset BIOS by removing CMOS battery. If it does not work, please remove dust off motherboard with vacuum cleanser and small brush. If same problem happens, please replace the motherboard. |
| 4 short beeps | Cause: Memory of motherboard failure. Solution: Clean the connector of the memory and the slots or replace the memory. |
| 5 short beeps | Cause: Battery of Time-Of-Day Clock failure. Solution: Reset BIOS by removing CMOS battery. |
| 6 short beeps | Cause: Video card failure or has poor connection. Solution: Clean the connector of the video card and the slots or replace the video card. |
| 7 short beeps | Cause: CPU failure Solution: Replace the CPU. |
◆ HP Beep Codes Diagnostic and Solution
1-1-2 represents 1 beep then 1 beep again finally 2 beeps.
| Beep Codes | Cause and Related Solutions |
| 3 short beeps | Cause: Unable to start flashing (such as when missing a utility or BIOS image). Solution: Disconnect the mouse and keyboard, and then restart the computer. If the beeping noise stops, repair or replace those devices. |
| 4 short beeps | Cause: Flashing failed (checksum error, corrupted image, etc). Solution: Clean the connector of the memory and the slots or reseat the memory. |
| 5 short beeps | Cause: BIOS recovery successful. |
| 2 short beeps, 2 long beeps | Cause: BIOS recovery successful. |
◆ Lenovo – ThinkPad Beep Codes Diagnostic and Solution

Example:
1-1-2 represents 1 beep then 1 beep again finally 2 beeps.
| Beep Codes | Causes and Related Solutions |
| Continuously short beeps or 2 short beeps | Cause: Motherboard fails to work, including BIOS damaged and ROM error. Solution: Replace or repair the motherboard. |
| 1 short beep and no display or keep blinking | Cause: Cloud be the problem of the motherboard. Solution: Reset BIOS by removing CMOS battery. Remove dust off the motherboard with vacuum cleanser and small brush (Click for more). If necessary, please replace or repair the motherboard. |
| 1 short beep and screen shows “Unable to access boot source” | Cause: Hard disk failure and can not find system. Solution: Reinstall Windows/Linux. |
| 1 long beep then 2 short beeps | Cause: Video card failure or has poor connection. Solution: Clean the connector of the video card and the slots or replace the video card. ClickBIOS reports video card failure for detailed solution. |
| 1-3-3-1 : 1 long beep then 3 short beeps and 3 short beeps finally 1 long beep | Cause: Memory of motherboard failure. Solution: Clean the connector of the memory and the slots or replace the memory. Please refer to “PC can not Find RAM” for details. |
| 1-4 | Cause: Security chip of the motherboard get something wrong. Solution: Replace or repair the motherboard. |
| 2 Short beeps | Cause: Depends on the error code on screen. |
SmartBeep has been accepted in the Lenovo PC which are manufactured after 2017. As a result, uses do not need to get detailed information from the beep code. Just go to find and download “Lenovo PC Diagnostics” in APP Store with mobile phone.
◆ ASUS Beep Codes Diagnostic and Solution

| Beep Codes | Cause and Related Solutions |
| 1 long beep then 2 short beeps (Continuously) | Cause: Memory of motherboard failure. Solution: Clean the connector of the memory and the slots or replace the memory. Please refer to “BIOS can not Find RAM” for detailed solution. |
| 1 long beep and 3 short beeps | Cause: Video card failure or has poor connection. Solution: Clean the connector of the video card and the slots (Refer to BIOS reports video card failure for detailed solution). If it still not work, please replace a new video card. |
| 1 long beep and 4 short beeps | Cause: Hard disk failure and can not find system. Solution: Reinstall Windows/Linux. |
How to Identify the Manufacturers of your Computer BIOS?

However, we can not find out the manufacturers of the BIOS since we can not get into the system. But we can find it out with some other methods.
(2) Pay attention to the beep code
If the beep codes it generates have long beep and short beep, the BIOS are from Awards. If it is continuous short beep codes, the BIOS could be from AMI.
◆ Phoenix BIOS Beep Codes Diagnostic and Solution
| Beep Codes | Causes and Solution |
| 1 short and PC starts normally | All is well. |
| 3 short beeps | Cause: Fail to process the POST stage. |
| 1-1-2 | Cause: Motherboard failure. Solution: Reset BIOS by removing CMOS battery. If it does not work, please replace or refresh CMOS hardware. |
| 1-1-3, 1-1-4 and 1-2-1 | Cause: Battery is out of power or CMOS damaged. Solution: Replace the CMOS battery. |
| 1-2-2, 1-2-3, 1-3-1, 1-3-2, 1-3-3, 1-4-1, 1-4-2, 1-4-3, 1-4-4, 2-1-1 and 4-3-1 | Cause: Detected memory fails when saving data. Solution: Clean the connector of the memory and the slots or replace the memory. Please refer to “BIOS can not Find RAM” for detailed solution. |
| 3-2-4 and 4-2-3 | Cause: Keyboard failure. Solution: Connect another keyboard or the port. |
| 3-3-4, 3-4-2 and 3-4-3 | Cause: Video card failure or has poor connection. Solution: Clean the connector of the video card and the slots. If it does not work, please refer to “BIOS reports video card failure” for detailed solution. |
| 4-2-2, 4-3-3, 4-3-4 and 4-4-3 | Cause: Motherboard fails to work, including BIOS damaged and ROM error. Solution: Reset BIOS by removing CMOS battery. If it does not work, please replace or refresh CMOS hardware. |
◆ Award BIOS Beep Codes Diagnostic and Solutions
| Beep Codes | Causes and Solutions |
| 1 long – 2 short beeps | Cause: Motherboard failure. Solution: Please remove dust off the BIOS with vacuum cleanser and small brush. Then reset BIOS by removing CMOS battery. If it does not work, please replace or refresh CMOS hardware. |
| 1 long – 3 shorts | Cause: Video card failure or has poor connection. Solution: Clean the connector of the video card and the slots (Refer to “BIOS reports video card failure” for detailed solution). |
| Beeps continuously | Cause: Memory of motherboard failure. Solution: Clean the connector of the memory and the slots or replace the memory. Please refer to “ BIOS can not Find Computer Memory Card” for detailed solution. |
| Repeated beeps alternating high & low frequency | Cause: CPU failure. Solution: Replace the CPU. |
◆ AMI (American Megatrends) Beep Codes Diagnostic and Solution
| Beep Codes | Causes and Solutions |
| 1 to 3 short beeps Example: 3 short beeps | Cause: Memory of motherboard failure. Solution: Clean the connector of the memory and the slots or replace the memory. Please refer to “BIOS can not Find RAM” for detailed solution. |
| 4 short beeps | Cause: System timer failure. Solution: Reset BIOS by removing CMOS battery. If it does not work, please replace or refresh CMOS hardware. |
| 5 short beeps or 11 short beeps | Cause: CPU failure. Solution: Please remove dust off the motherboard with vacuum cleanser and small brush (Click “How to clean BIOS” for more). If it does not work, please replace the CPU. |
| 6 short beeps | Cause: Gate A20 error. It could be caused by the dust in hardware. As a result, PC could get overheated and short circuit. Solution: Please remove dust off the motherboard with vacuum cleanser and small brush (Click “How to clean BIOS” for more). |
| 7 short beeps | Cause: Circuit of the motherboard or CPU get error. Solution: Please remove dust off the motherboard with vacuum cleanser and small brush (Click “How to clean BIOS)” for more. |
| 8 short beeps | Cause: Video card failure or has poor connection. Solution: Clean the connector of the video card and the slots (Refer to “BIOS reports video card failure” for detailed solution). |
| 9 short beeps | Cause: RMO BIOS checksum failure. Solution: Reset BIOS by removing CMOS battery. If it does not work, please replace or refresh CMOS hardware. |
| 10 short beeps | Cause: CMOS shutdown Read/Write error. Solution: Reset BIOS by removing CMOS battery. If it does not work, please replace or refresh CMOS hardware. |
| 1 long and 2 short beeps | Cause: Video card failure or has poor connection. Solution: Clean the connector of the video card and the slots (Refer to “BIOS reports video card failure” for detailed solution). |
| 1 long and 3 short beeps | Cause: Memory of motherboard failure. Solution: Clean the connector of the memory and the slots or replace the memory. Please refer to “BIOS can not Find RAM” for details. |
Quick Back up files at up to 3,000MB/min.
Overall Support system backup, disk/partition backup, file backup and disk clone.
Intelligent Automatically analyze the data differences between the source files and the backup files and save disk space by backing up incremental/differential data.
Convenient Support VSS, allowing to freely view web pages during the backup of the operating system.
Highly compatible Support various files and storage devices.
Quick Back up at up to 3,000MB/min
Overall System/partition/disk backup
Incremental/differential technology Save disk space
Free TrialFree TrialNow 2000 people have downloaded!Solution to Windows Fails to boot and Beeps
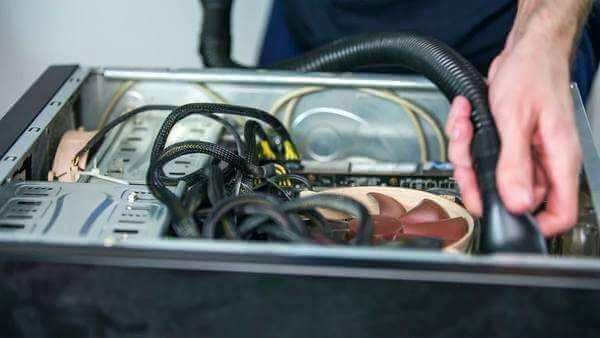
◆ Open Computer Case and Check Hardware Inside

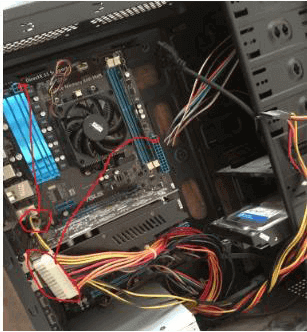
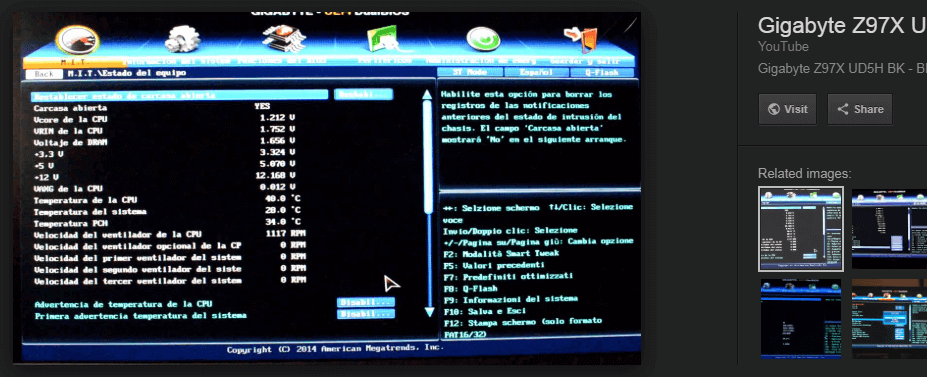
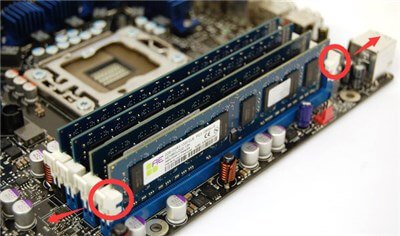
Plenty of hardware problem like short circuit and computer fail to boot can be caused by dusty hardware. Like the image below, the build up dust make computer fails to detect the memory. To help the computer case from being dusty, it is recommended to install the dust filter and remove dust off computer once a year. Here we go.
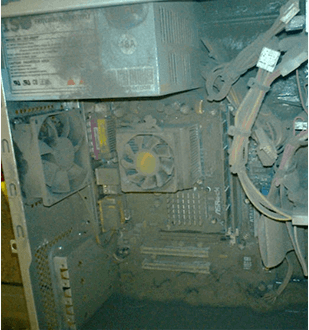
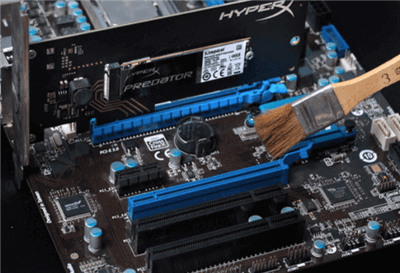
◆ Clean Hardware of Computer
In most case, computer hardware failing to work is caused by the build-up dust instead of damaged. However, dusty case sometimes may lead to short circuit and even damage the hardware at last. As a result, we need to clean the dust off the computer case regularly.

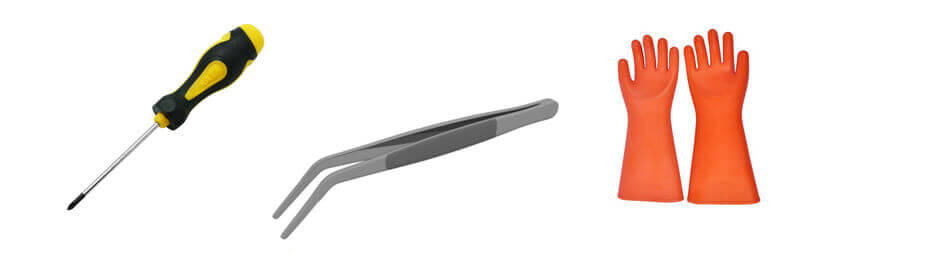
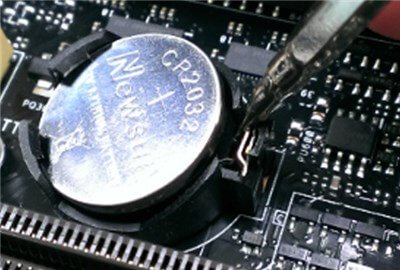
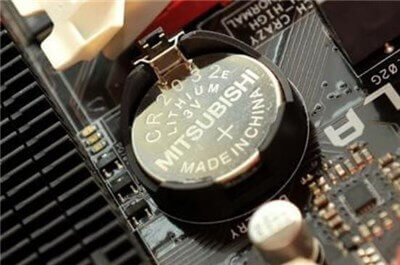
◆ Reset BIOS Settings by Removing the CMOS Battery
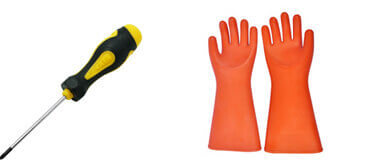
Essential Tools: Phillips screwdriver with magnetic tip cross head, tweezers and insulated gloves.
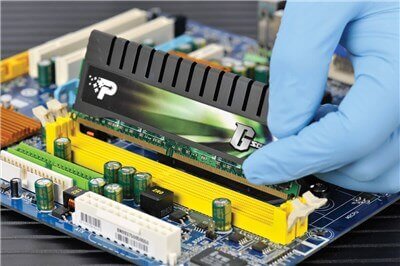
◆ PC can not Find RAM

◆ BIOS Reports Video Card Failure
Advanced Methods to Solve Windows Fails to Boot
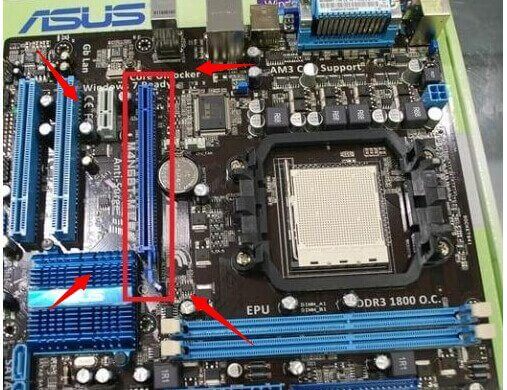
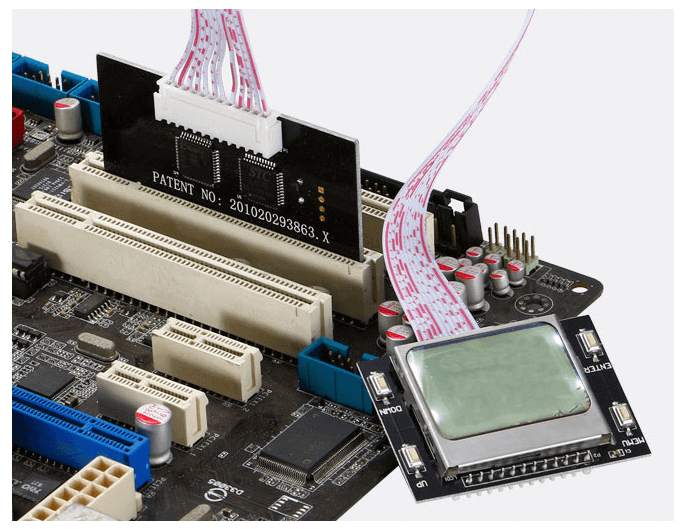
BIOS will test the circuit, memory, keyboard, video card, hard disk, etc when computer starts. Also, it will initialize the settings of some basic ports which has been set. If all processes are fine, system will boot normally. BIOS will send related POST code to PCI (80H or other ports) after going through each step here.
If something goes wrong, the boot process will stop and related post code will be sent to specific BIOS system port. And the POST test card here is to show the POST code.

Normally, we can plug the POST test card into PCI slot. POST test card in the image below are an advanced PCI POST test card. Users can get the POST code from the screen directly.

How to Maintain PC?
Quick Back up files at up to 3,000MB/min.
Overall Support system backup, disk/partition backup, file backup and disk clone.
Intelligent Automatically analyze the data differences between the source files and the backup files and save disk space by backing up incremental/differential data.
Convenient Support VSS, allowing to freely view web pages during the backup of the operating system.
Highly compatible Support various files and storage devices.
Quick Back up at up to 3,000MB/min
Overall System/partition/disk backup
Incremental/differential technology Save disk space
Free TrialFree TrialNow 2000 people have downloaded!
Provides multiple functions like backup, restore, clone, system migration.
Clone all data (including system) in HDD to smaller SSD or larger HDD. Disk could boot PC after clone finished.
Supports to migrate Windows to SSD with a few clicks.
4K alignment will be processed when clone disk, migrate system, restore disk or system.
Backup & restore system/disk/folder. Auto backup plans are available.
Provides functions like backup, restore, clone, system migration.
Clone all data (including system) in HDD to smaller SSD or larger HDD.
Backup & restore system/disk/folder. Auto backup plans are available.
Compatible with: Windows 10 / 8.1 / 8 / 7 / Vista / XP / 2008 / 2012(32bit/64bit) / Server 2008
Relate Links :
Windows 7/10 Password Requirements and Solution to Set Password Policy
05-01-2021
Amanda J. Brook : To protect personal computer’s security and privacy in a better way, we usually enable “Password must meet complexity...
How to Fix the Expired Windows 10 Password?

05-01-2021
John Weaver : Windows password is set an expiration time. Users may forget the frequently changed login password. But what should...

