

Compact Upgrade: How to Clone a Larger HDD to a Smaller SSD

Summary
Learn how to clone your larger HDD onto a smaller SSD without losing data, with the help of data reduction techniques and compatible cloning software. Make the smaller SSD bootable and maintain its health and data integrity post-cloning.
lsblk

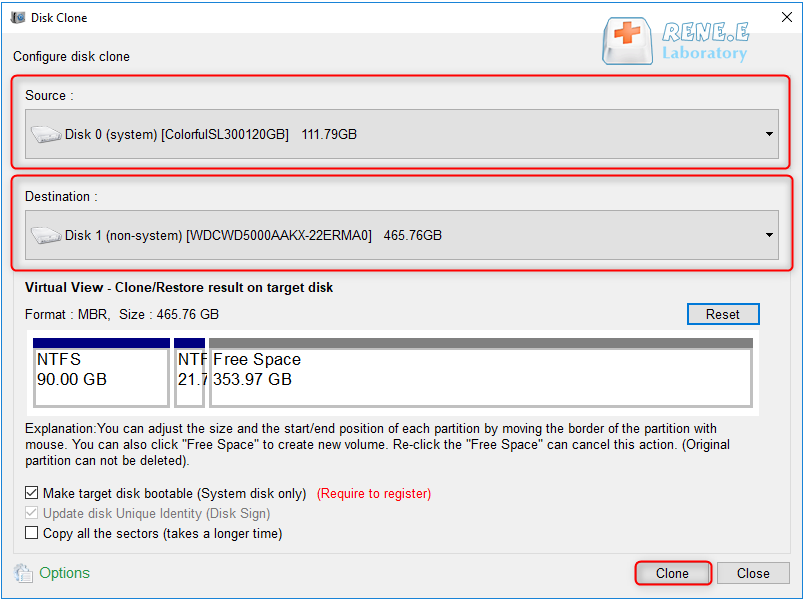
Automatic 4K alignment Improves SSD performance during system migration.
Support GPT and MBR Automatically adapt to the suitable partition format.
Support NTFS and FAT32 Redeploy various files in different file systems.
Back up quickly Back up files at up to 3,000MB/min.
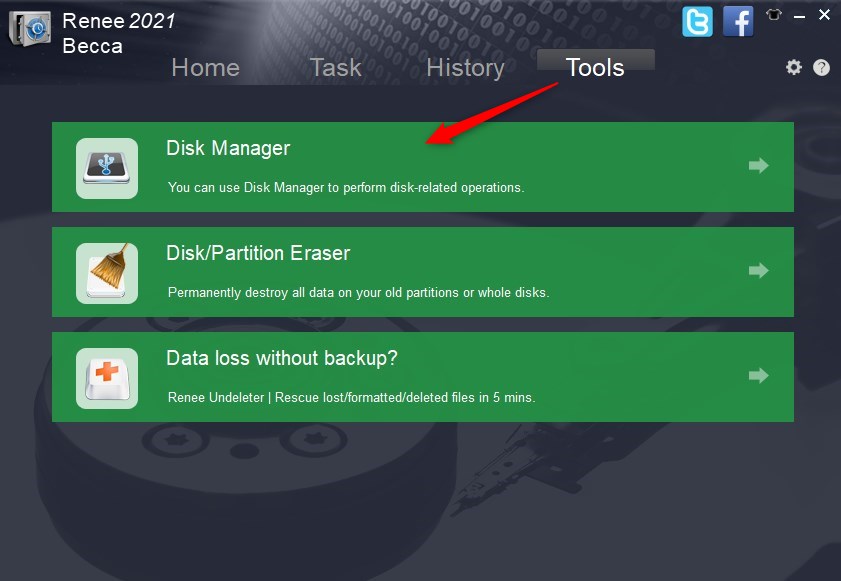
Overall backup schedule Support system redeployment/system backup/partition backup/disk backup/disk clone.
Automatic 4K alignment Improve SSD performance
Support GPT and MBR Intelligently adapt to a partition format
Support NTFS and FAT32 Redeploy files in different file systems

- Allows safe migration of operating system without fresh installation.
- Simple steps for a smooth and hassle-free transfer.
- Improves performance and faster boot times with new SSD.
Cons:
- Paid subscription required for full access to all features
- Ensures a successful and accurate cloning process
- Prevents data loss or errors
Cons:
- Requires additional time and effort
- May encounter issues during the cloning process
| BIOS Name | Method | The Key or Keys |
|---|---|---|
| Acer | Press Del or F2 immediately after powering on | Del/ F2 |
| Compaq | Press F10 while the cursor in the top right corner of the screen is blinking | F10 |
| Dell | Press F2 when the Dell logo appears/ or press every few seconds until the message Entering Setup appears | F2 |
| eMachines | Press Tab or Del while the eMachine logo displays on the screen | Tab/ Del |
| Fujitsu | Press F2 once the Fujitsu logo appears | F2 |
| Gateway | Press the F1 key repeatedly after restarting the computer | F1 |
| HP | Press the F1/ F10/ or F11 key after restarting the computer | F1/ F10/ F11 |
| IBM | Press F1 immediately after powering on the computer | F1 |
| Lenovo | Press F1 or F2 after powering on the computer | F1/ F2 |
| Nec | Press F2 to enter the BIOS Setup | F2 |
| Packard Bell | Press F1/ F2/ or Del to enter BIOS | F1/ F2/ Del |
| Samsung | Press F2 to start the BIOS setup utility | F2 |
| Sharp | Press F2 after the computer starts | F2 |
| Sony | Press F1/ F2/ or F3 after turning on the computer | F1/ F2/ F3 |
| Toshiba | Press F1 or Esc after powering on to access BIOS | F1/ Esc |
| ARLT | Press Del or F11 when the respective message is shown | Del/ F11 |
bootrec /fixmbrbootrec /fixbootbootrec /rebuildbcd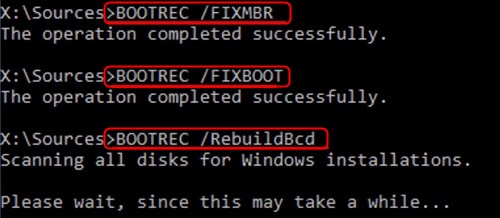
Relate Links :
How to Clone Large HDD to a Smaller SSD in Windows 10?

20-06-2019
Amanda J. Brook : Some users said that it was very time-consuming to install an new operating system after replacing HDD with...
Free Clone Large HDD to Smaller SSD in Windows
15-07-2019
Amanda J. Brook : Want to optimized the computer disk by replacing HDD with SSD? However, system reinstall makes you hesitate? Now...
Upgrade Your System: How to Clone OS from HDD to SSD for Windows

23-11-2023
Jennifer Thatcher : Upgrade to a faster system by easily cloning your OS from HDD to SSD on Windows 11/10 with...
Effortless OS Migration: Migrate Only Windows 10 OS to a Fresh SSD

23-11-2023
Ashley S. Miller : Looking to upgrade to a faster and more reliable system? Learn how to easily migrate only your OS...

