

How to Clone Large HDD to a Smaller SSD in Windows 10?

Summary
Some users said that it was very time-consuming to install an new operating system after replacing HDD with SSD. So, most users choose to directly clone HDD to the newly installed SSD. But some users don’t know how to make it. This article will provide methods about how to clone HDD to SSD (with smaller capacity) in Windows 10 quickly. Detailed instructions on installing an SSD will be provided as well.
- Types of SSDs and How to Choose a Suitable SSD
- 1. SATA SSD
- 2. M.2 SSD
- 3. How to Choose a Suitable SSD
- SSD Installation Guide
- 1. Preparations and Precautions of Installing SSDs
- 2. SSD Installation Guide for Desktop
- 3. SSD Installation Guide for Laptop
Types of SSDs and How to Choose a Suitable SSD

Automatic 4K alignment Improves SSD performance during system migration.
Support GPT and MBR Automatically adapt to the suitable partition format.
Support NTFS and FAT32 Redeploy various files in different file systems.
Back up quickly Back up files at up to 3,000MB/min.
Overall backup schedule Support system redeployment/system backup/partition backup/disk backup/disk clone.
Automatic 4K alignment Improve SSD performance
Support GPT and MBR Intelligently adapt to a partition format
Support NTFS and FAT32 Redeploy files in different file systems
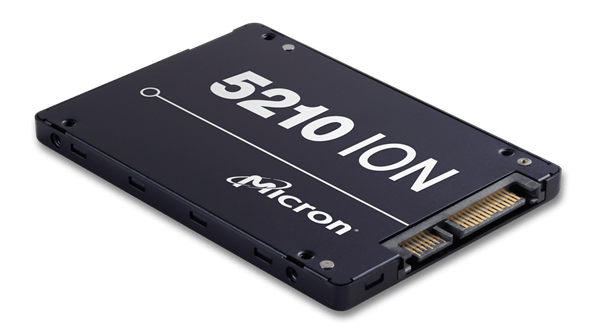
1. SATA SSD
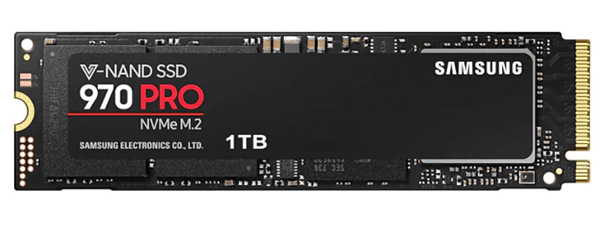
2. M.2 SSD
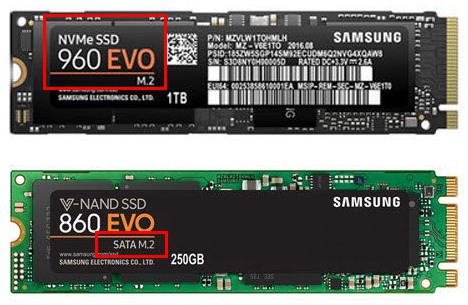
From the following chart, you will see that different interfaces working with different protocols will provide different data transfer speed. When M.2 SSD uses NVMe protocol, the data transimission speed is the best.
| Types of SSDs | Connector | Protocol | Data Transfer Speed |
|---|---|---|---|
| SATA SSD | SATA | AHCI | 550MB/s |
| M.2 SSD | SATA | AHCI | 550MB/s |
| M.2 SSD | PCI-e | NVMe | 3200MB/s |
If M.2 SSD uses NVMe protocol, it is usually labeled as “NVMe”. If marked with other information such as SATA M.2, the M.2 SSD usually adapts AHCI protocol.
3. How to Choose a Suitable SSD
From the perspective of installation and specific use of an SSD, it’s necessary to choose an SSD depending on the motherboard you are using and confirm what type of interface and connector that the motherboard supports. Generally, if there are only SATA ports on the motherboard, it’s suggested to use SATA SSD directly.
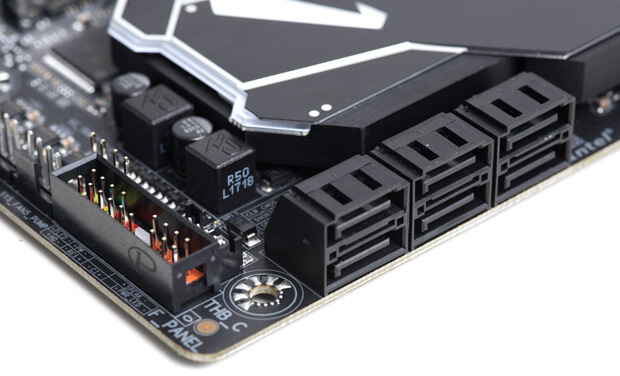
Whether M.2 SSD can be installed and used properly also depends on the compatibility of the socket, protocol and physical dimensions of an M.2 SSD. Most new motherboards basically support one or more M.2 ports, which offer different options for optimizing the PC.
Compatibility of Socket and Protocol of M.2
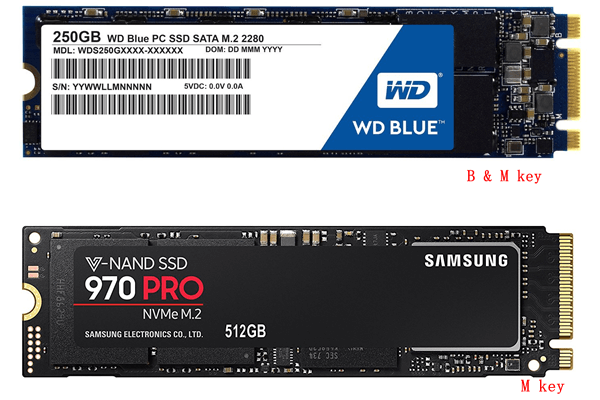
Socket 3 for M key supports four PCI Express lanes which is used for high-end M.2 SSD.
M.2 module with B & M key is very common now. On the basis of B key, B & M key produces better compatibility. M.2 module with B & M key can fit in sockets for B key or M key, but it can only use SATA or two PCI Express lanes.

Please note that M.2 module that only uses SATA lanes can’t fit in the M.2 slots that only supports PCI-e lane on the motherboard. So it’s suggested to confirm whether your motherboard has M.2 slots and supports both SATA and PCI-e lanes before you buy a new M.2 SSD.
M.2 SSD Physical Dimension
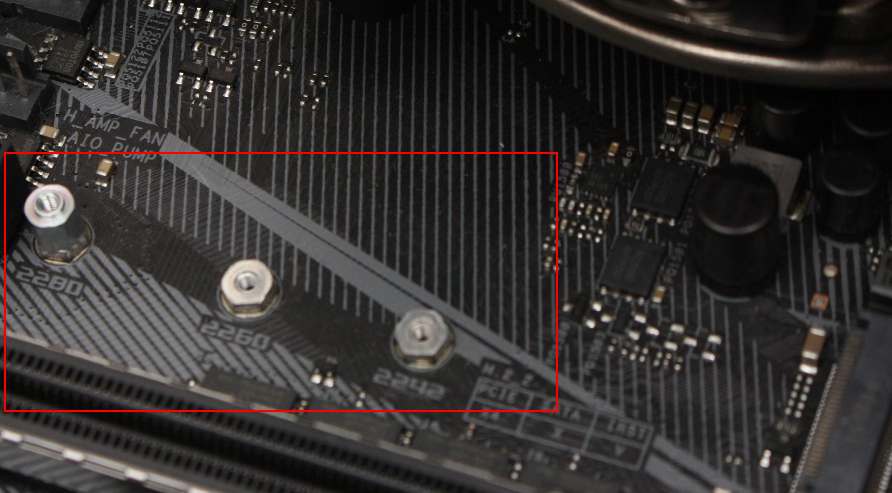
M.2 SSD comes in different dimensions, such as 2230, 2242, 2260, 2280 and 22110. Take M.2 2242 as an example, 22 refers to 22mm wide while 42 represents 42mm long. Most desktop PCs and laptops basically support the 2242/2260/2280 M.2 SSD.
M.2 2242 and 2280 are very common now and the smaller size M.2 2242 can be inserted into the standard slot for M.2 2280. If you don’t know how to choose the appropriate SSD, you could select it according to the M.2 slot on the motherboard where you could confirm which lengths are supported. If the motherboard is not labeled with supported width and length of an SSD, it’s suggested to confirm the dimensions by measuring the distance via the screw.

SSD Installation Guide
1. Preparations and Precautions of Installing SSDs
| Preparations | Desktop PC | Laptop |
|---|---|---|
| 2.5 inch to 3.5 inch hard drive adapter | For SATA SSD only | Not required |
| SATA 3.0 cable | For SATA SSD only | Not required |
| Cross screwdriver | Required | Required |
| Screws | Required | Required |
| Anti-static gloves | Required | Required |
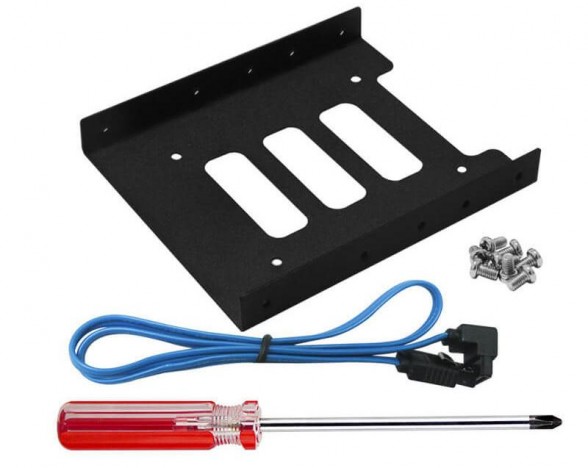
- When you install a SATA SSD on the desktop PC, 2.5 ” to 3.5″ hard drive adapter is required. If the bays for placing a hard drive is 2.5 “, then you don’t need to prepare an adapter. However, some desktop does not provide standard bays for hard drives. It would be better if you could prepare an adapter in advance.
- Generally, when you buy an SSD, it doesn’t come with a SATA 3.0 cable. So you need to buy it separately. Please confirm if the SATA 3.0 cable is labeled with “SATA 3” or “6Gbps” when you buy it.
- Cross screwdriver and screws are necessary. When you install SSDs on desktop PC and laptop, cross screwdriver and screws are used for fixing SSDs.
- Installing an SSD could produce static. For safety, please wear the anti-static gloves before installing an SSD.
2. SSD Installation Guide for Desktop
Option 1: Solution to Install a SATA SSD in Desktop
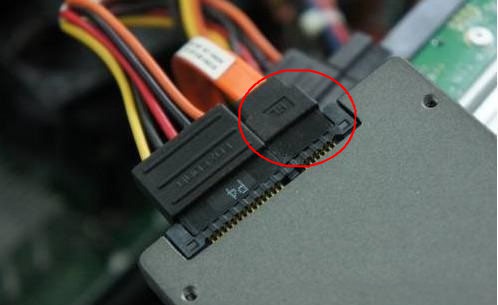
Step 2: Find out the SATA power cable and then connect it to the SSD.
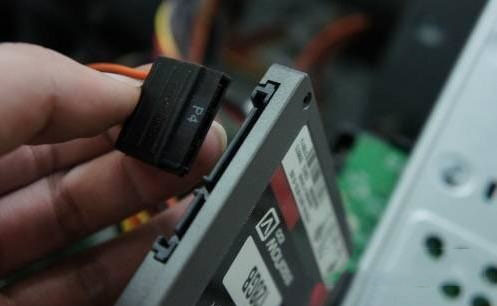
Step 3: Connect the SATA cable to the SSD and the other end to a spare SATA ports.
Step 4: Put the 2.5″ SSD into the 3.5″ adapter and then slide it into the drive bay. Finally, secure the drive with screws.
If the drive bay is 2.5″, the 2.5 ” to 3.5″ hard drive adapter is not required.
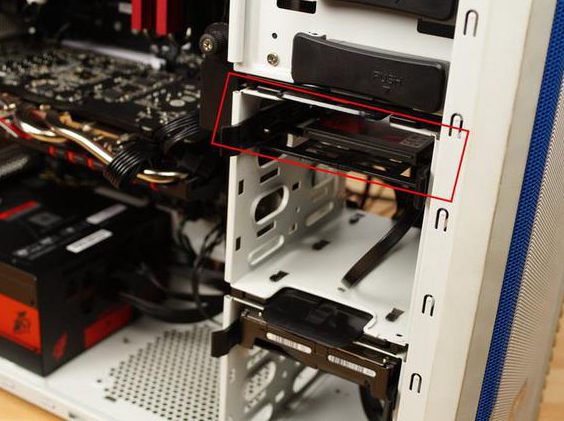
Step 5: Put the sides of your computer’s case back together.
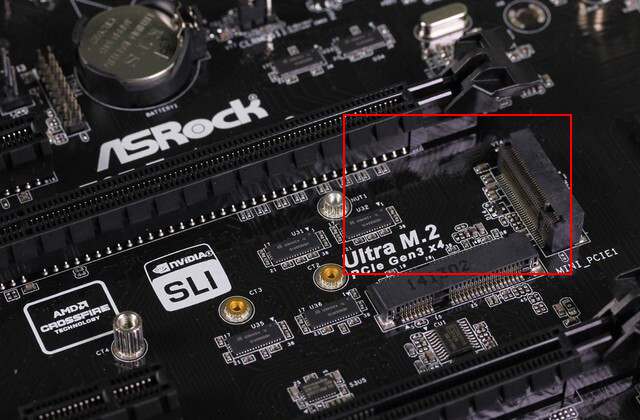
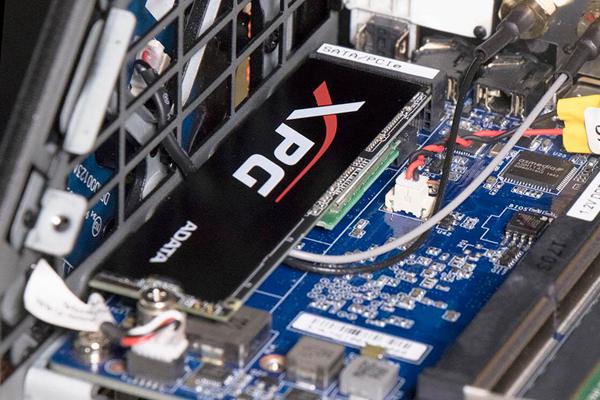
Option 2: Solution to Install an M.2 SSD in Desktop
If there is mounting screw on the M.2 slot, just unscrew it at first.
Step 2: Tilt the M.2 SSD about 25 degrees and then carefully insert and push it into the M.2 slot.
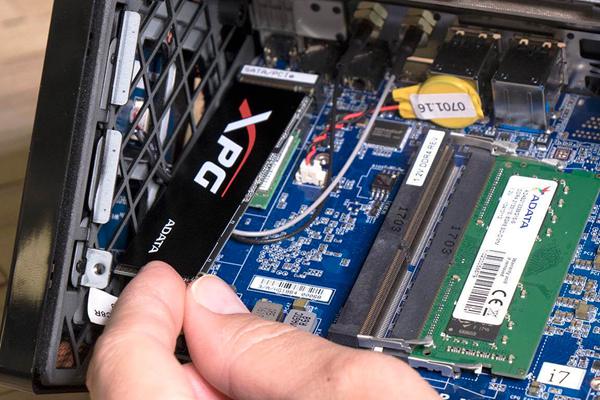
Step 3: Secure the M.2 SSD using the mounting screw. Finally, put the sides of your computer’s case back together.
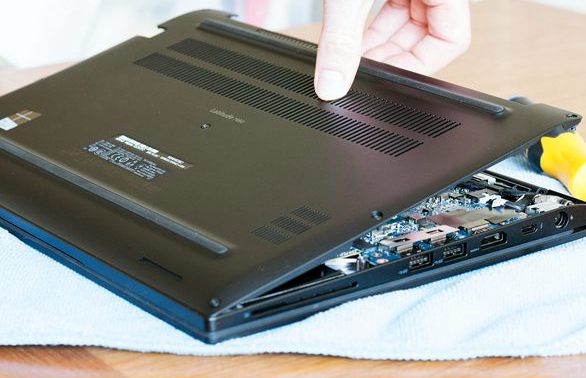
3. SSD Installation Guide for Laptop
Option 1: Solution to Install a SATA SSD in the Laptop
The ways to remove the access panel usually vary from laptop model to laptop model. It’s suggested to read the instruction manual of your laptop.
Step 2: Unscrew the hard disk drive using cross screwdriver. Then pull it out.
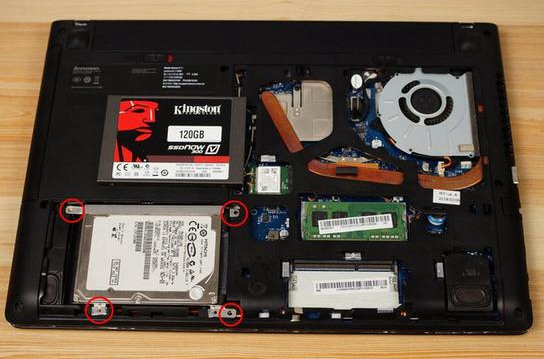
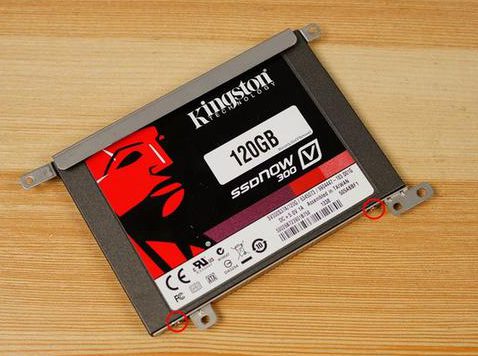
Step 3: Remove bracket or adapter attached to the HDD. Then connect one of them to the SSD.
Step 4: Place the SSD in the drive bay and secure it using mounting screws.
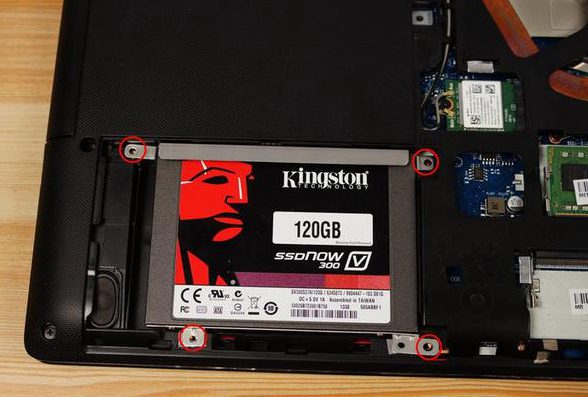
Step 5: Put the access panel door cover back.
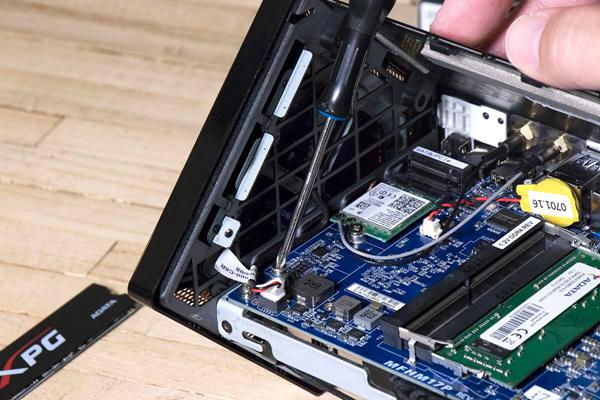
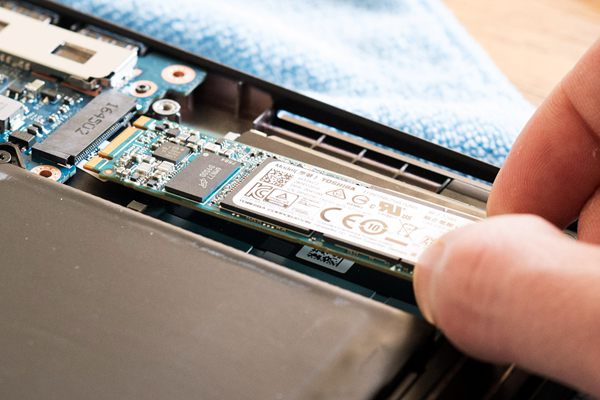
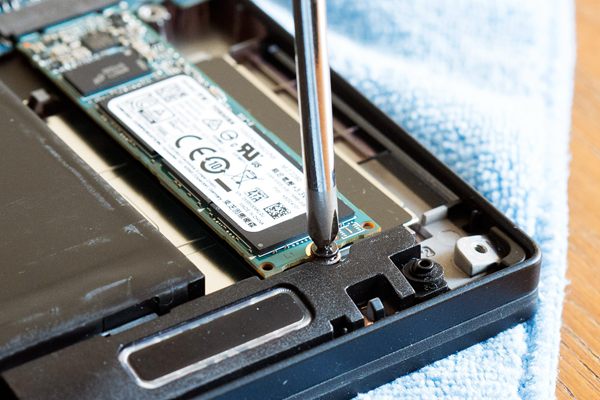
Option 2: Solution to Install an M.2 SSD in the Laptop
The ways to remove the access panel usually vary from laptop model to laptop model. It’s suggested to read the instruction manual of your laptop.
Step 2: Lift the M.2 SSD about 25 degrees and then carefully insert and push it into the M.2 slot.
Step 3: Secure the M.2 SSD using the mounting screw. Finally, put the bottom access panel door cover back.
How to Clone HDD to SSD without Reinstalling System
But there are different disk cloning software on the Internet. Which one is better? Here are 3 popular and free disk cloning software for your reference.
1. Brief Introduction of Disk Cloning Software
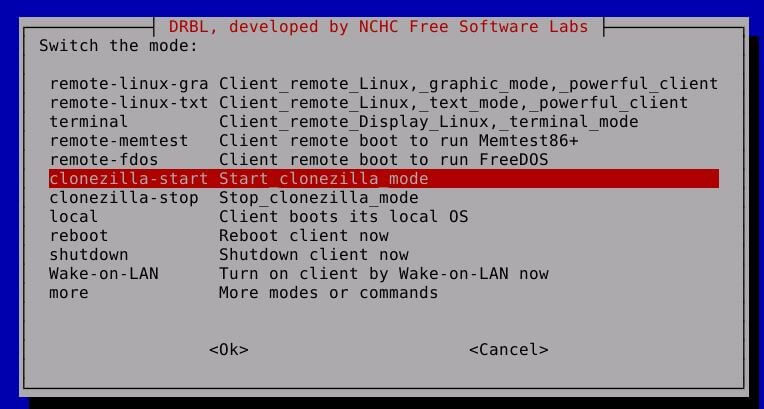
Clonezilla is a freeware for partition and disk cloning. It doesn’t provide many functions, but it brings a good result. It requires virtual interface like Ghost to perform. And you need to use USB drive or CD to create a bootable virtual system. The whole process is so complicated and the operation interface could be hard for beginners to understand.
Features
- A free program allows users to backup and restore the entire hard disk or a single sector and to run it using USB drive or CD.
- It requires that the destination partition must be equal or larger than the source one. But differential/incremental backup is not implemented yet.
Suitable for: Users know related professional knowledge
Recommend Degree: ★★☆☆☆
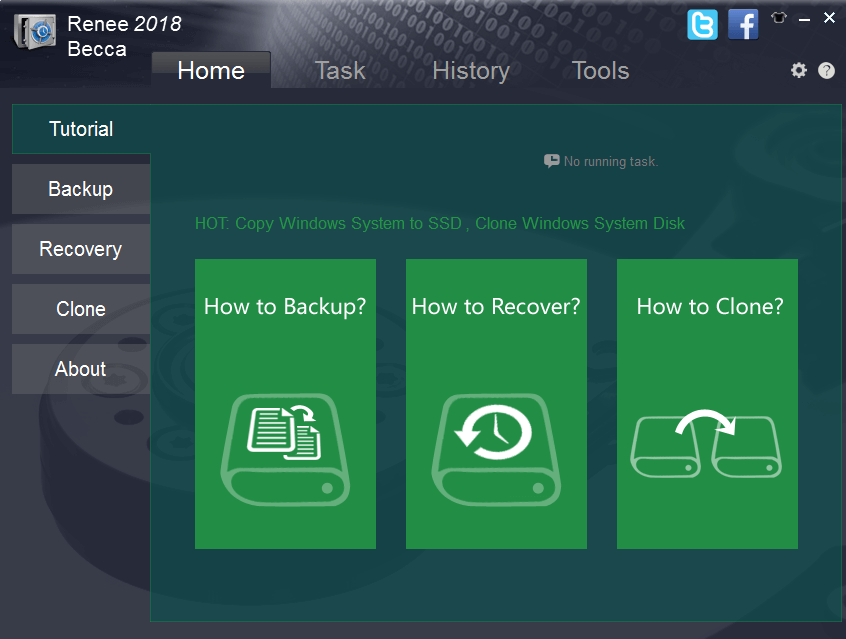
Renee Becca is a professional and reliable free disk cloning software that provides backup, restore and cloning. It supports system / hard disk / partitions / files backup & recovery and also supports cloning and system migration for hard disk / partitions. The program allows users to schedule a backup plan and perform a differential or incremental backup. In addition, the operation interface is simple and easy to use, which is suitable for most users.
Quick Backup files at up to 3,000MB/min.
Fullfill different backup needs Supports system backup, disk / partition backup, file backup and disk clone.
Intelligent Automatically analyze the differences between source and backup data.
Convenient Support VSS, allowing to freely view webpages when backing up system.
Highly compatible Supports various files and storage devices.
Quick Backup files at up to 3,000MB/min.
Fullfill different backup needs Backup for disk, partition and system. Save disk space by backing up incremental /differential data.
Highly compatible Supports various files and storage devices.
Features
- Renee Becca provides automatic 4K alignment that improves SSD’s performance.
- Besides, from the perspective of protecting personal data security, the built-in disk/partition eraser can help you remove data if necessary.
Suitable for: Beginners or the people who know related professional knowledge
Recommend Level: ★★★★★
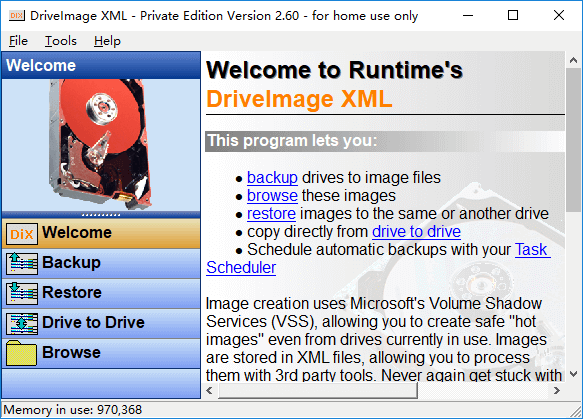
Drive Image XML is a reliable program for imaging and backing up partitions and logical drives. The private version is free, but the commercial version requires a fee. The free private version can only be used on home computers and is not supported commercial use. Besides, the Drive Image XML interface is simple and easy to understand, which is suitable for beginners.
Features
- The program supports browsing and extracting files. It allows users to backup and restore drives and also to schedule a backup plan.
- It’s especially helpful for partition backup, but doesn’t support system migration.
Suitable for: Beginners or the people who know related professional knowledge
Recommend Level: ★★★☆☆
2. Conclusion of Disk Cloning Software
| Tool | Clonezilla | Drive Image XML | Renee Becca |
|---|---|---|---|
| System backup and restore | √ | √ | √ |
| Files backup and restore | √ | ||
| System migration | √ | ||
| Disk/Partition clone | √ | √ | |
| Backup schedule | √ | √ | |
| Disk Erase | √ |
Besides, some users reported that they bought a smaller SSD but didn’t know how to clone HDD to it. In this case, Renee Becca also can help you solve this problem! For more details, please follow a few steps as below to clone large HDD to a smaller SSD using Renee Becca.

3. Precautions and Solutions of Cloning Large HDD to a Smaller SSD
Precautions of Cloning Large HDD to a Smaller SSD
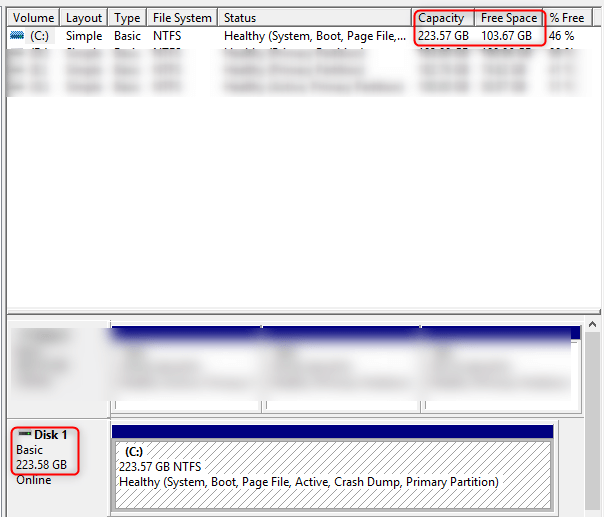
a. Press “Win” + “R” to open Run box and then type in: compmgmt.msc. Press Enter.
b. In the “Computer Management” window, click “Disk Management” in the left pane. Then you will see the details of disks and partitions.
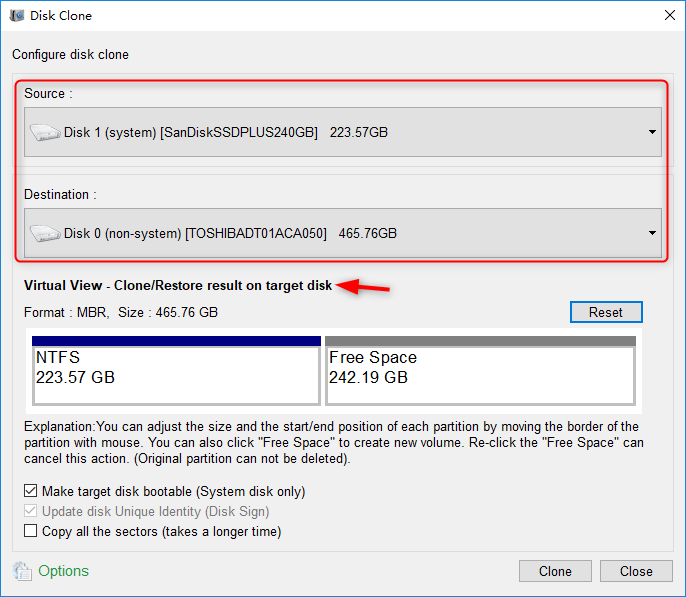
For example, the HDD has a total capacity of 223.58 GB and has free storage of 103.67 GB. So the HDD is totally used 119.91 GB. In this case, only when you have an SSD that has more than 120 GB storage capacity can you perform the disk cloning.
Solution 1: Clone the Entire HDD to the SSD
Quick Backup files at up to 3,000MB/min.
Fullfill different backup needs Supports system backup, disk / partition backup, file backup and disk clone.
Intelligent Automatically analyze the differences between source and backup data.
Convenient Support VSS, allowing to freely view webpages when backing up system.
Highly compatible Supports various files and storage devices.
Quick Backup files at up to 3,000MB/min.
Fullfill different backup needs Backup for disk, partition and system. Save disk space by backing up incremental /differential data.
Highly compatible Supports various files and storage devices.
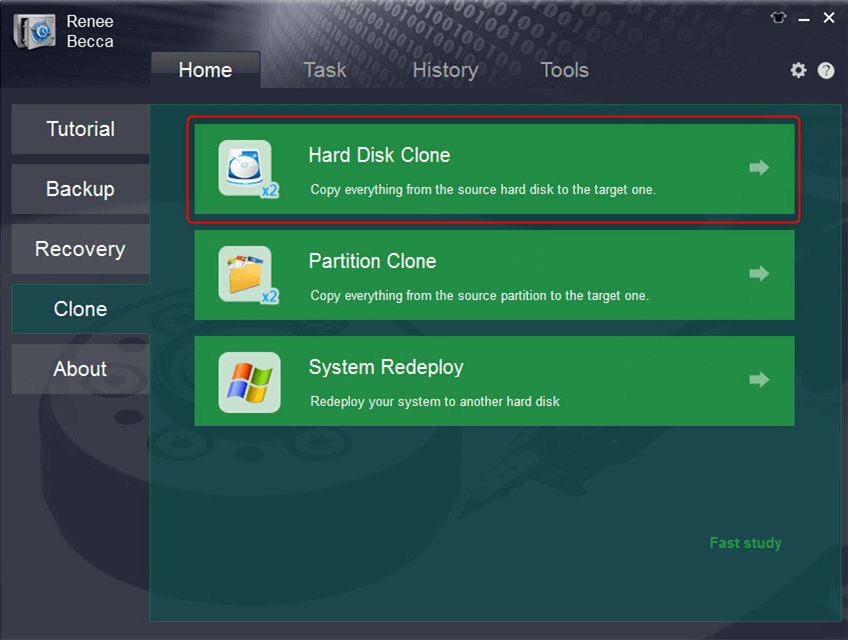
Step 2: Select your source HDD and target SSD. You will see the clone result on target disk via Virtual View. Then click “Clone”.
Step 3: After cloning process completes, select the SSD as the first boot option via BIOS settings next time when the PC boots.
After computer boots from SSD successfully, format the original system disk to make use of the disk space. Or you can remove the HDD after the PC shuts down. Start the PC from SSD and reconnect the HDD to PC for system disk formatting.
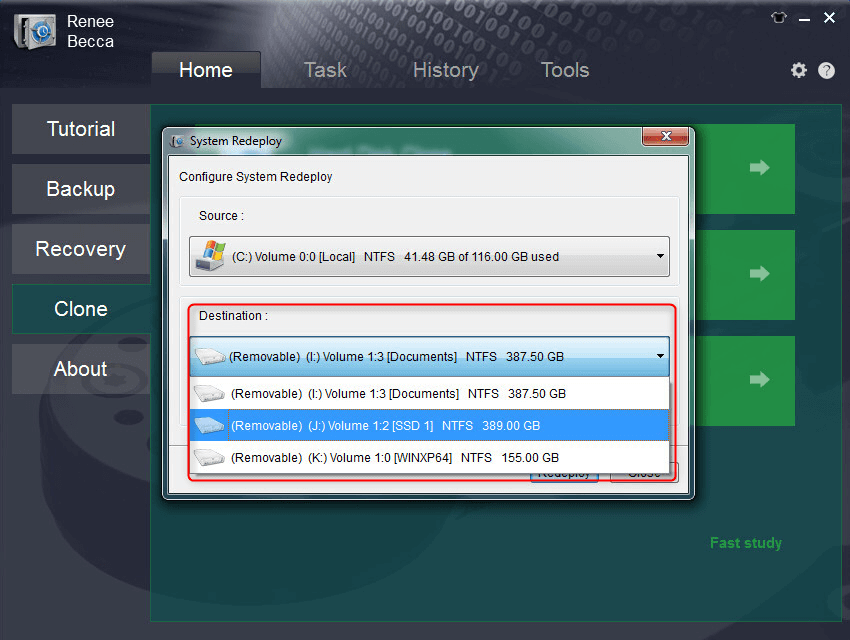
Solution 2: Migrate the System from HDD to the SSD
Step 2: Select the source HDD and target SSD.
Step 3: After cloning process completes, select the SSD as the first boot option via BIOS settings next time when the PC boots.
After computer boots from SSD successfully, format the original system disk to make use of the disk space. Or you can remove the HDD after the PC shuts down. Start the PC from SSD and reconnect the HDD to PC for system disk formatting.
Make Sure the SSD Works Properly
1. Change Boot Order via BIOS Settings
Step 1: Power on the PC. When the startup screen appears, constantly press the hot key to trigger the BIOS settings. Generally, the hot key is F2, F8, F12 or Del.
Please use the correct hot key to enter BIOS according to the brand of your PC.
Step 2: After you go into BIOS, use the arrow key to choose the “Boot” tap and select the SSD as the first boot option.
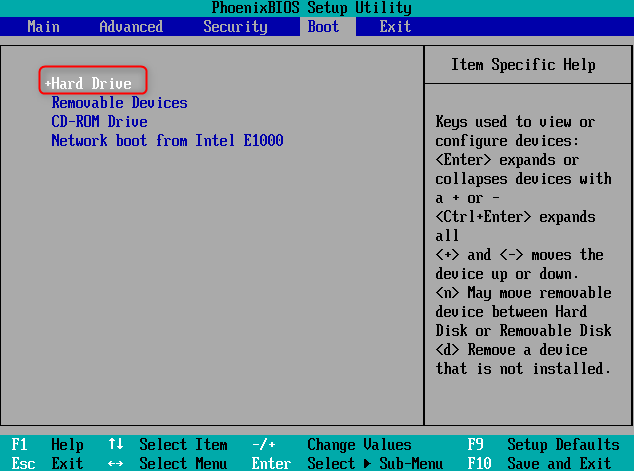
Step 3: Press F10 to save the settings. Then restart your PC.
2. Update or Change Boot Mode via BIOS Settings
Step 1: Power on the PC. When the startup screen appears, constantly press the hot key to trigger the BIOS settings. Generally, the hot key is F2, F8, F12 or Del.
Please use the correct hot key to enter BIOS according to the brand of your PC.
Step 2: Use arrow key to choose the “Boot” tap and select “UEFI/ BIOS Boot Mode”. Press Enter. Then select “Legacy” or “UEFI” according to your preset partition style.
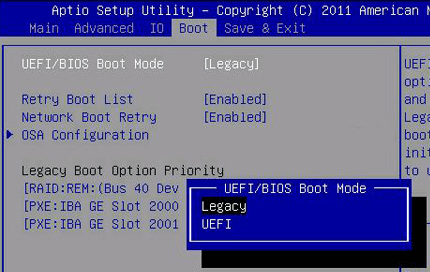
Step 3: Press F10 to save the settings. Then restart your PC.
3. Enable AHCI
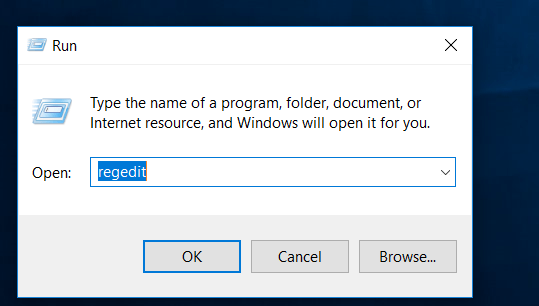
Step 1: Press “Win” + “R” key to open “Run” box. Then type in: regedit. Press Enter.
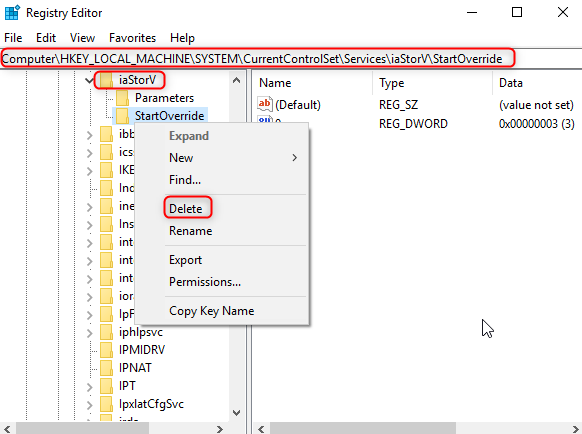
Step 2: When “Registry Editor” pops up, navigate to:
HKEY_LOCAL_MACHINE\SYSTEM\CurrentControlSet\Services\iaStorV
Step 3: Expand the “iaStorV”, then right click the “StartOverride” and click “Delete”.
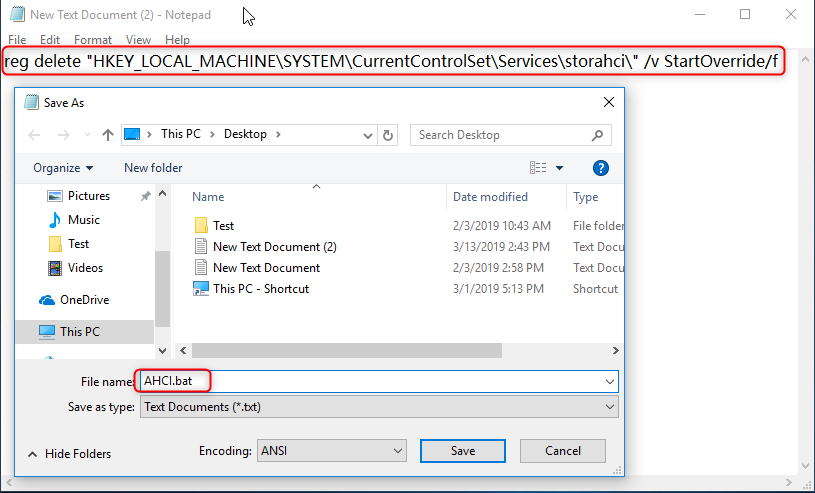
Step 4: Create a Text Document. Copy and paste the following command to the document and save as AHCI.bat.
reg delete “HKEY_LOCAL_MACHINE\SYSTEM\CurrentControlSet\Services\storahci\” /v StartOverride /f
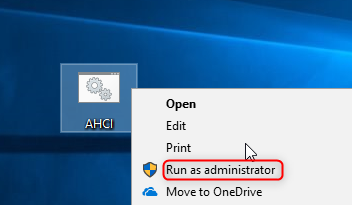
Step 5: Right click the AHCI.bat file and select “Run as Administrator”.
Step 6: In the command prompt, type in: Yes. Press Enter.

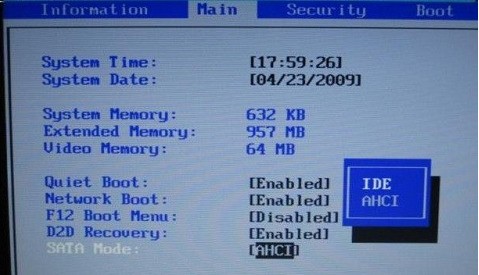
Step 7: Restart the PC and enter BIOS settings. Press right arrow key to select “Main” tap and press down arrow key to select “SATA Mode”. Press Enter. Then select “AHCI” and press “Enter”.
4. Enable TRIM
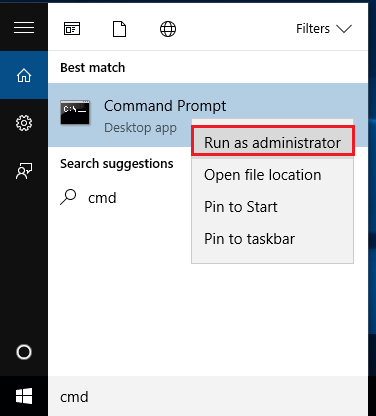
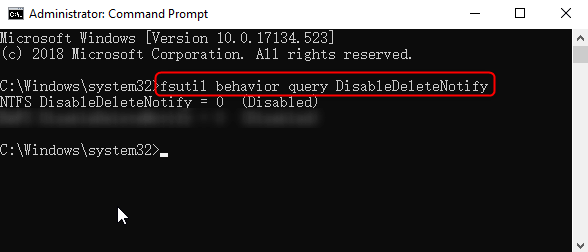
Step 1: Type “cmd” in the search box. Right click “Command Prompt” and select “Run as administrator”.
Step 2: In the Command Prompt, type in: fsutil behavior query DisableDeleteNotify. Press “Enter”.
If the result shows DisableDeleteNotify = 0, TRIM will be enabled successfully.
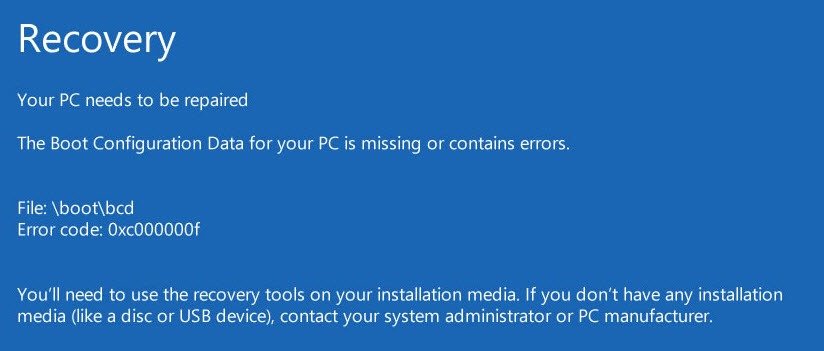
5. Fix a Cloned SSD That Won’t Boot
If SSD has an issue with booting, you could refer to the reasons and solutions of cloned SSD not bootingto troubleshoot the problem. Sometime you may encounter an error screen on startup, such as 0xc000000f, 0xc000014C, 0xc0000001, 0xc0000034, 0xc0000098, which is caused by the incorrectly configured BCD file by disk cloning software. If you use Renee Becca, you will be free from such trouble. Because it can automatically format/partition the hard drive and also configure boot information correctly.
Relate Links :
How to Backup and Restore Windows 7?

25-03-2019
John Weaver : Computer may have some issues after used for a long time. It would be better if you could...
How to Install Windows 10 from USB

11-03-2019
Ashley S. Miller : When we need to install Windows 10, we can make use of Windows 10 Installation Media. Here, method...

