author avatar
    Technology Manager of Test Dept.
 

Summary
DPC_WATCHDOG_VIOLATION is one of the blue screen errors in the Windows system. If you also encounter similar problems, you may wish to check the content of this article. This article will introduce a variety of practical solutions to this error. Of course, if the computer contains particularly important files, you can also refer to the content of this article to perform data backup or transfer when you cannot enter the system.


fix DPC WATCHDOG VIOLATION error on Windows 10

About DPC_WATCHDOG_VIOLATION

DPC_WATCHDOG_VIOLATION blue screen errors often occur after installing incompatible hardware or software, despite Microsoft’s efforts to address the issue. Outdated or improperly installed drivers, virus attacks, software conflicts, and corrupted system files are common causes.
After understanding the DPC_WATCHDOG_VIOLATION blue screen error, proceed to the following steps. If unable to restart the computer and access the system, refer to the second part for data backup. If data is already backed up, skip to the third part for solutions.

Use Renee Passnow to backup or transfer important data when you cannot enter the system

1. What is Renee Passnow?

Renee PassNow is a versatile tool for clearing Windows account passwords, creating new administrator accounts, backing up/transferring/restoring computer files, repairing Windows startup problems, and more. It is compatible with multiple systems including Windows 10/8.1/8/7/XP/Vista, making it a perfect choice for various system rescue needs.
Hot Topic - ADsRenee PassNow – 3 Steps to transfer data from the crashed system

Easy to use 3 steps to transfer the files.

Transfer the files Transfer the important files of the computer without system.

Preview the files Preview the files while transferring the data.

Multifuctional Data recovery, Windows password reset, bootable problem recovery can be run without system.

Highly compatible Windows 10/8.1/8/7/XP/Vista. Also supports UEFI boot mode.

Easy to use 3 steps to transfer the files.

Transfer the files Transfer the important files of the computer without system.

Preview the files Preview the files while transferring the data.

Free TrialFree TrialNow 2000 people have downloaded!

2. How to use Renee Passnow to backup or transfer data?

Step 1: Download and install Renee Passnow on other computers that can log in and run normally. Connect the USB disk to the computer, run Renee Passnow, and check the option to create a rescue USB disk. (Note: This process will save or delete all data on the USB disk, so ensure important files are saved elsewhere.)
Step 2: Next, select (x64) or (x86) according to the system type. Download the ISO file by clicking the (Download Now) button, create a rescue USB by clicking the (Create USB) button after downloading the file, and eject the USB by clicking the (Eject USB) button.
use renee passnow to create usb to reset passnword
Step 3: Connect the boot device to the computer needing data transfer. Turn on the computer and press the BIOS shortcut key displayed on the screen. Set the boot USB disk as the first in Boot Priority, save settings, and restart the computer.
Change boot sequence in BIOS
Step 4: Start the computer from the startup USB disk, enter the application program, and select the (data backup) option. This option clones the hard disk to other hard disks, so ensure the backup file saving hard disk has sufficient capacity.
passnow data backup
Step 5: Select the hard disk to back up the file in the (source) list, choose the hard disk from the (destination) list, then click (clone) and wait for the cloning process to finish.
Select backup source and destination
Step 6: If you only need to transfer some important files, use the (Data Transfer) function.
data transfer
Step 7: You can click on each disk letter (C/D/E/F, etc.) to find files that need to be transferred. It is recommended to transfer them to an external disk. Transferring data is simple – select the C drive on the upper left, G drive on the upper right, choose files in the C drive, and click the Copy function button in the middle. To delete a file, select it and click the (Delete) button in the middle, but be cautious as deletion cannot be undone.
data transfer in Renee Passnow
TipsIf any files are lost during the backup or data transfer process, use the “Undeleter” option on the main interface for data recovery.
After backing up or transferring important files on the computer, we can use the following methods to solve the DPC_WATCHDOG_VIOLATION blue screen error.

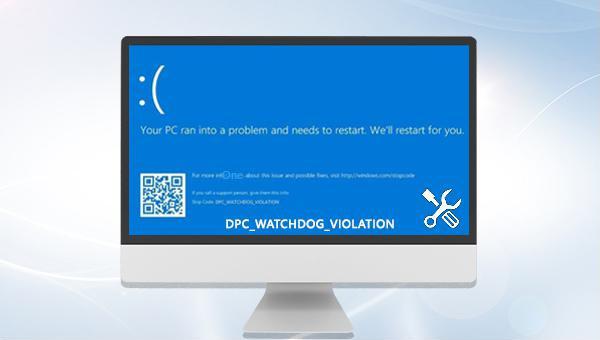
How to fix DPC_WATCHDOG_VIOLATION blue screen error?

1. Remove all external devices

To troubleshoot blue screen errors caused by external devices, shut down the computer, remove all external devices, restart, and reconnect devices one at a time.

2. Enter safe mode

Due to Windows blue screen errors, users may not be able to enter the system normally. Before attempting various repair methods, start your computer in safe mode. Safe mode is a special startup mode in Windows that only loads basic files and drivers necessary to run Windows, making it easier to repair system errors. Specific steps to enter safe mode are as follows:
Step 1: Press and hold the power button for 10 seconds to turn off the computer. Next, press it again to start the computer.
Step 2: When Windows starts and the brand logo appears, press and hold the power button for 10 seconds to turn off the device.
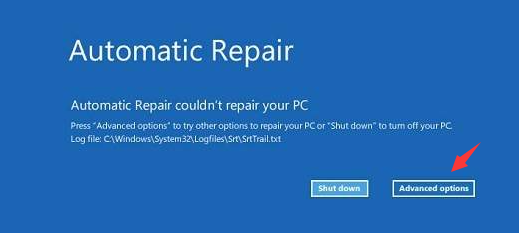
Step 3: Press the power button to start the computer, hold it for 10 seconds to turn off the device, then restart and allow it to fully start. Select “Advanced Options” in the “Automatic Repair” interface to enter the Windows recovery environment.
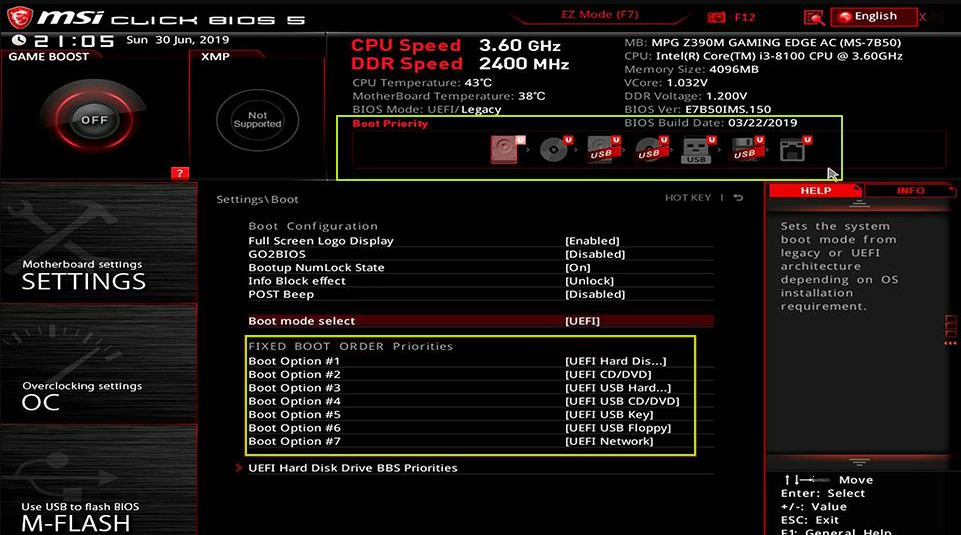
Tip: Insert the Windows installation disk into the computer and set the first boot sequence to the disk in the BIOS settings to start the computer from the installation disk. Select “repair your computer” in the Windows installation program to enter the recovery environment.
automatic Repair
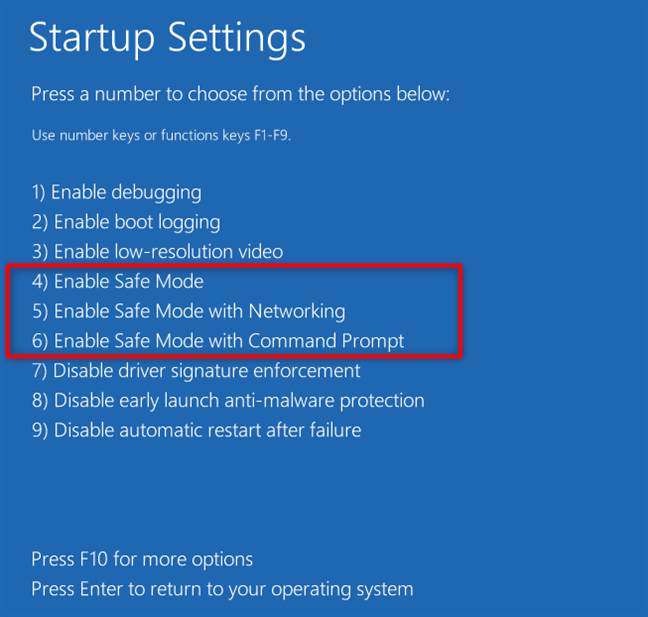
Step 4: Choose Troubleshoot, then Advanced Options > Startup Settings > Restart. Select 5 or F5 to start Safe Mode with Networking.
startup settings windows 10 safe mode
After enabling safe mode, you can proceed to the following repair operations.

3. Uninstall the newly installed software

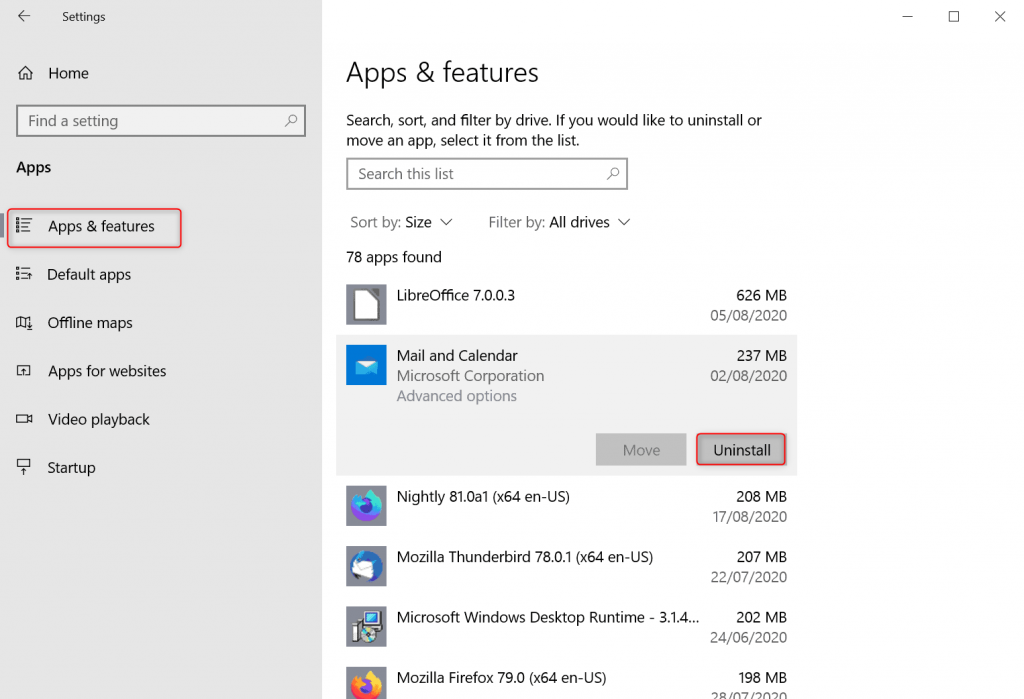
If the DPC_WATCHDOG_VIOLATION blue screen error occurs after installing new software, try uninstalling it by right-clicking (Start), selecting (Apps & Features), choosing the software, and clicking (Uninstall).
Windows 10 uninstall apps

4. Use the chkdsk command to check the hard disk

The hard disk error may cause the DPC_WATCHDOG_VIOLATION blue screen error. Use the chkdsk command to check and repair the hard disk.
Step 1: Restart the computer or enter safe mode, search for (cmd) in the search box in the lower left corner, right-click on (command prompt), and select (Run as administrator).
run as administrator
Tip: If unable to enter Windows normally, insert the Windows installation disk into the computer. Press F2, F10, DEL, or ESC continuously upon startup to access BIOS. Set first boot sequence to the installation disk, save settings, and restart. Boot from disk, select “Repair Computer” on Windows Installer to enter recovery environment. In recovery, choose “Troubleshoot” > “Advanced Options” > “Command Prompt.”
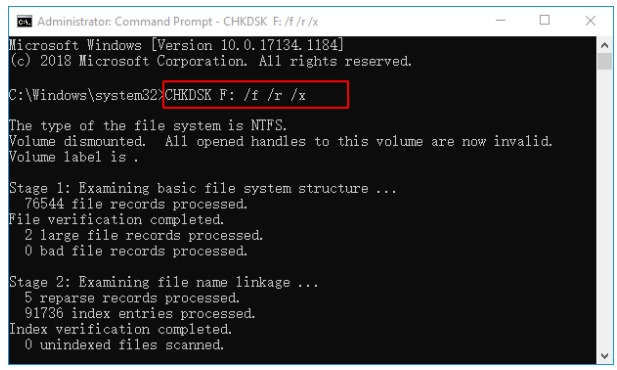
Step 2: Open the command prompt and enter chkdsk C: /f /r /x (C refers to the drive letter of the system hard disk). Press Enter.
chkdsk F: /f /r /x
Step 3: If prompted that “chkdsk cannot be run because the target disk is in use,” press Y to run the check on the next computer restart. After the Chkdsk check is complete, restart the computer to see if the problem is resolved.

5. Update the driver

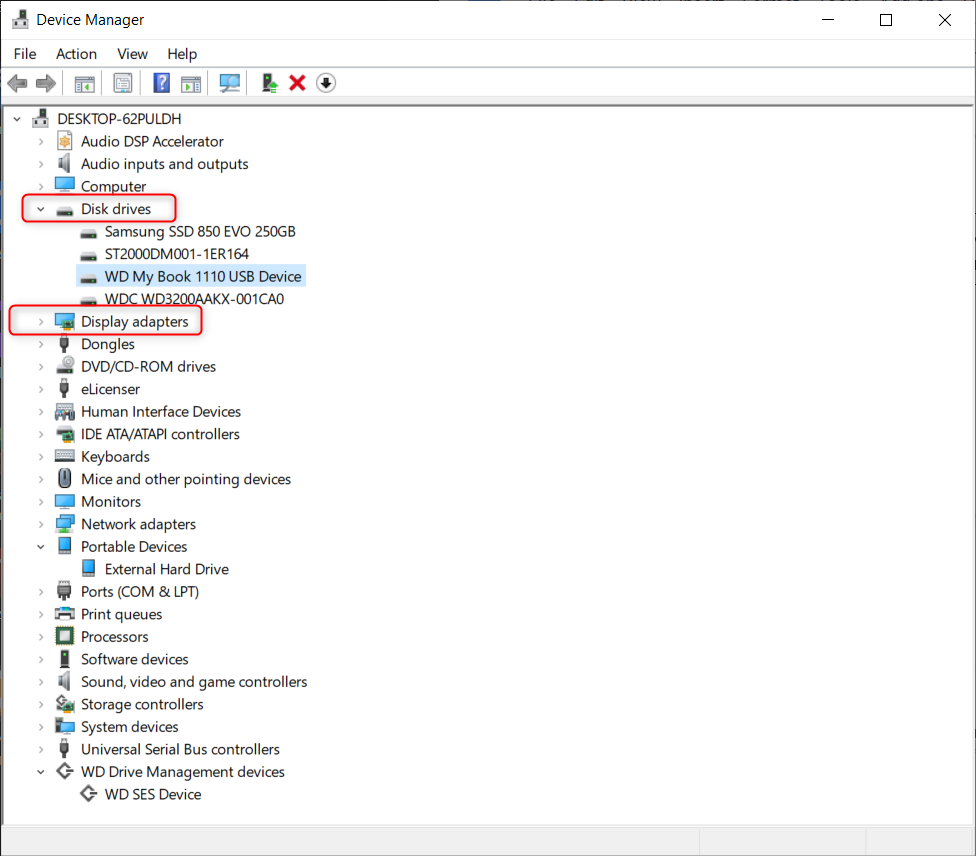
Some hardware drivers can cause DPC_WATCHDOG_VIOLATION blue screen error, particularly IDE ATA/ATAPI controllers, disk drives, and graphics cards. Checking and updating these drivers may help resolve the issue.
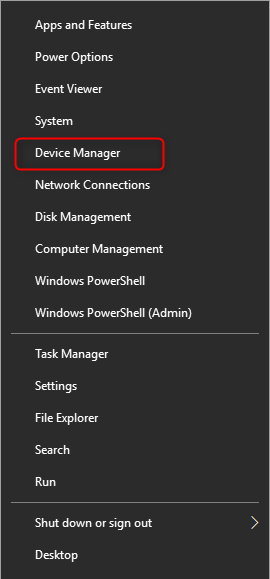
Step 1: Right-click (Start), and select (Device Manager).
right click at start menu and select device manager
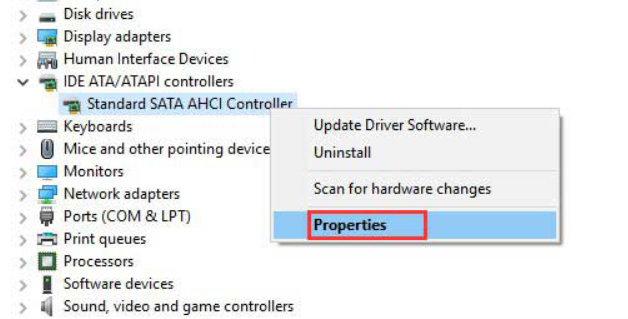
Step 2: Next, expand (IDE ATA/ATAPI Controller), then right-click (Standard SATA AHCI Controller), and select (Properties).
IDE ATA/ATAPI Controller properties
Step 3: Select the Driver tab, click the Driver Details button, and check the driver file in the pop-up window. If it is displayed as storahci.sys, click the Update Driver button. If the driver file is displayed as iaStorA.sys, click OK as there is no need to update the driver.
update driver
Step 4: Update the IDE ATA/ATAPI controller, disk drive, and display adapter drivers. Select “Automatically search for drivers” or “Browse my computer to find drivers“. Update drivers for devices with yellow exclamation marks or check device connections.
disk drive and display adapter

6. Run the SFC command

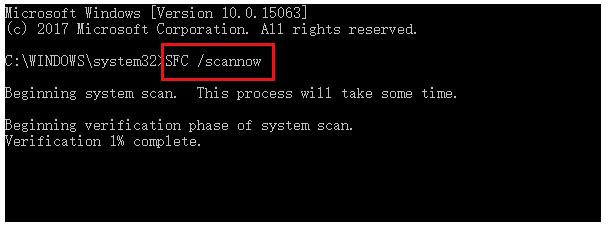
SFC (System File Checker) is a built-in utility in Windows that can scan and repair protected system files.
Step 1: Restart normally or enable safe mode, search for (cmd) in the search box in the lower left corner, right-click (command prompt), and select the (Run as administrator) option.
run as administrator
Step 2: Enter the command “SFC /scannow” in the command prompt window and press Enter to run System File Checker for a system scan and fix problematic files.
Enter the sfc command
If none of the above methods can resolve the blue screen error, try system restore using a previously created restore point to revert the system to its original state.