author avatar
    Senior Program Developer
 

Summary
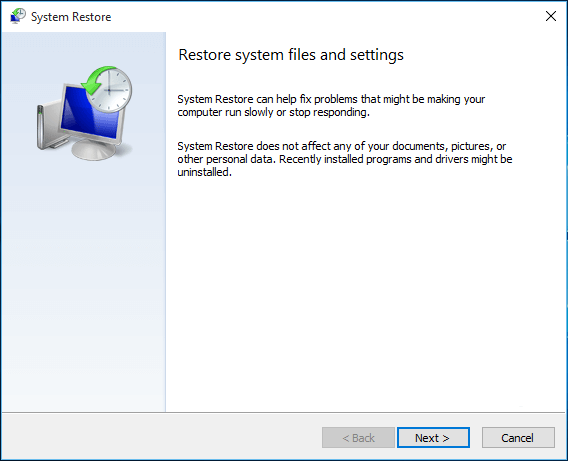
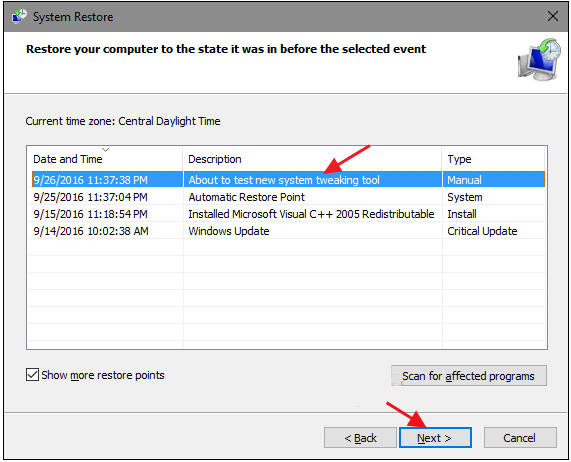
When a series of unknown problems happen in the computer, we can restore the system. On Windows 7, we can restore the system to a previous point in time when it was working normally.


how to restore the windows 7 system

Part 1: How to Restore Windows 7?

Window automatically creates a restore point at a particular point in time. It is similar to system backup. All system activities, such as installing and reinstalling the applications, drivers and the other updates, can be restored to the previous point. When the Windows 7 system gets crashed, you can use the restore point to restore the system. Click here to learn more about the Windows 7system restore point.

Next, we will show you how to restore Windows 7.

Step 1: Expand the Start menu and then search [system restore].
search system restore to restore windows 7
Step 2: In the [Restore system files and settings] windows, click on [Next] to go on.
get into system restore settings
Step 3: Next, view all the available restore points. By default, the manually and automatically created restore points will be shown together. Check the option [Show more restore points] to check all the restore points. In the option [Scan for affected program], you can learn about what will be uninstalled in this process.
When you checked the programs and drivers that will be deleted and restored, you can click on [Close] to turn off the window.
Step 4: Select one of the restore points and click on [Next] to go on.
select the restore point
Step 5: Click on [Finish] to restore the Windows 7 system.
It is noted that the process not be stopped once you launch. Click on [Yes] when you see the below notification.
These are the steps about how to restore Windows 7. If you or the system never creates a restore point, you should reinstall the system to fix the problems. Prior to reinstallation, we suggest that you use Renee PassNow to transfer the important data. In the followings, we will show you how to use.

Part 2: How to Transfer Data with Renee PassNow?

1. What is Renee PassNow?

Renee Passnow is the professional system rescue software which can help Windows users clear the password, create new administrator account, restore the disk/SD card data, retrieve the formatted drive, transfer data and fix Windows problems. Besides, it can fix the MBR boot reocrd, the DBR error parameters, 0xc00000e, black screen and blue screen.
This multifunctional system rescue tool can perfectly be compatible with Windows 10/8.1/8/7/XP/Vista.
Renee Passnow – Professional Windows Password Remover

Remove Windows Login Password 3 steps for whole password remove process.

Enable/Create Administrator One click for creating new administrator and enable the disabled account.

Widely Use New version supports UEFI boot model, which can be used on more computers, laptops and even surfaces.

Multifuctional Data transfer, data recovery, bootable problem recovery can be run without system.

Highly compatible Windows 10/8.1/8/7/XP/Vista.

Remove Login Password 3 steps for whole password remove process.

Enable/Create Administrator One click for creating new administrator and enable the disabled account.

Easy to use No need of any professional knowledge or password reset disk.

Free TrialFree TrialNow 2000 people have downloaded!

2. How to Transfer Data with Renee PassNow?

It is easy to use Renee PassNow. Even though you are a beginner, you can use the software to transfer data within minutes.
Step 1: First, download and install Renee PassNow in another computer. Insert CD/DVD/USB. Then, run the software. Select one option from [Crate a Live USB] and [Create a Live CD]. It is noted that the data should be backed up well when you insert the USB into the computer.
Step 2: Next, select [x64] or [x86] according to your computer. After that, click on [Download Now] to download the licensed ISO. Remember to activate the software beforehand. After that, click on [Create USB] to create the boot media. Click on [Eject USB] when the boot USB is created.
use renee passnow to create usb to reset passnword
Step 3: Connect the boot USB to the target computer. Enter into BIOS and set the system to boot from the USB. Click here to learn about how to change the boot order.
Note: If the boot disk is a USB flash drive, select [Removable Devices] as the first boot option. If you use a CD, select [CD-ROM Drive].
steps to change the boot order in BIOS
Step 4: After that, click on [Data Transfer] when the software is loaded well.
data transfer
Step 5: Drag the target files from the source disk to the target disk to complete data transfer.
data transfer in Renee Passnow