author avatar
    Senior Product Manager
 

Summary
Forgot your Acer laptop password? Don't worry, you can still factory reset it without the need for a password or disc. In this comprehensive guide, we explore various methods to reset your Acer laptop and get you back up and running in no time.


Have you forgotten your password to your Acer laptop and can’t seem to login? Don’t worry, there is a solution. Sometimes, performing a factory reset on your Acer laptop can be the best way to regain access to your device. This method will erase all of your personal information and settings, essentially resetting your laptop to its original factory state. However, you may be wondering how to perform this reset without knowing your password. In this article, we will discuss one method of resetting the administrator password on an Acer laptop using a password reset tool called Ophcrack Free Tool. Keep reading to learn how to gain access to your laptop again.
factory reset acer laptop without password

Method 1 : Reset Acer Laptop Password with Ophcrack Free Tool

If you have forgotten your Acer laptop password, don’t worry, there is a way to reset it without having to know the original password. One method to do so is by utilizing a password reset tool like Ophcrack Free Tool. This tool is designed to help users reset the administrator password on their laptop. It is a free and open-source software that works on Windows operating systems.
Step 1: First, you will need to download Ophcrack Free Tool from its official website onto a separate computer. You can use any computer that has internet access to do this.
Step 2: Once the download is complete, you will need to create a bootable device, such as a USB or CD, to use this tool on your Acer laptop.
Step 3: Insert the bootable device into your laptop and restart it. As the laptop is starting, press the boot key repeatedly (usually F12, Esc, or Del) until the boot menu appears. Select the bootable device from the menu and press “Enter“.
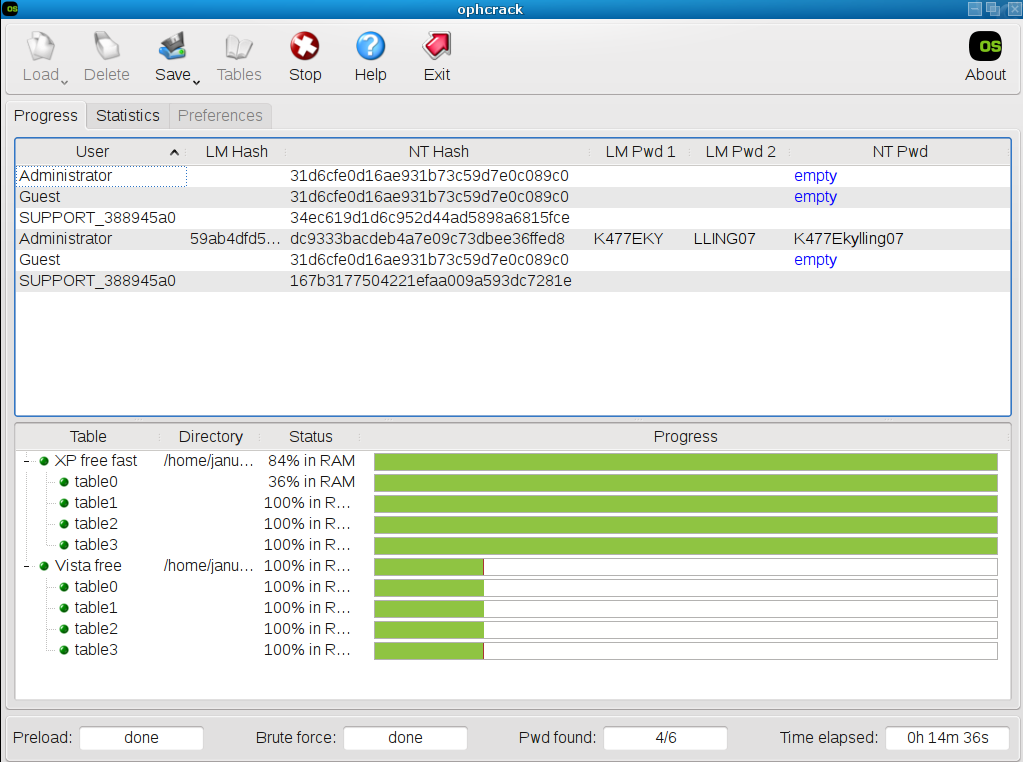
Launch Ophcrack
Step 4: Ophcrack Free Tool will now load and start scanning your laptop for user accounts and passwords. This process may take a few minutes.
Step 5: Once the scanning is complete, the tool will display a list of user accounts on your laptop and their corresponding passwords. You can then select the user account that you want to reset the password for and write down the new password.
Ophcrack main menu
Step 6: Remove the bootable device from your laptop and restart it. Use the new password to log in to your user account.
Tips:If Ophcrack Free Tool is unable to retrieve your password, it may be because the password is too complex. In this case, you can try using a different password reset tool or use the built-in factory reset option (if applicable) to reset your laptop to its original settings.
Congratulations, you have successfully reset your Acer laptop password using Ophcrack Free Tool. Remember to keep your password in a safe place or use a password manager to avoid forgetting it in the future.

Method 2 : Using Renee PassNow for Resetting or Removing Login Passwords on Acer Laptop

If you’re looking for a reliable method to reset or remove login passwords on your Acer laptop without the risk of losing any data, Renee PassNow is an excellent choice. This powerful tool provides a straightforward and efficient solution to regain access to your laptop.
Tips:If your account is Microsoft Account, Renee PassNow will convert this account to Local account. After resetting login password, you need to connect your account to your Microsoft Account again.
To reset your Windows password using Renee PassNow, follow these steps:
Step 1: Download and Install Renee PassNow
Start by downloading Renee PassNow from the official website and install it on a different computer that you can access. You can choose the appropriate version based on your computer’s operating system.
Renee PassNow – Professional Windows System Rescue Tool

Remove Windows Login Password 3 steps for whole password remove process.

Recover the files Recover the deleted files without Windows system.

Transfer the data Transfer the important files of the computer with system.

Fix Windows startup error Fix various Windows startup failures or crashes.

Erase disk Completely erase disk files which will not be restored.

Remove Windows Login Password 3 steps for whole password remove process.

Recover the files Recover the deleted files without Windows system.

Transfer the data Transfer the important files of the computer with system.

Free TrialFree TrialNow 2000 people have downloaded!
Step 2: Create a Bootable USB or CD/DVD
Launch Renee PassNow and insert a USB flash drive or blank CD/DVD into the computer. Select the option to create a bootable media. Follow the on-screen instructions to complete the process.
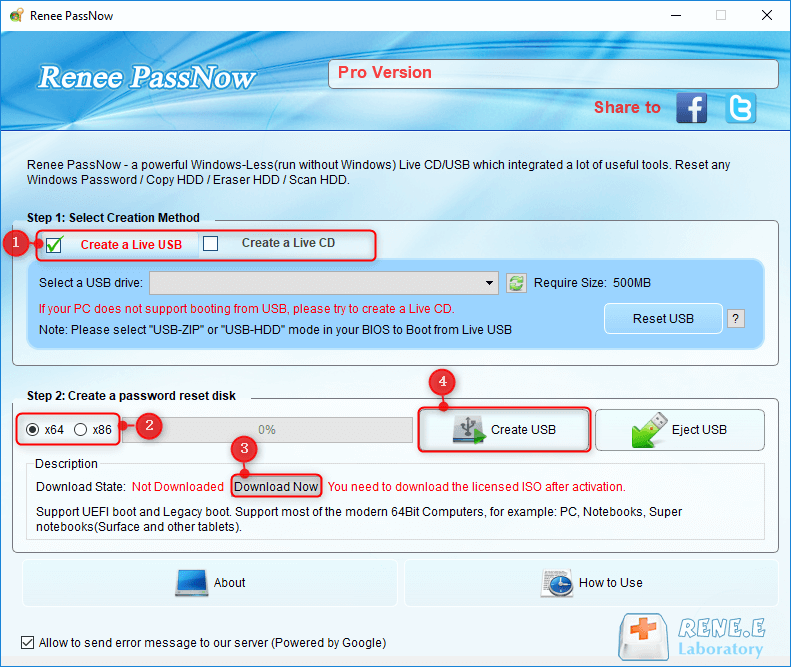
Create New Windows 10 Password Reset Disk with Renee PassNow
Step 3: Boot the Locked Server from the Bootable Media
Insert the bootable USB or CD/DVD into the locked Windows computer. Restart the computer and enter the BIOS settings by pressing the appropriate key (usually F2 or Delete). Configure the boot order to prioritize the bootable media.
Common Server:
Server TypeEnter boot menu method
DELLPress the F12 key repeatedly before the Dell logo appears on the screen.
HPPress the F9 key multiple times when the HP logo is displayed.
Common Computers:
BIOS NameEnter boot menu method
ASRockDEL or F2
ASUSDEL or F2 for PCs/ DEL or F2 for Motherboards
AcerDEL or F2
DellF12 or F2
ECSDEL
Gigabyte / AorusDEL or F2
Lenovo (Consumer Laptops)F2 or Fn + F2
Lenovo (Desktops)F1
Lenovo (ThinkPads)Enter then F1
MSIDEL
Microsoft Surface TabletsPress and hold Power and Volume Up buttons
Origin PCF2
SamsungF2
ToshibaF2
ZotacDEL
HPEsc/ F9 for `Boot Menu`/ Esc/ F10/ Storage tab/ Boot Order/ Legacy Boot Sources
INTELF10
Boot the target PC with the created password reset USB/CD/DVD.
Step 4: Select password reset function
After successfully booting from the bootable media, Renee PassNow will load. Select “PassNow!” function after booting from the new created Windows password reset disk.
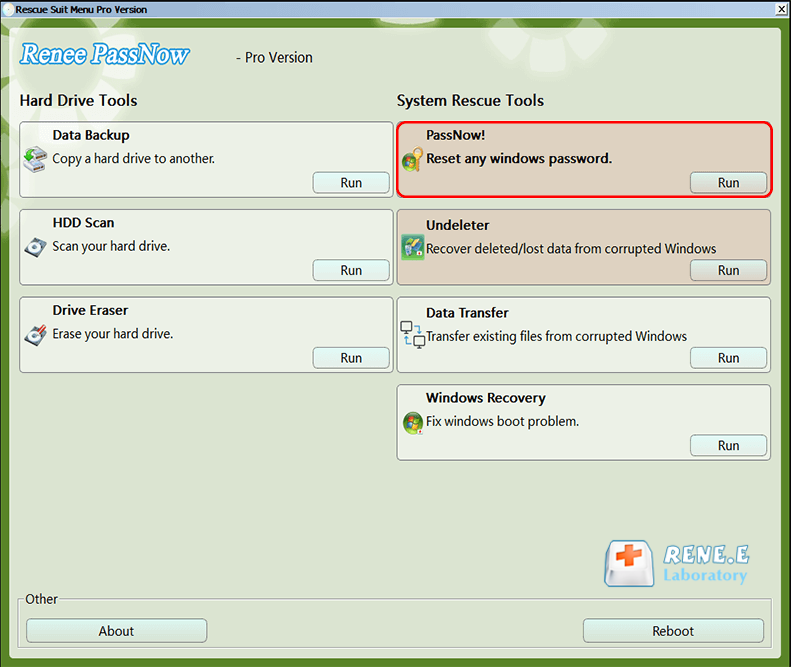
After loading into main interface, please select the “PassNow!” function.
Step 5: Resetting the Password
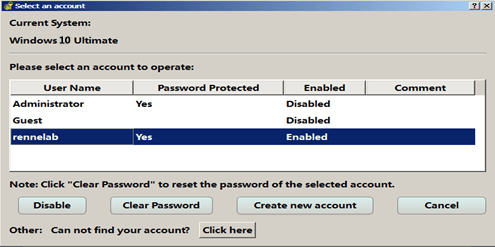
Choose the user account for which you want to reset the password. Then, click on the “Clear Password” button. Renee PassNow will remove or reset the password for the selected user account.
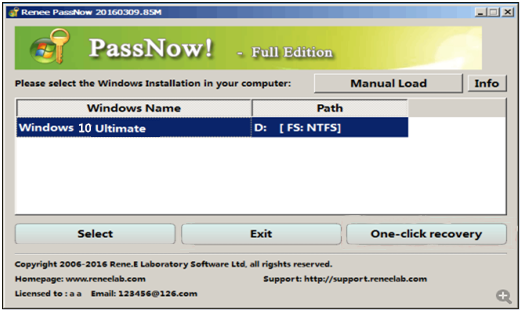
Select target Windows system in the list
Select target user account in the list
Step 6: Reboot the PC
Once the password is reset, remove the bootable media from the PC and restart the computer. You will now be able to log in to Windows Account without a password.
Using Renee PassNow is a simple and effective method to reset or remove login passwords on your Acer laptop. It ensures that your data remains intact while providing you with an easy way to regain access to your device.
Pros:
  • Efficient solution for resetting or removing login passwords on Acer laptop
  • Data remains intact during the process
  • Provides a simple and effective method to regain access to the device

Cons:

  • May require access to a different computer to download and install the tool
  • Need to purchase a license

Method 3 : Use Windows Installation Media to reinstall Acer Laptop

Reinstalling Windows on your Acer laptop using Windows Installation Media is a straightforward process. By following these steps, you can perform a clean installation of Windows and start afresh:
Step 1: Create a Bootable USB Drive
To reinstall Windows without a CD or USB drive, you can use the Microsoft Media Creation Tool. Here’s how:
  1. On a working PC, visit the Microsoft software download website and download the Media Creation Tool.
  2. Run the tool and select “Create Windows 10 Installation Media“.
  3. Choose the language, edition, and architecture (usually 64-bit).
  4. Insert an 8GB or larger USB flash drive and select it as the destination for the installation files.
  5. Wait for the tool to download and create the installation media.
Step 2: Adjust BIOS Settings
Before reinstalling Windows, access the BIOS settings of your Acer laptop and make the necessary changes:
  1. Restart your laptop and press the appropriate key (e.g., F2) to access the BIOS settings.
  2. Disable Secure Boot to allow booting from external media.
  3. Enable Legacy Boot for compatibility with the installation media.
  4. If available, enable CSM (Compatibility Support Module) for better compatibility.
  5. If necessary, enable USB Boot to prioritize the USB flash drive as the boot device.
  6. Save the changes and exit the BIOS settings.
Step 3: Start the Reinstallation Process
Now, you can proceed to reinstall Windows on your Acer laptop:
  1. Insert the USB flash drive that contains the Windows Installation Media into your Acer laptop.
  2. Power on the system and begin tapping the F2 key to enter the BIOS.
  3. In the BIOS, navigate to the Boot menu item and set the USB flash drive as the first boot device.
  4. Save the changes and exit the BIOS settings.
  5. As soon as the system begins rebooting, it will boot from the USB flash drive.
  6. Follow the on-screen instructions to proceed with the Windows installation.
  7. When prompted, select “Custom: Install Windows only (advanced)” to perform a clean installation.
  8. Delete all existing partitions, select the unallocated space, and proceed with the installation process.
  9. Follow the remaining on-screen instructions to complete the installation.
Final Steps and Considerations
After the installation is complete, there are a few additional steps you can take:
  1. Check the Device Manager for any yellow triangle-labeled items and update their drivers.
  2. Connect to the internet and run Windows Update to install the latest updates and drivers.
  3. Install any necessary applications and enjoy your freshly installed Windows system!
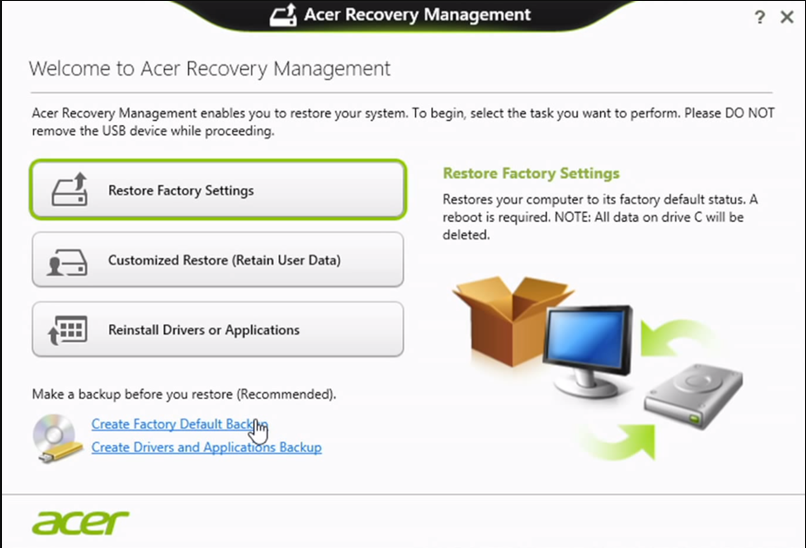
Note that the above method may erase everything on your computer. If you have important files, be sure to back them up before proceeding with the reinstallation. Additionally, if your Acer laptop is not able to start up normally, this method may not work, and you should consider using a different approach such as reinstalling from a USB drive or CD disc.
Important Note:
It’s crucial to note that reinstalling Windows using the Windows Installation Media will erase all data on your Acer laptop. Therefore, it’s essential to backup any important files or documents before proceeding with this method. Additionally, if your Acer laptop is not booting up normally, you may need to consider alternative methods such as reinstalling from a USB drive or CD disc. Always exercise caution and follow the instructions carefully to ensure a successful reinstallation process.

Method 4 : Using Partition Recovery for Factory Reset of Acer Laptop

If you are facing issues with your Acer laptop and want to perform a factory reset without a password, using partition recovery is the best option. This method allows you to reset your laptop to its factory settings while retaining your personal data.
Before starting the process, make sure you have backed up any important files and data as this reset will erase all data on your laptop. It is also recommended to plug in your laptop to a power source to avoid any interruptions during the reset.
Step 1: Start your Acer laptop and press the “Alt” and “F10” keys together on the keyboard. This will bring up the Acer eRecovery Management menu.
Acer eRecovery Management menu
Step 2: Select the “Restore system from factory default” option and press the “Enter” key.
Step 3: You will be prompted to enter your Acer laptop’s password. If you do not have a password, leave it blank and click “OK“.
Step 4: Select the partition for recovery. This is usually the “C:” drive, but if you have multiple partitions, make sure to select the correct one.
Step 5: Click “Next” and then “Start” to begin the recovery process. This may take some time, so be patient.
Step 6: Once the process is complete, your Acer laptop will be reset to its factory settings. Follow the on-screen instructions to set up your laptop again.
Using partition recovery to factory reset your Acer laptop is a straightforward and effective method. It allows you to reset your laptop without a password and retain your personal data. However, if you do not have a recovery partition or are unable to access it, you can also use Windows Installation Media to reinstall your laptop, as mentioned in the previous topic.
Remember to always back up your important data before performing a factory reset. This ensures that your personal data is not lost during the reset process. If you are still unable to reset your Acer laptop or facing any issues, it is recommended to contact Acer customer support for further assistance.
Tips:Make sure to back up your important files before performing a factory reset

Important Precautions for Factory Reset on Acer Laptop

Before initiating a factory reset on your Acer laptop, it is important to take certain precautions. These steps will help ensure a smoother and safer process, and help prevent any potential loss of important data or damage to your system.
Back up Important Data
One of the most important things to do before performing a factory reset is to back up any important data on your laptop. This includes documents, photos, videos, and any other important files that you do not want to lose. There are various methods to back up your data, including using an external hard drive, cloud storage, or a USB drive. Make sure to double check that all your important files have been successfully backed up before proceeding with the reset.
Create Restore Points
In addition to backing up your data, it is also recommended to create restore points before initiating a factory reset. Restore points are basically snapshots of your system’s current state, and they can be used to bring your laptop back to a previous state in case something goes wrong during the reset process. To create a restore point on Windows, go to “Control Panel” and select “Recovery“. From there, click on “Configure System Restore” and select “Create“. Follow the prompts to create a restore point.
Clean Your Laptop
Before performing a factory reset, it is a good idea to clean your laptop both internally and externally. This means uninstalling any unnecessary programs, clearing out your temporary files, and organizing your files and folders. You can also physically clean your laptop by wiping down the keyboard, screen, and exterior with a soft cloth.
Check for Updates
Before proceeding with the reset, make sure to check for any pending updates on your laptop. This includes operating system updates, driver updates, and software updates. Updating your laptop can prevent any potential compatibility issues during the reset process.
Keep Your Laptop Plugged In
During the factory reset, it is important to keep your laptop plugged in to a power source. This will prevent your laptop from unexpectedly turning off during the process, which can cause further issues.
Remove External Devices
Before initiating the factory reset, it is recommended to remove any external devices such as USB drives, external hard drives, or printers. These devices can interfere with the reset process and cause issues.
Conclusion
By taking these precautions before initiating a factory reset on your Acer laptop, you can ensure a smoother and safer process. As always, make sure to carefully follow the instructions for your specific laptop model to avoid any potential complications. If you are unsure about anything, it is always best to seek professional assistance.

Conclusion

In conclusion, there are various methods to factory reset an Acer laptop without needing a password or disc. The first method is using password reset tools like Ophcrack, while the second method involves using Renee PassNow to reset or remove login passwords without damaging any data. Another option is to use Windows Installation Media to reinstall the laptop, and partition recovery can also be used for a factory reset. However, it is important to consider backing up important data and creating restore points before initiating a factory reset. This will ensure that your data is safe and can be recovered if needed. By following these methods and precautions, you can easily reset your Acer laptop and resolve any password-related issues. Hopefully, this comprehensive guide has provided you with the necessary information to successfully perform a factory reset on your Acer laptop.