author avatar
    Technology Manager of Test Dept.
 

Summary
Learn how to fix the frustrating issue that folder keeps reverting to read only, hindering your ability to use your folder and its contents effectively. Our expert tips provide multiple solutions to help you cancel the read-only attribute and regain control of your folders.


folder keeps reverting to read only

I. Why does the Windows folder keep returning to read-only and cannot be canceled?

folder keeps reverting to read only
Usually, the reasons for the problem that the Windows folder cannot cancel the read-only attribute may be as follows:
1. The upgrade of Windows leads to tampering of account permissions;
2. The properties of the folder are tampered with;
3. It may be due to a virus or malware attack;
4. The file itself is damaged.
To prevent Windows folder from failing to cancel the read-only attribute, it is recommended to back up important data using a professional tool like Renee Becca.

II. Use Renee Becca to back up data before repairing the fault

1. What is Renee Becca?

Renee Becca is a tool for system/hard disk data backup and restoration. It uses incremental/differential backup technology to save time and disk space. It can back up and restore important data, including programs, system configurations, emails, photos, videos, documents, bookmarks, etc. The software also offers system backup, partition backup, hard disk backup, file backup, disk cloning, and system migration functions that are easy to operate.
Renee Becca - Quickly and safely back up SD card data

Fast backup Backup speed up to 3 000MB/minute

Support multiple SD cards Backup data of SD card, SDHC card and SDXC card

Incremental/differential backup technology Automatically analyze data differences between source files and backup files to save disk space

Multiple backup schemes Support system backup/partition backup/hard disk backup/file backup/disk cloning

Easy to use Even newbie can handle it in seconds

Fast backup Backup speed up to 3 000MB/minute

Support multiple SD cards Backup data of SD card, SDHC card and SDXC card

Easy to use Even newbie can handle it in seconds

Free TrialFree TrialAlready 2000 users have downloaded and try Renee Becca

2. How to backup data with Renee Becca?

Backing up data with Renee Becca is very simple, the specific steps are as follows:
Step 1: Download, install and run Renee Becca on the computer, and select the (File Backup) option in the main interface (Backup) column.
click to back up files in renee becca
Step 2: Select files to backup from the source device, choose destination hard disk partition to store data. For enhanced security, save backup file on an external hard disk. To schedule automatic backups, set up task plan with daily/weekly/monthly frequency and click OK to activate.
how to back up files in renee becca
In (Backup Scheme)-(Scheme Type), you can choose from 5 backup schemes in Renee Becca: version chain mode, single version mode, overall mode, incremental backup mode, and differential backup mode.
backup mode of file backup on Renee Becca
file backup schedule on Renee Becca
Step 3: Click the (Backup Now) button to start executing the backup file command based on your settings. Monitor the progress of all backup tasks on the taskbar. After completion, click the (Restore) button to restore the file to the specified disk when needed.
recover backup files from renee becca
Step 4: After that, select the location where the files are to be restored, and click the (Recovery) button.
recover the data from the backup file
After understanding the methods of backing up data, let’s learn several conventional methods for repairing Windows folders that keep returning to read-only and cannot be canceled.

III. How to fix the problem that the Windows folder cannot cancel the read-only attribute?

1. Change folder user permissions

Sometimes, folder permissions may change without your knowledge, leading to restricted access. You can manually adjust user permissions with the following steps:
Step 1: Run the computer, double-click the (This Computer) icon on the desktop of the computer. Right-click on the C drive and select the (Properties) option.
select properties
Step 2: Switch the function bar to the (Security) option, then find and click the (Advanced) button at the bottom.
Click the Advanced button in security tab
Step 3: Select the user whose permissions you want to change, and click the (Edit) button.
Step 4: Locate and check the (Full Control) option and press (OK).
When there are multiple users on one computer, you need to follow the steps below.
Step 1: Double-click the (This Computer) icon on the computer desktop, and then open (Local Disk (C:)).
open c drive
Step 2: Locate the (User) folder and open it.
c drive users folder
Step 3: Right-click the user folder where you want to change user permissions, and select the (Properties) option.
Step 4: Click the (Advanced) button under the (Security) tab.
Step 5: Click the (Enable Inheritance) button, then click (Apply) and (OK).

2. Change the properties of the folder

If you’re having trouble modifying a folder, it may have a “read-only” command in its properties. Follow the steps below to remove this command and gain permission to make changes or save new files.
Step 1: Run the computer, search for (cmd) in the search box in the lower left corner. Right-click on (Command Prompt) and select the (Run as administrator) option.
run as administrator
Step 2: Enter the command attrib -r +s C:\example in the command prompt window to remove the read-only attribute from the folder. Then try to access the target folder to see if the problem is resolved.
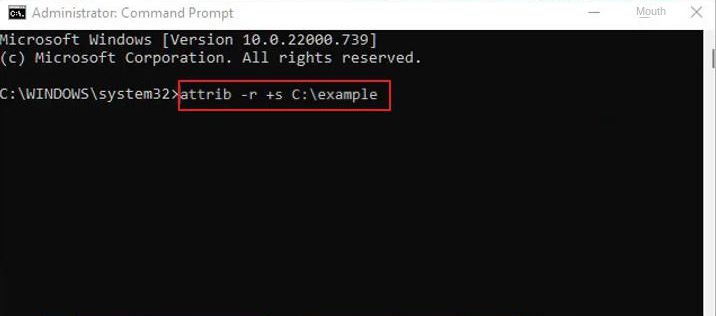
Command to remove the read-only attribute of a folder

3. Repair damaged system files

Corrupted files can cause folders to be reverted to “read-only” status. To repair corrupted files, run an SFC or DISM scan on your system. SFC scans and repairs Windows system files, automatically replacing any modified or corrupted files. DISM is a diagnostic tool for detecting and repairing corrupted files in Windows system images.
Step 1: Search (cmd) in the search box in the lower left corner, right-click (Command Prompt) and select the (Run as Administrator) option.
run as administrator
Step 2: In the opened command prompt window, enter the command (SFC /scannow) and press the (Enter) key. Next, System File Checker will perform a system scan and fix problematic system files. If the problem is not resolved, please continue to the next step.
Enter the SFC command
Step 3: Type (
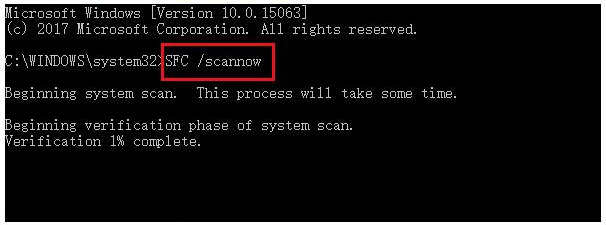
Dism /Online /Cleanup-Image /RestoreHealth) in the opened Command Prompt window and press the (Enter) key to execute the command to repair corrupted system files. After the command is executed, restart the computer and check whether the current problem is resolved.
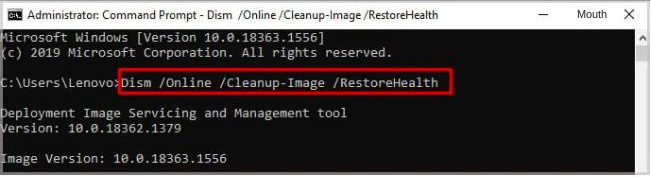
Run the dism command