author avatar
    Senior Program Developer
 

Summary
Why does a new SSD need to be formatted and how to format it? Read this article and you will learn about some considerations and suggestions of formatting an SSD.Besides, the ways of formatting an SSD in Windows 7/10 and macOS will also be provided for your reference.


The Reason of Formatting a New SSD

Formatting an SSD generally refers to advanced format for an SSD. Advanced format aims to divide the basic storage unit – cluster for each partition of the hard disk. Different operating systems have various format procedures, results and ways of dividing cluster. In brief, no matter what storage device it is, only when it is formatted can we store files on it.

Besides, formatting a new SSD will thoroughly bring the best performance and convenient for users to use the operating system.

The Considerations and Suggestions of Formatting a New SSD

Before formatting a new SSD, getting more about things we need to pay attention to will be helpful.

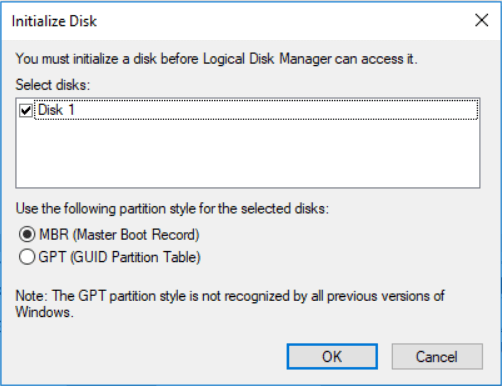
Partition Table: MBR and GPT

MBR known as Master Boot Record is a traditional partition scheme and only supports four partitions. If you need more partitions, you will need to make one of the primary partition as an extended partition and create logical partition in it. Besides, MBR works with disks up to 2TB in size.
MBR
GPT, also known as Globally Unique Identifier Partition Table or GUID partition table, is a new type of partition scheme. GPT supports up to 128 partitions and there’s no need to create extended partitions. Besides, GPT keeps the backup data of partition table at the end of the disk and also saves the CRC for testing the integrity of the data, which ensures the data recovery.
Here are 3 suggestions concerning how to choose partition scheme:

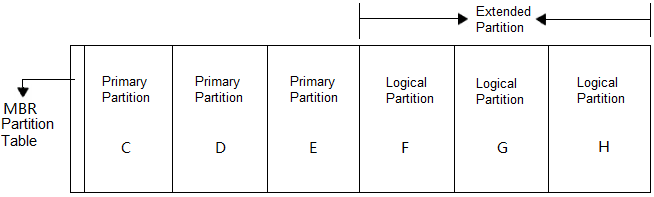
  • 1. It’s suggested to choose the MBR if the PC is with BIOS motherboard. Because both of the old and new system can work with MBR.
  • 2. It’s suggested to choose the GPT if the PC supports UEFI. Please note that all 32-bit versions of Windows operating system are not compatible with GPT.
  • 3. MBR works with disks up to 2TB in size. If your hard disk exceeds 2TB, it’s suggested to adopt GPT.

How to Choose a File System (FAT, NTFS, APFS or Mac OS Extension)

After choosing MBR or GPT partition, we need to choose the file system. FAT and NTFS are developed by Microsoft. APFS and Mac OS Extension are dedicated for Apple use only.

  • In Windows, NTFS is widely used on the computer. And it’s strongly recommended to use NTFS. Because disk with FAT file system can’t save a single file that is over 4GB. Besides, when new data is written after a file is deleted, FAT doesn’t save the file as a complete one. The data will become fragmented after using for a long time, which will slow down the speed of data transition.
  • For Mac, the Mac OS extension is the file system included in Mac OS 10.12 and earlier Mac versions. APFS is the default file system for SSDs on Mac. And APFS takes the advantages of strong encryption, space sharing, disk snapshots and is compatible with SSD on new Mac. It is recommended to choose the compatible format that the system lists. If the built-in disk is set up with APFS, please do not change it to the Mac OS Extension.
After learning about the partition scheme and file system, we could begin to format the newly installed SSDs in Windows 7/10 and Mac OS.

How to Format a New SSD

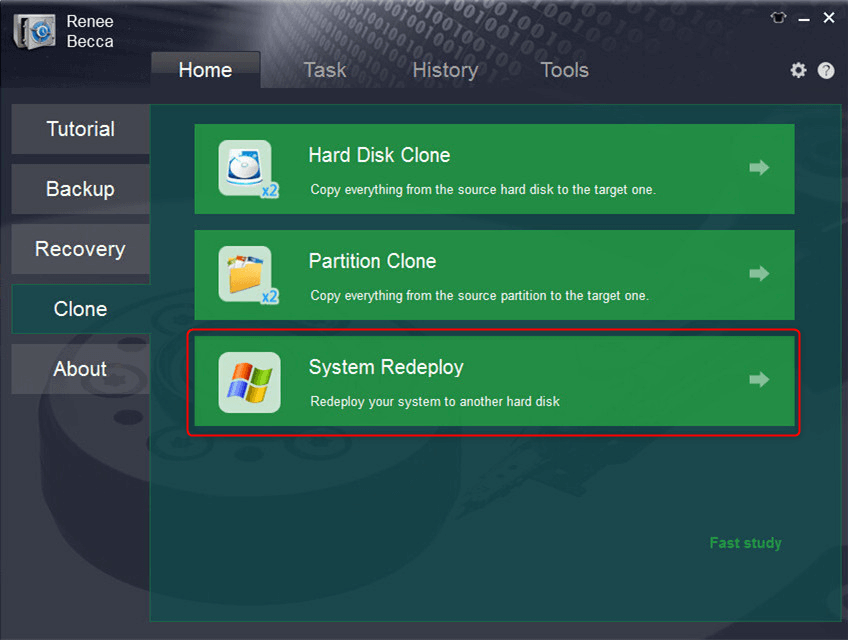
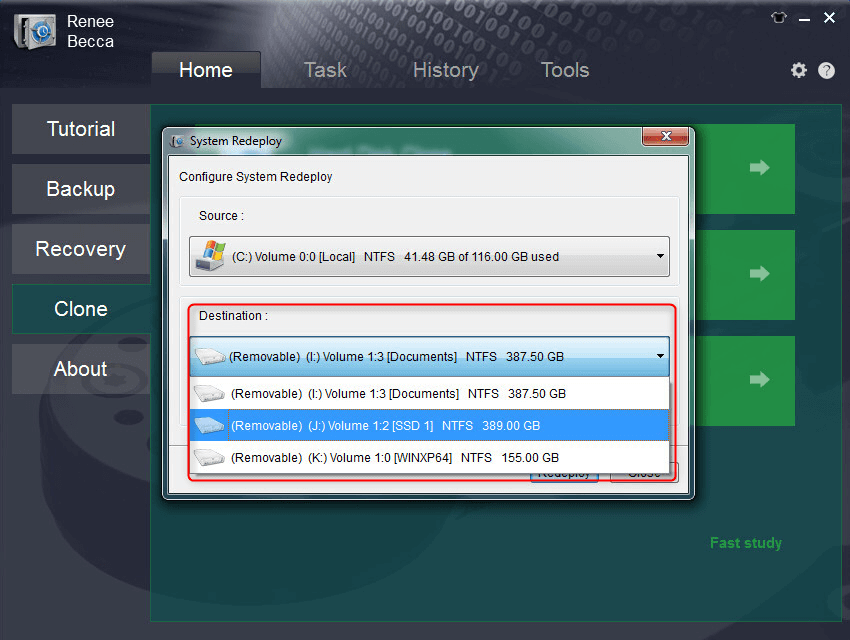
Clone the Data from Old Hard Drive to the Newly Installed SSD (Formatting and Data Migration)

The new SSD requires partitioning and 4K alignment at first and then clone the data to the newly installed SSD, which is so complicated. In fact, you only need one tool and use it to complete this tedious task by a few simple steps. It is recommended to use Renee Becca.

Advantages

  • Automatically 4K alignment helps SSD get the best performance
  • No need to reinstall system. Save time.
  • Free from software reinstallation and activation.
  • No need to make all settings. Everything will remain to be the same.
  • Chat history in software will be reserved.
Hot Topic - ADsRenee Becca – Safe and Quick System Migration to SSD

Automatic 4K alignment Improves SSD performance during system migration.

Support GPT and MBR Automatically adapt to the suitable partition format.

Support NTFS and FAT32 Redeploy various files in different file systems.

Back up quickly Back up files at up to 3,000MB/min.

Overall backup schedule Support system redeployment/system backup/partition backup/disk backup/disk clone.

Automatic 4K alignment Improve SSD performance

Support GPT and MBR Intelligently adapt to a partition format

Support NTFS and FAT32 Redeploy files in different file systems

Free TrialFree TrialNow 2000 people have downloaded!
Step 1: Launch Renee Becca and click “System Migration” in “Clone” function.
Tips: Please backup the system before migration or format the system disk after assuring the SSD can boot the computer as usual.
select system redeploy function in renee becca
Step 2: Select the new SSD you prepare for the migration.
select destination to migrate system
Step 3: After the migration finished, you can start your computer with the new SSD.
① Please choose the SSD to be the first disk to boot in BIOS. After computer succeeded to boot from SSD, format the original system disk to make use of the disk space.
② You can take off the HDD first and then start the PC from SSD. After start, please connect the HDD to computer for format.
select destination to migrate system

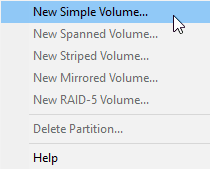
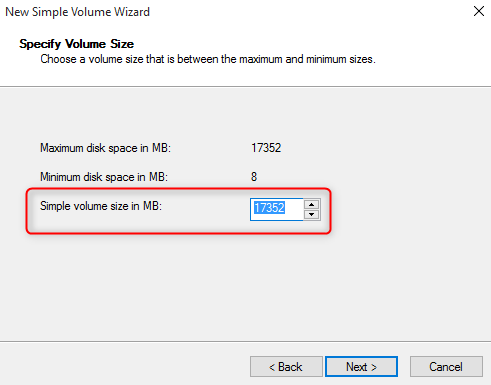
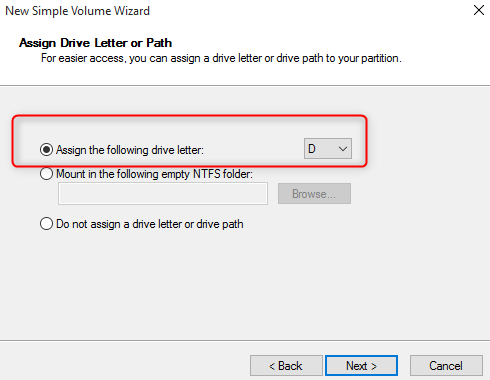
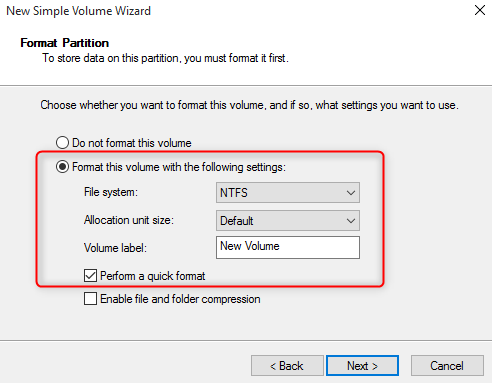
2. Format a New SSD in Windows 7/10

Step 1: Type “compmgmt.msc” in the search box to open “Computer Management“. Or you could right-click on “This PC” icon on the desktop and then select “Manage”.
compmgmt.msc
Step 2: After “Computer Management” pops up, click “Disk Management”. Then right-click on the new SSD drive labeled as uninitialized and select “Initialize the hard drive”.
initialize a new SSD
Step 3: Select the partition style MBR or GPT and then click “OK”.
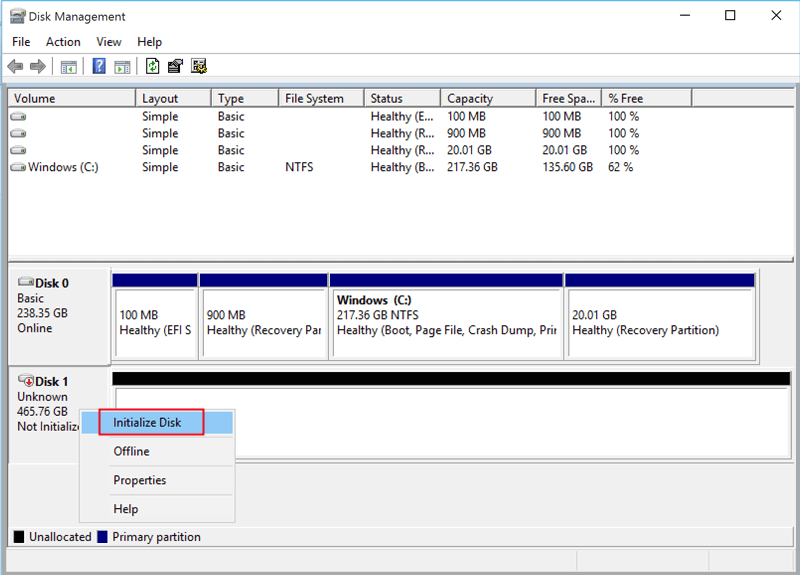
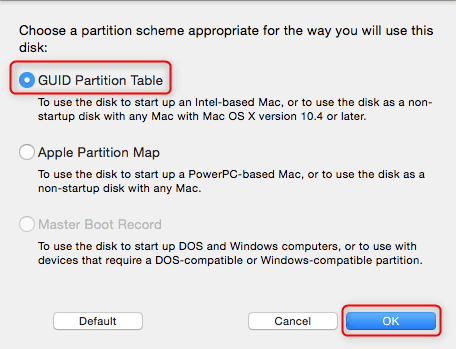
How to choose the appropriate partition table? Please refer to the suggestions for selecting a partition scheme.
Partition style MBR or GPT
Step 4: Once the disk is initialized, the status of the disk will change to “online”. Right click the unallocated space and select “New Simple Volume”. Then go on to the next step.
New simple volumn
Step 5: In the New Simple Volume Wizard, set the partition size and click “Next”.
set the partition size
Step 6: Assign the drive letter for the partition and click “Next”.
assign drive number for partition
Step 7: Select the file system as NTFS and choose the default value for “Allocation unit size”. Then type the partition name in the “Volume label” and check the box “Perform Quick Format”. Click “Next”. Finally, click “Finish”.
format a new SSD in Windows 7/10

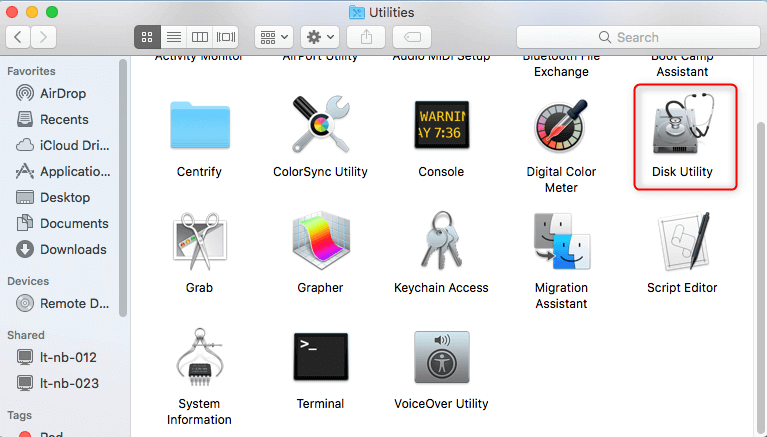
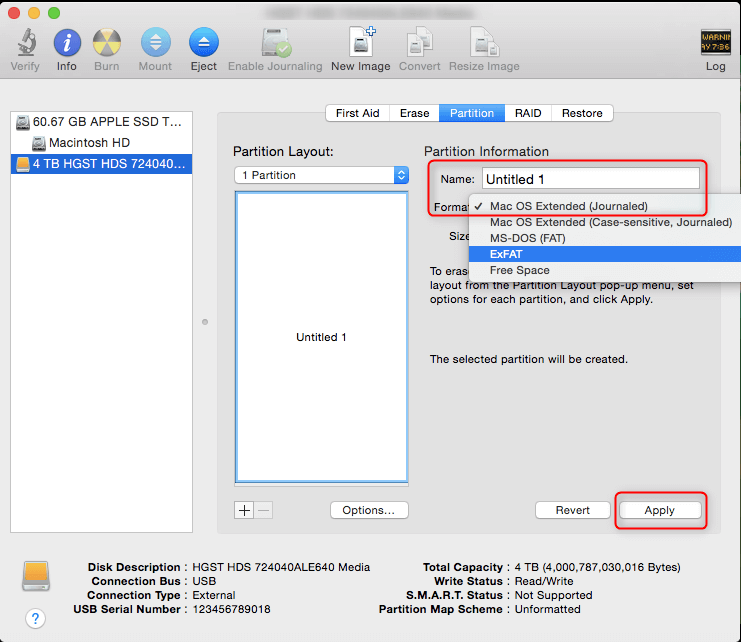
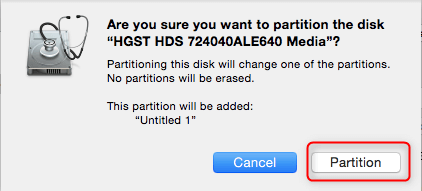
3. Format a New SSD in macOS

Step 1: Navigate to “Applications” > “Utilities” > “Disk Utility”.
Format a new SSD in macOS
Step 2: Select the new disk in the left pane and click the “Partition” tab in the right pane.

Select “one partition” from the drop-down menu of “Partition Layout”.

partition layout
Step 3: When a window pops up, select “GUID Partition Table” and click “OK”.
GUID partition lable
Step 4: Click the “Partition” tap and complete other partition information. Then click “Apply”.

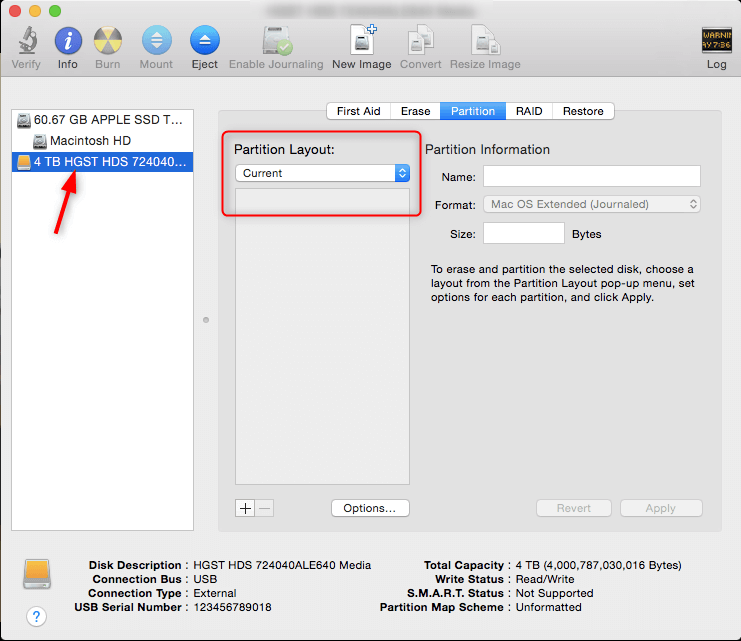
  • Type the partition name at the “Name”.
  • Select the type of file system from the drop-down menu of “Format”. In default settings, the compatible formats will automatically displays and usually choose the default option “Mac OS Extended (Journaled)”.
partition information
Step 5: Finally, click “Partition”. It will start partitioning and formatting the SSD.
Partition a new SSD in macOS