

How To Recover Data from A Hard Drive That Won’t Boot: Ultimate Guide

Summary
This article explains how to recover data from hard drive that wont boot by identifying common logical, firmware, and system-level causes. It outlines non-destructive recovery approaches such as bootable USB environments, Linux live systems, and external drive connections. Professional recovery scenarios are also categorized based on risk and failure type.

Table of contents
| Cause | Common Symptoms | Data Recovery Likelihood | Suitable Methods (Non-Destructive) |
|---|---|---|---|
Corrupted boot sector | “No bootable device”, black screen, boot loop | 95%+ | Renee PassNow Bootable USB or Linux Rescue Kits |
Damaged MBR / GPT partition table | “Invalid partition table”, boot manager error | 90–95% | Bootable USB (PassNow Data Transfer) or Linux Live |
Failed Windows update | Blue screen (BSOD) right after update | 85–95% | Renee PassNow Bootable USB (Data Transfer) |
Bad / corrupted system files | Automatic Repair loop, error codes 0xc00000e9 etc. | 90%+ | Linux Rescue Kits or PassNow Undeleter |
Motherboard / power-supply glitch (drive electronics fine) | Drive not spinning temporarily but visible in BIOS | 98% | External connection (if USB boot fails) |

Remove Windows Login Password 3 steps for whole password remove process.
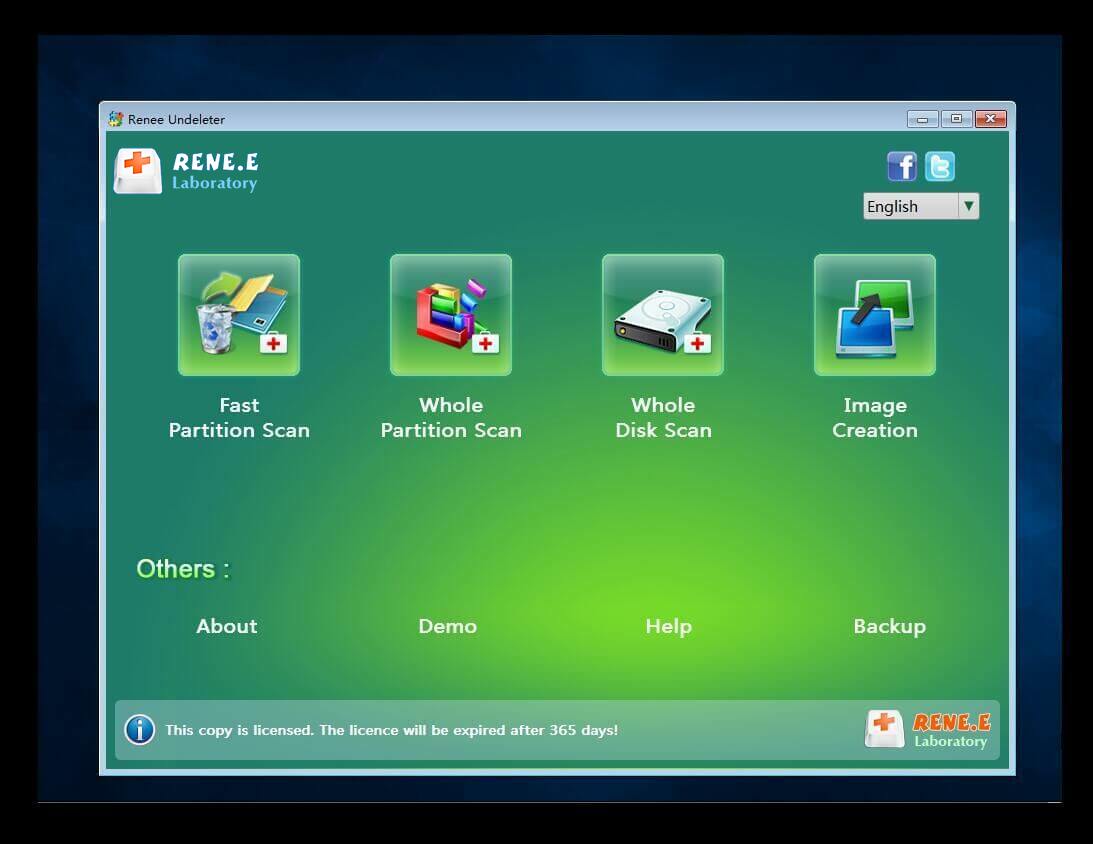
Recover the files Recover the deleted files without Windows system.
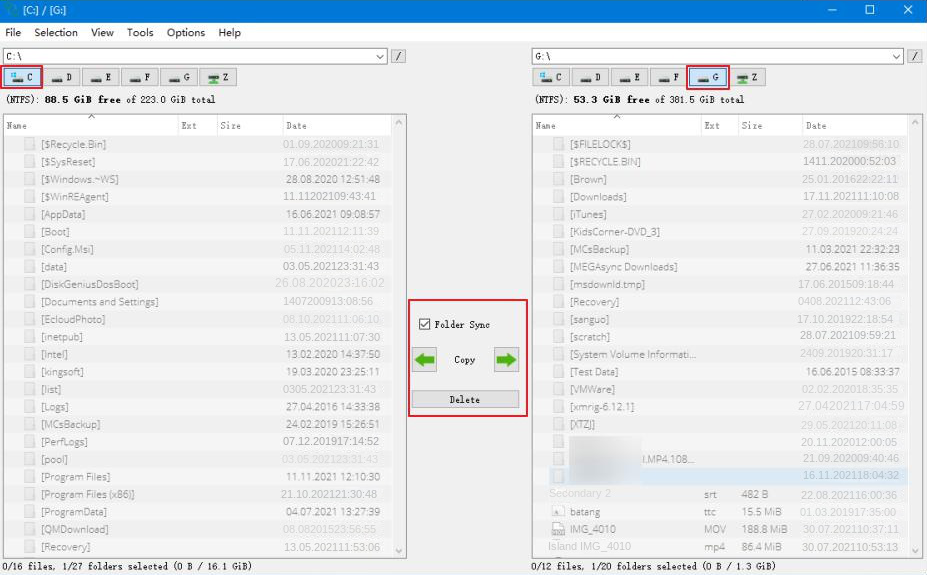
Transfer the data Transfer the important files of the computer with system.
Multifuctional Data transfer, data recovery, bootable problem recovery can be run without system.
Highly compatible Windows 11/10/8.1/8/7/XP/Vista. UEFI boot.
Remove Login Password Support Windows 11/10/8.1/8/7/XP/Vista. UEFI boot.
Recover the files Recover the deleted files without Windows system.
Transfer the data Transfer the important files of the computer with system.
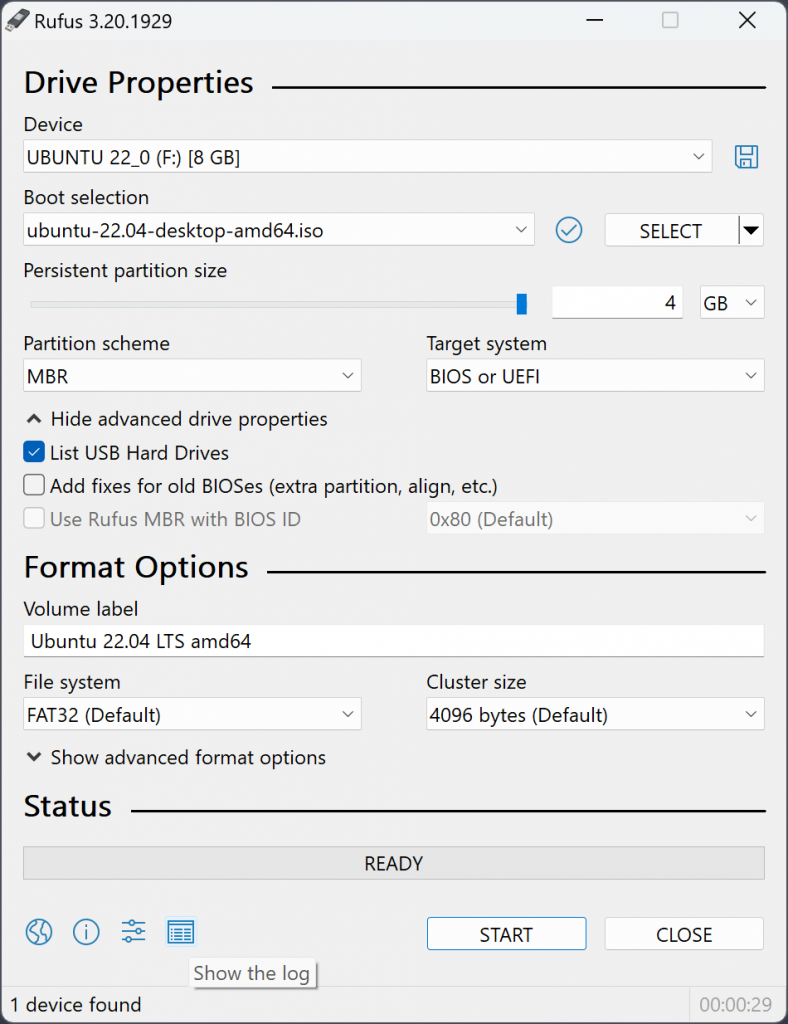
- One-click bootable USB creation
- Built-in Undeleter for deep recovery without OS
- Dedicated Data Transfer wizard
- File preview before saving
- Works on Windows 11/10/8/7/XP
- No disassembly required
Disadvantages:
- Paid software (free trial available)
- Requires a second working PC to create the USB
Step-by-step guide


| Server Type | Enter boot menu method |
|---|---|
DELL | Press the F12 key repeatedly before the Dell logo appears on the screen. |
HP | Press the F9 key multiple times when the HP logo is displayed. |
| BIOS Name | Enter boot menu method |
|---|---|
ASRock | DEL or F2 |
ASUS | DEL or F2 for PCs/ DEL or F2 for Motherboards |
Acer | DEL or F2 |
Dell | F12 or F2 |
ECS | DEL |
Gigabyte / Aorus | DEL or F2 |
Lenovo (Consumer Laptops) | F2 or Fn + F2 |
Lenovo (Desktops) | F1 |
Lenovo (ThinkPads) | Enter then F1 |
MSI | DEL |
Microsoft Surface Tablets | Press and hold Power and Volume Up buttons |
Origin PC | F2 |
Samsung | F2 |
Toshiba | F2 |
Zotac | DEL |
HP | Esc/ F9 for |
INTEL | F10 |


Troubleshooting
Popular Linux Rescue Kits Comparison
| Rescue Kit | ISO Size | Ease for Beginners | Key Recovery Tools | Best For |
|---|---|---|---|---|
SystemRescue | ~800 MB | Medium-High | TestDisk, PhotoRec, ddrescue, GParted | Advanced data rescue & cloning |
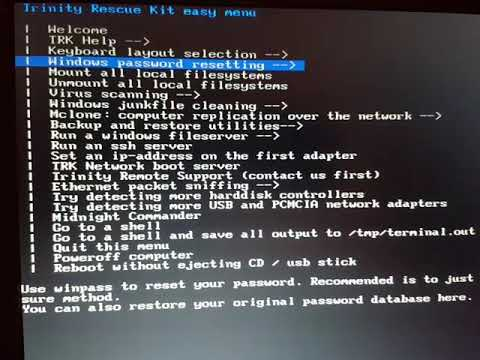
Trinity Rescue Kit (TRK) | ~300 MB | Medium | NTFS tools, file undelete scripts | Quick Windows data rescue |
GParted Live | ~400 MB | Beginner-Friendly | GParted, fsck, ntfs-3g | Partition check & safe file copy |
Step-by-step
Quick File System Troubleshooting in Live Linux
- Drive shows as read-only: Right-click → Properties → ensure NTFS is mounted with ntfs-3g.
- RAW or unallocated partition: Use Disks utility or GParted to check (never format).
- Permission issues: Open terminal and use
sudocautiously or right-click → Open as Administrator.
- Completely free with no usage limits
- Full open-source transparency and offline operation
- Lightweight options available for older PCs
Disadvantages:
- Requires occasional command-line knowledge for tricky mounts
- Interface may feel less polished than paid one-click wizards
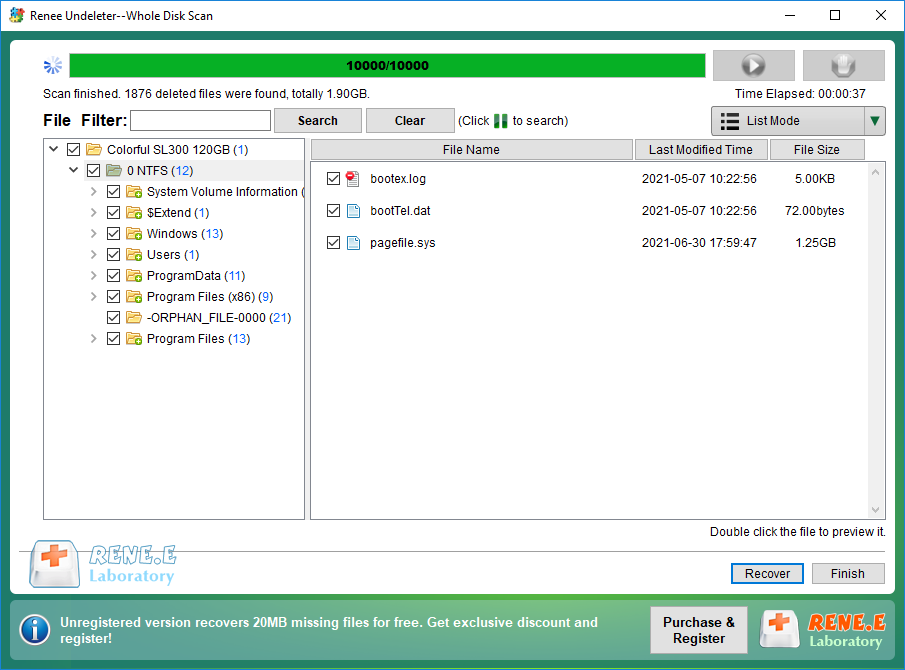
Easy to use Only simple steps to recover data from storage devices.
Multiple scan modes Fast partition scan, whole partition scan and whole disk scan for different recovery needs.
File types Support to recover pictures, videos, audios, documents, mails, etc.
Supported storage devices Recover data from recycle bin, SD card, external disk, etc.
Supported systems Windows 11,10, 8.1, 8, 7, Vista, XP, 2000 and Mac OS X10.6, 10.7, 10.8+.
Easy to use Only simple steps to recover data from storage devices.
Multiple scan modes - 3 scan modes for different recovery needs.
Supported storage devices Recover data from recycle bin, SD card, external disk, etc.
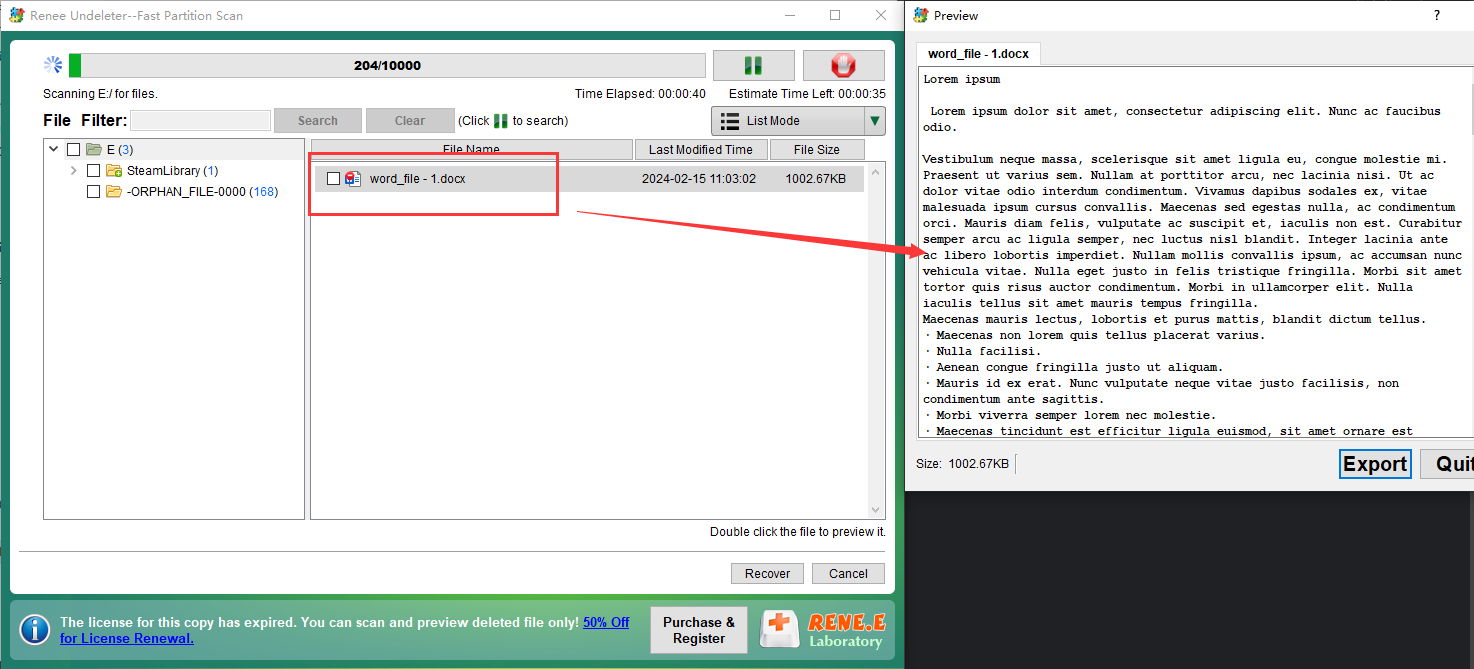
- Multiple targeted scan modes
- Built-in file preview
- Supports RAW and unallocated drives
- Simple step-by-step wizard
Disadvantages:
- Requires a working PC for installation
- Free version has recovery limits
- Not suitable for severe physical damage
Recovery steps


- Shows as RAW/unallocated: Do NOT initialize or format.
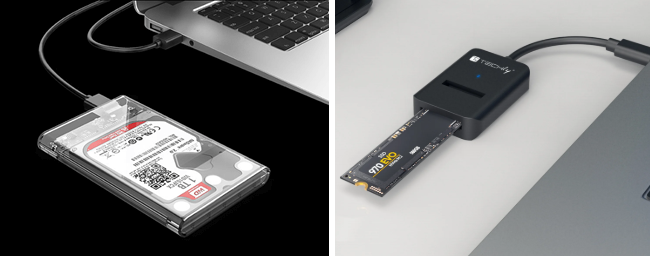
- Not detected: Try different cable/port/adapter.
- Scan freezes or drive makes noise: Stop immediately and seek professional help.
Red-Flag Symptoms Table
| Symptom | Severity Level (Risk) | DIY Risk | Action Required |
|---|---|---|---|
Clicking, grinding, beeping | High (70–90%) | Very High | Stop immediately |
Burning smell or visible damage | Critical (90%+) | Extreme | Power off, contact lab |
Drive not detected in BIOS (even external) | High (60–80%) | High | Professional cleanroom evaluation |
Extremely slow / freezing during scan | Medium-High (50–75%) | High | Stop scan, seek pro imaging |
Rapidly increasing bad sectors (CrystalDiskInfo) | High (65–85%) | High | Professional service |
Professional Data Recovery Pricing Guide (2026)
| Damage Type | Typical Price Range (USD) | Typical Turnaround | Estimated Success Rate |
|---|---|---|---|
Logical / Boot Corruption | $300 – $900 | 1–5 business days | 85–95% |
Firmware / Electronics | $700 – $1,800 | 3–7 business days | 75–90% |
Mechanical HDD Failure | $1,200 – $2,800 | 5–14 business days | 40–70% |
SSD / NAND Chip-Off Recovery | $1,000 – $3,500 | 7–21 business days | 50–80% |
Can I recover data if the drive shows in BIOS but Windows won’t boot?
Will these methods fix the original computer so it boots again?
Does this work the same for SSDs and HDDs?
My laptop won’t turn on at all—is the process the same?
What if my drive is BitLocker-encrypted?
Remove Windows Login Password 3 steps for whole password remove process.
Enable/Create Administrator One click for creating new administrator and enable the disabled account.
Widely Use New version supports UEFI boot model, which can be used on more computers, laptops and even surfaces.
Multifuctional Data transfer, data recovery, bootable problem recovery can be run without system.
Highly compatible Windows 11/10/8.1/8/7/XP/Vista.
Remove Login Password Support Windows 11/10/8.1/8/7/XP/Vista.
Enable/Create Administrator One click for creating new administrator and enable the disabled account.
Easy to use No need of any professional knowledge or password reset disk.
Relate Links :
How to Recover Deleted Desktop Files and Folders in Windows 10/11

13-09-2024
Jennifer Thatcher : The desktop in Windows 10/11 is a convenient location for frequently used files and folders, but it's also...
How to Restore a Missing D: Local Disk Drive on Your Computer
11-09-2024
Ashley S. Miller : The article discusses how to restore a missing D: disk drive on a computer by first determining whether...
How to Recover Data from an Uninitialized Disk Without Further Damage
29-08-2024
Ashley S. Miller : When a hard drive becomes uninitialized, it becomes inaccessible via Windows Explorer, often due to logical or physical...
Mastering Moving C Drive to SSD: A Step-by-Step Guide

30-07-2024
Amanda J. Brook : This article provides a thorough guide for moving your C drive to an SSD, including preparation, using cloning...


User Comments
Leave a Comment