

Step-by-Step Guide: How to Clone Windows to a Smaller SSD Effortlessly

Summary
Learn how to clone Windows to a smaller SSD with this step-by-step guide. Perfect for users in the US and India, it covers preparation, cleanup, and booting from your new SSD to ensure a hassle-free, performance-boosting upgrade.

Table of contents
Maybe you’re asking:
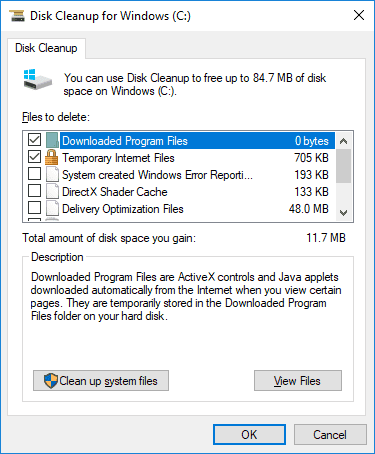
1. Free Up Space by Deleting Unnecessary Data

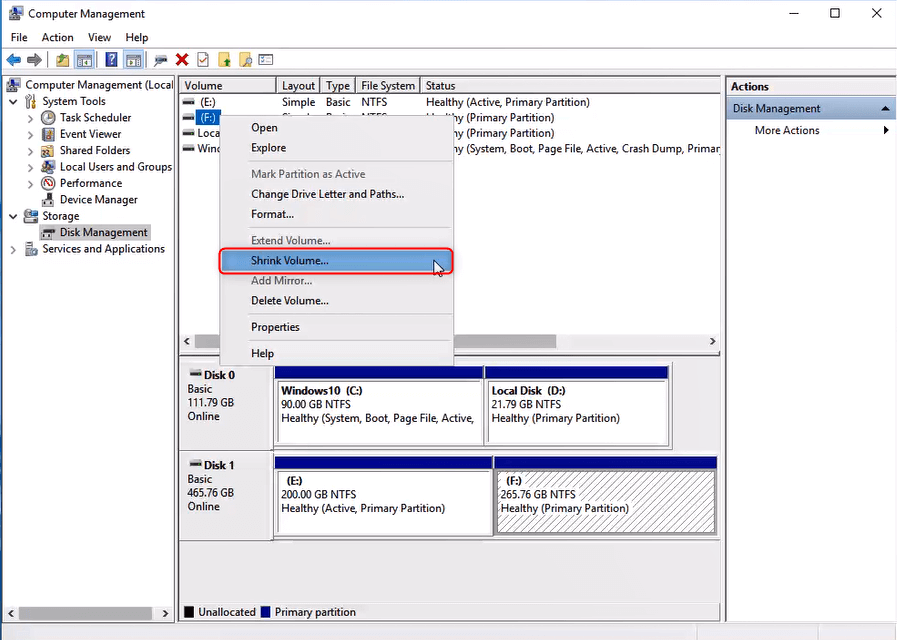
2. Shrink Your Windows Partition (If Needed)
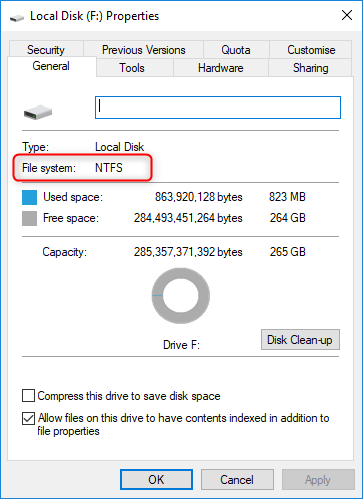
3. Check How Much Space You’re Actually Using
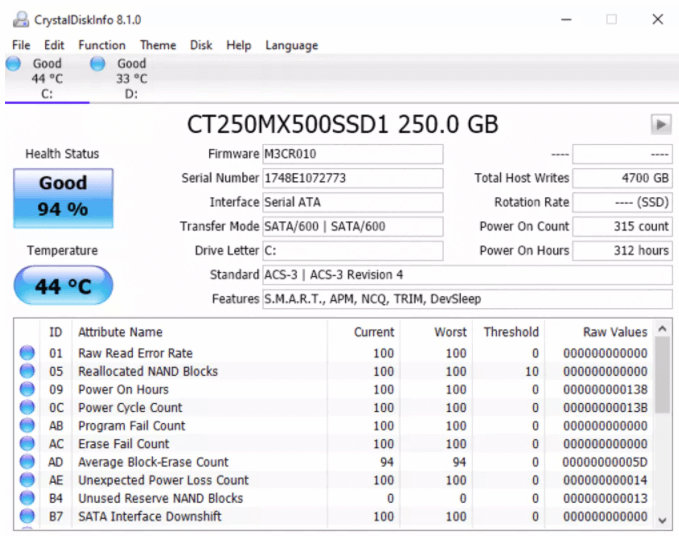
4. Fix System Errors in Your Windows Partition
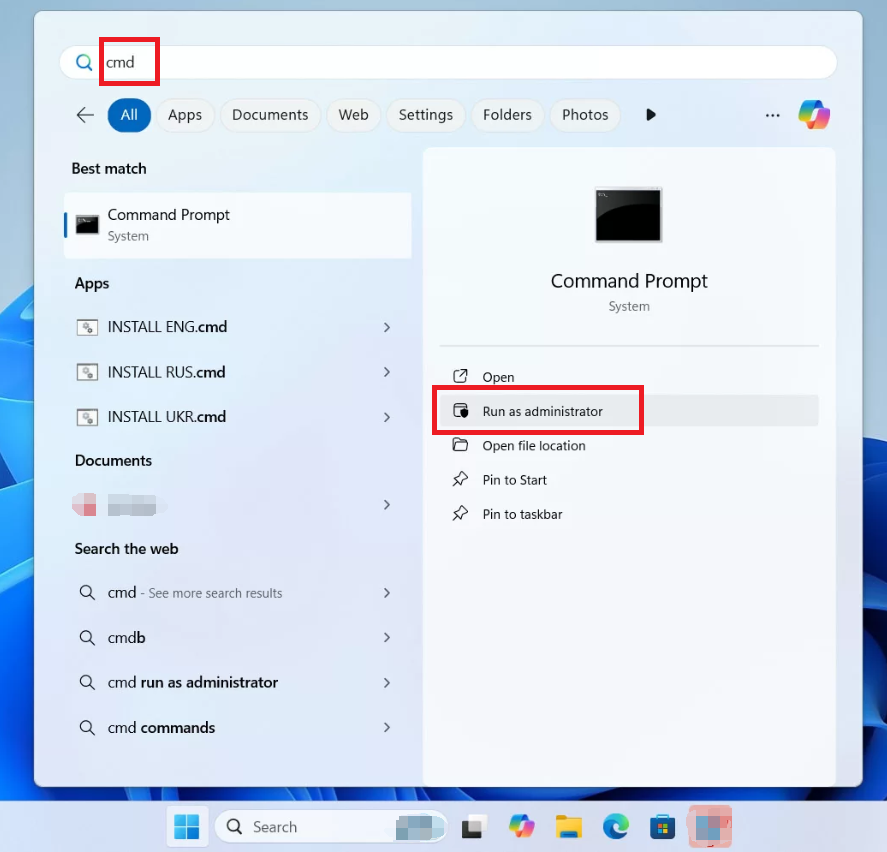
chkdsk C: /f
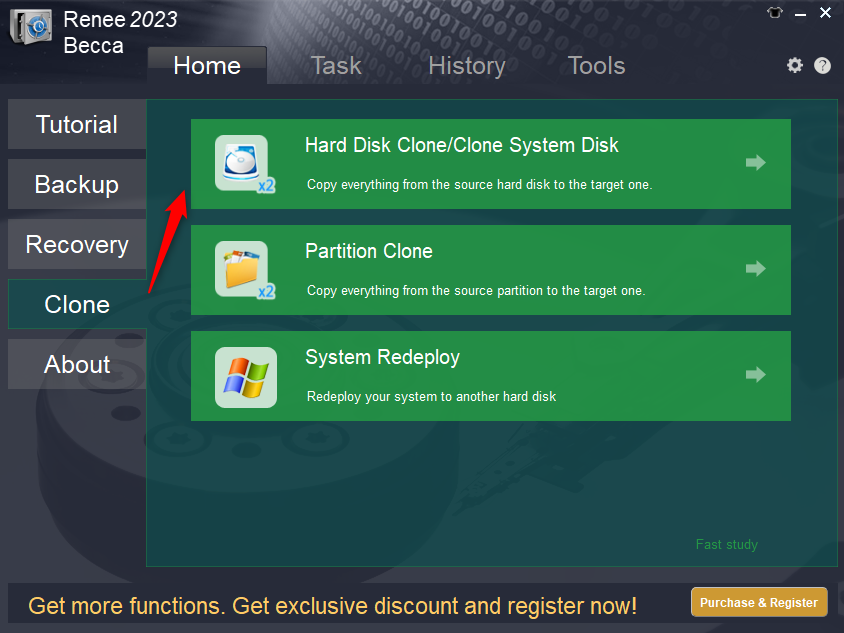
5. Get a Good Disk Cloning Tool

Automatic 4K alignment Improves SSD performance during system migration.
Support GPT and MBR Automatically adapt to the suitable partition format.
Support NTFS and FAT32 Redeploy various files in different file systems.
Back up quickly Back up files at up to 3,000MB/min.
Overall backup schedule Support system redeployment/system backup/partition backup/disk backup/disk clone.
Automatic 4K alignment Improve SSD performance
Support GPT and MBR Intelligently adapt to a partition format
Support NTFS and FAT32 Redeploy files in different file systems
6. Connect Your New SSD Properly

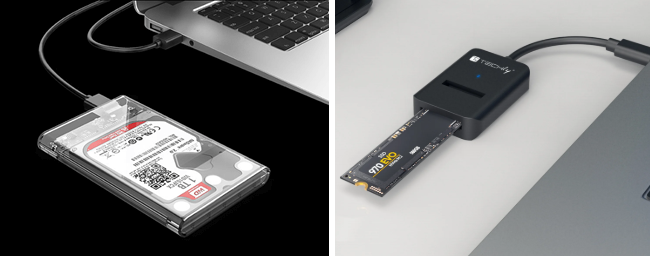
- Make sure your new SSD is properly connected, as outlined in the preparation section.
- Have Renee Becca downloaded and installed on your computer.
- Ensure that the used space on your current drive is less than the capacity of your new SSD.
- If your SSD is new, it might need to be initialized to match your system’s disk style (MBR or GPT). You can do this in Disk Management.
Automatic 4K alignment Improves SSD performance during system migration.
Support GPT and MBR Automatically adapt to the suitable partition format.
Support NTFS and FAT32 Redeploy various files in different file systems.
Back up quickly Back up files at up to 3,000MB/min.
Overall backup schedule Support system redeployment/system backup/partition backup/disk backup/disk clone.
Automatic 4K alignment Improve SSD performance
Support GPT and MBR Intelligently adapt to a partition format
Support NTFS and FAT32 Redeploy files in different file systems
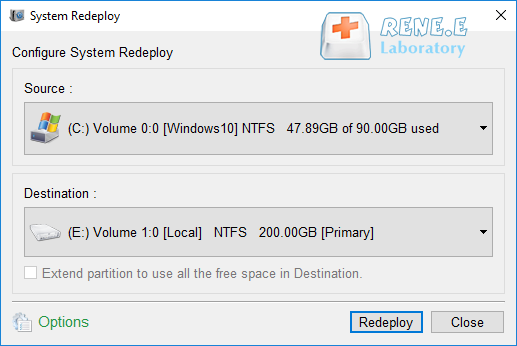
- System Redeploy: This moves only the Windows system partition to the new SSD, leaving other data behind. It’s great if you’re keeping your old drive for extra storage.
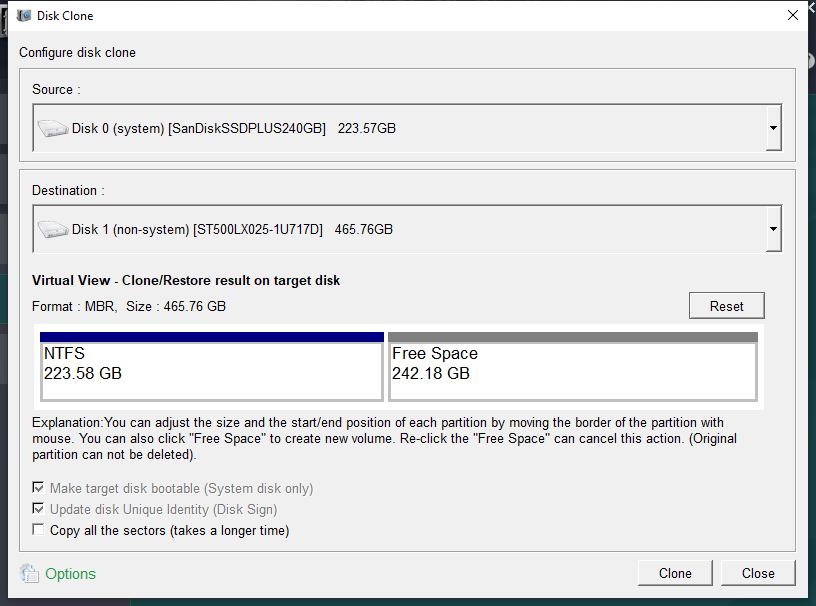
- Hard Disk Clone/Clone System Disk: This copies your entire drive—system, data, everything—and lets you adjust partition sizes to fit the smaller SSD. It’s ideal if you’re replacing your old drive completely.
Option 1: For system-only cloning, use the 'System Redeploy' function to save time.
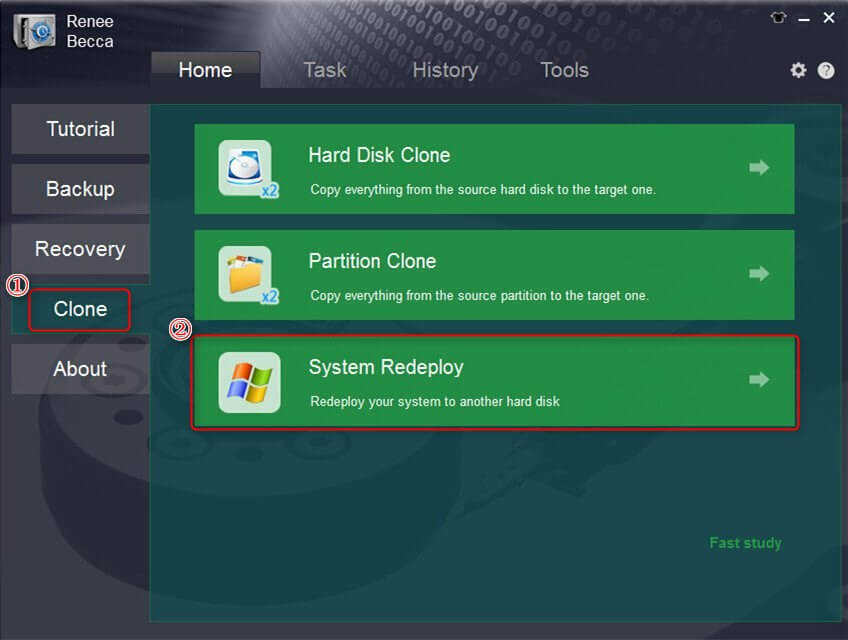
Option 2: Clone the Entire Drive Using the “Hard Disk Clone” Feature

- Press Win + X and select Disk Management.
- Right-click on the partition and choose Extend Volume if there’s unallocated space.
- If the partitions are locked or you need more control, try a tool like EaseUS Partition Master.
- Also, make sure your SSD is 4K aligned for the best performance.
Automatic 4K alignment Improves SSD performance during system migration.
Support GPT and MBR Automatically adapt to the suitable partition format.
Support NTFS and FAT32 Redeploy various files in different file systems.
Back up quickly Back up files at up to 3,000MB/min.
Overall backup schedule Support system redeployment/system backup/partition backup/disk backup/disk clone.
Automatic 4K alignment Improve SSD performance
Support GPT and MBR Intelligently adapt to a partition format
Support NTFS and FAT32 Redeploy files in different file systems
Relate Links :
How to Clone Large HDD to a Smaller SSD in Windows 10?

20-06-2019
Amanda J. Brook : Some users said that it was very time-consuming to install an new operating system after replacing HDD with...
Free Clone Large HDD to Smaller SSD in Windows
15-07-2019
Amanda J. Brook : Want to optimized the computer disk by replacing HDD with SSD? However, system reinstall makes you hesitate? Now...
[2025] Ultimate Guide to Upgrading SSD and RAM in Razer Blade Laptops

24-06-2025
Jennifer Thatcher : Upgrade Razer Blade SSD and RAM with this authoritative, step-by-step guide. Learn how to select a compatible SSD,...
Seamless Upgrade: How to Clone NVMe SSD to NVMe SSD Easily
09-06-2025
Jennifer Thatcher : Learn reliable and effective ways to clone NVMe SSD to NVMe SSD in Windows. This guide covers proven...


I need some help cloning my 180GB Intel SSD to a new 512GB SSD on my X270, all from within Windows 10. The smaller drive’s getting cramped, and I wanna make sure the new one has the same partitions, with all the extra space going to C:/.
I had an old Pop!_OS install taking up 32GB (28GB root + 4GB swap) that I finally removed and merged with C:/. Figuring out GRUB and MBR for Legacy BIOS was a nightmare—info’s so hard to find since everyone’s on UEFI now.
There’s a 518MB Recovery Partition at the end, not sure if it’s from Linux or Windows, but I’m keeping it just in case.
Any tools you’d recommend for cloning in Windows? I’d love something reliable like Renee Becca to handle the partition resizing and make the new SSD bootable. Thanks!
Plus, live USBs make me nervous with OEM recovery partitions—I don’t wanna mess up my Windows install. A Windows-based tool like Renee Becca sounds safer, especially since it can handle resizing and boot setup without risking the system. Any other Windows-based options?
The problem was my testing method. I cloned my internal SSD to the new one using a USB-to-SATA adapter, but kept getting BSODs when trying to boot from the external SSD.
Turns out, you gotta swap the new SSD into the laptop’s internal SATA port to boot properly—testing it via USB won’t work.
TLDR: Can’t boot a cloned Windows SSD via USB. Swap it to the internal SATA port.
ddto copy the drive. Then resize the partition in Windows with Disk Management.Honestly, though, a clean Windows install with your data backed up is the best way to go.
ddisn’t always straightforward—you might need to tweak the partition table after. Resizing works okay for Linux, but Windows can be finicky.dd if=/dev/sda of=/dev/sdb (or whatever for NVMe).
Cloning a 180GB to a 512GB SSD gives you a 180GB partition, but you can easily resize it in Windows Disk Management.
I’ve done this tons of times for system migrations.
I’ve used
ddfor Linux and macOS before, but Windows is a different beast. Thanks for the tip—I’ll probably use it for some other PCs I’m fixing up.Still, a clean Windows install is the way to go for a fresh start.
The trick was swapping the new SSD into the internal SATA port—USB clones won’t boot.
PS: Never had this issue with macOS back in the day.
TLDR: A cloned Windows 10 SATA drive won’t boot via USB. Gotta install it internally.
I did a similar clone (larger HDD to smaller SSD, Win 10) a while back with no issues. This time, I forgot what tool I used and kept hitting boot failures. Turns out, I was trying to boot the cloned SSD via USB, which doesn’t work for Windows (unlike macOS).
Swapping the new SSD into the internal SATA port fixed it. Renee Becca was super helpful for resizing partitions and making sure the clone was bootable.
TLDR: Don’t try booting a cloned Windows SSD from a USB enclosure. Swap it to the internal SATA port for smooth sailing!
I’m kinda picky about details, always tweaking my posts to fix typos or clarify stuff. I worry people see the messy version before I polish it, lol.
(Rant)
Feedback’s hard to come by now, not like the old forum days. Feels like I’m just typing into the void sometimes, especially when nerds like me try to explain tech stuff clearly. Community support really keeps these knowledge hubs alive.
This fast-paced, troll-heavy internet’s a lot, but I’m getting used to it.
PS: I miss the 2000s internet—tech was exciting, and people weren’t so instant-everything.
Totally agree! Happy I could brighten your day and bring back some nostalgia for the chill, old-school internet. 🥲
My 6-year-old laptop’s getting slow, so I grabbed a 1TB SSD to replace my 2TB HDD (only 170GB used). Tried AOMEI Backupper, but it wants me to buy the pro version to clone a larger drive to a smaller one. I just need the system and my 170GB of files cloned, and the 1TB SSD has plenty of space. Should I shrink the Windows partition first? Found some confusing advice online.
Any tips to make this smooth with a tool like Renee Becca?
Thanks!
Bob
Or use MiniTool Partition Wizard Free to shrink the C: drive and slide any partitions to the left so the used space fits on the 1TB SSD.
Give Samsung Data Migration a try—it’s free and should work fine.
Most free cloning apps will require you to purchase the full version to do this.
Try Samsung Data Migration tool SSD Tools & Software | Download | Samsung Semiconductor USA
it’s free and should do the job.
There are plenty of free tools that can clone from larger to smaller drives. Macrium Reflect, EaseUS Todo, and Renee Becca are good options—Renee Becca’s especially great for resizing partitions during cloning.
Thanks!
Bob
If you can boot into Windows with the SSD connected, press Windows + X, choose Disk Management, and check the bottom pane. Your SSD should show as Unallocated Space. Leave it like that for cloning, or right-click to create a Simple Volume, format it, and assign a drive letter for storage.
Cloning from a larger to a smaller drive is tricky, and many apps lock that feature behind a paywall.
When you clone a Source Drive to the Destination drive, it wipes the Destination drive to prepare it for the clone.
If you can still get into Windows, with the new SSD connected, press the Windows key +X and choose Disk Management. Here, in the lower pane it should show your SSD. It should say the file system is Unallocated Space. You can leave it this way if you still planning on Cloning. If you want to use it for Storage, you can Right click the space and Create a New Simple Volume, Format it and give it a drive letter.
Cloning a larger Disk to a smaller Disk is an advanced step and software app makers like to save that for people who buy their software.
Huge thanks for the help! After a lot of stress, I got it sorted. The issue was the SSD being unallocated, and the Samsung tool was trying to apply firmware to a non-Samsung drive. Renee Becca worked like a charm, cloning my 2TB HDD to the 1TB SSD no problem. It’s in the laptop now, though not as fast as I’d hoped.
Thanks again!
Bob
If that feels too tricky, move your data to an external drive, do a fresh Windows install on the SSD, then copy the data back for a clean setup.
Or should I delete some games to get the HDD size down to fit the SSD?
Thanks for any advice!
Uninstall some games, move videos or music to another drive, then clone with a tool like Renee Becca, which can adjust partitions to fit the smaller SSD.
I’m swapping a Win7 HDD for a smaller SSD to save on cost. Shrunk the HDD partition with Gparted, set up NTFS partitions on the SSD, marked the first one as Boot, and copied them over. Worked fine on one PC.
Tried the same on another PC, but the SSD wouldn’t boot. Used Acronis True Image before with no issues, but this time it took forever and still failed. Switched to Clonezilla for partition-to-partition cloning—faster, but the SSD lost its partitions, like it’s unformatted. Is the SSD bad, or did I mess up? Can someone guide me through cloning a Win7 drive to a smaller SSD with a reliable tool? Thanks!
Didn’t make the disc on that PC cause it was too slow—hence the SSD upgrade!
Microsoft suggests a full backup with system state and restoring to a fresh Win7 install.
If your drive came with a limited version of Acronis or similar, that could work too. WD and Seagate often include free versions.