author avatar
    Specialist of Customer Service Dept.
 

Summary
Struggling to access your laptop due to a forgotten or lost password? Don't panic! In this article, we will guide you through various methods to unlock your locked laptop and regain access to your valuable files and data.


It’s a common scenario that many of us have experienced – you’re in a rush to finish an important project or access some important files, and suddenly you find yourself locked out of your laptop. Panic sets in as you frantically try different passwords, but to no avail. Don’t worry, you’re not alone in this frustrating situation. The good news is, there are options to regain access to your laptop without having to resort to extreme measures. In this article, we’ll be exploring one of these options for Windows users – discovering the built-in administrator account. So if you’ve found yourself in a similar predicament, read on to find out how you can unlock your laptop and get back to work in no time.

Option 1 for Windows: Unlocking Your Laptop by Enabling the Built-in Administrator Account

Being locked out of your laptop can be a frustrating and stressful experience, especially if you have important work or personal information stored on it. While there are various ways to regain access to your laptop, one of the most effective options for Windows users is to enable the built-in administrator account. This will give you administrative privileges to reset your password or create a new account, allowing you to unlock your laptop and get back to using it.
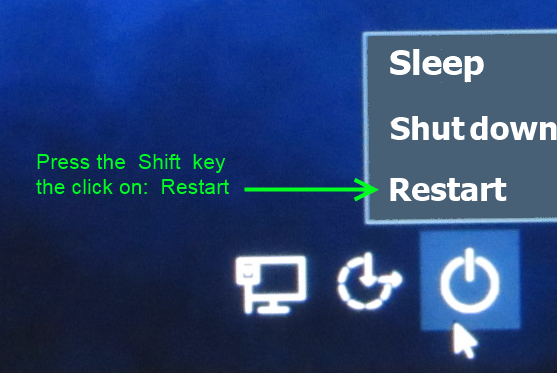
Step 1: Start by restarting your laptop. Once it boots up, press the Shift key and click on the Power button, then select Restart. This will bring up the Windows Recovery Environment.
press Shift key and click the restart button
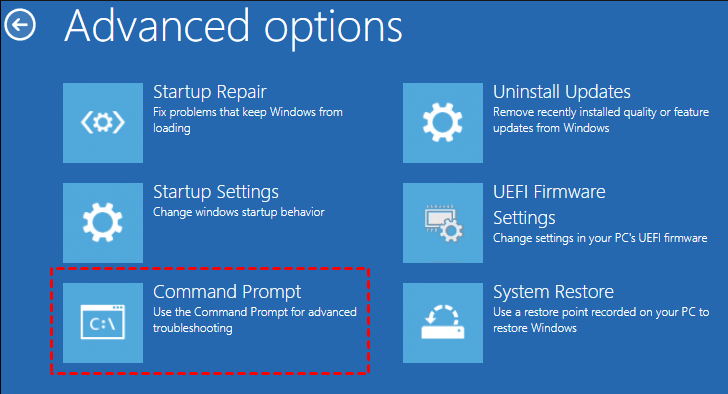
Step 2: In the recovery menu, select Troubleshoot followed by Advanced options and then Command Prompt. This will open a command line interface where you can enter commands to make changes to your system.
locked out of laptop
Step 3: In the command prompt, type

net user administrator /active:yes

and press Enter. This will enable the built-in administrator account on your laptop.
Step 4: Exit the command prompt and restart your laptop. When it boots up, you will now see the option to log in to the built-in administrator account.
Step 5: Log in to the administrator account and go to Control Panel > User Accounts > User Accounts > Manage Accounts. Here, select your regular account and click on Change the password.
Step 6: Enter a new password for your account and click on Change password. This will reset your password, allowing you to log in to your regular account again.
Step 7: Once you have successfully logged in, you can go back to User Accounts and Manage Accounts to disable the built-in administrator account by selecting it and clicking on Change the account type. Then, change it from Administrator to Standard.
Congratulations, you have successfully unlocked your laptop by enabling the built-in administrator account. Remember to always create a password reset disk or backup your files to prevent being locked out of your laptop in the future. Stay safe and keep your information secure.
Tips:Always create a password reset disk or backup your files to prevent being locked out in the future.

Option 2 for Windows : Use a Renee PassNow to regain access to your locked laptop.

In the previous chapter, we discussed how to unlock your locked laptop by enabling the built-in Administrator account. However, if this method does not work or you do not have access to a secondary account, there is another option you can try – using a Renee PassNow software.
Renee PassNow is a versatile software that can help you regain access to your locked laptop by resetting the password or removing it completely. It works for all versions of Windows, including the latest Windows 10. The software is easy to use and has a simple user interface, making it a convenient option for those who are not tech-savvy.
To use Renee PassNow, you will need a spare computer (can be either a Windows or Mac) and a USB drive. Here are the steps to follow:
Tips:If your account is Microsoft Account, Renee PassNow will convert this account to Local account. After resetting login password, you need to connect your account to your Microsoft Account again.
To reset your Windows password using Renee PassNow, follow these steps:
Step 1: Download and Install Renee PassNow
Start by downloading Renee PassNow from the official website and install it on a different computer that you can access. You can choose the appropriate version based on your computer’s operating system.
Renee PassNow – Professional Windows System Rescue Tool

Remove Windows Login Password 3 steps for whole password remove process.

Recover the files Recover the deleted files without Windows system.

Transfer the data Transfer the important files of the computer with system.

Fix Windows startup error Fix various Windows startup failures or crashes.

Erase disk Completely erase disk files which will not be restored.

Remove Windows Login Password 3 steps for whole password remove process.

Recover the files Recover the deleted files without Windows system.

Transfer the data Transfer the important files of the computer with system.

Free TrialFree TrialNow 2000 people have downloaded!
Step 2: Create a Bootable USB or CD/DVD
Launch Renee PassNow and insert a USB flash drive or blank CD/DVD into the computer. Select the option to create a bootable media. Follow the on-screen instructions to complete the process.
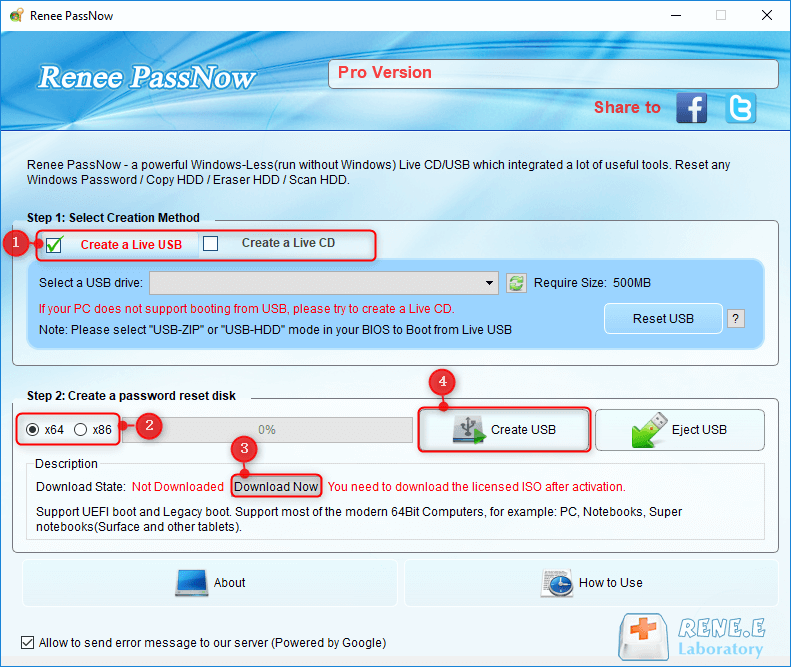
Create New Windows 10 Password Reset Disk with Renee PassNow
Step 3: Boot the Locked Server from the Bootable Media
Insert the bootable USB or CD/DVD into the locked Windows computer. Restart the computer and enter the BIOS settings by pressing the appropriate key (usually F2 or Delete). Configure the boot order to prioritize the bootable media.
Common Server:
Server TypeEnter boot menu method
DELLPress the F12 key repeatedly before the Dell logo appears on the screen.
HPPress the F9 key multiple times when the HP logo is displayed.
Common Computers:
BIOS NameEnter boot menu method
ASRockDEL or F2
ASUSDEL or F2 for PCs/ DEL or F2 for Motherboards
AcerDEL or F2
DellF12 or F2
ECSDEL
Gigabyte / AorusDEL or F2
Lenovo (Consumer Laptops)F2 or Fn + F2
Lenovo (Desktops)F1
Lenovo (ThinkPads)Enter then F1
MSIDEL
Microsoft Surface TabletsPress and hold Power and Volume Up buttons
Origin PCF2
SamsungF2
ToshibaF2
ZotacDEL
HPEsc/ F9 for `Boot Menu`/ Esc/ F10/ Storage tab/ Boot Order/ Legacy Boot Sources
INTELF10
Boot the target PC with the created password reset USB/CD/DVD.
Step 4: Select password reset function
After successfully booting from the bootable media, Renee PassNow will load. Select “PassNow!” function after booting from the new created Windows password reset disk.
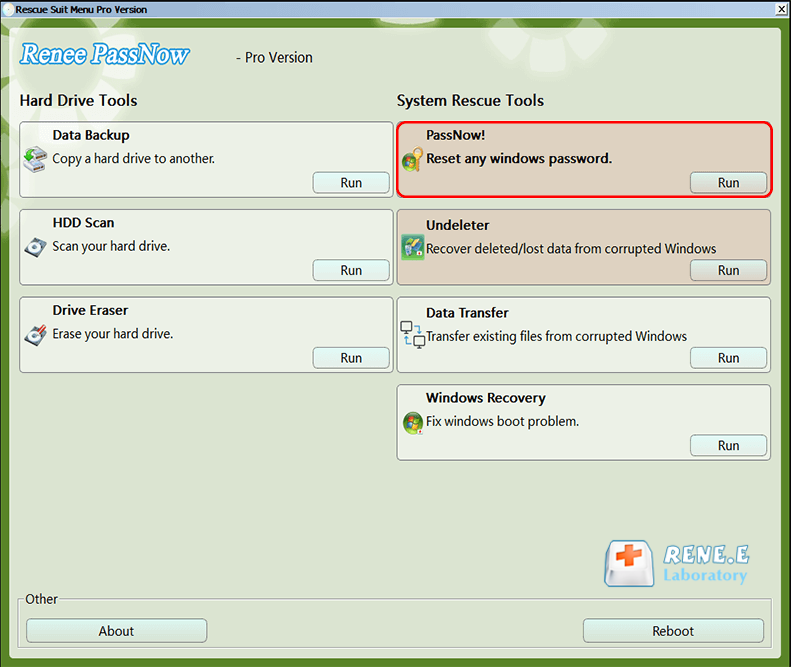
After loading into main interface, please select the “PassNow!” function.
Step 5: Resetting the Password
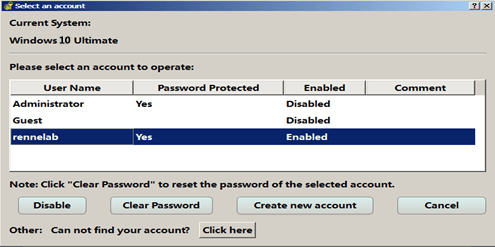
Choose the user account for which you want to reset the password. Then, click on the “Clear Password” button. Renee PassNow will remove or reset the password for the selected user account.
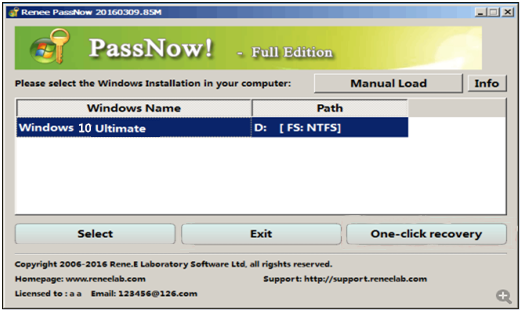
Select target Windows system in the list
Select target user account in the list
Step 6: Reboot the PC
Once the password is reset, remove the bootable media from the PC and restart the computer. You will now be able to log in to Windows Account without a password.
Please note that using Renee PassNow will remove the password, not recover it. This means that you will no longer need a password to access your laptop. If you want to set a new password, you can do so through the Control Panel.
Renee PassNow is a helpful tool for regaining access to your locked laptop. However, it is recommended to keep a backup of your important files in case of any accidents. Prevention is always better than cure.

Option 3 for Windows : Unlock your laptop using a Windows installation disk

Are you locked out of your laptop and need to regain access? One effective method is by using a Windows installation disk and replacing the “utilman.exe” file with “cmd.exe.” This allows you to access the Command Prompt and reset passwords or perform troubleshooting tasks. Follow the steps below to unlock your laptop using a Windows installation disk:
Step 1: Start by booting your locked laptop from the Windows installation disk. Make sure that your laptop’s BIOS is set to boot from the disk.
Step 2: When the Windows installation screen appears, press “Shift + F10″ simultaneously. This will open the Command Prompt.
Step 3: In the Command Prompt, enter the following command to navigate to the root of the C: drive:

cd C:

Step 4: Now, you need to replace the “utilman.exe” file with “cmd.exe.” Execute the following commands:

move C:\Windows\System32\utilman.exe C:\

copy C:\Windows\System32\cmd.exe C:\Windows\System32\utilman.exe

Step 5: After successfully replacing the files, close the Command Prompt window and remove the Windows installation disk.
Once you have completed these steps, restart your laptop. When you reach the Windows login screen, click on the “Accessibility” icon located in the lower-right corner. This will launch the Command Prompt as the “Ease of Access” utility.
From the Command Prompt, you can reset the password for your Windows local admin account by using the following command:

net user [username] [newpassword]

Replace “[username]” with the name of the user account you want to reset the password for, and “[newpassword]” with your desired password.
After resetting the password, close the Command Prompt and sign into the admin account with the new password.
To ensure the safety of your system, it is important to restore the original “utilman.exe” file. To do this, follow these steps:
Step 1: Reboot your computer from the Windows installation disk again.
Step 2: When you reach the Windows Setup screen, press “Shift + F10″ to bring up the Command Prompt window.
Step 3: Run the following command to restore the Utility Manager:

copy C:\utilman.exe C:\Windows\System32\utilman.exe
When prompted to overwrite the file, type “Yes” and press Enter.
Finally, remove the Windows installation disk, restart your computer, and everything should be back to normal.
Unlocking your locked laptop using a Windows installation disk and replacing the “utilman.exe” file with “cmd.exe” allows you to regain control of your laptop. Follow the steps carefully to successfully unlock your laptop.

Option 1 for MacOS: Reset Your Password Using Your Apple ID

If you are a Mac user and find yourself locked out of your laptop, do not panic. There is an option to reset your password using your Apple ID. This method is convenient and can be done easily if you have your Apple ID credentials.
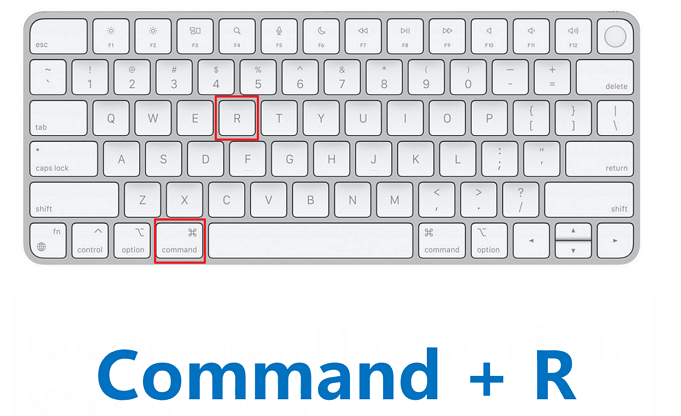
To start the process, first, restart your Mac and hold down the Command + R keys simultaneously until the Apple logo appears. This will boot your laptop into the Recovery Mode.
MacOS Command + R
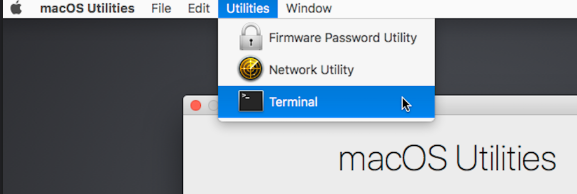
Once in Recovery Mode, click on Utilities in the menu bar and select Terminal. This will open a console where you can enter commands to reset your password.
locked out of laptop
Now, type in the following command in the Terminal window:

resetpassword

Press Enter to execute the command. This will open the Reset Password window.
Next, click on the Next button at the bottom of the window. You will be prompted to enter your Apple ID and password.
Enter your Apple ID and Password and click on the Next button again. This will verify your credentials and allow you to reset your password.
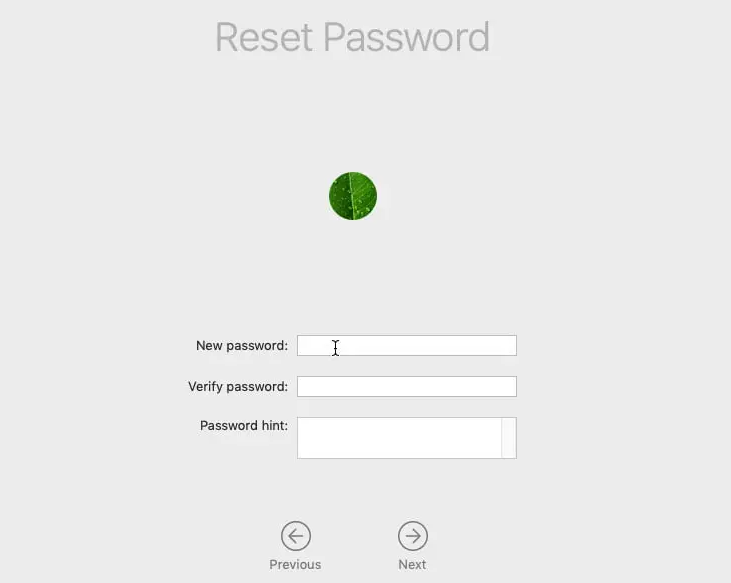
In the Reset Password window, enter your new password and confirm it by entering it again. You can also add a Password Hint if desired. Once done, click on the Next button.
You will receive a message that your password has been reset. Click on the Restart button to reboot your Mac.
MacOS Reset Password
After your Mac restarts, you can log in with your new password and access your laptop.
If you have multiple user accounts on your Mac, you can use this method to reset the password for any of those accounts. Simply select the account you want to reset the password for in the top-left corner of the Reset Password window.
In case you do not have your Apple ID credentials, you can still reset your password using the Recovery Mode options. However, this will require you to erase your hard drive and reinstall MacOS. Therefore, it is always recommended to have your Apple ID credentials handy to avoid losing any data on your laptop.
Using your Apple ID to reset your password is a simple and effective method for Mac users. Make sure to keep your Apple ID credentials safe to avoid being locked out of your laptop.

Option 2 for MacOS: Using Another Admin Account to Unlock Your Mac

If you have been locked out of your Mac and cannot access your account, there is another option for unlocking your laptop. This involves using another admin account on your Mac to reset your password. This may be a good alternative if you do not have access to your Apple ID or if you do not want to reset your password using your Apple ID.
Step 1: Start by restarting your Mac and going to the login screen. Once there, you will see the list of user accounts on your Mac.
Step 2: Look for the option to switch users or log in as a different user. Click on this option and a list of all the admin accounts on your Mac should appear.
Step 3: Select an admin account that you have access to and click on the “Log In” button. You will now have access to this account’s desktop and files.
Step 4: Once logged into the admin account, open “System Preferences” and go to the “Users & Groups” section.
Step 5: Select your locked out account from the list of users and click on the “Reset Password” button at the bottom of the window.
Step 6: A pop-up window will appear asking you to create a new password for your account. Enter a new password and confirm it.
Step 7: You can also add a password hint in case you forget your password in the future. Once you have entered all the necessary information, click “Reset Password.
Step 8: You will receive a notification that your password has been reset. You can now log out of the admin account and log in using your newly reset password for your locked out account.
By using another admin account to reset your password, you have successfully unlocked your Mac and regained access to your account. Make sure to remember your new password and keep it in a secure place.
It is always a good idea to have multiple admin accounts on your Mac in case of situations like this. This way, you can use one account to reset the password for another in case of a lockout. Additionally, make sure to regularly back up your files and important documents to prevent losing them in case of a lockout or other technical issues.

In case of Encryption-Related Lockouts

Unlocking a laptop that is encrypted can be a challenging task, but there are methods available to help you regain access. In case of encryption-related lockouts, explore the following methods to regain access to your encrypted laptop:
1. Contact your IT department or system administrator: If you are using an encrypted laptop that is managed by your organization, reach out to your IT department or system administrator. They may have the necessary tools or recovery keys to help you unlock your laptop. They can also provide guidance on using the BitLocker recovery tool to decrypt the volume at the block level if other methods don’t work.
2. Recover BitLocker keys from Active Directory Domain Services (AD DS): If your laptop is protected by BitLocker encryption and your organization has saved the recovery information in AD DS, you can use this information to unlock your laptop. A domain administrator can obtain the recovery password from AD DS and use it to unlock the drive. This method requires enabling the BitLocker recovery method in the group policy settings.
3. Use a data recovery agent: If you have set up data recovery agents for your encrypted laptop, they can use their credentials to unlock the drive. However, this method may require mounting the drive as a data drive on another computer for the data recovery agent to unlock it.
4. Seek professional help: If you are unable to unlock your encrypted laptop using the above methods, it is recommended to seek professional help from a data recovery specialist. They have the expertise and tools to handle complex encryption scenarios and may be able to assist you in regaining access to your laptop.
5. Restore from a backup: If you have a recent backup of your encrypted laptop, you can consider restoring your data to a different device. This would allow you to access your files and data without unlocking the encrypted laptop directly.
Additional considerations:
- Use BitLocker recovery key hints: BitLocker metadata includes information about when and where the BitLocker recovery key was backed up. These hints can help you locate the recovery key. It is recommended to use cloud-based or Active Directory backups instead of printing or saving the recovery keys to a file.
- Prioritize recovery key backups: If multiple recovery keys exist on the volume, prioritize the last-created and successfully backed up recovery key. The system will ask for a key that has been backed up, even if another key is newer.
- Be aware of firmware and hardware changes: Certain changes to firmware or hardware can cause BitLocker to enter recovery mode. It is important to suspend BitLocker before making such changes and resume protection after the changes are completed.
- Forgotten PIN or lost startup key: If you have forgotten the PIN for your encrypted laptop or lost the USB flash drive containing the startup key, alternate recovery methods such as contacting your organization’s help desk or using the BitLocker recovery tool may be required.
- Using Windows Recovery Environment (RE) and BitLocker: Windows RE can be used to recover access to a drive protected by BitLocker. If the Windows RE environment has been modified or TPM protection is disabled, the BitLocker recovery key will be required to unlock the drives.
Conclusion:
When faced with an encryption-related lockout on your laptop, it is important to explore different methods to regain access. Contact your IT department, recover BitLocker keys from AD DS if applicable, use data recovery agents, seek professional help if necessary, or restore from a backup. Additionally, be aware of BitLocker recovery key hints, prioritize backups, firmware and hardware changes, forgotten PIN or lost startup key situations, and the potential use of Windows RE for recovery. These considerations will help you navigate the process of regaining access to your encrypted laptop and retrieve your important data.

Conclusion

In conclusion, being locked out of your laptop can be a frustrating experience, but there are several methods to regain access. For Windows users, you can try enabling the built-in administrator account or using a Renee PassNow tool. Alternatively, you can also use a Windows installation disk and replace ultiman.exe with cmd.exe. For MacOS users, resetting your password using your Apple ID or using another admin account can be helpful. It is also important to know how to regain access to your encrypted laptop in case of encryption-related lockouts. By following these methods, you can unlock your laptop and get back to using it without any further hassle. Remember to always keep your login information secure and easily accessible to avoid being locked out in the future.