author avatar
    Senior Program Developer
Last update by Emma Johnson at 25 June 2025

Summary
Learn reliable and effective ways to recover deleted files after Windows update. This guide covers trusted software tools and built-in Windows features, ensuring users can restore lost data with ease and confidence.


Losing files after a Windows update can be a nightmare, but it’s a common issue that can often be resolved with the right tools and techniques. Whether due to system glitches, such as Blue Screen of Death (BSOD), power outages, or other errors, knowing how to recover your deleted files is crucial. In this comprehensive guide, we’ll walk you through multiple proven methods to retrieve your lost data, from using professional data recovery software to leveraging built-in Windows features. Let’s get started!
Windows update failed

Essential Methods to Recover Deleted Files After Windows Update

Discovering that files have vanished after a Windows update can be alarming, but the situation isn’t always as dire as it appears. Sometimes your documents are simply relocated or temporarily hidden rather than permanently erased. The approach you take to recover deleted files after a Windows update depends on your specific situation and whether you’ve been using Windows’ built-in backup features.
Since complete file deletion presents the most challenging scenario, we’ll tackle that first before exploring simpler recovery situations.

Method #1: Use Professional Data Recovery Software

When a Windows update has genuinely deleted your files and you lack recent backups, specialized data recovery software becomes your most reliable option. These applications scan your storage device’s file system to locate and restore missing data. For cases where the file system itself has been corrupted, look for tools that offer signature-based scanning capabilities – these can recover deleted files after Windows update even when the directory structure is damaged. Renee Undeleter stands out as an excellent choice for this task.
If your Windows system becomes unresponsive or inaccessible after an update—making it difficult or even impossible to operate—try using Renee PassNow, an offline Windows PE rescue CD/USB. This tool can help you retrieve files, recover lost data, or even create a new user account when you can't access your system normally.

click on passnow to reset login password

Renee Undeleter is a powerful and intuitive data recovery tool designed to help you retrieve files lost or deleted during events like a Windows update. With its user-friendly interface and robust recovery capabilities, it supports over 400 file formats, ensuring you can recover documents, photos, videos, and more with ease. Whether files were accidentally deleted, misplaced, or lost due to system errors, Renee Undeleter offers a high success rate.
Beyond its signature scanning technology, which excels at recovering overwritten files, Renee Undeleter also supports file system-based recovery for all major Windows file systems, such as NTFS and FAT32. This makes it ideal for finding files that haven’t been overwritten but are simply hidden or misplaced after a system update.

Follow these straightforward steps to recover your lost files using Renee Undeleter:

Step 1: Download, Install, and Launch Renee Undeleter
Visit the official website to download Renee Undeleter, then install and run it on your Windows computer.
Renee Undeleter - Powerful Data Recovery SoftwareRenee Undeleter data Recovery software

Easy to use Only simple steps to recover data from storage devices.

Multiple scan modes Fast partition scan, whole partition scan and whole disk scan for different recovery needs.

File types Support to recover pictures, videos, audios, documents, mails, etc.

Supported storage devices Recover data from recycle bin, SD card, external disk, etc.

Supported systems Windows 11,10, 8.1, 8, 7, Vista, XP, 2000 and Mac OS X10.6, 10.7, 10.8+.

Easy to use Only simple steps to recover data from storage devices.

Multiple scan modes - 3 scan modes for different recovery needs.

Supported storage devices Recover data from recycle bin, SD card, external disk, etc.

Free TrialFree TrialFree Trial

3000 users have downloaded Renee Undeleter and found data back!

Important Tip: To prevent overwriting lost data, avoid installing the software on the disk where your missing files were stored. Similarly, refrain from saving new data to that disk until recovery is complete.
Step 2: Choose the Fast Partition Scan Option
Once the software is open, select the [ Fast Partition Scan ] option from the main interface. This mode is perfect for recovering files lost due to accidental deletions or emptied recycle bins.
Renee Undeleter, select Fast Partition Scan 
Renee Undeleter’s Key Recovery Features
- Fast Partition Scan: Quickly recovers files from accidental deletions or recycle bin clearance.
- Whole Partition Scan: Restores data from inaccessible or formatted partitions.
- Whole Disk Scan: Performs an in-depth analysis of partition information for comprehensive recovery.
- Image Creation: Creates a mirror image of a partition for safe backup purposes.
Step 3: Select the Partition to Scan
Choose the partition where your lost files were located and click [ Next ] to proceed.
Select partition to scan for fast partition scan 
Step 4: Run a Fast Scan
Select the [ Fast Scan ] option and click [ Next ] to begin scanning. This mode targets the first 30GB of available space on the selected disk, making it a quick way to locate recently deleted files. If the Fast Scan doesn’t find your files, you can switch to [ Deep Scan ] for a more thorough search, though this will take longer.
Select Fast scan in Fast Partition Scan 
Step 5: Preview and Recover Files
After the scan completes, you can double-click files to preview them. Select the files you want to recover, then click [ Recover ] to save them to a different disk to avoid overwriting other potential data.
Preview before recovery 
Pro Tip: If the Fast Scan doesn’t locate your files, try the Deep Scan mode for a comprehensive search. Act quickly after data loss, as the longer you wait, the higher the risk of permanent overwriting.
Using Renee Undeleter significantly boosts your chances of recovering files lost during a Windows update. Its combination of speed, versatility, and ease of use makes it a top choice for both novice and experienced users.

Method #2: Restore Files Using File History

When recovery software cannot locate your missing files following a Windows update, they may have been permanently overwritten. In such cases, your only recourse is restoring from backups created before the update occurred, such as those generated by File History.
File History automatically creates backup copies of files stored in key folders – Documents, Music, Pictures, Videos, Desktop, and Favorites. If your missing files were located in these directories and you had File History enabled prior to the update, you can use this feature to recover deleted files after Windows update.
Follow these steps to recover deleted files after Windows update using File History:
1. Access the Control Panel on your Windows computer.
find control pannel in Windows 11
2. Navigate to "System and Security," then click on "File History."
select file history
3. Connect the external storage device or access the network location where your File History backups are stored.
4. In the File History window, locate and click the "Restore personal files" link on the left sidebar.
5. Browse through the backup timeline to find the version of the folder or file you need to restore.
Windows File History
6. Once you locate the desired items, right-click and select "Restore" to return the file to its original location, or choose "Restore to" if you prefer to save it elsewhere.
If File History wasn’t enabled before the update, or your files weren’t stored in the automatically backed-up folders, this method won’t help recover deleted files after Windows update. You’ll need to explore alternative recovery approaches.

Method #3: Check Cloud Storage Services

Cloud storage services can be invaluable for recovering files lost during Windows updates, particularly when you’ve been manually uploading important documents rather than relying on automatic synchronization. Manual uploads ensure your files remain safely stored in the cloud regardless of what happens to your local system.
However, if you have automatic sync enabled between your device and cloud storage, deleting a file locally typically removes it from all synchronized locations. Fortunately, most cloud services maintain deleted files in a recycle bin or trash folder for approximately 30 days, giving you a window to recover deleted files after Windows update.
Here’s how to recover deleted files after Windows update using OneDrive (similar steps apply to Google Drive, iCloud, and other services):
1. Open the OneDrive application on your computer or visit the OneDrive website. Sign in using your Microsoft account credentials.
2. Navigate to the main “Files” section where you typically store documents, photos, and other data.
3. Use the search bar at the top to look for specific files by name or file type. If you remember the filename, enter it to see if the file appears in search results.
search files in onedrive
4. If the search doesn’t yield results, manually browse through folders where you typically save files. Sometimes files aren’t deleted but simply moved to different locations. If you find your files in OneDrive, click the “Download” button to save them back to your computer.
5. Still no luck? Look for the “Recycle Bin” in the bottom-left corner. OneDrive stores deleted files there for up to 30 days.
6. If you find your missing files in the Recycle Bin, select them and click “Restore.” They’ll return to their original folder, or you can specify a different location.
OneDrive Recycle Bin
7. After restoration, navigate to the file’s location, select it, and use the “Download” option to save it back to your computer.

Method #4: Enable Hidden File Visibility

Sometimes files become hidden during Windows updates, making them invisible in normal File Explorer searches. To recover deleted files after Windows update that may actually be hidden rather than deleted, you need to adjust Windows visibility settings.

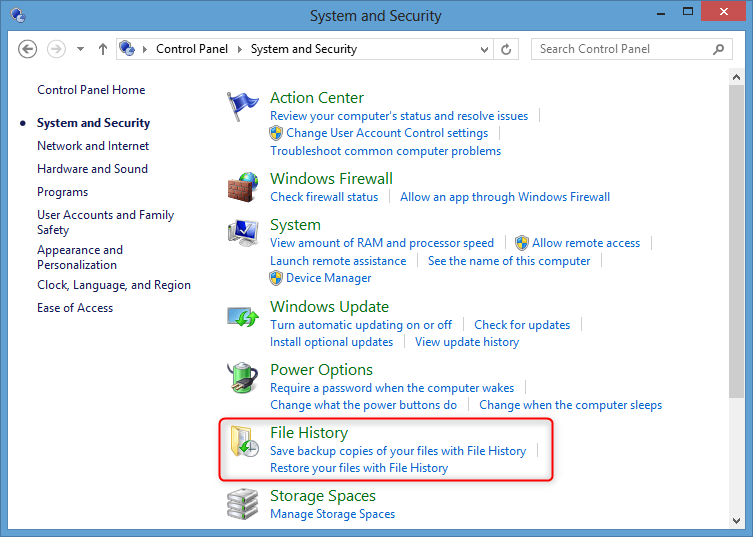
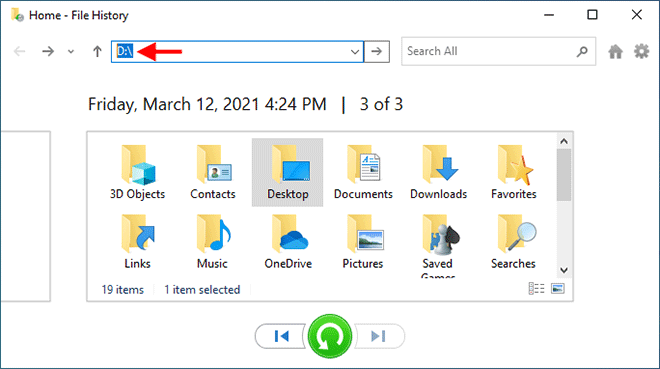
Follow these steps to reveal hidden files and recover deleted files after Windows update:

1. Press Win + E or click the File Explorer icon to open it.
2. Click the “View” tab at the top, then hover over “Show” in the dropdown menu.
3. Check the box next to “Hidden items” to make hidden files and folders visible.
file explorer hidden items
4. Use File Explorer’s search bar to locate your files. You should now see any previously hidden items.

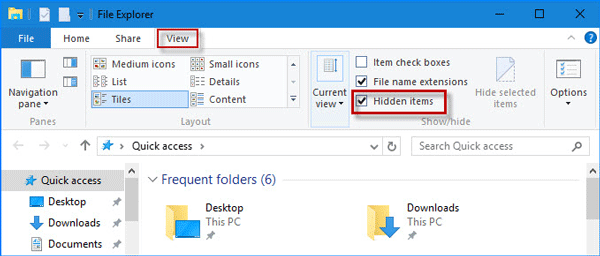
To permanently unhide important files so you can easily recover deleted files after Windows update in the future:
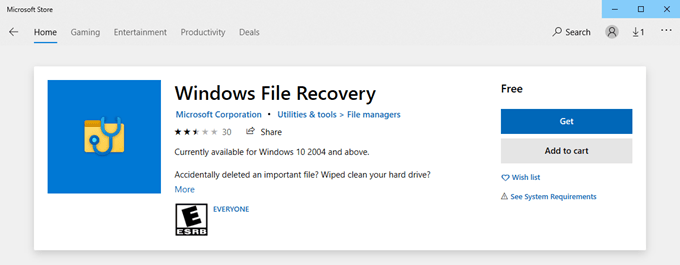
1. Right-click the hidden file or folder and select “Properties.”
2. Under the General tab, find the Attributes section. If the “Hidden” box is checked, uncheck it.
3. Click “Apply,” then “OK” to save the change.

Method #5: Perform Comprehensive File Searches

To make the search more effective, please execute "Method #4: Enable Hidden File Visibility" before starting the search.
Following a Windows update, files that appear to be missing may have simply been moved to different folders. Major system updates can relocate both system files and personal data, making it challenging to locate specific items among thousands of files. File Explorer’s search functionality can help you efficiently track down relocated files and recover deleted files after Windows update scenarios.
Here’s how to conduct thorough searches to recover deleted files after Windows update:
1. Press Win + E or click the File Explorer icon to open File Explorer.
2. To search across all drives and folders, start from “This PC” rather than a specific directory.
open Windows 11 download folder
3. If you remember the exact filename, type it into the search bar in the top-right corner and press Enter.
4. For files where you only remember the type, use wildcards. For example, typing “*.jpg” will display all JPEG image files.
find files in Windows 11
5. To refine your search, click the “Search Tools” button and select “Advanced options”, and apply filters like Kind, Size, or Date modified to narrow down results.
use search options on windows

Method #6: Exit Temporary Profile Mode

If you notice that everything seems to have disappeared after a Windows update – files are missing, your desktop is blank, and all settings have reset – you’re likely signed into a temporary user profile rather than your regular account.
Windows Temporary User Profile (TEMP) Issue
Windows creates temporary profiles as a fallback when your main profile cannot load properly. This temporary environment doesn’t contain your personal files, custom settings, or installed applications. To recover deleted files after Windows update in this situation, you need to return to your primary user profile.
When Windows encounters a problem loading your usual user profile—often due to corrupted files, incomplete updates, or permission issues—it may sign you into a temporary profile. If you can not logout and enter other account, you may try to use Renee PassNow to create a new account, recovery lost file and transfer exsiting files in an offline Windows PE rescue CD/USB.
Here’s how to recover deleted files after Windows update by exiting temporary profile mode:
1. Press Ctrl+Alt+Del and select “Task Manager.” Go to the “Users” tab to check which profile you’re currently using. If it displays “Temporary,” you’re in a temporary profile.
Users Tab Windows 11 Task Manager
2. Click the Start menu, then click your profile icon at the top. Select “Sign out.”
3. At the login screen, enter your credentials to sign into your main profile. If your computer has multiple accounts, ensure you select the correct one.
4. After logging in, verify that your files and settings have returned to normal.

Method #7: Access the Windows.old Folder

The Windows.old folder is automatically created during major Windows version upgrades and contains a complete copy of your previous system installation. This includes system files, user profiles, and personal data from folders like Desktop, Documents, and Pictures. When you need to recover deleted files after Windows update, Windows.old often provides the most comprehensive recovery option.
If you don’t find Windows.old on your system drive (typically C:), several scenarios might explain its absence: you may have performed a clean installation rather than an upgrade, someone might have manually deleted it, or Windows automatically removed it. By default, Windows deletes the Windows.old folder approximately 28 days after an upgrade to free up storage space.
To recover deleted files after Windows update using Windows.old:
1. Press Win + E to open File Explorer and navigate to your system drive (usually C:). Look for the Windows.old folder in the root directory.
Windows 11 windows.old
2. Open the folder and navigate to subfolders like Users [ YourUsername ] to find your old Desktop, Documents, Pictures, and other personal directories.
3. When you locate the files you want to recover, right-click and select “Copy”. Go to your desired destination folder, right-click again, and choose “Paste”.
4. Verify that the recovered files function correctly. Once you’ve successfully retrieved everything needed, consider deleting the Windows.old folder to reclaim significant disk space.

Method #8: Use System Restore Points

System Restore Points in Windows allow you to roll back your computer to an earlier configuration when everything was functioning properly. This feature captures snapshots of system files, installed programs, registry settings, and configurations at specific moments in time. When a Windows update causes problems or data loss, you can revert to one of these snapshots to recover deleted files after Windows update and restore system stability.
Before proceeding with System Restore to recover deleted files after Windows update, ensure you had restore points created before installing the problematic update. Remember that restoring will remove any applications or updates installed after the selected restore point.
Here’s how to recover deleted files after Windows update using System Restore:
1. Type “Create a restore point” into the Windows search bar and click the top result to open System Properties.
find create restore point in windows 10,
2. Navigate to the “System Protection” tab and click the “System Restore...” button. A wizard will open – click “Next” to continue.
system protection configure
3. You’ll see a list of available restore points. Select one created before your problems began (prior to the most recent Windows update), then click “Next.”
system restore
4. Review the restore point details to confirm it’s the correct one. If everything appears accurate, click “Finish” to begin the restoration process.
5. Windows will restart to apply the changes. Depending on your system specifications and the number of changes being reversed, this process may take considerable time.

Method #9: Use Windows File Recovery

Windows Fast Partition Scan is a utility released by Microsoft around the time of Windows 10 version 2004 (approximately May 2020). Available for download from the Microsoft Store on Windows 10 and Windows 11, it can restore files deleted from local SSD drives, USB sticks, memory cards (SD cards), external hard drives, and even ZIP drives.

A Command Line App

Windows Fast Partition Scan is a command-line-only program, meaning there is no official graphical user interface (GUI). If you are familiar with command-line shells like Windows Terminal, you will find it easier to use. However, even if you are new to command-line utilities, this article will help you get started quickly.

How Windows File Recovery Works

Windows Fast Partition Scan uses two scanning methods to search for your deleted files:
- Regular: Uses the Master File Table (MFT) on your volume to search for files. Best used for recently deleted files on non-corrupted NTFS drives.
- Extensive: Offers a thorough recovery option suitable for all file systems, including FAT, FAT32, ReFS, etc.

How to Install Windows File Recovery

To install Windows Fast Partition Scan, you need to be running at least Windows 10 version 2004 or Windows 11. Follow these steps to download and install WFR:
1. Open the Microsoft Store application from your Taskbar or the Start Menu.
2. Click in the Search bar at the top, type in ‘Windows Fast Partition Scan’, and hit Enter. Alternatively, you can click on this Microsoft Store link.
windows file recovery in store
3. Click the Install button on the right.
Renee Undeleter - Powerful Data Recovery SoftwareRenee Undeleter data Recovery software

Easy to use Only simple steps to recover data from storage devices.

Multiple scan modes Fast partition scan, whole partition scan and whole disk scan for different recovery needs.

File types Support to recover pictures, videos, audios, documents, mails, etc.

Supported storage devices Recover data from recycle bin, SD card, external disk, etc.

Supported systems Windows 11,10, 8.1, 8, 7, Vista, XP, 2000 and Mac OS X10.6, 10.7, 10.8+.

Easy to use Only simple steps to recover data from storage devices.

Multiple scan modes - 3 scan modes for different recovery needs.

Supported storage devices Recover data from recycle bin, SD card, external disk, etc.

Free TrialFree TrialFree Trial

3000 users have downloaded Renee Undeleter and found data back!