author avatar
    Senior Program Developer
 

Summary
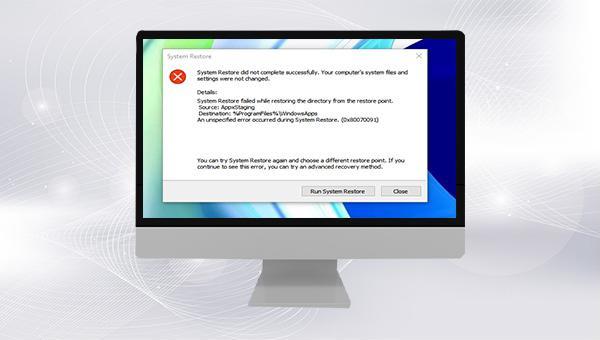
Learn how to fix Windows system restore failed issue and restore your computer to a previous stable state using this comprehensive guide.


system restore failed

I. What is system restore, and what are the reasons why the system cannot be restored?

System Restore, an integral Windows feature, leverages restore points to revert system files and installed programs to a prior state. These points are snapshots of your system at a given moment. Typically, Windows creates a restore point automatically when updating or installing new software, but you can also create them manually by pressing Windows Key + R, typing sysdm.cpl, and navigating to the System Protection tab.
Windows stores the restore point on your hard drive, preserving it until it’s required for system restoration or deletion. If you encounter any problems after making changes, you can use Windows System Restore to revert your system to this safe state. Provided the restore point is free from any issues, your system is expected to operate normally following the restoration process.
No operation is infallible. System restore can fail due to various reasons, such as a missing or corrupt restore point file, disabled system protection settings, or damaged system files. Knowing these potential issues, we can now address how to resolve them.

II. What is the repair method for system restore failure?

1. Perform system restore from other restore points

If you have created multiple restore points, you can try to restore the system from other restore points when the system restore fails. The specific operation steps are as follows:
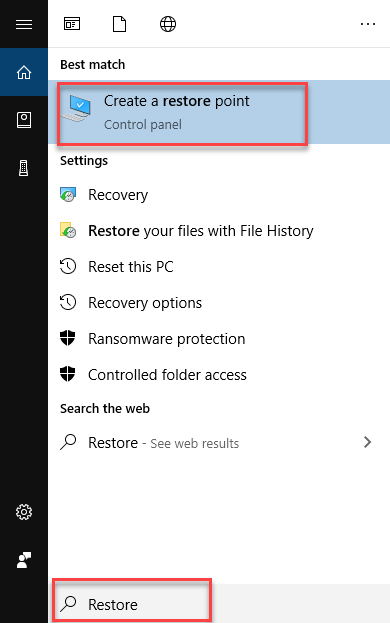
Step 1: Run the computer, enter (create a restore point) in the search box in the lower left corner, and click to enter.
search to create a restore point in windows
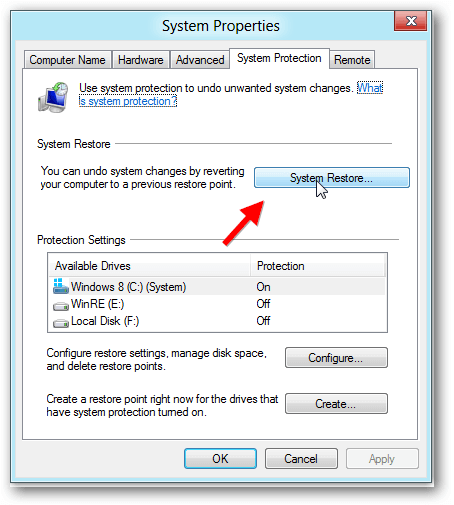
Step 2: Switch the function bar to the (System Protection) option in the opened “System Properties” interface. Then click the (System Restore) button to display all the restore points you created.
System Restore Point thumb
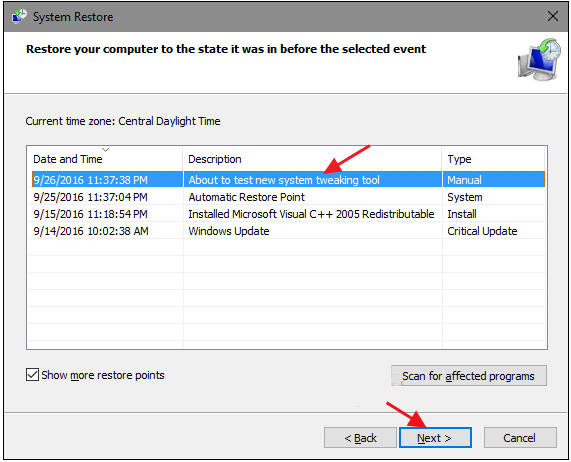
Step 3: Select another recent system restore point, then click (Next). The next interface will pop up to confirm the system restore operation, click the (OK) button, and the system restore command can be executed.
select the restore point

2. Check the system protection setting status

If the system protection setting status is turned off, the problem of system restore failure may also occur. Let’s learn how to view and set the system protection status.
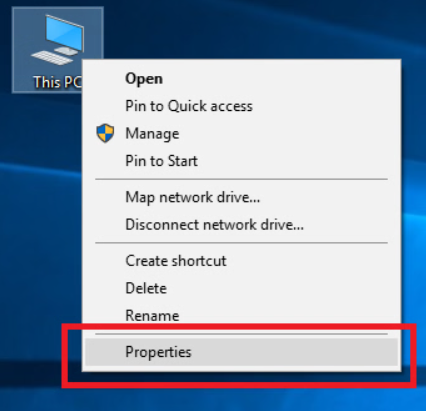
Step 1: Run the computer, right-click (This Computer) on the desktop, and then select the (Properties) option.
this pc properties
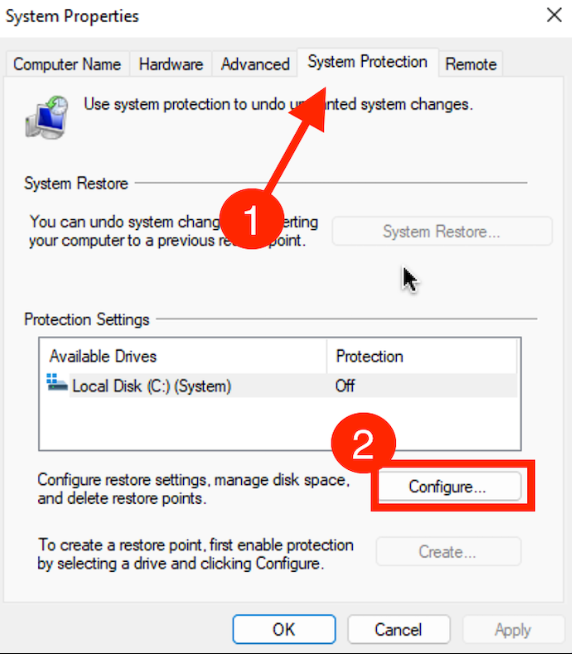
Step 2: Click “System Protection,” locate the “Protection Settings” in the system properties, and ensure the C drive is “On.” If “Off,” click “Configure,” choose “Enable System Protection,” and click “OK.” Return to the System Properties window and click “OK” again.
system protection configure

3. Use the SFC command to check and repair damaged system files

When the system restore cannot be performed normally, it may be caused by system file corruption. The following is the method to check and repair damaged system files with the help of SFC command.
Step 1: Search (cmd) directly in the search box in the lower left corner, and select (Run as administrator) to open the command prompt tool.
run as administrator
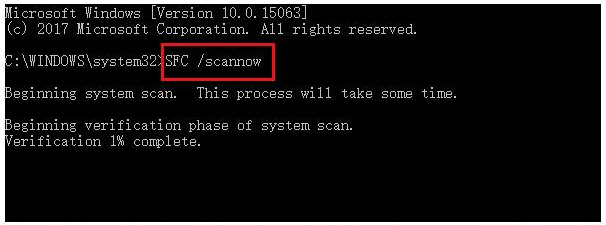
Step 2: Open the command prompt by pressing Windows + R, type cmd, and then press Enter. Inside the command prompt, type SFC /scannow and press Enter. The System File Checker will begin scanning for and repairing corrupted system files. After the process is complete, restart your PC to apply the changes and attempt the Windows 10 restoration once more. For in-depth information on the sfc command, click here.
Enter the SFC command
The three most common repair methods for system restore failure are outlined above. To avoid errors associated with Windows system restore, here’s a practical approach for backing up system data. Employ multiple backup methods for greater preparedness.

III. (Extended reading) Backup Windows system with Renee Becca

Despite the robustness of the Windows operating system, users may encounter issues during everyday use. To mitigate potential problems, it is advisable to perform regular system backups using specialized software. For efficient system backup and restoration, consider utilizing Renee Becca.

1. What is Renee Becca?

Renee Becca is a dedicated tool for system and hard disk data backup and recovery. It enables you to safeguard critical data, including programs, system settings, emails, photos, videos, documents, and bookmarks. Utilizing advanced incremental/differential backup technology, it saves time and conserves disk space. Renee Becca also offers features like partition, hard disk, and file backup, as well as disk cloning and system migration to suit various user requirements.
Renee Becca - Reliable Data Backup & Restore Software

Quick Backup files at up to 3,000MB/min.

Fullfill different backup needs Supports system backup, disk / partition backup, file backup and disk clone.

Intelligent Automatically analyze the differences between source and backup data.

Convenient Support VSS, allowing to freely view webpages when backing up system.

Highly compatible Supports various files and storage devices.

Quick Backup files at up to 3,000MB/min.

Fullfill different backup needs Backup for disk, partition and system. Save disk space by backing up incremental /differential data.

Highly compatible Supports various files and storage devices.
Free TrialFree Trial 2000 users have downloaded and enjoy Renee Becca!

2. How to use Renee Becca to back up the system?

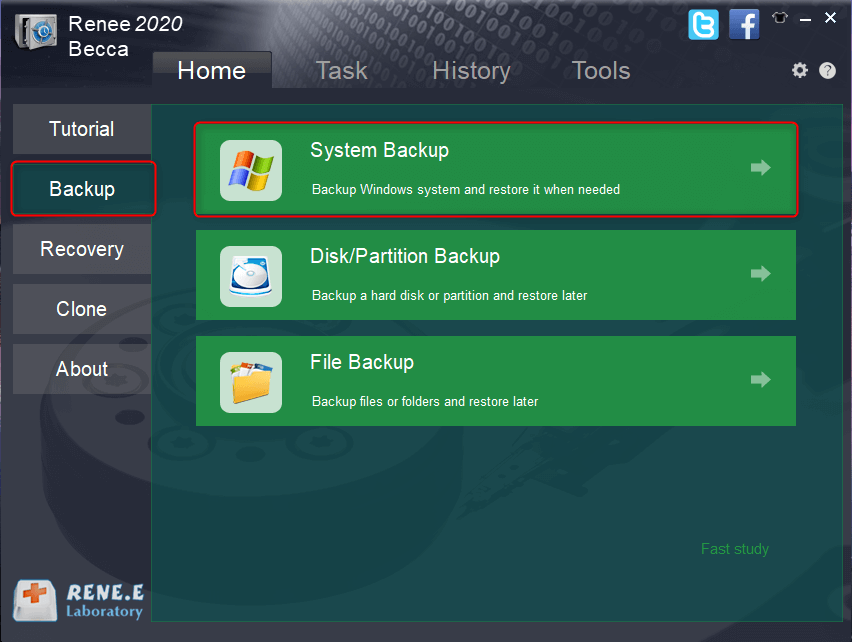
Step 1: Download, install and run Renee Becca on the computer, and select the (System Backup) option in the main interface.
system backup renee becca
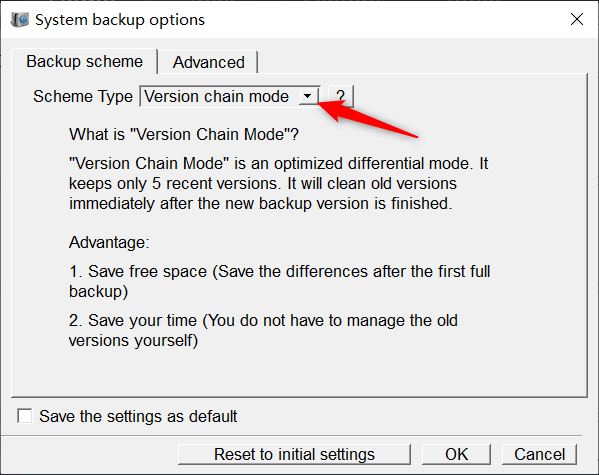
Step 2: Select the source file (typically the system partition) and the destination for the backup. Within the Backup Scheme options, choose from 5 modes: version chain, single versionfull, incremental, or differential, based on your needs.
system backup mode
Renee Becca has 5 backup plans:

  • Version chain mode: Only the latest 5 versions are kept, and useless old versions are automatically deleted after the backup is complete.
  • Single version mode: Only the most recent version is kept, and the previous version is automatically deleted after the backup is complete.
  • Full mode: Create a full backup.
  • Incremental mode: After the initial full backup, only incremental backups are created.
  • Differential mode: After the initial full backup, only differential backups are created.
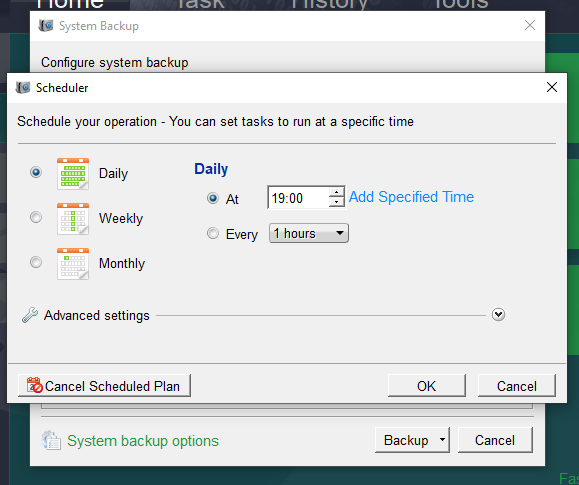
In addition, in (Scheduler), you can set a daily/weekly/monthly automatic backup plan and the time to start the backup, click (OK) to enable the automatic backup function.
system backup-schedule
Step 3: After all the settings are completed, click (Backup) and wait for the system backup to complete. You can check the backup progress in the (Task) interface.
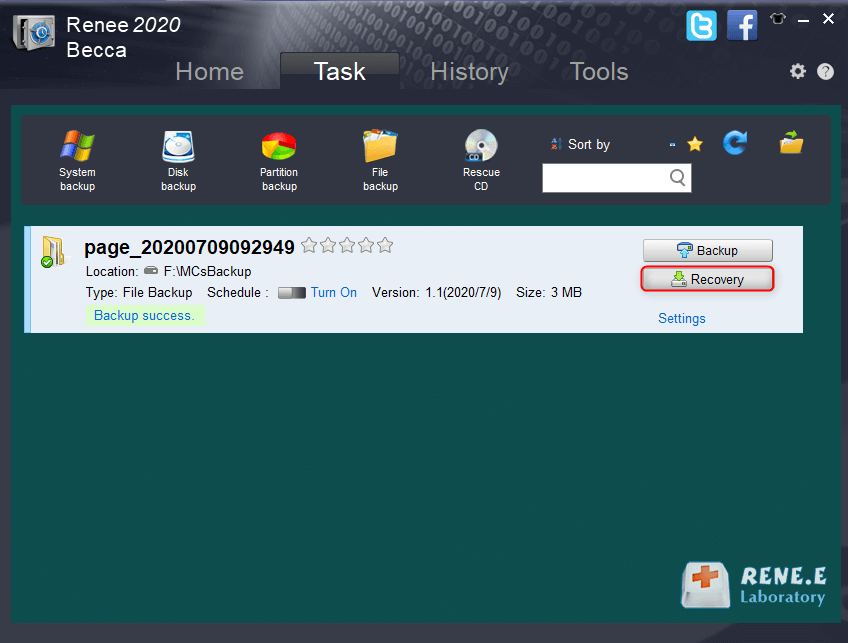
recover backup files from renee becca

3. How to restore the system with the help of Renee Becca?

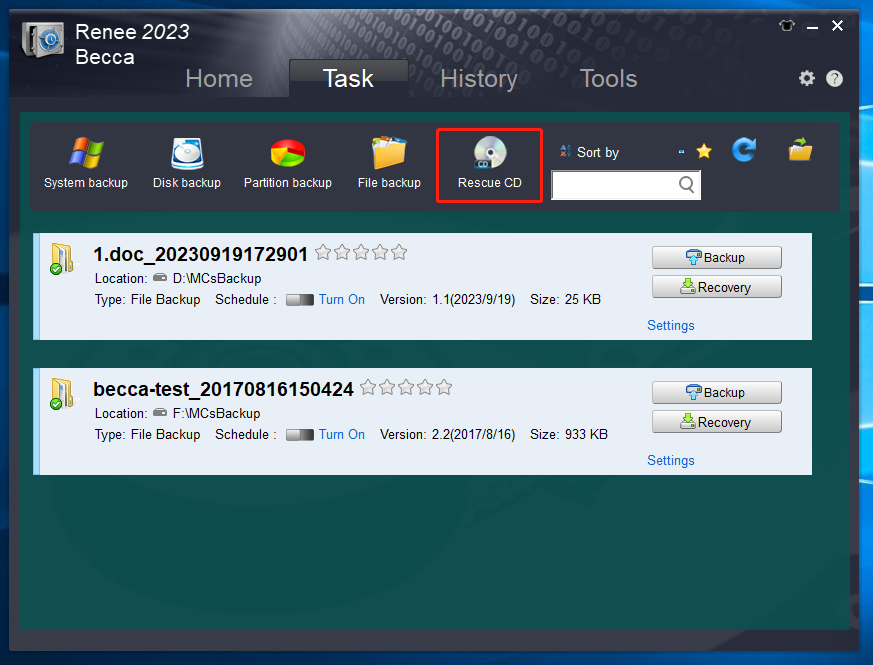
Step 1: Run Renee Becca, switch to (Task) in the function bar at the top of the interface, and then select the (Rescue CD) option.
rescue CD
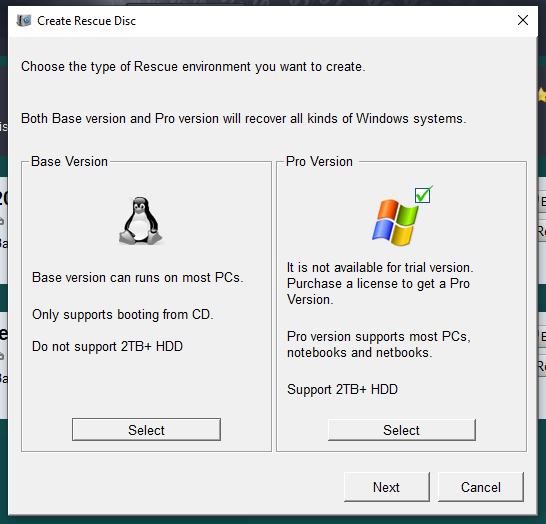
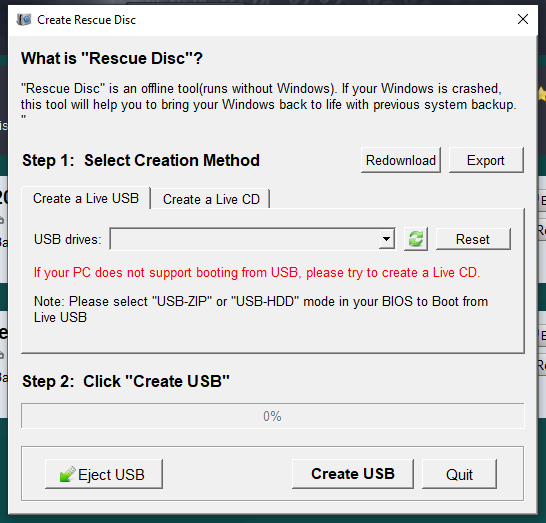
Step 2: Select the type of rescue disk to be created. Please select according to your disk and computer conditions. After that, connect a blank CD or USB stick to the computer, and click Select (Next) to create a startup disk.
select the Pro version
create a rescue CD
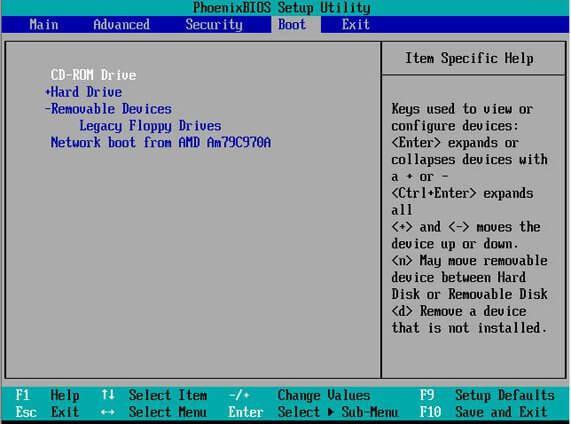
Step 3: Attach the boot disk (CD/USB stick) to the target computer. Power on the machine and immediately press the designated key to access the BIOS. Within the BIOS menu, alter the boot sequence to prioritize the USB/CD. For instance, choose (CD-ROM Drive) to boot from a CD or (Removable Devices) for a USB flash drive.
Change bios startup items
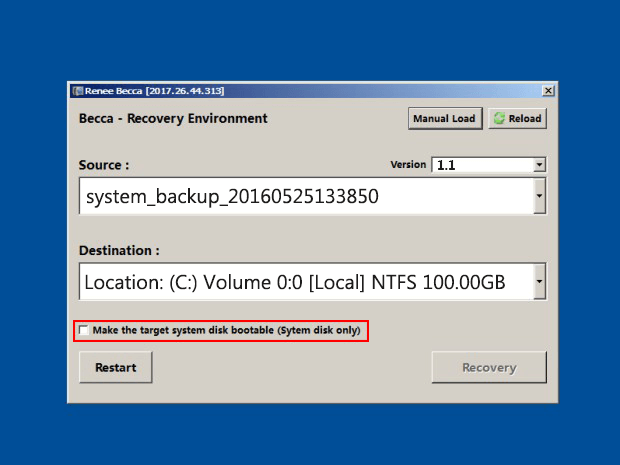
Step 4: After the system has started up, select the appropriate system backup version and determine the restoration destination. If necessary, connect the external hard drive that holds the backup. Make sure to check the option to ‘make the target disk bootable’. Click on ‘Recovery’ to begin the system restoration process.
recover system from rescue CD