author avatar
    Senior Program Developer
 

Summary
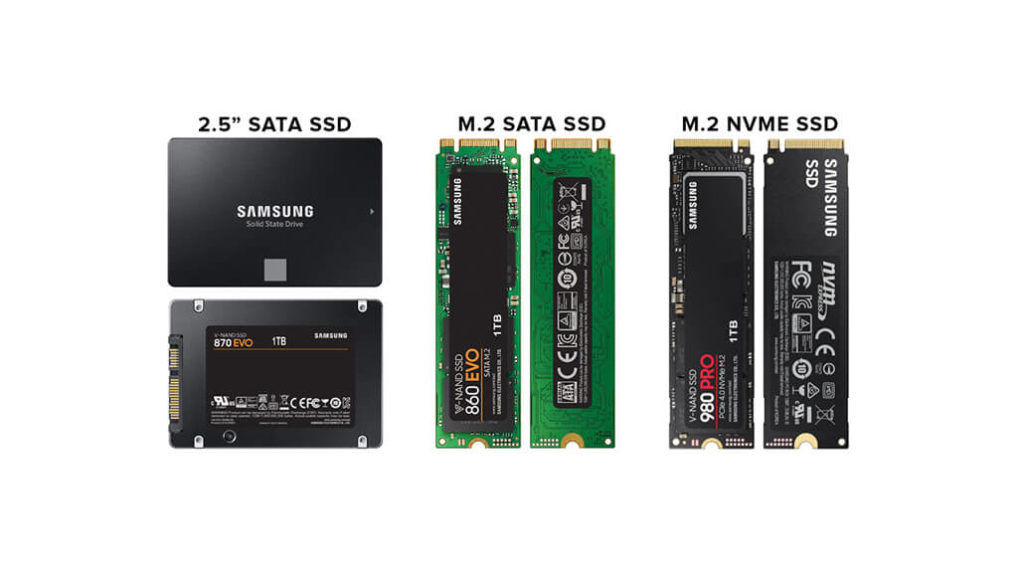
Transferring your operating system (OS) from SSD to SSD can greatly improve computer performance, and can be done by selecting the right SSD and cloning the OS using Renee Becca.


Upgrading your computer’s storage capacity is a common practice for many users, and transferring your operating system (OS) from one SSD to a larger one is a crucial step in this process. Not only does it allow you to keep all your important files and programs, but it also ensures a seamless transition with minimal downtime. However, selecting the right SSD for this task is essential to ensure optimal performance and compatibility. In this article, we will provide a step-by-step guide on how to transfer your OS from SSD to a larger SSD, as well as discuss the benefits of doing so. Furthermore, we will explore the factors to consider when selecting a new larger SSD for this process, including storage capacity, interface, speed, and compatibility.

Preparation : Selecting the Right SSD

In order to transfer your operating system from one SSD to a larger SSD, the first step is to select the right SSD for the task. This is crucial in ensuring a seamless transition and optimal performance. There are various factors to consider when choosing a new larger SSD, including storage capacity, interface, speed, and compatibility.
Storage Capacity: When selecting an SSD for transferring your operating system, storage capacity is an important consideration. You will need to ensure that the new SSD has enough space to accommodate all of your data and programs. It is recommended to choose an SSD with at least twice the storage capacity of your current SSD to allow for future upgrades and expansions.
Interface: There are three main types of SSD interfaces: M2, SATA, and PCI-E. Each has its own advantages and compatibility considerations. M2 SSDs are compact and use less power, making them ideal for laptops. SATA SSDs are more commonly used and offer faster speeds than traditional hard drives. PCI-E SSDs are the fastest and most expensive option, usually used in high-performance systems such as gaming PCs.
SSD interfaces
Speed: The speed of an SSD is measured in read and write speeds. A higher speed means faster performance. When selecting an SSD for transferring your operating system, it is important to consider not only the maximum speed but also the sustained speed, which may be affected by the SSD’s controller and interface.
Compatibility: It is essential to choose an SSD that is compatible with your computer’s operating system. Most SSDs are compatible with both Windows and Mac, but it’s always best to double-check to avoid any potential issues. It is also important to ensure that the SSD is compatible with your computer’s interface and BIOS (Basic Input/Output System).
Once you have selected the right SSD for the task, you are ready to transfer your operating system. The process may vary depending on your operating system and SSD, but it typically involves cloning your current SSD onto the new one and then swapping them out. Make sure to follow the instructions provided by the SSD manufacturer for the best results.

Clone Your OS to a Larger SSD with Renee Becca

After selecting the right SSD for transferring your operating system, the next step is to clone your OS from the smaller SSD to the larger one. It is important to note that cloning your operating system is different from simply copying and pasting files. Cloning ensures that all of your settings and configurations are transferred over as well, allowing for a seamless experience on the new SSD.
Renee Becca is a tool specially used for system/hard disk data backup and restoration. It can help you back up and restore important data in your computer, such as programs, system configuration, emails, photos, videos, documents, bookmarks, etc. In addition, you can also use it to clone disk and system data. The software provides three cloning methods, including hard disk cloning/cloning system hard disk; partition cloning and system migration. You can choose the most suitable cloning method according to your different needs.
Here is a guide on how to use Renee Becca for cloning your Windows system from to a larger SSD.
Hot Topic - ADsRenee Becca – Safe and Quick System Migration to SSD

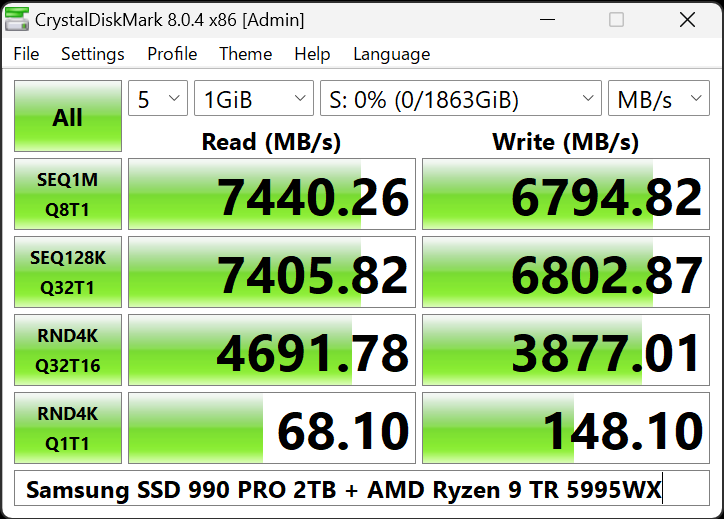
Automatic 4K alignment Improves SSD performance during system migration.

Support GPT and MBR Automatically adapt to the suitable partition format.

Support NTFS and FAT32 Redeploy various files in different file systems.

Back up quickly Back up files at up to 3,000MB/min.

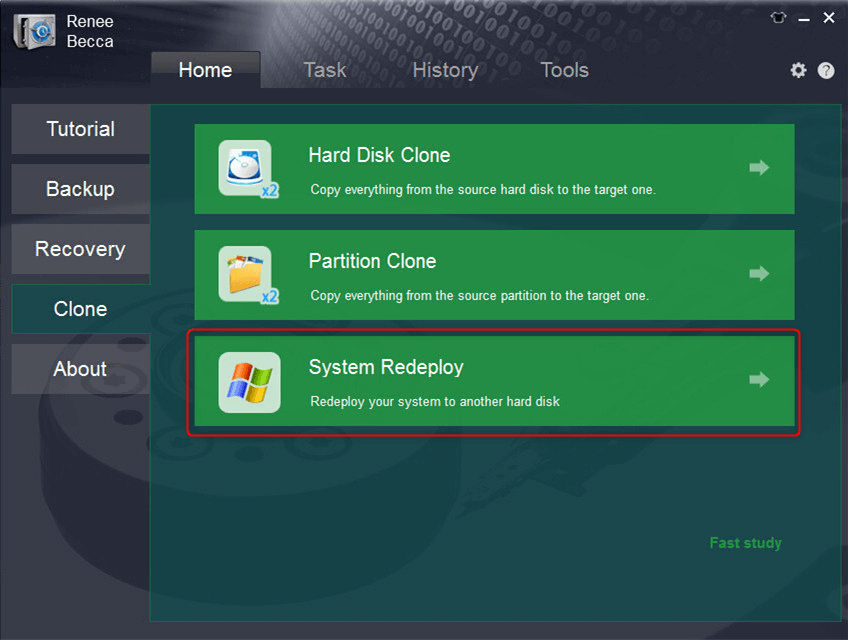
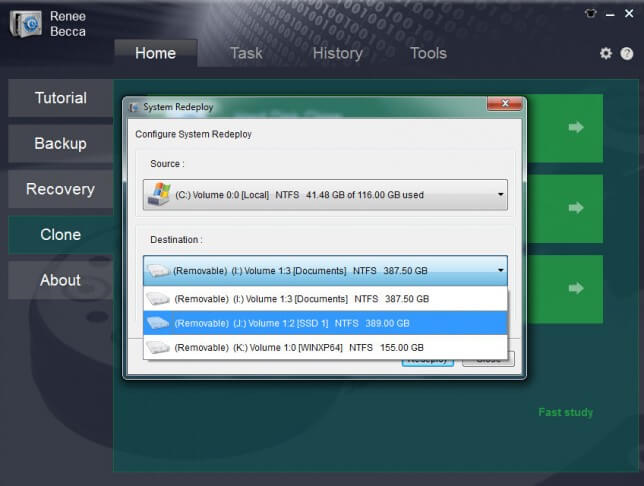
Overall backup schedule Support system redeployment/system backup/partition backup/disk backup/disk clone.

Automatic 4K alignment Improve SSD performance

Support GPT and MBR Intelligently adapt to a partition format

Support NTFS and FAT32 Redeploy files in different file systems

Free TrialFree TrialNow 2000 people have downloaded!
Step 1: Launch Renee Becca and click “System Redeploy” function in “Clone”.
select system redeploy function in renee becca
Step 2: Please select the original disk which saves Windows system and the target disk. Then click “Redeploy” to process the system migration.
select target disk and desination in system redeploy function in renee becca
By following these simple steps, you can successfully clone your operating system from a smaller SSD to a larger one, ensuring a smooth and hassle-free transition. This method eliminates the need for a fresh installation, saving you time and effort. Enjoy the improved performance and faster boot times that come with a new SSD!
Pros:
  • Allows safe migration of operating system without fresh installation.
  • Simple steps for a smooth and hassle-free transfer.
  • Improves performance and faster boot times with new SSD.

Cons:

  • Doesn't have a Mac version.
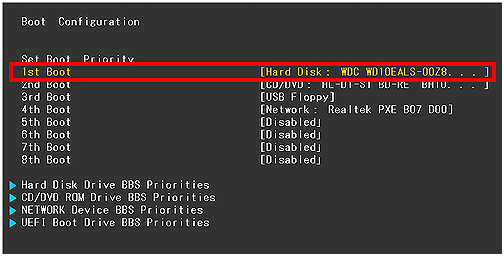
After a Successful Transfer : Test and Verify the Result

Once the transfer process is complete, it is important to do a final verification to ensure everything was transferred successfully. This includes checking the operating system version, system settings, and any important data. If everything is functioning as expected, then the transfer was successful!
Testing for Functionality: After the final verification, it is essential to test the functionality of the transferred operating system. This can be done by performing tasks such as opening applications, browsing the internet, and accessing files. It is also important to check if the system is running smoothly without any glitches or errors.
Verifying Data Integrity: In addition to testing the functionality, it is also crucial to verify the integrity of the data that was transferred. This involves checking if all the files and folders have been successfully transferred and if there are any corrupt files. This step ensures that no data was lost during the transfer process.
When it comes to comparing two folders in Windows, one simple method is to use the right-click property option. This feature allows you to quickly inspect and compare the contents of two folders to identify any differences.
use the right-click property option
To compare two folders, navigate to the first folder location and right-click on it. From the context menu, select Properties. In the Properties window, go to the General tab, and you can compare the size, files count and folder count in this Dialog. It is recommend to compare the Windows Folder in System Drive(C Drive).
compare folders
Running System Updates: After the transfer is complete, it is a good idea to run system updates to make sure that your operating system is up-to-date. This will also help fix any bugs or issues that may have occurred during the transfer process.
Verifying Boot Options: It is important to make sure that the new SSD is set as the primary boot option. This can be checked in the system BIOS settings. This step ensures that the system will boot from the new SSD and not the old one, avoiding any confusion or booting issues. Please select the new disk in BIOS as the boot disk. Then you can start the computer from the newly installed hard disk with the original system.
change the boot order in hard disk in boot configuration in BIOS
Here is a list of BIOS shortcut keys for different brands. Alternatively, you can observe the BIOS shortcut keys displayed on the screen during booting.
BIOS NameMethodThe Key or Keys
AcerPress Del or F2 immediately after powering onDel/ F2
CompaqPress F10 while the cursor in the top right corner of the screen is blinkingF10
DellPress F2 when the Dell logo appears/ or press every few seconds until the message Entering Setup appearsF2
eMachinesPress Tab or Del while the eMachine logo displays on the screenTab/ Del
FujitsuPress F2 once the Fujitsu logo appearsF2
GatewayPress the F1 key repeatedly after restarting the computerF1
HPPress the F1/ F10/ or F11 key after restarting the computerF1/ F10/ F11
IBMPress F1 immediately after powering on the computerF1
LenovoPress F1 or F2 after powering on the computerF1/ F2
NecPress F2 to enter the BIOS SetupF2
Packard BellPress F1/ F2/ or Del to enter BIOSF1/ F2/ Del
SamsungPress F2 to start the BIOS setup utilityF2
SharpPress F2 after the computer startsF2
SonyPress F1/ F2/ or F3 after turning on the computerF1/ F2/ F3
ToshibaPress F1 or Esc after powering on to access BIOSF1/ Esc
ARLTPress Del or F11 when the respective message is shownDel/ F11
Testing for Performance: One of the main reasons for transferring an operating system to a larger SSD is to improve performance. It is essential to test the performance of the system after the transfer to ensure that it meets your expectations. This can be done by running benchmark tests or simply using the system and observing its speed and responsiveness.
There are several reliable SSD testing tools available in the market. One such tool is CrystalDiskMark which is widely used and trusted by professionals. Download and install the tool from the official website.
CrystalDiskMark

Conclusion

In conclusion, transferring your operating system from a smaller SSD to a larger one can greatly benefit your overall computer performance. With our step-by-step guide, beginners can easily navigate through the process and ensure a seamless transition. By selecting the right SSD, cloning your OS, and testing and verifying the results, you can guarantee a successful transfer. The benefits of upgrading to a larger SSD include increased storage capacity, improved speed, and enhanced performance. And in case of any issues, our recommended software, Renee Becca, has reliable customer support and troubleshooting resources available. Don’t let a small SSD hold you back, follow our guide and transfer your OS to a larger SSD for a smoother and more efficient experience.